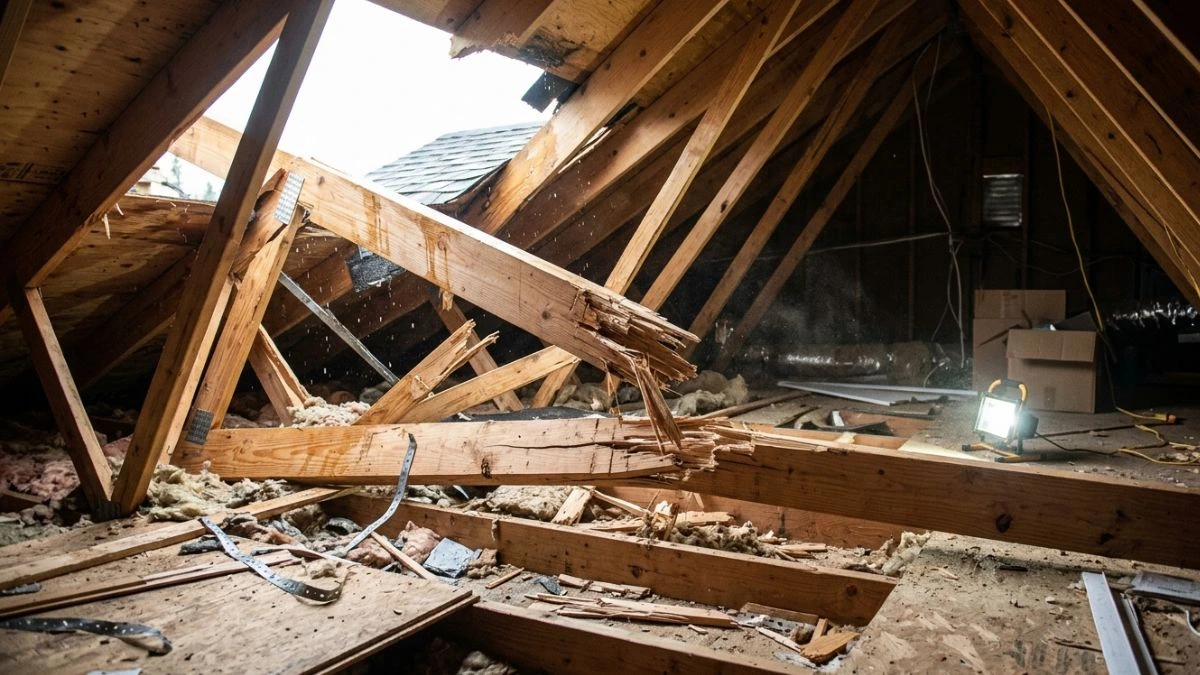
Is your roof sagging or making strange noises? A broken roof truss could be the hidden problem putting your home at risk.
Ignoring this issue can lead to costly damage and even safety hazards for you and your family. But don’t worry—you can fix it before things get worse. You’ll learn simple steps to identify and repair a broken roof truss, saving your home and peace of mind.
Signs Of A Damaged Roof Truss
A roof truss supports the entire roof structure. It keeps the roof strong and stable. Damage to a roof truss can cause serious problems. Early signs of damage help prevent bigger issues. Spotting these signs fast saves money and protects your home. Here are common signs of a damaged roof truss to watch for.
Visible Cracks And Splits
One of the clearest signs of a damaged roof truss is visible cracks and splits in the wood. These cracks often appear along the beams or at connection points. They can range from small hairline fractures to wide splits that weaken the truss.
Look for:
- Vertical cracks along the length of the wood.
- Splits near joints where beams connect.
- Wood pieces that seem to be separating or bowing.
Cracks happen due to:
- Wood drying out or shrinking.
- Heavy loads causing stress.
- Improper installation or poor-quality materials.
Ignoring cracks can lead to truss failure. Regular checks help spot these early signs.
Sagging Roof Sections
Sagging roof sections are a visible sign that the truss is damaged or weakening. Sagging happens when the truss cannot hold the roof’s weight properly. It causes parts of the roof to dip or curve downward.
Signs of sagging include:
- Roofline appears uneven or curved.
- Ceiling inside the house looks bowed or lower than normal.
- Gaps between roof and walls.
Sagging can result from:
- Broken or cracked truss members.
- Loose or damaged joints.
- Excess weight from snow, water, or debris.
Here is what sagging means for your roof:
| Cause | Effect | Urgency |
| Truss Damage | Weak roof support | High |
| Extra Load | Increased sagging | Medium |
| Joint Issues | Structural instability | High |
Ignoring sagging leads to roof collapse risks. Immediate action is needed to fix the truss and support the roof again.
Water Damage Indicators
Water damage weakens wooden roof trusses. Signs of water damage show that moisture has reached the truss structure. This can cause rot, mold, and decay that reduce the truss’s strength.
Look for these water damage indicators:
- Dark stains or discoloration on the underside of the roof.
- Soft, spongy, or crumbling wood.
- Mold or mildew growth near the roof beams.
- Musty or damp smell in the attic or near the roof.
Water damage occurs from:
- Leaking roof or damaged shingles.
- Poor attic ventilation causing condensation.
- Blocked gutters or flashing failures.
Water damage affects the roof truss as follows:
| Water Damage Sign | Impact on Truss | Action Needed |
| Wood Rot | Weakens load capacity | Replace damaged wood |
| Mold Growth | Health risk, structural decay | Clean and dry area |
| Discoloration | Shows leaks present | Fix leaks promptly |
Ignoring water damage causes fast deterioration. Repair leaks and dry the truss to stop further harm.
Unusual Noises
Unusual noises from the roof may signal a damaged roof truss. Sounds like creaking, popping, or cracking can mean the truss is under stress or shifting.
Common noises include:
- Creaking during windy conditions.
- Cracking sounds when weight is on the roof.
- Popping noises during temperature changes.
Causes of unusual noises:
- Loose or broken truss connections.
- Wood shrinking and expanding.
- Structural movement due to damage.
Why these noises matter:
| Noise Type | Possible Cause | Severity |
| Creaking | Loose joints or stress | Medium |
| Cracking | Wood damage or splits | High |
| Popping | Wood movement | Low to Medium |
Persistent noises need quick inspection. Fixing the problem early prevents truss failure and roof damage.
Common Causes Of Truss Damage
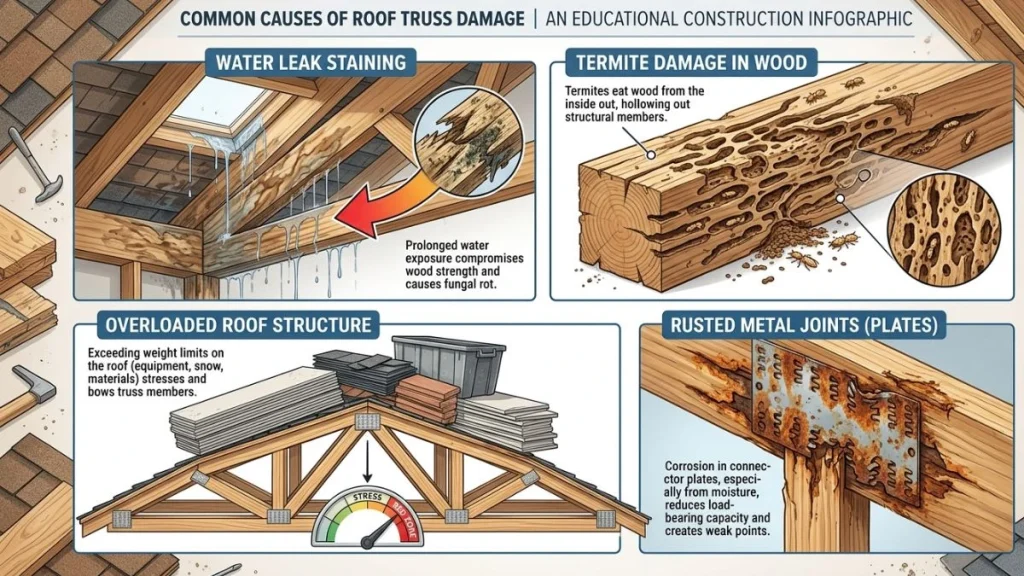
Repairing a broken roof truss is essential to keep your home’s structure safe and stable. Understanding the common causes of truss damage helps you spot problems early and avoid costly repairs. Roof trusses face many challenges, from natural forces to human errors. Knowing these causes helps protect your roof and home.
Weather Impact
Weather plays a big role in damaging roof trusses. Strong winds, heavy rain, snow, and temperature changes can weaken the wood and joints. Over time, this stress causes cracks, warping, and breaks.
- Wind: High winds can shake the roof, loosening connections.
- Rain and Moisture: Water seeps into wood, causing rot and mold.
- Snow Load: Heavy snow adds weight, stressing the truss beyond its limit.
- Temperature Changes: Expansion and contraction cause wood to split.
Here is a table showing how weather affects roof trusses:
| Weather Condition | Effect on Truss | Signs of Damage |
| Strong Winds | Loosen joints and fasteners | Squeaking sounds, loose panels |
| Heavy Rain | Wood rot and decay | Discoloration, soft spots |
| Snow Load | Excess weight causing cracks | Bowed or sagging trusses |
| Temperature Swings | Wood splits and warps | Visible cracks, gaps in joints |
Poor Installation
Improper installation is a common cause of truss damage. Mistakes during construction weaken the roof’s framework. Incorrect placement, weak fasteners, and poor design reduce truss strength.
Some key problems include:
- Wrong nail or screw types: These fail to hold joints tightly.
- Incorrect truss spacing: Too far apart causes excess load on each truss.
- Improper alignment: Misaligned trusses do not evenly share weight.
- Skipping metal connectors: These provide extra strength and stability.
Check for these signs of poor installation:
- Loose or missing nails and screws
- Visible gaps between wood pieces
- Uneven roof lines or sagging spots
- Rust on metal parts or missing braces
Proper installation requires following manufacturer instructions and using the right tools. Mistakes cause early failure and higher repair costs.
Pest Infestation
Pests like termites, carpenter ants, and wood-boring beetles attack wood trusses. They eat or tunnel through the wood, causing hidden damage. This weakens the truss structure over time.
Common pest problems include:
- Termites: Consume wood from inside, leaving hollow sections.
- Carpenter ants: Create tunnels that reduce wood strength.
- Wood-boring beetles: Lay eggs that hatch into larvae eating wood fibers.
Signs of pest infestation are:
- Small holes or tunnels in wood
- Wood dust or frass near trusses
- Weak or crumbling wood pieces
- Unusual noises inside walls
Prevent pest damage by keeping wood dry and sealed. Regular inspections help catch infestations early.
Structural Overloads
Structural overload happens when roof trusses carry more weight than designed. Extra loads cause bending, cracking, or breaking.
Common causes of overload include:
- Heavy snow or ice build-up: Adds unexpected weight.
- Additional roof equipment: Solar panels, HVAC units increase load.
- Renovations or extensions: Adding floors or rooms changes load distribution.
- Stored items in attic: Heavy objects add weight on trusses.
Look for these overload signs:
- Sagging or bowed roof lines
- Cracks in wood or joints
- Loose or bent metal connectors
- Noise or creaking during storms
Prevent overload by consulting structural engineers before changes. Remove heavy attic storage if needed.
Step-by-step Repair Process
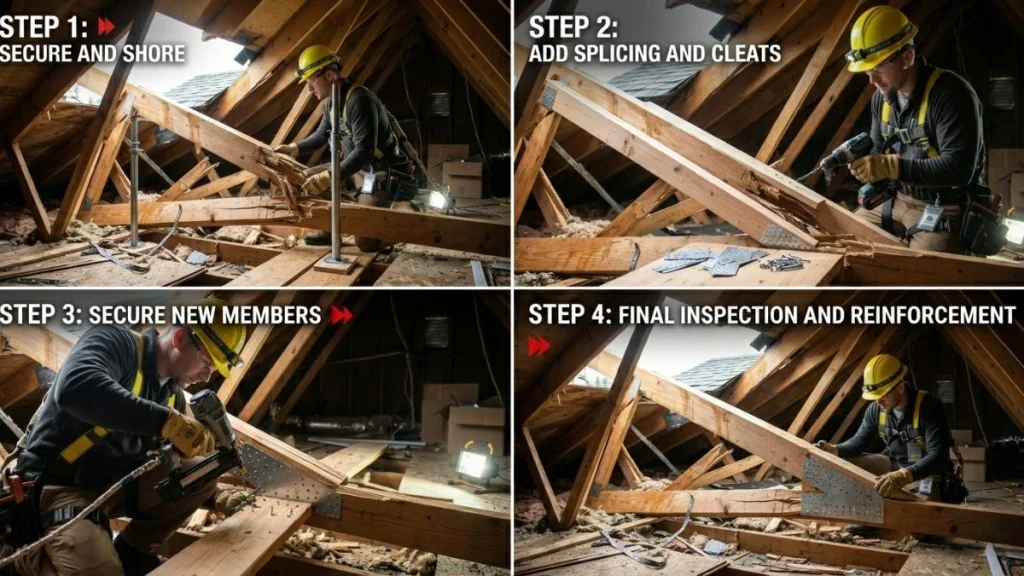
Repairing a broken roof truss requires a clear and careful approach. The step-by-step repair process helps restore strength and safety. Following each stage precisely ensures the roof can hold weight and resist weather. This guide breaks down the repair into manageable steps for easy understanding and action.
Removing Damaged Components
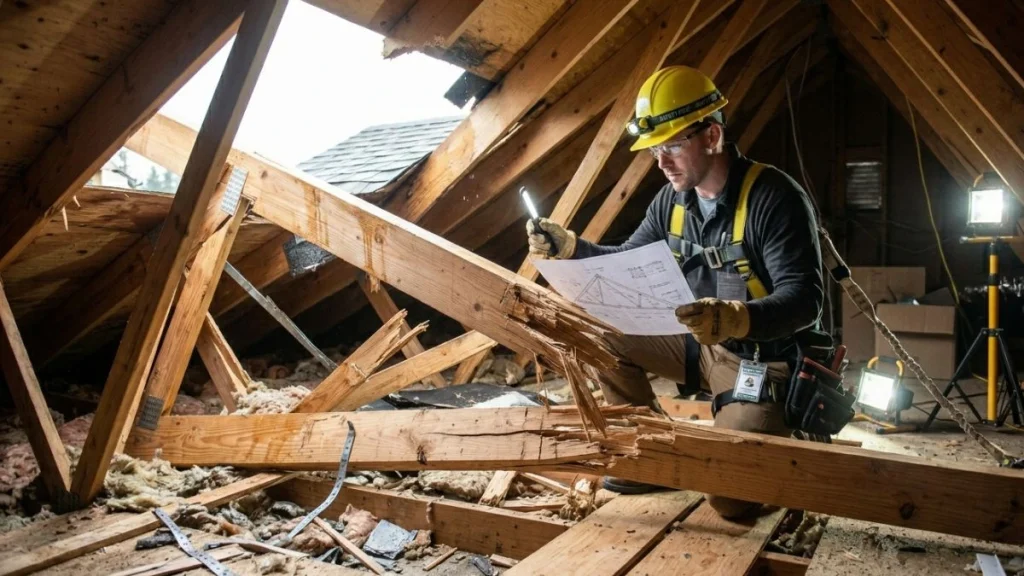
Start by identifying all damaged parts of the truss. Look for cracked, split, or rotted wood, and any loose or rusted metal plates. Removing these parts prevents further damage and prepares the area for repair.
Steps to remove damaged components:
- Clear the workspace: Remove debris and old insulation around the truss.
- Use safety gear: Wear gloves, goggles, and a hard hat for protection.
- Cut out damaged wood: Use a saw to carefully remove cracked or broken members.
- Remove metal plates: Pry off rusted or bent connectors with a crowbar or hammer.
- Dispose of debris: Collect all removed parts for proper disposal to avoid accidents.
Removing damaged components may take time. Work slowly to avoid harming good parts. Check each piece twice before removal. This careful work sets the stage for a strong repair.
Reinforcing Or Replacing Truss Members
After removing bad parts, reinforce or replace truss members to restore strength. Choose between adding support or full replacement based on damage size and location.
Options include:
| Method | Description | Best For |
| Reinforcement | Attach additional wood or metal plates to support existing members. | Minor cracks or splits |
| Replacement | Remove damaged member fully and install a new one of the same size and type. | Severe damage or rot |
Follow these steps:
- Measure the damaged area accurately.
- Cut new wood members matching original sizes.
- Attach reinforcements using nails, screws, or metal plates.
- Ensure tight fits to avoid movement.
- Double-check alignment with the rest of the truss.
Strong, secure members keep the roof stable and safe. Use quality materials for lasting repairs.
Securing Joints And Connections
Joints and connections hold the truss together. Secure these points to restore full strength. Loose or damaged connections cause roof instability and failure.
Key steps include:
- Inspect all joints: Look for loose nails, screws, or worn metal plates.
- Replace damaged fasteners: Use galvanized nails or screws to prevent rust.
- Add metal gusset plates: Reinforce joints with strong metal plates on both sides.
- Use construction adhesive: Apply adhesive before fastening to increase bond strength.
- Tighten all connections: Use a hammer or drill to secure fasteners firmly.
Properly secured joints prevent movement and distribute loads evenly. This step is essential for a durable roof repair.
Inspecting Completed Repairs
After repairs, inspect the entire truss carefully. This final check ensures safety and quality. Look for any missed damage or weak points.
Inspection checklist:
- Check all new and existing members for cracks or splits.
- Verify metal plates are flush and properly fastened.
- Confirm no gaps exist between connected parts.
- Test for stability by gently applying pressure.
- Look for signs of moisture or rot near repair areas.
Use a flashlight and mirror to see hidden spots. Take notes of any concerns for future monitoring. A thorough inspection guarantees the roof truss can support weight safely.
Preventing Future Truss Damage
Repairing a broken roof truss is important, but preventing future damage is just as crucial. A strong roof truss supports the whole roof structure and keeps your home safe. Taking steps to protect your trusses helps avoid costly repairs later. Simple habits and checks can extend the life of your roof trusses and keep them sturdy for years.
Regular Inspections
Regular inspections catch small problems before they become big issues. Check your roof trusses at least twice a year, especially after storms or heavy winds. Look for signs like cracks, splits, or sagging in the wood. Also, inspect the joints and metal connectors for rust or looseness.
- Visual checks: Look for damage, cracks, or wood warping.
- Listen: Creaking sounds can mean stress on the truss.
- Check fasteners: Nails or screws should be tight and rust-free.
- Look for water stains: Moisture can weaken wood over time.
Use a checklist to keep track of inspection points:
| Inspection Area | What to Look For | Frequency |
| Wood Condition | Cracks, splits, rot | Every 6 months |
| Metal Connectors | Rust, looseness | Every 6 months |
| Fasteners | Tightness, corrosion | Every 6 months |
| Signs of Moisture | Water stains, mold | After heavy rain |
Early detection saves money and prevents roof collapse. Call a professional if you find major damage.
Proper Maintenance
Maintaining roof trusses keeps them strong and stable. Clean your roof and attic regularly. Remove debris like leaves and branches that trap moisture. Check for loose or missing shingles that let water in. Tighten or replace any loose fasteners on the trusses.
Use these maintenance tips:
- Clean gutters: Prevent water overflow that can damage trusses.
- Trim trees: Avoid branches rubbing or falling on the roof.
- Seal roof leaks: Stop water from reaching the wood.
- Reinforce weak trusses: Add metal plates if needed.
Keep a maintenance log with dates and tasks done. This helps monitor your roof’s health over time.
| Maintenance Task | Reason | Recommended Frequency |
| Gutter Cleaning | Prevents water damage | Every 3-4 months |
| Roof Cleaning | Stops moss and debris buildup | Twice a year |
| Fastener Check | Keeps trusses secure | Every 6 months |
| Leak Repairs | Prevents wood rot | As needed |
Controlling Moisture And Pests
Moisture and pests cause serious damage to roof trusses. Wood soaks up water, making it weak and prone to rot. Pests like termites and carpenter ants eat wood and create holes. Keep your roof dry and pest-free to protect trusses.
Ways to control moisture and pests:
- Fix leaks: Repair roof and plumbing leaks fast.
- Improve ventilation: Airflow reduces moisture buildup in the attic.
- Use pest barriers: Install metal mesh or chemical treatments.
- Remove wood debris: Piles near the house attract pests.
- Inspect for infestations: Check for holes, droppings, or damaged wood.
Maintain a dry, clean attic environment:
Ventilation: Ridge vents, soffit vents
Moisture control: Dehumidifiers, vapor barriers
Pest control: Regular pest inspections and treatments
Protecting trusses from moisture and pests extends their life and keeps your roof safe.
Recommended Read: Rotted Roof Rafter Repair
Conclusion
Repairing a broken roof truss protects your home’s structure and safety. Small damage can become big problems fast. Act quickly to avoid costly repairs later. Use the right materials and tools for a strong fix. If unsure, ask a professional for help.
Regular roof checks keep your home safe and dry. Taking care of your roof truss saves money and stress. A solid roof means peace of mind every day. Simple steps can prevent bigger issues in the future.