Are you looking to raise your floor height but don’t know where to start? Whether you want to fix uneven floors, add extra insulation, or create more space for wiring and plumbing, raising your floor height can make a big difference.
But it can also feel overwhelming if you’re not sure what steps to take or what materials to use. You’ll discover simple, clear methods to raise your floor safely and effectively. By the end, you’ll have the confidence to transform your space exactly how you want it.
Reasons To Raise Floor Height
Raising the floor height in a building serves several important purposes. It helps protect homes and structures from environmental issues and improves the overall comfort and appearance of a space. Whether you face natural challenges or want to enhance your living area, raising the floor height offers practical benefits.
Flood Prevention
Flooding can cause severe damage to buildings, especially in low-lying areas or regions with heavy rain. Raising the floor height is a simple but effective way to protect your property from floodwaters.
Benefits of raising floor height for flood prevention:
- Protects floors, walls, and furniture from water damage
- Reduces the risk of mold and mildew growth caused by dampness
- Improves the safety of electrical systems and appliances
- Maintains a dry and healthy living environment
Here is a simple comparison of flood risks for different floor heights:
| Floor Height (above ground) | Flood Risk | Damage Potential |
| 0-6 inches | High | Severe water damage |
| 6-12 inches | Moderate | Some water seepage possible |
| 12 inches or more | Low | Minimal to no damage |
Raising floors reduces repair costs and increases property value in flood-prone zones.
Improved Ventilation
Raising the floor creates space between the ground and the floor. This gap allows air to circulate freely beneath the building. Better airflow helps keep the floor dry and reduces moisture buildup inside the home.
Advantages of improved ventilation from raised floors:
- Prevents dampness that can cause wood rot and mold
- Helps regulate indoor temperature by allowing cooler air underneath
- Reduces musty odors caused by trapped moisture
- Improves overall air quality inside the building
Raised floors are common in hot and humid climates because they help cool the building naturally.
To maximize ventilation benefits, consider the following:
- Install vents around the perimeter of the raised floor.
- Keep the crawl space clear of debris and insulation that blocks airflow.
- Use moisture barriers on the ground below the floor.
Aesthetic Enhancements
Raising floor height can also improve the look and feel of your space. Higher floors create a sense of openness and add architectural interest. They offer more design options and make rooms feel larger.
Ways raised floors enhance aesthetics:
- Create steps or platforms for different room zones
- Allow installation of underfloor lighting for dramatic effects
- Enable stylish skirting or baseboards that highlight the floor
- Make it easier to hide wiring and pipes beneath the floor
Here is a brief comparison of visual effects between standard and raised floors:
| Floor Type | Visual Appeal | Design Flexibility |
| Standard Floor | Basic, flat appearance | Limited |
| Raised Floor | Dynamic, layered look | High |
Raising the floor height brings both functional and visual benefits to any building project.
Assessing Existing Floor Conditions

Raising a floor’s height requires careful planning and precise work. The first step is assessing existing floor conditions. This assessment helps understand the current structure, level, and any hidden challenges. Knowing these details reduces risks and ensures a smooth project.
Checking Structural Integrity
Before raising the floor height, inspect the floor’s structure. A strong foundation supports the added weight and modifications. Look for cracks, sagging, or water damage on beams, joists, and subfloor.
- Visual Inspection: Check for visible cracks or warping in wooden or concrete floors.
- Tap Test: Lightly tap the floor with a hammer. Hollow sounds may indicate weak spots.
- Check Load Capacity: Understand the floor’s load limits to avoid overloading.
Safety is key. Fix any problems before raising the floor.
Measuring Current Floor Level
Accurate measurements are essential to raise the floor correctly. Use a level or laser level to find the current height and uneven spots.
- Tools Needed: Spirit level, laser level, measuring tape, chalk line.
- Check Multiple Points: Measure at least four corners and the center of the room.
- Note Variations: Record any slopes or dips in the floor.
Follow this ordered list for best results:
- Place the level on the floor near a wall.
- Mark the height on the wall with chalk.
- Move the level across the room, marking heights at intervals.
- Compare marks to find low and high points.
Document your measurements in a simple chart like this:
| Location | Height from Reference Point (inches or cm) | Notes |
| North-West Corner | 0.0 | Reference point |
| North-East Corner | 0.3 | Slightly higher |
| Center | -0.2 | Low spot |
| South-West Corner | 0.1 | Near level |
This data helps decide how much to raise the floor and where to add material.
Identifying Utilities And Obstacles
Check for any pipes, wires, or ducts under or inside the floor before raising it. Damaging utilities can cause costly repairs and safety hazards.
- Locate Utilities: Use a stud finder or utility locator to find hidden cables and pipes.
- Mark Positions: Clearly mark all utilities on the floor or walls.
- Plan Around Obstacles: Adjust the floor height or design to avoid interference.
Common utilities to watch for:
- Water and drainage pipes
- Electrical wiring and outlets
- Heating and air ducts
- Gas lines
Choosing The Right Method
Raising the floor height can improve your home’s comfort and functionality. Choosing the right method depends on your needs, budget, and the current floor structure. Each technique offers unique benefits and challenges.
Adding A Subfloor
Adding a subfloor is a common way to raise floor height. It involves installing a new layer of plywood or oriented strand board (OSB) over the existing floor. This method is usually faster and less expensive than other options.
This technique works well when the existing floor is stable but too low. It creates a smooth, level surface ready for new flooring like carpet, tile, or hardwood.
- Easy to install with basic tools
- Provides extra insulation and soundproofing
- Can add 1 to 2 inches of height
- May require adjusting doors and trim
Here is a simple table comparing subfloor materials:
| Material | Cost | Durability | Installation Ease |
| Plywood | Moderate | Good | Easy |
| OSB | Low | Fair | Easy |
Important: Make sure the floor below is dry and level before adding the subfloor. Use screws, not nails, for a stronger hold.
Using Floor Joists
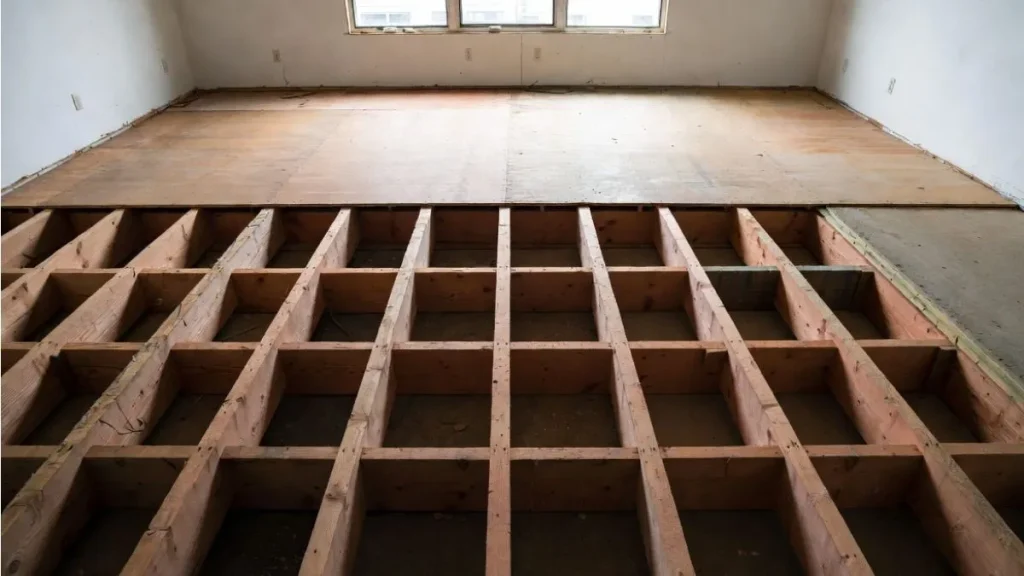
Raising floors with floor joists means adjusting or adding new joists under the floor. This method changes the floor height from the foundation up. It is more complex but offers strong support and more height gain.
This technique suits floors with damaged or uneven joists or when raising floors significantly (more than 2 inches).
- Remove existing flooring to expose joists
- Add new, taller joists or sister existing ones
- Install new subfloor on top
Benefits of using floor joists:
- Allows raising floor by several inches
- Improves structural strength
- Fixes joist damage or rot
- Better air circulation under floors
This method demands more time and skill. Consult a professional to ensure joists meet building codes and carry the load safely. Improper joist work can cause floor sagging or collapse.
Installing Raised Platforms
Raised platforms are freestanding structures built on top of the existing floor. They create a higher surface without changing the main floor. This option suits small areas or rooms needing quick height changes.
Common uses include stages, seating areas, or loft beds. Platforms can be made from wood, metal, or modular kits.
- Simple to build and remove
- No damage to original floor
- Customizable shapes and sizes
- Can add storage space underneath
Steps for building a raised platform:
- Measure and plan platform size
- Build frame with lumber or metal
- Attach surface panels (plywood or decking)
- Secure platform to floor for safety
Note: Platforms may create tripping hazards at edges. Use trim or ramps to smooth transitions.
Step-by-step Raising Process

Raising the floor height can improve room functionality and solve uneven surface problems. The process requires careful planning and precise steps to ensure safety and durability. This step-by-step raising process breaks down the task into simple parts. Follow each stage carefully for the best results.
Preparing The Area
Start by clearing the room of all furniture and obstacles. This gives you enough space to work comfortably. Next, inspect the existing floor for damage or moisture issues. Repair any cracks or water damage before moving forward.
Gather these essential tools and materials before beginning:
- Measuring tape
- Level
- Protective gloves and goggles
- Screwdriver and drill
- Floor cleaner
Mark the new floor height on the walls using a pencil and level. This line will guide your framing and ensure even height. Remove baseboards carefully to avoid damage; you will reinstall them later. Cover vents or openings temporarily to prevent dust from entering other rooms.
Building The Frame
The frame supports the new floor and raises it to the desired height. Use pressure-treated lumber for durability and resistance to moisture. Cut joists and beams according to your height measurements. Assemble the frame on the ground first.
Steps to build a strong frame:
- Lay out the perimeter beams along the marked line on the walls.
- Secure beams to the existing floor using screws or anchors.
- Install joists across the beams, spacing them 16 inches apart for strength.
- Check level frequently to maintain even height.
Use metal brackets and joist hangers at joints for extra stability. Double-check all connections to avoid creaking later. Leave space under the frame for air circulation to prevent mold.
Laying The New Floor
Choose the right flooring material for your needs: plywood, hardwood, or engineered wood. Plywood is common for subfloors, while hardwood offers a finished look. Cut panels to fit the frame precisely.
Steps for laying the new floor:
- Start at one corner and lay panels perpendicular to joists.
- Leave a small expansion gap (about 1/8 inch) between panels.
- Secure panels with screws or nails every 6 to 8 inches along joists.
- Stagger seams between rows to increase floor strength.
Use a circular saw to cut panels for vents, pipes, or doorways. Sand edges smooth to avoid splinters. Check the floor with a level to confirm flatness. Adjust panels if necessary before finishing.
Finishing Touches
Finishing improves floor appearance and protects the material. Start by reinstalling baseboards and trim removed earlier. Use finishing nails and wood filler to hide nail holes. Sand trim lightly for a smooth finish.
Apply these finishing steps:
- Clean the floor surface of dust and debris.
- Apply a primer if painting or staining.
- Use a brush or roller to apply paint, stain, or sealant evenly.
- Allow each coat to dry completely before applying the next.
Place floor transition strips where the new floor meets other surfaces. Add rugs or mats to protect the floor and add comfort. Maintain good ventilation during finishing for quick drying and safety.
Safety Tips
Raising floor height is a task that requires careful planning and attention to safety. Without proper safety measures, accidents and structural problems can happen. Follow key safety tips to protect yourself and ensure the floor is stable and strong.
Using Proper Tools
Using the right tools is essential for safety and efficiency when raising floor height. Tools that are not designed for the job can cause injuries or damage the floor. Make sure to prepare all necessary equipment before starting the work.
- Measuring tools: Use a laser level or spirit level to get accurate height measurements.
- Cutting tools: A circular saw or handsaw helps cut wood or drywall precisely.
- Fastening tools: Nail guns, drills, and screwdrivers ensure secure attachment of materials.
- Lifting tools: Use jacks or supports to raise the floor safely.
Keep tools in good condition. Inspect them for damage before use. Faulty tools increase the risk of accidents.
| Tool | Purpose | Safety Tip |
| Laser Level | Measure exact floor height | Check calibration regularly |
| Circular Saw | Cut wood and panels | Use blade guard and cut slowly |
| Drill | Fasten screws securely | Wear eye protection during use |
| Floor Jack | Lift floor safely | Place on stable surface and check weight limit |
Follow the tool instructions carefully. Using proper tools reduces risks and speeds up work.
Wearing Protective Gear
Protective gear is a must to prevent injuries while raising floor height. Floors involve heavy materials and sharp tools. Wearing the right gear helps avoid cuts, bruises, and breathing problems.
Important protective equipment includes:
- Safety glasses: Protect eyes from dust and flying debris.
- Gloves: Shield hands from splinters, nails, and rough materials.
- Dust mask or respirator: Prevent inhaling dust and harmful particles.
- Hard hat: Protect your head from falling objects.
- Steel-toed boots: Prevent foot injuries from heavy tools or dropped materials.
Always wear clean and well-fitting gear. Replace damaged equipment immediately.
| Gear | Protection Area | Key Benefit |
| Safety Glasses | Eyes | Blocks dust and sharp particles |
| Gloves | Hands | Prevents cuts and splinters |
| Dust Mask | Respiratory system | Filters harmful dust |
| Hard Hat | Head | Protects from falling objects |
| Steel-Toed Boots | Feet | Prevents crushing injuries |
Wearing protective gear reduces injury risks significantly. Make it a habit.
Ensuring Structural Support
Strong structural support is vital when raising floor height. The new floor must hold weight safely without bending or breaking. Weak support can cause dangerous collapses.
Steps to ensure structural support:
- Check existing joists: Inspect floor joists for damage or weakness.
- Use additional beams: Add beams or supports to handle extra weight.
- Secure connections: Fasten all new parts firmly to existing structure.
- Consult a professional: Get advice for complex or large projects.
Cost Considerations
Raising the floor height in a home or building can improve space usability and prevent issues like flooding. Before starting, understanding the cost considerations is crucial. These costs include materials, labor, and permits. Knowing these factors helps plan your budget well and avoid surprises during the project.
Material Expenses
Materials are a major part of the total cost when raising floor height. The type of material used affects both the price and the project’s durability. Common materials include:
- Concrete – strong and durable but can be costly.
- Wooden joists and plywood – cheaper but may need more maintenance.
- Steel supports – expensive but very strong and long-lasting.
- Insulation – important for energy efficiency and comfort.
Here is a basic cost estimate for common materials:
| Material | Approximate Cost per sq.ft. | Durability |
| Concrete | $5 – $10 | High |
| Wood (joists and plywood) | $3 – $6 | Medium |
| Steel supports | $8 – $15 | Very High |
| Insulation | $1 – $3 | Medium |
Material choice also depends on the floor height increase needed and the existing structure. Sometimes combining materials lowers costs without losing strength.
Labor Costs
Labor is often the largest part of the expense. Skilled workers are needed to ensure the floor is raised safely and correctly. Labor costs vary by region and project complexity.
Common labor tasks include:
- Removing old flooring and preparing the base.
- Building new floor supports or adding concrete layers.
- Installing new floorboards or finishing surface.
- Checking and adjusting utilities like wiring or plumbing.
Average labor costs per hour range from $40 to $80. For a typical home project, labor may take several days to weeks, depending on size.
Here’s a quick labor cost estimate based on project size:
| Project Size | Estimated Labor Hours | Estimated Labor Cost |
| Small (100 sq.ft.) | 20 – 30 hours | $800 – $2,400 |
| Medium (300 sq.ft.) | 60 – 90 hours | $2,400 – $7,200 |
| Large (500 sq.ft.) | 100 – 150 hours | $4,000 – $12,000 |
Choosing experienced contractors may cost more but reduces risks and delays.
Recommended: Cheapest Way to Raise Floor Height
Potential Permits
Raising floor height often requires permits from local building authorities. Permits ensure the work meets safety and code standards. Costs and requirements vary by location.
Types of permits needed may include:
- Building permit – to approve structural changes.
- Electrical permit – if wiring is affected.
- Plumbing permit – if plumbing lines move.
Permit fees range from $100 to over $1,000 depending on the project size and local rules. Obtaining permits involves:
- Submitting detailed plans to local authorities.
- Paying application fees.
- Scheduling inspections during and after construction.
Failing to get permits can lead to fines or forced removal of work. Check your local building department early to understand rules and fees.
Common Challenges
Raising the floor height in a room or building is a common task in renovation and construction projects. It helps improve insulation, fix uneven floors, or install new flooring types. Despite its benefits, this process comes with several challenges. The three main issues faced are uneven surfaces, moisture problems, and adjusting door frames and fixtures. Each requires careful planning and action to ensure a smooth and durable finish.
Dealing With Uneven Surfaces
Uneven floors can cause many problems when raising the floor height. If the base surface is not level, the new floor may crack, feel unstable, or look unattractive. Checking the floor’s level before starting is very important.
Common causes of uneven surfaces include:
- Settlement of the foundation
- Wear and tear over time
- Poor original construction
- Water damage
Steps to fix uneven surfaces:
- Use a spirit level or laser level to find low and high spots.
- Remove loose debris and clean the floor thoroughly.
- Apply a self-leveling compound for minor unevenness.
- For deep dips, use a cement-based patch or screed.
- Allow the surface to dry completely before continuing.
Example of leveling materials:
| Material | Use | Drying Time |
| Self-leveling compound | Minor unevenness | 24 hours |
| Cement screed | Deep dips or cracks | 48-72 hours |
Fixing uneven surfaces ensures the raised floor will be stable and last longer. It also prevents problems during installation of flooring materials.
Managing Moisture Issues
Moisture is a major concern when raising floor height. Water can damage flooring materials and cause mold growth. Moisture problems often come from ground water, leaks, or poor ventilation.
Signs of moisture issues:
- Musty smell
- Water stains or damp spots
- Peeling paint or wallpaper
- Warped wood or flooring
Methods to manage moisture:
- Install a moisture barrier or vapor barrier under the new floor.
- Use waterproof membranes on concrete slabs.
- Improve drainage around the building foundation.
- Fix any leaks in plumbing or roofs immediately.
- Ensure proper ventilation in basements and crawl spaces.
Common moisture barriers:
| Type | Material | Best For |
| Sheet membrane | Plastic or rubber sheets | Concrete slabs, crawl spaces |
| Liquid-applied membrane | Brush or spray-on liquid | Irregular surfaces |
Proper moisture management prevents damage and maintains a healthy indoor environment. It also extends the life of the raised floor and avoids costly repairs later.
Adjusting Door Frames And Fixtures
Raising floor height changes the level of doorways and fixtures. Doors may rub on the floor or fail to close properly. Fixtures like cabinets and baseboards may look uneven or damaged.
Common adjustments needed:
- Raising door frames and trimming doors
- Adjusting thresholds and weatherstripping
- Raising or replacing baseboards and moldings
- Modifying built-in cabinets or shelving
Steps to adjust door frames and fixtures:
- Measure the new floor height increase.
- Remove doors and trim the bottom edges to fit new height.
- Raise door frames if possible or install new frame extensions.
- Replace or move thresholds and weatherstripping to match floor.
- Adjust or replace baseboards and moldings to avoid gaps.
Example of door adjustment tools:
- Hand planer or electric planer
- Hammer and nails or screws
- Measuring tape and pencil
- Level and shims
Making these adjustments ensures doors and fixtures function well and look good after raising the floor. It also prevents damage to doors and frames over time.
Conclusion
Raising floor height can improve your space’s comfort and safety. Follow clear steps and use the right tools. Take care to measure well and work slowly. Small changes can make a big difference. Always check local rules before starting. This helps avoid problems later.
With patience, you can achieve a better floor level. Enjoy a stronger, more even surface in your home. Keep learning and improving your skills for future projects.