Are you looking to raise your floor height without breaking the bank? Whether you want to fix uneven floors or add extra space under your flooring, finding the cheapest way to do it can save you a lot of money and hassle.
You’ll discover simple, cost-effective methods that anyone can try. By the end, you’ll know exactly how to lift your floors safely and affordably—so keep reading and get ready to transform your space without overspending!
Assessing Floor Height Needs

Raising the floor height can solve many problems such as uneven surfaces, water damage, or the need for better insulation. Before starting any work, assessing floor height needs is essential. This step helps avoid unnecessary costs and ensures the project meets your goals.
Measuring Existing Floor Levels
Start by measuring the current floor levels accurately. This step shows how much the floor height needs adjustment and highlights any uneven areas. Use simple tools like a spirit level, tape measure, or laser level for best results.
- Choose several points around the room to measure floor height.
- Mark the lowest and highest points to find floor slope.
- Note down measurements relative to a fixed reference point, such as a door frame.
Use this table to organize your measurements:
| Measurement Point | Height from Reference (mm) | Notes |
| Corner A | 15 | Lowest point |
| Center | 25 | Uneven surface |
| Corner B | 20 | Slightly higher |
After measuring, analyze the data to detect slopes or dips. This helps decide how much leveling and height increase are necessary. Always double-check your measurements for accuracy.
Determining Required Height Increase
Next, decide the exact height increase needed. This depends on the problem you want to fix and the final floor use. For example, raising the floor to prevent water damage requires a different height than adding insulation.
Consider these factors:
- Floor purpose: living space, garage, storage, etc.
- Existing floor issues: unevenness, cracks, moisture.
- Ceiling height limits: avoid making the room too low.
- Floor covering thickness: account for tiles, carpet, or wood.
Accurate assessment avoids overspending on materials and labor. This approach saves money and ensures the floor height fits your needs perfectly.
Budget-friendly Materials
Using the right materials helps maintain safety and comfort. Here are three cost-effective options to consider for raising floor height.
Using Plywood Sheets
Plywood sheets are a popular choice for raising floor height on a budget. They are easy to handle, cut, and install. Plywood provides a strong, stable base for new flooring layers. It also resists warping, which keeps the floor even over time.
Key benefits of using plywood sheets:
- Affordable and widely available
- Easy to cut and shape with basic tools
- Strong enough to support furniture and foot traffic
- Works well under carpet, laminate, or hardwood floors
Consider these plywood types:
| Type | Thickness | Cost per Sheet | Best Use |
| Softwood plywood | 1/2 inch | $20-$30 | Light floor raising in dry areas |
| Hardwood plywood | 3/4 inch | $40-$50 | Stronger base for heavy use |
| Exterior-grade plywood | 3/4 inch | $45-$55 | Areas with moisture or humidity |
Opting For Concrete Overlays
Concrete overlays offer a durable and affordable way to raise floor height. They create a new surface layer on top of the existing floor. Overlays can be customized with different textures and colors. This method suits garages, basements, and patios.
Advantages of concrete overlays:
- Strong and long-lasting surface
- Can be applied thinly to add height
- Resists moisture and heavy wear
- Easy to clean and maintain
Types of concrete overlays:
| Type | Thickness | Cost per Sq Ft | Best Use |
| Thin polymer-modified | 1/8 to 1/4 inch | $3-$5 | Light floor raising, decorative finish |
| Self-leveling | 1/4 to 1/2 inch | $4-$7 | Uneven floor correction, smooth surface |
| Thick overlays | 1/2 to 1 inch | $6-$9 | Higher floor raising, durable use |
Exploring Foam Underlayment
Foam underlayment is a lightweight and cost-effective material to raise floor height slightly. It is mostly used under laminate or vinyl floors. Foam adds cushioning, soundproofing, and minor height increase.
Benefits of foam underlayment:
- Inexpensive and easy to install
- Adds comfort and reduces noise
- Provides minor height adjustment (usually less than 1 inch)
- Helps with minor floor imperfections
Common foam underlayment types:
| Type | Thickness | Cost per Sq Ft | Features |
| Polyethylene foam | 2-3 mm | $0.20-$0.40 | Basic cushioning, moisture barrier |
| Felt foam | 3-6 mm | $0.40-$0.60 | Better sound absorption |
| Cork foam composite | 3-6 mm | $0.60-$1.00 | Eco-friendly, improved insulation |
Simple Installation Methods
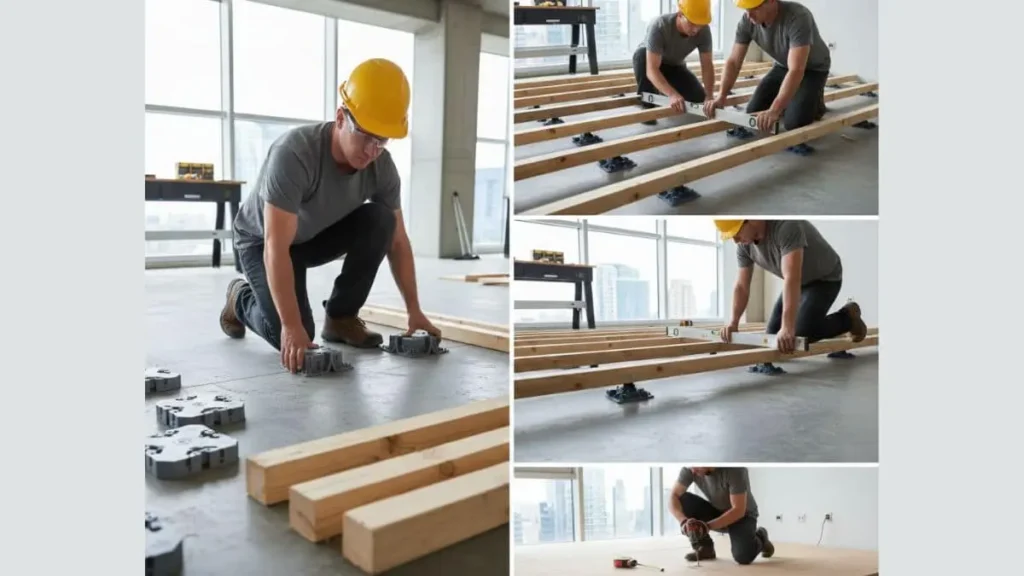
Raising floor height can improve room functionality and fix uneven surfaces. Choosing simple installation methods helps save money and time. These methods require basic tools and skills. They work well for small height adjustments or leveling floors before new flooring installation. The following options offer easy ways to raise floor height without heavy construction work.
Self-leveling Compounds
Self-leveling compounds are liquid materials that spread evenly over floors. They harden into a smooth, flat surface. This method suits small to moderate height increases, usually up to 2 inches. It is excellent for fixing uneven concrete or wooden floors.
Steps to use self-leveling compounds:
- Clean and prime the floor surface.
- Mix the compound with water following package instructions.
- Pour the mixture over the floor.
- Use a trowel or spreader to help it flow evenly.
- Allow it to dry fully before walking or adding flooring.
Raised Subfloor Systems
Raised subfloor systems involve building a new floor structure above the existing floor. This method suits larger height increases and uneven floors. It also allows installation of insulation and wiring under the floor.
Common materials include wood joists or metal framing. These create a grid that supports new floor panels.
Key steps:
- Measure and plan the desired height.
- Install sleepers or joists on the current floor.
- Secure subfloor panels on top of framing.
- Add finish flooring over the raised subfloor.
Drywall Or Wood Frame Platforms
Drywall or wood frame platforms are simple raised floors built using framing lumber or drywall sheets. This method is fast and cost-effective for small height increases, usually under 6 inches.
Wood frames offer strong support and easy attachment for flooring. Drywall platforms create smooth surfaces ready for carpet or vinyl.
Installation steps:
- Construct a frame using 2×4 or 2×6 lumber.
- Secure the frame to the existing floor.
- Cover the frame with plywood or drywall sheets.
- Finish with the chosen floor covering.
DIY Techniques To Save Costs
Raising the floor height can improve room comfort and fix uneven surfaces. Choosing DIY techniques saves a lot of money compared to hiring professionals. Simple tools and clear steps let you adjust the floor height yourself without heavy expenses. This approach fits many budgets and skill levels. Preparing well and following easy instructions lead to good results.
Tools And Equipment Needed
Using the right tools makes the job easier and safer. Most tools for raising floor height are affordable or you might already own some. Here is a list of essentials:
- Measuring tape: To check floor height and room dimensions accurately.
- Spirit level: Ensures the new floor surface is flat and even.
- Hammer and nails: For fixing floorboards or joists securely.
- Screwdriver and screws: To attach wooden supports firmly.
- Power drill: Speeds up screw installation and drilling holes.
- Circular saw or handsaw: Cuts wood to the needed size.
- Wooden beams or sleepers: Act as supports to raise the floor height.
- Plywood sheets: Create the new raised floor surface.
- Protective gear: Gloves, safety glasses, and dust masks keep you safe.
Buying materials in bulk often lowers costs. Reusing scrap wood or leftover plywood cuts expenses further. Renting power tools instead of buying saves money for one-time projects. Below is a quick cost comparison for basic tools:
| Tool/Material | Approximate Cost (USD) | Buy or Rent |
| Measuring tape | $10 – $20 | Buy |
| Spirit level | $15 – $30 | Buy |
| Power drill | $40 – $100 | Rent (around $20/day) |
| Wooden beams (per piece) | $5 – $15 | Buy |
| Plywood sheet | $20 – $50 | Buy |
Step-by-step Installation Tips
Follow these steps to raise your floor height safely and cheaply:
- Clear the area: Remove furniture and clean the floor thoroughly.
- Measure and mark: Use the measuring tape and level to plan the new floor height.
- Install wooden sleepers: Lay wooden beams on the floor spaced about 16 inches apart. Secure them with nails or screws.
- Check level: Use the spirit level to ensure sleepers are even. Shim with small wood pieces if needed.
- Cut plywood sheets: Measure and cut plywood to fit the room size exactly.
- Fix plywood to sleepers: Screw plywood firmly onto the sleepers to create a stable raised floor.
- Inspect the surface: Walk over the new floor to check for any movement or uneven spots.
- Finish the floor: Add flooring material like carpet, laminate, or tiles over the plywood.
Keep these tips in mind:
- Work slowly to keep everything level and secure.
- Use clamps to hold beams while fixing them in place.
- Double-check all measurements before cutting wood.
- Wear protective gear during cutting and drilling.
- Ask for help if the project feels too big to do alone.
This method avoids expensive concrete or professional labor costs. It suits small to medium room sizes well. The raised floor adds insulation and can hide cables or pipes underneath. Good planning and patience make the DIY floor raise a smart, cost-effective choice.
Potential Challenges And Solutions
Raising the floor height cheaply can save money but comes with challenges. These challenges affect door fit, floor transitions, and the building’s strength. Knowing common problems and how to fix them helps avoid costly mistakes. This section explains key issues and practical solutions for a smooth, stable floor raise.
Dealing With Door Adjustments
Raising the floor changes the height of door openings. Doors may rub or not close properly. Fixing this is important to keep doors functional and prevent damage.
Common door problems:
- Doors scraping the floor
- Difficulty opening or closing
- Gaps below the door causing drafts
Simple fixes include:
- Trim the bottom of the door: Use a saw to cut the door bottom. Leave a small gap (about 1/2 inch) for clearance.
- Adjust door hinges: Move hinges up or down to realign the door.
- Install a door sweep: This seals the gap and blocks drafts.
Addressing Floor Transitions
Raising floor height creates differences between rooms. These gaps need smooth transitions to avoid tripping and look good. Managing floor transitions is key for safety and style.
Types of floor transitions:
- T-molding: connects floors at the same height
- Reducer strip: used where floors differ in height slightly
- Threshold: bridges gaps at doorways
How to fix uneven floors:
- Use a floor leveling compound: Fill low spots before raising the floor.
- Install transition strips: Choose the right type based on height difference.
- Secure strips properly: Nail or glue strips to prevent movement.
Ensuring Structural Stability
Raising a floor affects the building’s structure. The floor must support weight safely without damage. Structural stability is critical for safety and durability.
Potential risks:
- Weak joists or beams
- Uneven load distribution
- Floor sagging or cracking
Steps to maintain stability:
- Inspect existing structure: Check joists, beams, and subfloor for damage or weakness.
- Add support beams or posts: Reinforce weak areas to handle new floor height.
- Use proper materials: Choose strong plywood or boards for the raised floor.
- Secure fasteners: Use screws and nails in correct sizes and spacing.
Conclusion
Raising floor height does not have to be expensive. Simple materials and smart planning save money. Using wooden beams or concrete blocks works well. Always measure carefully before starting the project. Small changes can make a big difference in your space.
You can improve your home without spending much. Take your time and choose the best method for you. The cheapest way often brings good results if done right.