


If you’ve ever dealt with a rocking toilet, a mysterious sewer smell in your bathroom, or water damage around the base of your toilet, there’s a good chance the problem started with one small detail — the height of your toilet flange. Most homeowners don’t think twice about flange height until something goes wrong. But getting it right from the start can save you hundreds of dollars in repairs and a whole lot of frustration.
The rule is simple: your toilet flange should sit 1/2 inch above the finished floor. That’s it. But as simple as that sounds, getting there can be tricky — especially after a bathroom remodel, tile installation, or when you’re dealing with an old, worn-out flange. This guide walks you through everything you need to know, from measuring correctly to fixing a flange that’s too high or too low.
What Is a Toilet Flange and Why Does Height Matter?

A toilet flange — technically called a closet flange — is the pipe fitting that connects the bottom of your toilet to the drain pipe in your floor. It’s typically made of PVC, ABS plastic, cast iron, or stainless steel, and it does two critical jobs: it anchors the toilet securely to the floor, and it creates a watertight connection through the wax ring.
The wax ring is the unsung hero of toilet installation. It’s a soft, malleable ring of wax that sits between the bottom of your toilet and the top of the flange. When you press the toilet down onto the flange, the wax compresses and forms an airtight, watertight seal. That seal is what keeps sewer gases and wastewater from getting where they shouldn’t be.
Here’s why height matters so much: the wax ring needs enough flange height to compress properly. If the flange sits too low — flush with the floor or below it — the wax can’t create a full seal. Over time, this leads to slow leaks, sewer gas sneaking into your bathroom, and eventually, water damage under the floor that can rot your subfloor. On the flip side, if the flange sits too high — more than an inch above the floor — the toilet won’t sit flat. It’ll rock back and forth, which breaks down the wax seal even faster.
The 1/2 inch rule isn’t arbitrary. It’s the sweet spot that gives the wax ring just enough room to compress fully while keeping the toilet stable and level. This standard is recognized by both the International Plumbing Code (IPC) and the Uniform Plumbing Code (UPC), so it’s not just a best practice — in most jurisdictions, it’s code.
Tools and Materials You’ll Need
Before you start any flange work, gather everything upfront. Running to the hardware store mid-job is how mistakes happen.
Tools:
- Tape measure and pencil
- Straight edge or level
- Hacksaw or reciprocating saw (for cutting old flanges)
- Drill with bits
- Adjustable wrench
- Putty knife or scraper
Materials:
| Item | Purpose |
| Toilet flange (3″ or 4″) | Replacement if current flange is damaged |
| Flange extender kit | Raises a low flange without full replacement |
| Wax ring (standard or thick) | Creates watertight seal under toilet |
| Closet bolts (T-bolts) | Secures toilet to flange |
| PVC primer and cement | For PVC flange connections |
| Floor patching compound | For gaps around flange after tile work |
Choosing the Right Flange for Your Floor Type
Not every floor is the same, and your flange choice should reflect that.
- Ceramic or porcelain tile — Tile adds 3/8 to 1/2 inch of height, so flanges installed before tiling will often end up too low. A flange extender is the most common fix here.
- Hardwood flooring — Adds roughly 3/4 inch. This is one of the most common causes of a too-low flange.
- Luxury vinyl plank (LVP) or laminate — Adds 1/4 to 3/8 inch, which can push a properly set flange slightly out of range.
- Concrete slab — Flanges set in concrete require anchor bolts and are harder to adjust. Professional help is often worth it here.
How to Measure Your Toilet Flange Height the Right Way

Measuring first — before buying anything or making any cuts — is the step most DIYers skip. Don’t. An accurate measurement saves time, money, and a second trip to the hardware store.
Step 1: Remove the toilet. You can’t get an accurate reading with the toilet in place. Turn off the water supply, flush to empty the tank, disconnect the supply line, and lift the toilet straight up off the flange.
Step 2: Clean the flange surface. Remove any old wax with a putty knife. You need a clear view of the top edge of the flange.
Step 3: Lay a straight edge (a level works perfectly) across the finished floor, spanning over the flange opening.
Step 4: Measure the gap between the top of the flange and the bottom of your straight edge. That gap is your flange height above the floor.
Target: 1/4 inch to 1/2 inch. If you’re right at 1/2 inch, you’re in perfect shape.
One important note — always measure from the finished floor, not the subfloor. If your tile isn’t installed yet, factor in the tile thickness plus the mortar bed (typically 1/2 to 5/8 inch total for standard ceramic tile). Getting this wrong is the most common measuring mistake homeowners make.
How to Raise a Toilet Flange to the Correct Height
A low flange is by far the most common problem, especially after bathroom renovations where new flooring raises the floor level. You have three main options, and the right one depends on how low your flange is and what condition it’s in.

Using a Toilet Flange Extender
A flange extender kit is the easiest and most affordable fix for a flange that’s structurally sound but sitting too low. These kits typically cost $10 to $30 and come with stackable plastic rings and new bolts.
Here’s how to install one:
- Clean the top of the existing flange thoroughly — any debris will prevent a tight fit.
- Dry-fit the extender ring to check the height. Stack rings if needed until you reach 1/2 inch above the floor.
- Apply the sealant or silicone included in the kit around the top edge of the existing flange.
- Press the extender ring firmly into place and secure it with the provided screws.
- Let it cure per the manufacturer’s instructions before reinstalling the toilet.
- Recheck height with your straight edge before putting the toilet back.
Flange extenders work well for height differences up to about 1 inch. Beyond that, a full replacement is a better long-term solution.
Installing a New Toilet Flange
If your existing flange is cracked, broken, corroded, or sitting more than an inch too low, replacing it entirely is the smarter move. A failing flange won’t hold an extender properly anyway.
To replace a PVC flange:
- Cut the old flange off as close to the pipe as possible using a reciprocating saw. Work carefully to avoid damaging the drain pipe below.
- Clean the pipe end and dry-fit the new flange to check depth.
- Apply PVC primer to both the pipe and the inside of the new flange socket, then apply PVC cement.
- Push the new flange onto the pipe, rotating slightly to spread the cement evenly, and hold for 30 seconds.
- Align the bolt slots front-to-back (parallel to the wall behind the toilet) before the cement sets.
- Secure the flange to the subfloor with screws.
- Measure height again before proceeding.
For cast iron flanges, the process is more involved and often requires a plumber unless you’re experienced with lead joints or banded couplings.
Using a Thick Wax Ring
A double-thick or extra-thick wax ring can compensate for a flange that’s only slightly low — roughly 1/4 inch below the ideal. This is a viable option for minor discrepancies, but it’s not a substitute for proper flange height. Thick wax rings add bulk, not structural support. If the flange is significantly low, don’t rely on wax alone.
Pro Tips:
- Always install your finished flooring before setting the final flange height. The floor comes first, the flange measurement comes second.
- Never twist the toilet when lowering it onto the wax ring — press straight down.
- Use new closet bolts every time you reinstall a toilet.
How to Lower a Toilet Flange That’s Too High

A flange that sits more than 1 inch above the floor is less common but equally problematic. In this case, the toilet can’t sit flush against the floor. It’ll wobble, and the wax ring will sit unevenly, leading to seal failure.
The fix is trimming the flange down — but it needs to be done carefully.
For PVC flanges, use an oscillating multi-tool or hacksaw to trim the top collar down. Work in small increments, check your height frequently, and smooth the cut edge with sandpaper to remove any sharp burrs that could damage the wax ring.
For cast iron flanges, trimming is much harder. A grinder or angle grinder is typically needed, and the risk of cracking the flange is real. If you’re dealing with a cast iron flange that’s too high, it’s worth calling a licensed plumber rather than risking a broken flange and a much bigger repair.
After any trimming, measure again, clean the surface, and proceed with a standard wax ring installation.
Reinstalling the Toilet After Flange Adjustment
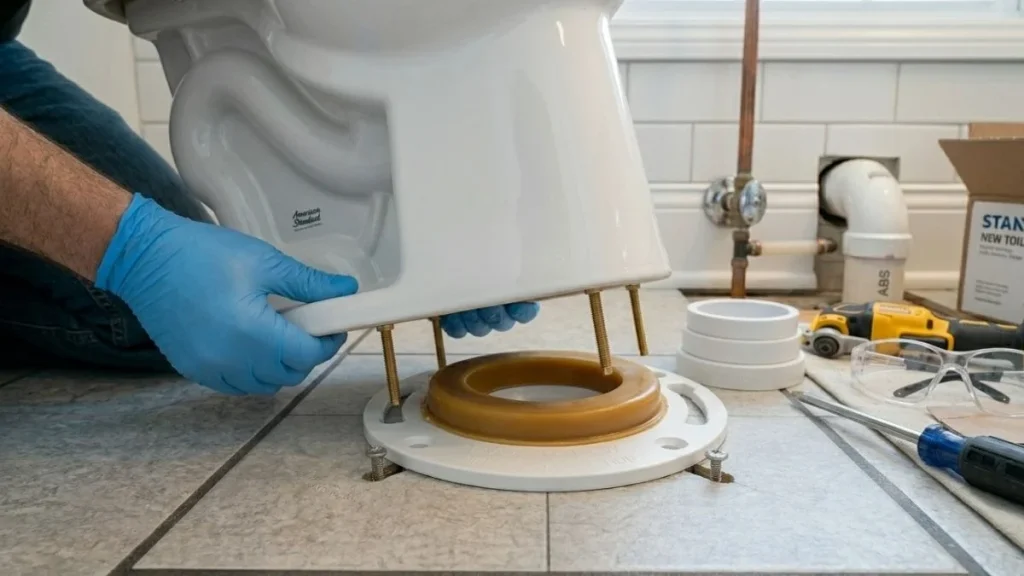
With your flange at the correct height, reinstalling the toilet correctly is just as important as the flange work itself. A good flange paired with a sloppy reinstall will still end up leaking.
- Insert new closet bolts into the flange slots. Position them straight and centered.
- Place the new wax ring on the flange, not on the toilet. Wax-side up.
- Carefully lower the toilet straight down, aligning the bolt holes with the closet bolts. Do not twist or slide — go straight down.
- Apply your body weight evenly to press the toilet down. The wax needs to compress fully to seal.
- Hand-tighten the washers and nuts onto the bolts, then snug them up with a wrench. Alternate sides to keep even pressure. Do not overtighten — porcelain cracks easily.
- Trim the excess bolt length with a hacksaw, leaving about 1/2 inch above the nut.
- Snap on the bolt caps and reconnect the water supply.
- Flush several times and inspect the base carefully for any moisture or movement.
Check again after 24 hours. A small amount of flex in a new wax seal can cause a hairline leak that only shows up after a few flushes.
Toilet Flange Height and Building Codes
Plumbing codes exist for good reason, and toilet flange height is covered under both major U.S. standards. The International Plumbing Code (IPC) and the Uniform Plumbing Code (UPC) both specify that the flange must be set at the proper height relative to the finished floor to ensure an adequate seal.
Why does this matter beyond just the technical fix? If you’re selling your home, a plumbing inspection can flag an improperly set flange. Homeowner’s insurance claims related to water damage may be denied if the damage traces back to a non-code-compliant installation. And if you’ve had any work done by a contractor, a properly set flange is part of what you’re paying for — knowing the standard helps you verify the work.
Always check your local jurisdiction’s plumbing code as well. While most adopt IPC or UPC standards, some municipalities have amendments that may affect toilet installation requirements.
When to Call a Professional Plumber
DIY flange work is well within reach for most homeowners — but not every situation calls for a DIY fix. Know when to step back.
Call a licensed plumber if:
- The flange is embedded in a concrete slab and needs repositioning
- The drain pipe below the flange is damaged, cracked, or misaligned
- You’re dealing with a cast iron flange that needs significant adjustment
- There are signs of subfloor water damage — soft spots, discoloration, or rot around the flange
- You’ve reinstalled the toilet twice and it’s still leaking
Professional flange repair or replacement typically runs $150 to $400, depending on your location and the complexity of the job. That’s a lot less than the cost of fixing a rotted subfloor or dealing with a mold remediation job from a slow, undetected leak.
Read Also: Toilet Water Supply Line Through Floor
Conclusion
Getting your toilet flange 1/2 inch above the finished floor isn’t complicated — but it is important. That half inch is what stands between a solid, leak-free toilet installation and a slow plumbing disaster that can damage your floor, your subfloor, and your wallet.
Whether you’re dealing with a new tile floor that buried your flange, an old flange that was never set right, or a full bathroom renovation, the fix is usually straightforward. Measure carefully, choose the right solution — extender, replacement, or trim — and reinstall the toilet correctly. Do it once, do it right, and you won’t have to think about it again.
And when the job feels bigger than expected, there’s no shame in calling a plumber. A $200 professional fix beats a $2,000 subfloor repair any day of the week.


