That water stain on your ceiling right where the addition begins is not a coincidence. The junction where a home addition meets the original roof is one of the most leak-prone areas on any house — and it almost always comes down to one thing: flashing failure.
This spot is uniquely vulnerable because two separate roof systems, built at different times, are forced to meet at a single seam. When the connection isn’t watertight — whether from poor original installation, aging materials, or missing components — water finds its way in every time it rains.
To make things worse, the leak rarely appears directly at the source. Water travels along rafters and sheathing before dripping somewhere that looks completely unrelated, causing many homeowners to patch the wrong spot repeatedly.
The Role of Flashing in Roof Addition Leaks
What Is Roof Flashing and Why Does It Matter?
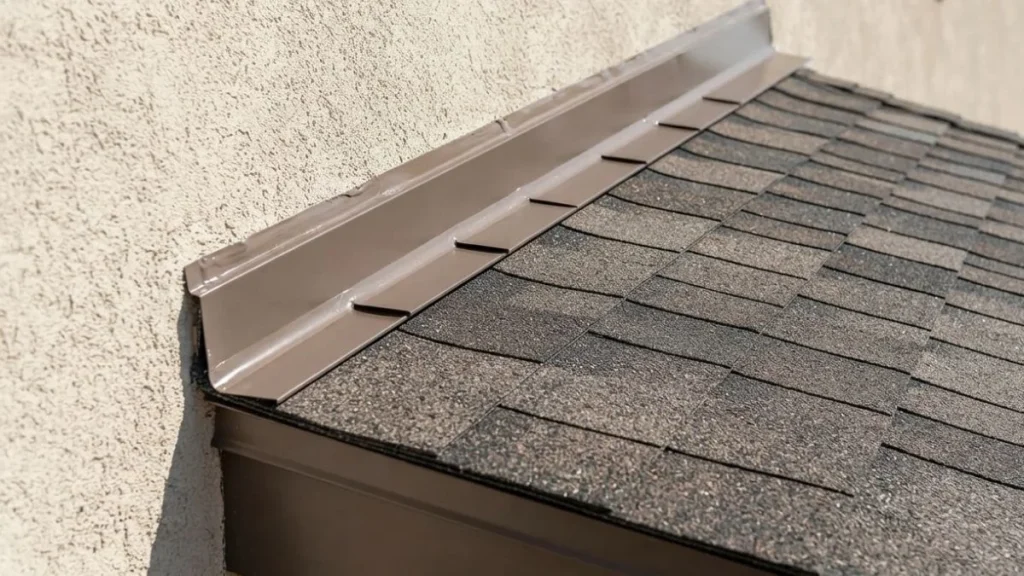
Flashing is thin sheet metal — typically aluminum, galvanized steel, or copper — that is installed at any point where the roof surface meets a vertical surface like a wall, chimney, or another roofline. Its entire job is to redirect water away from these joints and prevent it from seeping underneath the shingles.
At the junction where an addition meets the main house, multiple types of flashing work together:
| Flashing Type | Location | Purpose |
| Step Flashing | Along the sidewall where roof meets vertical wall | Directs water over each shingle course |
| Counter Flashing | Embedded into the wall above step flashing | Caps and seals the step flashing from above |
| Valley Flashing | Where two roof pitches meet at a low angle | Channels heavy water flow away from the seam |
| Kickout Flashing | At the bottom where roof meets the sidewall | Diverts water into the gutter, not behind siding |
The Kickout Flashing Problem Nobody Talks About
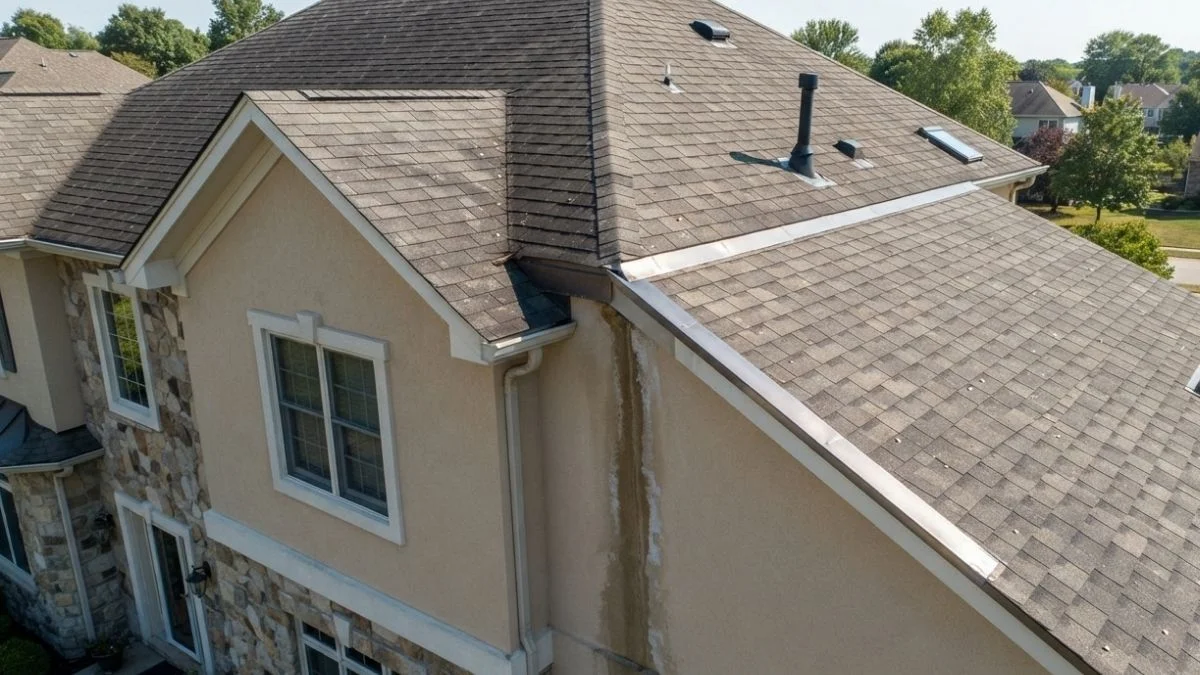
Kickout flashing is the single most overlooked piece in any addition roof repair. It’s a small, bent piece of metal installed at the very bottom of a step flashing run — right where the roof edge meets the exterior wall. Its job is to kick water out into the gutter rather than letting it run behind the siding and into the wall cavity.
When kickout flashing is missing — which it often is on older additions — water silently saturates the wall framing behind the siding, sometimes for years, before any visible damage appears. By the time you notice a stain, the rot and mold damage behind the wall can be extensive and expensive.
Signs your kickout flashing is missing or failing include water stains running vertically down the exterior wall near the roofline, peeling paint or bubbling siding at the lower corner of the addition, soft spots in the wall near the junction, and musty odors inside the room adjacent to the addition wall.
How to Diagnose a Roof Leak at the Addition Junction

Start Inside: Attic and Ceiling Inspection
Before you climb on the roof, go to the attic first. Bring a flashlight and look for water stains on the roof sheathing, wet or compressed insulation, dark streaking along rafters, and any visible mold or mildew growth. The key is to trace the moisture as far back toward its source as you can from the inside.
Remember — the wet spot on your ceiling may be two or three feet away from where water is actually entering. Follow the trail.
Exterior Inspection Checklist
Once you’re ready to inspect the outside, work methodically. Look for these specific issues at the addition junction:
- Lifted or missing step flashing — shingles should lay flat with no visible gaps along the wall
- Cracked or dried-out caulk — any caulk line that is pulling away from the surface is a potential entry point
- Rust stains on or below flashing — indicates old galvanized metal that has begun to deteriorate
- Missing kickout flashing — look at the very bottom corner where the roof meets the side wall
- Shingle damage at the tie-in zone — cracked, curled, or missing shingles right at the junction
- Open valley seams — gaps or lifted edges along the valley where the two rooflines meet
The Garden Hose Test
If you can’t identify the source visually, the garden hose test is your best diagnostic tool. You’ll need two people — one on the roof with a hose and one inside watching the ceiling or attic.
Start at the lowest point of the junction and work upward slowly, saturating one section at a time for about two minutes before moving higher. When the person inside sees water appear, the section you were soaking last is your leak zone. This method eliminates guesswork and saves you from making unnecessary repairs.
Safety first: Never get on a wet roof. Wear rubber-soled shoes, use a stable ladder, and if the roof pitch is steep or you’re uncomfortable at height, stop and call a professional. A roof inspection from a licensed contractor typically costs $150–$300 and is worth every cent if it keeps you safe.
How to Fix a Roof Leak Where the Addition Meets the House
DIY vs. Hiring a Professional
Not every addition roof leak requires a contractor. Here’s an honest breakdown of what you can handle yourself and what you shouldn’t:
DIY-appropriate repairs:
- Resealing exposed nail heads with roofing cement
- Reapplying caulk at minor flashing gaps
- Replacing a single piece of damaged step flashing if you’re comfortable on a roof
- Clearing debris from valleys and gutters
Call a professional for:
- Full step flashing replacement along a wall run
- Installing or replacing kickout flashing
- Any repair that requires lifting more than a few shingles
- Situations where you’ve found rot in the decking or rafters
- Leaks that return within a season after a DIY repair
Resealing Flashing at the Addition Junction
For minor repairs where the flashing is still in good shape but the sealant has dried out, resealing is a straightforward fix. You’ll need roofing cement or a quality polyurethane sealant, a wire brush, a putty knife, and a caulk gun.
Clean the area thoroughly with the wire brush to remove old caulk, debris, and rust. Apply a generous bead of roofing cement along the flashing edge where it meets the wall, pressing it firmly into any gaps. Smooth it with the putty knife and allow it to cure fully before rain. This repair can extend the life of existing flashing by several years, but it’s not a permanent fix if the metal itself is deteriorating.
Replacing Step Flashing

When resealing isn’t enough, full step flashing replacement is necessary. This is a more involved repair but entirely doable for a handy homeowner. The process requires carefully lifting — not tearing — the shingles along the wall to expose the existing flashing. Each piece of step flashing is woven between shingle courses, so replacing it means working from the bottom up, one piece at a time.
Use 26-gauge or heavier aluminum or galvanized steel for replacement flashing. Each piece should be at least 4 inches wide on both the horizontal and vertical leg. Nail the flashing to the roof deck only — never nail through the vertical leg into the wall, as this prevents proper expansion and contraction movement.
Addressing Water Damage After the Repair
Fixing the leak is only half the job. If the leak has been active for any significant period, you need to assess what damage has already occurred. Check the roof decking for soft spots that indicate rot. Inspect the insulation — wet insulation loses its R-value and must be replaced. Look for mold on any wood surfaces and treat with a mold-killing solution before closing everything back up.
If you find significant rot or mold has spread into wall cavities, bringing in a water damage restoration specialist is the right call. Trying to seal over compromised structural material is a short-term fix that will cost far more down the road.
How Much Does It Cost to Fix This Type of Roof Leak?
Repair costs vary widely based on how long the leak has been active, the size of the addition, and what materials were originally used. Here’s a realistic cost breakdown:
| Repair Type | Estimated Cost |
| Resealing and caulk work | $150 – $400 |
| Single flashing section repair | $300 – $700 |
| Full step flashing replacement | $500 – $1,500 |
| Kickout flashing installation | $200 – $500 |
| Full junction re-flashing with minor deck repair | $1,500 – $3,500 |
| Re-flashing plus water damage restoration | $3,500 – $8,000+ |
Homeowners insurance may cover sudden, accidental water damage — like damage from a storm that dislodged flashing. However, if the leak developed gradually over time due to deferred maintenance or original poor installation, most insurers will deny the claim. Document everything with photos, note the date you discovered the leak, and contact your insurer promptly if you believe the damage qualifies.
How to Prevent Future Leaks at the Roof Addition Junction
Prevention is straightforward if you’re consistent about it. Inspect the flashing at the addition junction every fall and spring — this takes less than 20 minutes and can catch problems before they become expensive. Clear leaves and debris from valleys and gutters near the addition after each fall season, since debris traps moisture directly against your flashing.
Reapply sealant to any visible caulk joints every two to three years, as UV exposure breaks down most sealants on that timeline. And schedule a professional roof inspection every three to five years — a roofer will spot early flashing failure, lifted counter flashing, or rust development that’s easy to miss from the ground.
If you’re building a new addition, insist that kickout flashing is included in the scope of work. Ask to see it installed before the siding goes up. It costs almost nothing to install during construction and can prevent thousands of dollars in wall and framing damage over time.
Related: Roof Leaking Where Porch Meets House
Conclusion
A roof leak where your addition meets the house is frustrating, but it’s not mysterious. It comes down to one thing in almost every case — flashing that was improperly installed, has aged out, or was never there to begin with. The good news is that this is a fixable problem with a clear diagnosis process and a defined repair path.
Start with a thorough inspection, trace the water to its actual entry point, and address the flashing — not just the symptoms. If the damage is still early-stage, a targeted repair will solve it. If water has been getting in for a while, take the time to check for rot and mold before closing everything back up.
When in doubt, a professional roof inspection is money well spent. Finding the right entry point once is far cheaper than patching the wrong spot three times.