


A rotted window sill left untreated can allow water to penetrate the wall cavity, leading to structural damage that costs thousands to repair — yet a solid temporary fix for rotted window sill damage can hold for 6 to 12 months using materials that cost under $30.
Window sill rot moves fast: once the wood’s surface breaks down, rain drives moisture deeper with every storm, and renters or budget-conscious homeowners often can’t schedule professional replacement immediately.
This article covers 3 tested DIY methods — wood filler, epoxy consolidant, and waterproof caulk — with honest tradeoffs on cost, durability, and how long each one realistically buys you before a full replacement becomes unavoidable.
Preparing the Sill for Filler Application
Skipping prep is the single biggest reason DIY decay patching fails within weeks. Whether you’re using water putty for rotted wood, a two-part epoxy filler, or siliconized latex caulk, the repair material is only as good as the surface underneath it.
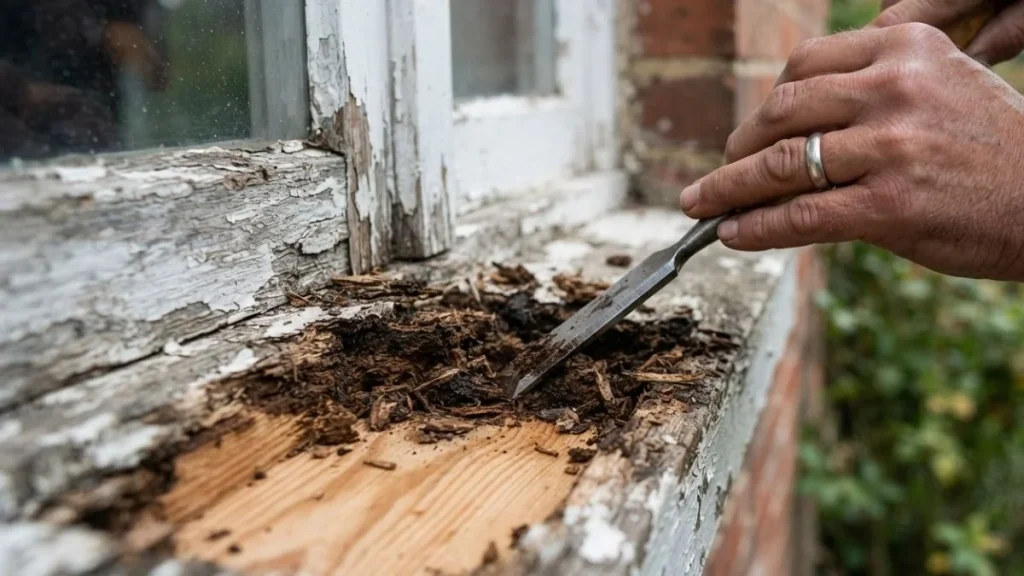
Removing Deteriorated Wood Safely
Start by pressing a screwdriver or chisel into the damaged area. If the wood compresses easily, it’s spongy rot and must come out. Excavate all soft, discolored material until you reach solid wood that resists pressure — this is your bonding base for any moisture damage repair.
Work carefully but aggressively. Use a stiff wire brush to scrub out crumbled fibers from the cavity, then switch to 100-grit sandpaper to roughen the exposed solid wood. That roughened surface is critical — smooth wood rejects filler the same way a wet window sill does. Finish with a shop vacuum to pull every dust particle and loose fiber from the repair zone.
Moisture Management Before Filling
This step determines whether your repair lasts 2 weeks or 12 months. A wet sill will cause any filler — epoxy, wood putty, or latex-based product — to fail at the bond line.
Allow the exposed wood to dry for a minimum of 24 to 48 hours in normal conditions. If your timeline is tight, position a box fan directly at the sill or run a dehumidifier in the room to accelerate drying. In humid climates, extend that window to 72 hours.
Touch the wood before you fill. If it feels cool or damp, wait. No filler bonds reliably to wet wood — not DAP Plastic Wood, not Minwax High Performance Wood Filler, not any two-part epoxy system.
Comparing Three Temporary Repair Methods
Each method solves a different version of the same problem. Choosing the wrong one wastes both time and money, so match the method to the severity of your sill deterioration before you buy anything.

Water Putty for Budget Fixes
Water putty — products like DAP Crack Shot or Durham’s Rock Hard Water Putty — costs under $10 and handles minor surface rot effectively. Mix it to a peanut-butter consistency, press it firmly into the excavated cavity, and overfill slightly to account for shrinkage during cure. Once hardened, sand it smooth with 120-grit sandpaper, prime it, and paint it.
The tradeoff is longevity. In exposed outdoor conditions, expect 6 to 12 months before the repair softens or cracks. It’s best suited for shallow decay patching where the structural wood beneath is still largely intact.
Two-Part Epoxy Filler for Maximum Durability
Two-part epoxy systems like Minwax High Performance Wood Filler or LiquidWood with WoodEpox offer the strongest moisture damage repair available in a DIY product. Mix Part A and Part B at the manufacturer’s specified ratio — usually 1:1 by volume — and work quickly because most formulas begin hardening within 20 to 30 minutes.
Epoxy bonds chemically to wood fiber, resists freeze-thaw cycles, and won’t shrink. Properly applied to a dry, prepped sill with moderate rot, it realistically holds 12 to 24 months. It costs $25 to $50 per kit but covers multiple sills.
Siliconized Latex Caulk as a Leak-Prevention Layer
Siliconized latex caulk — GE Supreme or DAP Alex Flex are reliable options — is not a structural wood restoration product. It belongs as the final layer over a filled repair, sealing the perimeter joint between the sill and window frame to block water intrusion.
Apply it after filler has fully cured. Run a continuous bead along every gap, smooth it with a wet finger, and let it skin over for 30 minutes before any rain exposure. As a standalone application on bare rotted wood, caulk fails fast — it bridges gaps but doesn’t replace missing wood fiber or stop active sill deterioration beneath the surface.
Step-by-Step Application and Finishing
Good prep and the right product mean nothing if the application technique is sloppy. These steps apply whether you’re using water putty for rotted wood or a two-part epoxy filler — the mechanics are nearly identical.

Applying Filler with Proper Technique
Load your putty knife or a broad flexible blade with filler and press it firmly into the excavated cavity using deliberate, downward strokes. The goal is full contact with no air pockets — voids beneath the surface create weak spots that crack under weather stress.
Overfill the repair by about 10 to 15 percent above the surrounding sill surface. This matters because both water putty and epoxy filler shrink or settle slightly during cure. Once the product reaches a firm, leather-hard stage — typically 1 to 2 hours depending on temperature and humidity — use a straight-edged scraper to knock the excess flush with the surrounding wood. Don’t wait for a full cure before scraping, or you’ll be fighting hardened material with sandpaper for an hour.
Follow the manufacturer’s stated cure time before sanding. DAP Plastic Wood specifies 2 hours minimum; Minwax High Performance Wood Filler recommends 4 hours. Rushing this step tears the surface and compromises the repair.
Finishing for Durability
Once fully cured, sand the repair smooth using 150-grit sandpaper, then finish with 220-grit for a surface that accepts primer cleanly. Rotted window frame sandpaper preparation at this stage determines how well paint adheres — a rough surface traps moisture at the paint edge and restarts the decay cycle.
Prime the bare repair and any exposed surrounding wood with a water-blocking exterior primer like Zinsser Bulls Eye 1-2-3 or KILZ Exterior. These products seal micro-pores that standard latex primer misses. Follow with 2 coats of exterior-grade sill paint — Benjamin Moore Regal Select Exterior or Sherwin-Williams Duration are proven choices — allowing full dry time between coats.
Paint is the final moisture barrier. Without it, even a perfect epoxy repair degrades within a single wet season.
When to Plan for Permanent Replacement
A temporary fix buys time — it doesn’t solve the underlying problem. Knowing exactly when to stop patching and start budgeting for full replacement saves money in the long run and prevents minor sill deterioration from becoming a structural crisis.
The Cost-Benefit Tipping Point
Track your repair spending across 18 to 24 months. A single water putty application costs under $10. A two-part epoxy kit runs $25 to $50. Add primer, paint, sandpaper, and caulk, and a thorough decay patching job lands around $40 to $70 per repair cycle.
Professional window sill replacement typically costs $190 to $600 per window depending on material, labor rates, and damage extent. Here’s the math that matters: if you’ve completed 2 to 3 repair cycles on the same sill, you’ve likely spent $120 to $200 and are approaching the lower end of replacement cost — with no permanent result to show for it. At that point, continued moisture damage repair through temporary methods is just postponing an unavoidable expense.
Recognizing When Damage Has Spread
Probe the wood around your repair with a screwdriver after each wet season. If the soft, spongy zone has expanded beyond the original sill footprint — moving into the window frame sides, the interior framing, or the exterior wall cladding — temporary solutions are no longer appropriate.
According to Truitt and White, a licensed building materials contractor, rot that reaches the structural frame requires professional assessment before any cosmetic repair, because surface patching over compromised framing creates a false sense of security while hidden decay continues. At this stage, no epoxy filler or siliconized latex caulk application addresses the real problem. Call a licensed contractor for a full frame inspection before spending another dollar on fillers.
Read Also: Bay Window Sill Replacement
FAQ
How Long Will a Temporary Fix Actually Last?
Water putty repairs on exposed window sills last 6 to 12 months before cracking or softening. Two-part epoxy filler extends that window to 12 to 24 months when applied over properly dried, prepped wood. Both timelines shorten significantly in climates with frequent freeze-thaw cycles or heavy rain exposure.
Can You Use Flex Seal on Rotted Window Sills?
Flex Seal can slow water intrusion at the surface but it is not a structural repair — it films over rot without bonding to or replacing the degraded wood fiber underneath. Use it only as a short-term emergency measure, and plan to follow up with proper excavation, filler, and primer within weeks.
Do You Need Both Filler and Caulk, or Just One?
You need both, but for different jobs. Filler — whether water putty or epoxy — rebuilds the missing wood structure inside the damaged cavity. Siliconized latex caulk then seals the perimeter joint between the repaired sill and the window frame, blocking the water entry point that caused the rot in the first place. Using only caulk on bare rotted wood does neither job effectively.


