Are you remodeling your bathroom and worried about water or debris going down your toilet drain? Knowing how to properly plug your toilet drain during a remodel can save you from costly repairs and messy cleanups.
Discover simple, effective ways to block the drain, protect your plumbing, and keep your workspace clean. Keep reading to learn the easy steps you can take right now to avoid hidden problems and make your remodel run smoothly.
Preparing The Toilet Drain
Preparing the toilet drain is a vital first step when remodeling a bathroom. It ensures no water or debris causes damage during the work. Proper preparation also makes the remodeling process smoother and safer. Taking the time to prepare the drain helps avoid costly repairs and keeps your workspace clean.
Clearing The Drain Area
Start by removing any objects around the toilet drain. Clear away rugs, mats, and cleaning supplies. This gives you easy access and prevents accidents. Next, clean the floor near the drain to remove dust and dirt. Use a damp cloth or mop for this task.
Check inside the drain opening for leftover debris or water. Use gloves to remove any visible dirt or small items. A flashlight helps see inside the drain clearly. Make sure the drain is dry before proceeding.
Here are key steps to clear the drain area:
- Remove rugs and mats around the toilet.
- Clear cleaning tools and supplies.
- Wipe the floor clean near the drain.
- Inspect the drain opening carefully.
- Remove any debris or standing water.
Keeping the drain area clean and dry prevents mold and unpleasant smells. It also protects your tools and materials during the remodel.
Gathering Necessary Tools
Collecting the right tools makes the job faster and easier. Prepare all items before starting to avoid interruptions. Here is a list of common tools needed to plug the toilet drain during a remodel:
| Tool | Purpose |
| Drain Plug or Cap | Blocks the drain to stop water and debris. |
| Rubber Gloves | Protects hands from dirt and germs. |
| Flashlight | Helps inspect the drain inside. |
| Bucket | Catches any water during the process. |
| Towels or Rags | Used to clean spills and dry the area. |
Keep these tools within reach. Check each tool to ensure it is clean and in good condition. Having the right tools helps maintain safety and efficiency.
Shutting Off Water Supply
Stopping the water supply is crucial before plugging the toilet drain. It prevents leaks and flooding during the remodel. Locate the water shut-off valve near the toilet or under the sink. Turn the valve clockwise to close it. This stops water flow to the toilet.
After closing the valve, flush the toilet to empty the tank and bowl. This step ensures the drain is free of water. Use a sponge or towel to soak up any leftover water in the bowl or pipes.
Steps to shut off the water supply:
- Find the shut-off valve near the toilet.
- Turn the valve clockwise until tight.
- Flush the toilet to empty water.
- Remove remaining water with a sponge or towel.
- Double-check that no water flows into the toilet.
Shutting off the water supply protects your home from water damage. It also makes plugging the drain safe and clean.
Choosing The Right Plug
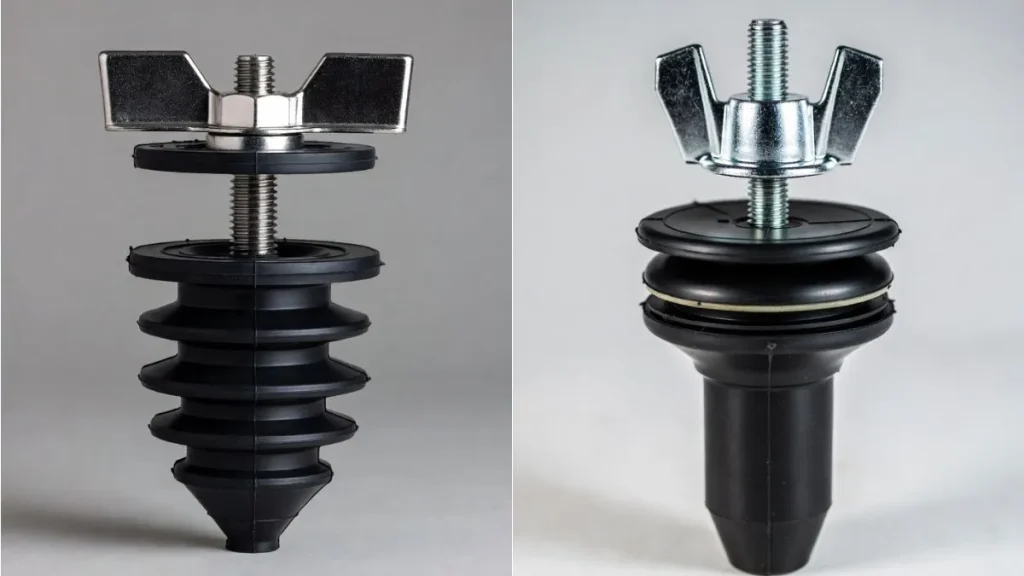
Choosing the right plug for your toilet drain is a key step during a remodel. A proper plug stops water, dust, and debris from going down the drain. It also prevents bad smells and pests from coming up. Selecting the wrong plug can cause leaks or make the work harder. Focus on the type, material, and size of the plug to get the best fit and protection.
Types Of Drain Plugs
There are several types of drain plugs designed for toilet drains. Each type suits different needs and drain sizes. Understanding these types helps pick the best option for your remodel.
- Mechanical Plugs: These use a rubber or silicone seal that expands when tightened. They provide a strong, leak-proof seal.
- Test Plugs: Often used by plumbers for pressure testing, these plugs expand inside the pipe to block it completely.
- Expandable Rubber Plugs: Made from rubber, these plugs expand to fit snugly. Easy to install and remove.
- Drain Stoppers: Simple plugs that sit over the drain opening. Good for quick, temporary seals.
Materials To Consider
The material of the plug affects durability and sealing ability. Different materials suit various remodel conditions. Choose a material that lasts and fits your needs.
- Rubber: Flexible and creates a tight seal. Good for most toilet drains.
- Silicone: More durable than rubber. Resists chemicals and temperature changes.
- Plastic: Lightweight and inexpensive. Less flexible and can crack under pressure.
- Metal: Strong and durable. Usually used for mechanical plugs but can be heavy and prone to rust.
Sizing The Plug Correctly
Choosing the right size plug ensures a secure seal. A plug too small will not block the drain. A plug too large might be hard to insert or damage the pipe.
Follow these steps to size your plug:
- Measure the inside diameter of the toilet drain pipe carefully.
- Check the plug size range and pick one that fits your pipe diameter.
- Consider plugs with adjustable sizes for flexibility.
- Test the plug by inserting it gently to confirm a snug fit.
Use this sizing chart as a guide:
| Drain Diameter (inches) | Plug Size (inches) | Plug Type |
| 3 | 2.75 – 3.25 | Expandable Rubber, Mechanical |
| 4 | 3.75 – 4.25 | Test Plug, Mechanical |
| 5 | 4.75 – 5.25 | Mechanical, Custom |
Always double-check measurements before buying or installing a plug. Correct sizing saves time and prevents leaks.
Plugging Methods
During a bathroom remodel, preventing bad smells and water leaks from the toilet drain is key. Plugging the toilet drain keeps dust, debris, and pests out of your plumbing. Different methods suit different situations and tools available. Choosing the right method helps keep your work area clean and safe. Below are common and effective plugging methods to stop the toilet drain during remodeling.
Using A Test Plug
A test plug is a simple rubber device designed to fit inside the toilet drain opening. It expands to form a tight seal, stopping air, water, and debris from passing through. This method works well for temporary blocking during remodels.
Steps to use a test plug:
- Choose a test plug size that fits your toilet drain diameter.
- Insert the plug carefully into the drain.
- Turn the screw or handle to expand the plug inside the pipe.
- Check for a firm seal by gently pulling the plug.
Advantages of using a test plug:
- Easy to install and remove
- Reusable for multiple projects
- Creates a strong, airtight seal
Test plugs are cost-effective and reliable. They prevent debris from entering pipes and keep odors controlled. Perfect for remodels that last days or weeks.
Applying A Mechanical Plug
A mechanical plug uses a physical device that fits inside the drain and locks in place. It often has a rubber gasket combined with a metal or plastic frame. This method suits longer remodels or when a stronger seal is needed.
How to apply mechanical plugs:
- Measure the drain diameter accurately.
- Insert the mechanical plug until the rubber gasket touches pipe walls.
- Tighten the mechanism (screw, clamp, or lever) to secure the plug.
- Verify the plug is stable and sealed by pressing gently.
Benefits of mechanical plugs:
- Stronger seal for longer use
- Durable materials resist damage
- Can withstand water pressure if needed
Mechanical plugs come in various styles:
| Type | Material | Best For |
| Expansion plug | Rubber and metal | Strong seals in round pipes |
| Clamp plug | Plastic frame with rubber gasket | Easy installation in tight spaces |
Mechanical plugs require more effort to install but provide excellent protection. Use them for remodels lasting over a week or with plumbing work nearby.
Temporary Sealing Techniques
Temporary sealing methods use materials like tape, plastic, or cloth to block the drain. These techniques are quick fixes and work well for short remodels or small projects. They do not create strong seals but reduce dust and odor escape.
Common temporary sealing options:
- Plastic wrap or bag: Cover the drain opening fully and tape the edges tightly.
- Duct tape: Use heavy-duty tape over a folded cloth or paper towel inside the drain.
- Foam plugs or pipe insulation: Stuff foam pieces into the drain then seal with tape.
Limitations: Not water-tight and not suitable for long periods or heavy debris.
Ensuring A Secure Seal
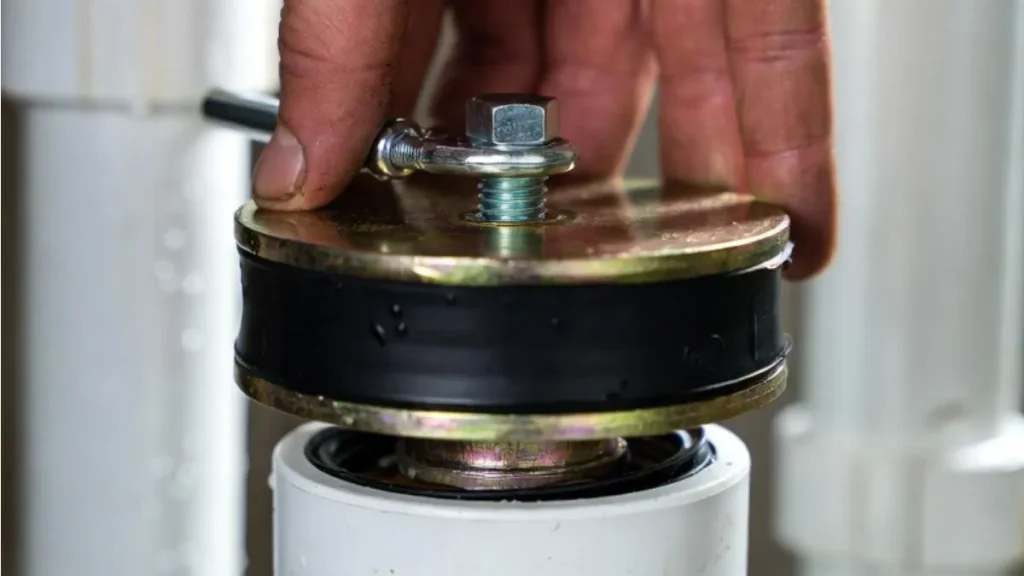
Ensuring a secure seal when plugging a toilet drain during a remodel is essential. A tight seal stops odors, debris, and water from escaping. It also protects your workspace from damage and keeps the area clean. Without a proper seal, leaks can cause stains, bad smells, and expensive repairs. Taking time to secure the plug correctly saves problems later.
Testing For Leaks
Testing for leaks is the first step to confirm the plug fits well. After placing the plug, check for any gaps or water escaping. A simple test helps find weak spots early. Follow these steps:
- Pour a small amount of water around the plug.
- Watch carefully for drips or moisture.
- Look under the toilet drain if possible.
- Use a flashlight to see hidden leaks.
If water does not leak, the seal is good. If you see drops or wet areas, the seal needs fixing. Another way to test is by feeling for air leaks. Hold a piece of tissue near the edges. If it moves, air passes through, meaning the seal is not tight.
| Test Method | What to Look For | Result |
| Water Pour Test | Drips or wet spots around plug | Leak present if water escapes |
| Air Movement Test | Tissue moves near plug edge | Seal is not airtight |
Testing early helps avoid bigger issues during the remodel. Fix leaks before continuing work.
Adjusting The Plug
Adjusting the plug ensures it fits perfectly and holds firm. Sometimes the plug may be too loose or too tight. Both cause problems. A loose plug lets water or air escape. A tight plug might damage the drain or be hard to remove later. Follow these tips for a good fit:
- Check the size of the plug against the drain opening.
- Use a rubber or foam plug that can compress easily.
- Insert the plug gently, twisting slightly to fit it firmly.
- Do not force the plug if it feels stuck.
- Remove and try a different size if the plug is too big or small.
Sometimes adding a washer or gasket can help fill small gaps. Adjust the plug height to sit flush with the drain surface. Make small movements and test the seal after each change.
| Adjustment Tip | Purpose |
| Choose correct plug size | Ensures snug fit without gaps |
| Use compressible material | Allows better sealing on uneven edges |
| Twist gently when inserting | Improves grip without damage |
| Add gasket or washer | Fills small spaces for tighter seal |
Adjusting takes patience. Test the seal after each try to get it just right.
Using Sealants Or Tape
Sealants and tape provide extra protection for the plug seal. They fill gaps and stop leaks from small cracks. Choose the right product for your drain type and plug material. Common options include silicone sealant, plumber’s putty, and waterproof tape.
Apply sealants carefully:
- Clean the drain surface and plug area well.
- Apply a thin, even layer of sealant around the plug edge.
- Press the plug in place and hold it firmly.
- Let the sealant cure as directed (usually a few hours).
For tape:
- Use waterproof plumber’s tape or duct tape.
- Wrap the tape tightly around the plug’s edge.
- Overlap layers for better coverage.
- Check the seal again after application.
Sealants last longer and create a stronger bond. Tape is quicker and easier but may need replacing sooner. Avoid using too much sealant as it can cause mess or block the drain.
| Sealant Type | Best Use | Pros | Cons |
| Silicone Sealant | Permanent, waterproof seal | Strong, flexible, long-lasting | Requires curing time, messy if overused |
| Plumber’s Putty | Sealing around fixtures | Easy to shape, good for small gaps | Not waterproof long-term |
| Waterproof Tape | Temporary or quick fixes | Fast, easy to apply | Less durable, may need frequent replacement |
Using sealants or tape improves your plug’s seal and keeps the remodel clean and safe.
Recommended: How To Fix A Slow Draining Toilet
Safety And Maintenance Tips
Plugging the toilet drain during a remodel helps keep your workspace clean and safe. It stops debris, dust, and water from entering the drainpipe. This step protects your plumbing and home from damage. Following safety and maintenance tips ensures the process goes smoothly.
Preventing Foul Odors
Foul odors come from sewer gases escaping the drain. A tight seal blocks these gases effectively. Use a good quality rubber or foam plug that fits snugly inside the drain opening.
- Clean the drain area before plugging. Remove dirt and debris to ensure a better seal.
- Use odor-blocking materials like plumber’s putty or silicone sealant around the plug edge.
- Check the plug daily. Any gaps can let smells escape.
- Ventilate the room to reduce any trapped odors during the remodel.
Avoiding Damage To Pipes
Protect pipes from damage by using the correct plug and following proper installation steps. Pipes can crack or break if you force the wrong plug. Avoid over-tightening expansion plugs as this can stress the pipe walls.
- Choose plugs made for toilet drains to fit the pipe diameter exactly.
- Do not use sharp tools near the drain opening; they can cause scratches or cracks.
- Inspect pipes before plugging for any existing damage or weak spots.
- Install the plug gently, twisting it slowly to avoid sudden pressure.
Removing The Plug After Remodel
Removing the plug carefully avoids damage and prepares the drain for normal use. Do not rush this step to prevent pipe or flange harm.
- Turn off water supply near the toilet to avoid leaks when removing the plug.
- Use gloves to protect your hands from dirt and residue.
- Loosen the plug gently, twisting it back slowly if it is an expansion type.
- Clean the drain opening after plug removal to remove buildup or sealant.
- Inspect the pipe and flange for damage before reinstalling the toilet.
Avoid using sharp tools or excessive force. If the plug is stuck, apply a little warm water or lubricant to ease removal.
Keep a record of the plug type and size for future use. This saves time if another remodel or repair happens.
Conclusion
Plugging a toilet drain during a remodel helps avoid water damage. Use the right tools to seal the drain tightly. Check the plug often to keep it secure. This simple step saves time and money later. Keep your workspace clean and dry for safety.
Properly blocking the drain protects your home from leaks. Take your time and follow the steps carefully. This small task makes your remodel easier and safer.