Are you ready to upgrade your kitchen without a full remodel? Modifying your wall oven cabinet can give your space a fresh, custom look that fits your needs perfectly.
Whether you want to install a new oven, improve storage, or simply refresh the style, this task is easier than you might think. In this guide, you’ll discover simple steps and expert tips to change your wall oven cabinet with confidence.
Keep reading to unlock the secrets to a smoother, smarter kitchen update that works for you.
Planning The Modification
Careful preparation prevents costly mistakes and saves time. It starts with understanding the current cabinet’s dimensions, selecting the right oven size, and gathering necessary materials and tools. Each of these steps helps create a clear plan before cutting or assembling anything. Proper planning also improves safety and ensures the new oven fits perfectly and looks good.
Measuring Existing Cabinet
Accurate measurements of the existing cabinet are essential. Start by removing any shelves or doors inside the cabinet. Use a tape measure to record the width, height, and depth of the cabinet opening. Take note of any uneven surfaces or obstructions like wiring or plumbing. Write down these numbers carefully to avoid errors later.
- Width: Measure the inside width at the top, middle, and bottom.
- Height: Measure from the bottom to the top inside the cabinet.
- Depth: Measure the distance from the front edge to the back wall.
Compare these three measurements from different points. If there are differences, use the smallest measurement for your planning. This prevents buying an oven that won’t fit.
| Measurement | Top (inches) | Middle (inches) | Bottom (inches) |
| Width | 24.0 | 23.8 | 23.7 |
| Height | 28.0 | 27.9 | 27.8 |
| Depth | 24.0 | 24.0 | 23.9 |
Double-check all measurements before moving on. Mistakes here lead to fitting problems and extra work.
Choosing The Right Oven Size
Selecting the correct oven size depends on the cabinet space and cooking needs. Wall ovens come in standard widths like 24, 27, and 30 inches. The oven depth usually ranges between 23 and 25 inches. Height varies by model but often matches cabinet space.
Use the smallest cabinet measurement to find an oven size that fits comfortably. Leave at least 1/4 inch space on each side for ventilation and ease of installation. Also, consider the oven’s height and depth to avoid sticking out or being too tight inside the cabinet.
- Measure cabinet opening: Use smallest width, height, and depth.
- Check oven dimensions: Width, height, and depth must fit with clearance.
- Account for ventilation: Leave space for air circulation around the oven.
Review your cooking habits before choosing size. Larger ovens suit big families or frequent cooking. Smaller ovens save space and energy for light use.
| Oven Width | Recommended Cabinet Width | Common Use |
| 24 inches | 24.5 – 25 inches | Small kitchens, light cooking |
| 27 inches | 27.5 – 28 inches | Medium families, regular cooking |
| 30 inches | 30.5 – 31 inches | Large families, heavy cooking |
Choosing the right size avoids costly cabinet modifications or oven returns.
Selecting Materials And Tools
Gathering the right materials and tools is vital for a safe and efficient modification. Use materials that match your kitchen’s style and durability needs. Common materials include plywood, MDF, and hardwood for cabinet repairs or changes.
Tools depend on the work needed. Basic tools include a tape measure, level, screwdriver, and drill. For cutting or reshaping the cabinet, use a circular saw or jigsaw. Sandpaper smooths rough edges after cutting.
- Materials: Plywood, MDF, hardwood, screws, wood glue.
- Tools: Tape measure, level, drill, screwdriver, saw, sandpaper.
- Safety gear: Gloves, goggles, dust mask.
Plan for electrical work if the oven requires new wiring. Hire a professional electrician for safety and code compliance.
Organize materials and tools before starting. This reduces delays and keeps the workspace safe and clean.
Preparing The Cabinet
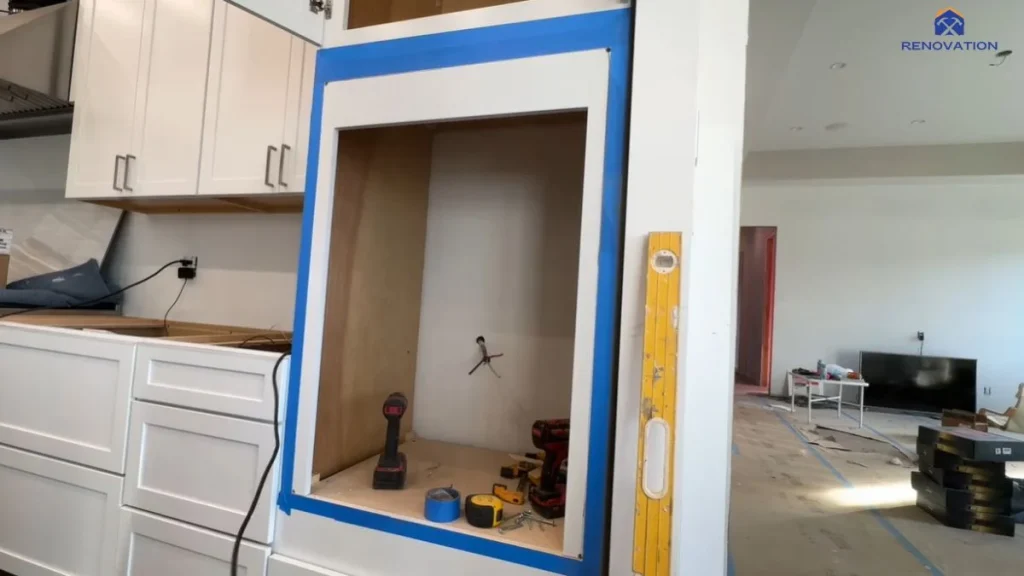
Modifying a wall oven cabinet requires careful preparation to ensure a smooth and safe project. The first step is preparing the cabinet, which involves clearing the space, removing any obstructive parts, and taking safety measures. Proper preparation saves time and prevents damage during the modification process.
Removing Doors And Shelves
Start by taking off the cabinet doors and shelves inside the oven space. This step creates room to work and prevents accidental damage. Follow these simple steps:
- Open the cabinet doors fully. Check the hinges for screws or clips holding the doors.
- Use a screwdriver to remove the hinge screws carefully.
- Lift the doors off once the screws are out. Place them on a soft surface to avoid scratches.
- Remove all shelves inside the cabinet. Shelves might slide out or require unscrewing.
Keep all screws and hardware in a labeled container. This organization helps when reinstalling parts later. Removing these elements also makes the cabinet lighter and easier to handle during modification.
Clearing The Workspace
Clearing the workspace around the cabinet is crucial for safety and efficiency. A clean area helps move tools and materials without obstacles. Follow these tips to prepare your work zone:
- Remove furniture or items near the cabinet. This creates space and reduces tripping hazards.
- Lay down protective coverings like drop cloths or cardboard on the floor to catch dust and debris.
- Organize tools and materials on a nearby table or bench. Keep frequently used items within reach.
- Ensure good lighting by adding portable lamps if needed. Clear visibility prevents mistakes.
Maintaining a tidy workspace reduces stress and helps keep the project on track. It also protects your home from accidental damage.
Ensuring Safety Precautions
Safety is a top priority when modifying a wall oven cabinet. Taking the right precautions protects you and your home. Consider these important safety measures:
- Turn off power supply to the oven at the circuit breaker to avoid electrical shocks.
- Wear protective gear such as gloves, safety glasses, and a dust mask.
- Use proper tools designed for cabinet work. Avoid makeshift tools that can slip or break.
- Keep children and pets away from the workspace during the project.
- Double-check measurements before cutting or drilling to prevent mistakes.
Review these safety tips regularly throughout the modification process. Staying cautious reduces accidents and ensures the job finishes well.
Cutting And Reshaping
Modifying a wall oven cabinet often requires precise cutting and reshaping of the existing structure. This step ensures the oven fits perfectly and functions safely. Careful planning and execution help avoid damage and maintain the cabinet’s strength. Cutting and reshaping involve marking exact lines, using the right tools, and finishing edges smoothly. Each task demands attention to detail to achieve a professional result.
Marking Cut Lines
Begin by measuring the wall oven and the cabinet space. Accurate measurements prevent mistakes and wasted materials. Use a pencil and a straightedge or ruler to draw clear, precise cut lines on the cabinet.
- Double-check measurements: Measure twice to avoid errors.
- Use a level: Ensure lines are straight and even.
- Mark all sides: Draw lines on the inside and outside for guidance.
Consider marking with painter’s tape to protect the cabinet surface. Tape also helps create a clean edge when cutting. Label each line with notes, such as “cut here” or “do not cut,” to stay organized.
Using Proper Cutting Tools
Choosing the correct tools is key for clean and safe cuts. Different materials need different blades or saws. For wood cabinets, a circular saw or jigsaw with a fine-tooth blade works well. For laminates, use a blade designed to reduce chipping.
- Circular saw: Best for straight, long cuts.
- Jigsaw: Ideal for curved or detailed cuts.
- Oscillating multi-tool: Useful for tight spots and precise trimming.
Always wear safety goggles and a dust mask. Secure the cabinet firmly before cutting to prevent slips. Cutting slowly and steadily improves accuracy and reduces splintering.
Smoothing Edges And Surfaces
After cutting, edges are rough and need smoothing. Smooth edges prevent splinters and improve the cabinet’s look. Use sandpaper or sanding blocks with medium grit (80-120) to start. Follow with finer grit (180-220) for a smooth finish.
- Sand all cut edges evenly.
- Remove dust with a damp cloth.
- Check for rough spots and sand again if needed.
For laminate surfaces, avoid sanding too hard to prevent peeling. Use a fine sanding sponge instead. Applying edge banding or trim covers exposed edges for a clean, finished look. Use strong adhesive and press firmly until dry.
Properly smoothed edges protect the cabinet and give a polished, professional appearance. This step enhances durability and safety around the oven area.
Reinforcing The Structure
Modifying a wall oven cabinet requires careful attention to the cabinet’s strength and durability. Reinforcing the structure ensures the cabinet can support the oven’s weight safely. This step prevents damage and keeps the oven secure during use. Strengthening the cabinet involves adding support brackets, securing panels firmly, and checking overall stability. Each action plays a key role in creating a safe and lasting installation.

Adding Support Brackets
Support brackets provide extra strength to the cabinet frame. They hold the oven securely and prevent sagging or shifting over time. Start by selecting brackets made of strong metal, such as steel or heavy-duty aluminum. These brackets should fit the cabinet size and match the oven’s weight requirements.
Install the brackets inside the cabinet at key points:
- Along the sides near the oven opening
- Underneath the base where the oven will sit
- At the back to prevent movement away from the wall
Use screws that are long enough to reach the cabinet’s studs or solid wood. Avoid using only particleboard or thin panels for anchoring. Tighten screws firmly but do not over-tighten to avoid splitting the wood.
| Bracket Type | Best Use | Material |
| L-Shaped | Corner support and side walls | Steel |
| Flat Strap | Base reinforcement | Aluminum |
| Angle Bracket | Back wall stabilization | Steel |
Placing brackets evenly ensures balanced support. This reduces stress on any single point. Check for level alignment before final tightening. A level base helps the oven fit perfectly and operate safely.
Securing Panels
Panels form the cabinet’s walls and base. They need to be tightly secured to avoid rattling and to support the oven’s weight. Replace any damaged or weak panels with thicker plywood or solid wood for better strength.
Use the following methods to secure panels:
- Apply wood glue along edges before screwing panels together.
- Use screws instead of nails to hold panels firmly in place.
- Add corner blocks inside the cabinet to connect panels securely.
Corner blocks are small wood pieces fixed inside each corner. They increase rigidity and prevent panels from bending or separating. Install them with wood glue and screws for a strong bond.
Checking Stability
After adding brackets and securing panels, testing the cabinet’s stability is vital. A stable cabinet will hold the oven safely without wobbling or shifting.
Follow these steps to check stability:
- Press gently on different cabinet areas to detect movement.
- Use a level tool to check that the base and walls are even.
- Shake the cabinet lightly to feel for loose parts.
- Look inside for gaps between panels or brackets.
If any part moves too much, tighten screws or add extra support brackets. Fix loose panels by adding more screws or glue. A cabinet that feels solid means the oven will stay secure during use.
Installing The Oven
Installing the oven is a crucial step in modifying a wall oven cabinet. Proper installation ensures safety, efficiency, and a clean look. This process involves careful positioning, making electrical and ventilation connections, and securing the oven firmly inside the cabinet. Each step needs attention to detail to avoid problems later. Follow clear guidelines to make the installation smooth and successful.
Positioning The Oven
Start by measuring the oven and cabinet opening. The oven should fit snugly but not be forced. Leave space for airflow and adjustments. Place the oven near the cabinet opening before final installation to check alignment and clearance.
- Measure twice: Confirm the oven dimensions match the cabinet space.
- Check ventilation gaps: Leave at least 1/4 inch on all sides.
- Align the front: The oven face should be flush with the cabinet front.
- Use a level: Ensure the oven is perfectly horizontal to avoid door issues.
Connecting Electrical And Ventilation
Electrical and ventilation connections must follow safety rules and manufacturer instructions. Turn off power at the breaker before starting any electrical work. Check that the oven’s voltage matches your home supply. Use a licensed electrician if unsure.
- Electrical connection: Connect wires to the oven’s junction box using wire nuts.
- Ground wire: Attach the ground wire to avoid electrical hazards.
- Ventilation: Connect the oven vent to the home’s exhaust system.
- Check airflow: Ensure vents are not blocked or kinked.
Securing Oven In Place
After positioning and connecting, fix the oven firmly inside the cabinet. Use screws supplied by the oven manufacturer. Secure the oven through mounting holes on the sides or bottom.
- Open the oven door fully to access mounting points.
- Use a drill and screws sized as per instructions.
- Check that the oven does not move or shift after securing.
- Do not overtighten screws to avoid damaging the cabinet or oven frame.
Check alignment one last time. The oven door should open and close smoothly without rubbing the cabinet edges.
Some ovens include brackets or rails. Attach these before sliding the oven into place. This adds extra stability and prevents vibrations during use.
Finishing Touches
After modifying your wall oven cabinet, the finishing touches bring the entire project together. These final steps ensure your work looks clean, professional, and lasts longer. Paying attention to details like sealing, painting, and adding trim enhances both appearance and function. The right finish protects your cabinet and makes the oven fit seamlessly into your kitchen design.
Sealing Gaps
Sealing gaps around the wall oven cabinet is crucial. Open spaces can collect dust, grease, and moisture, causing damage over time. Sealing also improves the cabinet’s insulation and keeps the oven stable. Use a high-quality caulk or foam sealant made for kitchen use. Focus on areas where the oven meets the cabinet frame and any cutouts made during installation.
Steps to seal gaps effectively:
- Clean the edges and surfaces around the gaps to remove dust and grease.
- Apply painter’s tape along both sides of the gap for a clean line.
- Use a caulking gun to apply the sealant smoothly into the gap.
- Smooth the sealant with a damp finger or a caulk finishing tool.
- Remove the painter’s tape before the sealant dries.
- Allow the sealant to cure fully, usually 24 hours, before using the oven.
Painting Or Staining
Painting or staining the cabinet after modifications protects the wood and enhances its look. Both options create a smooth, finished surface that matches your kitchen style. Choose paint or stain based on the existing cabinet finish and your personal taste.
Follow these tips for the best results:
- Sand the cabinet surface to remove rough edges and old finish.
- Clean dust and debris with a damp cloth before painting or staining.
- Use a primer if painting, especially on bare wood.
- Apply thin, even coats with a brush or roller to avoid drips.
- Allow each coat to dry fully before applying the next.
- Use a clear sealer or varnish to protect stained wood.
Painting vs. Staining Comparison:
| Aspect | Painting | Staining |
| Appearance | Opaque, solid color | Transparent, shows wood grain |
| Durability | High with sealer | Good with varnish |
| Maintenance | Easy to clean | May need reapplication |
| Application | Requires primer | Direct on wood |
Installing Trim And Hardware
Adding trim and hardware finishes the look and improves the cabinet’s function. Trim hides rough edges and gaps, making the oven fit look custom and neat. Hardware like handles or knobs can complement your kitchen décor.
Here’s how to install trim and hardware:
- Measure and cut trim pieces to fit around the oven opening.
- Use wood glue and finishing nails to secure trim firmly.
- Fill nail holes and any gaps with wood filler for a smooth finish.
- Sand and paint or stain the trim to match the cabinet.
- Attach hardware with screws, ensuring they are level and secure.
Types of Trim Commonly Used:
- Cove Molding: Rounded edges soften corners.
- Quarter Round: Covers small gaps between cabinet and wall.
- Flat Stock: Simple, modern look for clean lines.
Proper installation of trim and hardware adds value and style to your kitchen. It also protects cabinet edges from damage and wear.
Read Also: Cabinet Face Frame Overhang
Conclusion
Modifying a wall oven cabinet can improve your kitchen’s look and function. Plan carefully and measure twice before cutting. Use the right tools to keep work safe and neat. Take your time and follow each step clearly. This way, you avoid costly mistakes and stress.
Small changes can make a big difference in your space. Enjoy cooking in a kitchen that fits your needs better. Keep learning and trying new ideas for your home projects.