Have you ever looked at your hardwood floors and felt disappointed with how they turned out after refinishing? Maybe the finish is uneven, the color looks off, or the surface feels rough instead of smooth.
Bad hardwood floor refinishing can turn what should be a beautiful upgrade into a frustrating headache. If you want to avoid costly mistakes and protect the value of your home, it’s important to understand what causes these problems and how to fix them.
Keep reading to discover the common signs of poor refinishing and what you can do to bring your floors back to life.
Signs Of Bad Refinishing
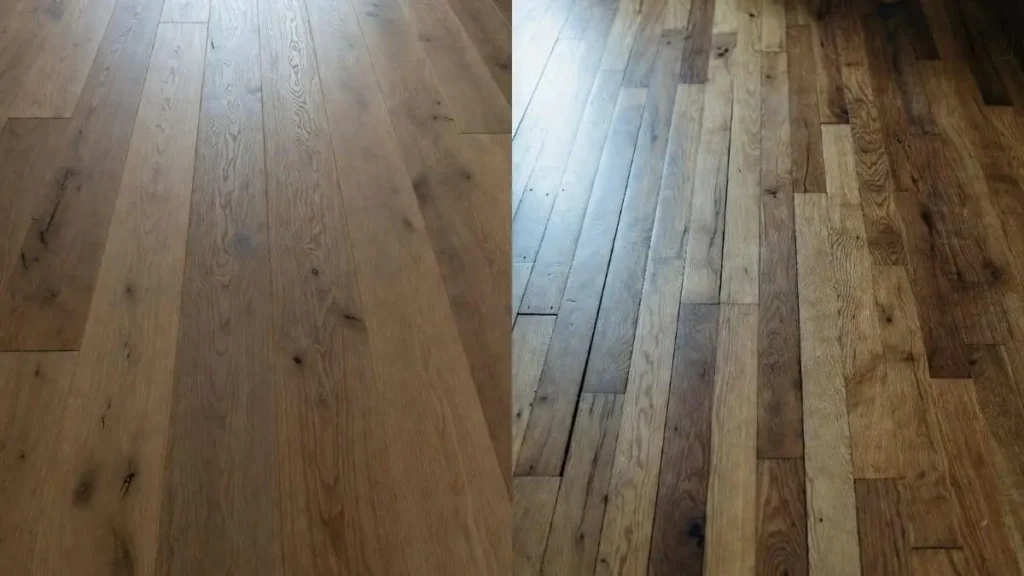
Bad hardwood floor refinishing can ruin the beauty and value of your floors. Recognizing the signs of bad refinishing early helps you avoid costly repairs later. Poor workmanship often shows through visible flaws that affect both appearance and durability.
Uneven Stains And Discoloration
Uneven stains and discoloration are common signs of poor refinishing. The wood may have blotchy areas where the stain absorbed differently. This can happen if the floor was not sanded evenly or cleaned properly before staining. Stains should look smooth and consistent across the whole floor.
Common causes of uneven stains include:
- Improper sanding leading to rough spots
- Uneven application of stain or too much stain in some areas
- Failure to use a pre-stain wood conditioner
- Old finish or dirt left on the surface
Here is a simple table showing the difference between good and bad stain application:
| Aspect | Good Stain | Bad Stain |
| Color Uniformity | Consistent across all boards | Patchy with dark and light spots |
| Surface Smoothness | Even and smooth | Rough or blotchy areas |
| Preparation | Properly sanded and cleaned | Insufficient sanding or dirty surface |
Uneven stains distract the eye and reduce floor beauty. Fixing this often requires sanding and refinishing again, costing extra time and money.
Visible Scratches And Gouges
Scratches and gouges that remain after refinishing show poor prep work. The sanding process should remove surface damage before applying any finish. If scratches stay visible, the floor looks worn and unprofessional.
Causes of visible scratches include:
- Using coarse sandpaper instead of fine grit for final sanding
- Failing to sand deep enough to remove old damage
- Not cleaning dust between sanding steps
- Applying finish over dirty or damaged wood
Visible scratches can also worsen over time because the finish does not protect damaged areas well. A floor with gouges looks neglected and lowers home value.
Peeling Or Bubbling Finish
Peeling or bubbling finish signals a bad application or poor surface preparation. The finish should bond tightly with the wood, creating a smooth, hard layer. Peeling shows it did not stick properly.
Common reasons for peeling or bubbling include:
- Applying finish over damp or oily wood
- Not allowing enough drying time between coats
- Using incompatible products or mixing brands
- Poor ventilation during drying
Bubbles often form when dust or air is trapped under the finish. Peeling usually appears at edges or high-traffic spots, making floors look old quickly.
Dust And Debris Trapped In Finish
Dust and debris trapped in the finish ruin a floor’s smooth look. A clean environment and proper cleaning before finishing are essential. Trapped particles create bumps and rough spots.
Reasons for dust in finish:
- Not vacuuming and wiping floor before applying finish
- Refinishing in a dusty room or windy area
- Failing to use tack cloths to catch fine dust
- Applying finish too quickly or carelessly
Effects of dust in the finish:
- Uneven surface texture
- Dull or cloudy appearance
- Reduced durability as finish layers do not bond well
Causes Behind Refinishing Failures
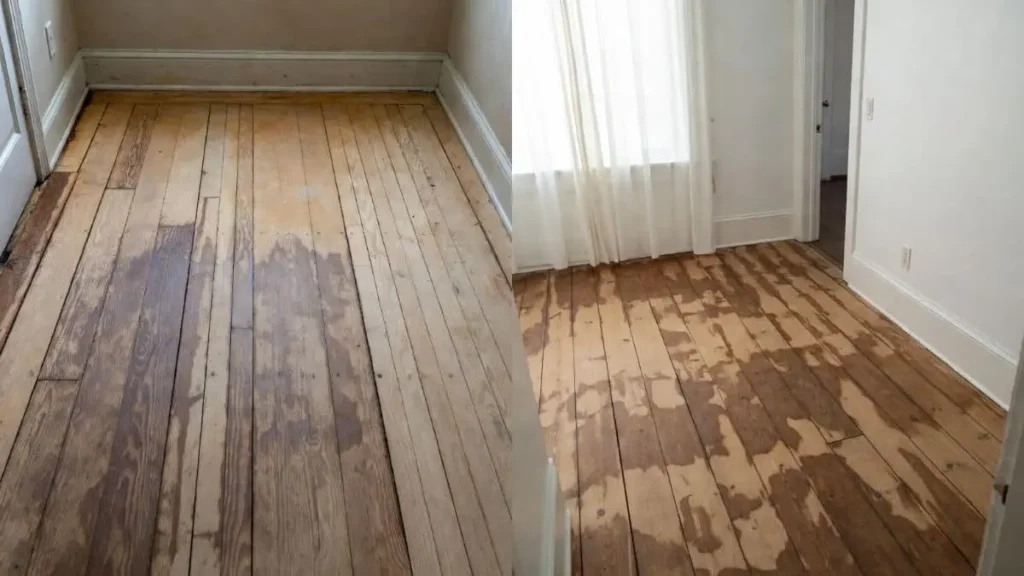
Refinishing hardwood floors can restore their beauty and increase home value. Yet, many attempts end in disappointment. Bad hardwood floor refinishing often results from common mistakes. These errors cause visible damage, uneven finishes, or premature wear.
Lack Of Experience
One main cause of refinishing failures is lack of experience. Hardwood floor refinishing requires skill and knowledge about wood types, sanding techniques, and finishing products. Novices often make critical errors that damage floors.
- Improper sanding: Using the wrong grit or sanding unevenly creates scratches and uneven surfaces.
- Poor dust control: Dust left on floors can mix with stains or finishes, causing blotchy results.
- Wrong product use: Applying incompatible stains or finishes leads to peeling or discoloration.
Inadequate Equipment
Using inadequate equipment causes many refinishing failures. Quality hardwood floor refinishing requires specific tools for sanding, cleaning, and finishing. Poor tools produce uneven sanding, visible marks, or rough surfaces.
| Equipment | Common Issues with Poor Tools | Effect on Floor Refinishing |
| Drum Sander | Worn or unbalanced drums | Gouges and uneven sanding |
| Orbital Sander | Wrong grit sandpaper | Scratches and swirl marks |
| Vacuum System | Poor suction or filters | Dust residue causing blotchy finish |
| Buffers & Polishers | Incorrect pads or speed | Uneven sheen or damage |
Proper maintenance and selection of equipment ensures smooth sanding and clean surfaces. Renting or buying subpar machines saves money upfront but risks costly refinishing errors. Quality tools help achieve a flawless finish.
Ignoring Manufacturer Guidelines
Many refinishing failures occur by ignoring manufacturer guidelines for stains, finishes, and products. Each product has specific application instructions and drying times. Skipping these rules leads to poor adhesion, bubbling, or discoloration.
- Wrong drying times: Applying a second coat too soon traps solvents and causes peeling.
- Incorrect mixing: Failing to stir or mix products properly changes their effectiveness.
- Temperature and humidity: Ignoring environment conditions affects curing and finish quality.
Rushing The Process
Rushing is a major reason refinishing fails. Hardwood floor refinishing takes time and patience. Skipping steps or hurrying causes visible damage and weak finishes.
Common issues from rushing:
- Insufficient sanding leads to uneven surfaces.
- Incomplete dust removal causes bumps and spots.
- Applying coats too fast traps moisture, causing bubbles.
- Failing to allow full curing reduces durability.
Fixing A Poor Refinishing Job

Refinishing hardwood floors can breathe new life into a room. Yet, a poor refinishing job can spoil the look and feel of your space. Fixing a poor refinishing job requires patience and the right steps. Mistakes like uneven sanding, blotchy stains, or peeling finishes need careful correction.
Sanding Down The Floor Again
Sanding is the foundation of hardwood floor refinishing. A bad job often starts with uneven or incomplete sanding. Fixing this means sanding the floor down again to remove old finish and smooth the surface.
Steps for sanding down the floor again:
- Clear the room: Remove all furniture and clean the floor well.
- Choose the right grit: Start with coarse grit (36-40) to remove the old finish.
- Use a drum or orbital sander: Move in the direction of the wood grain for even sanding.
- Follow with finer grits: Use 60-80 grit next, then finish with 100-120 grit for smoothness.
- Vacuum thoroughly: Remove all dust before applying any stain or finish.
Recommended: How To Clean Prefinished Hardwood Floors
Spot Repair Techniques
Spot repairs fix small areas where the finish or wood is damaged. This method saves time and money compared to refinishing the entire floor.
Common issues fixed by spot repair:
- Scratches or dents
- Stain blotches
- Peeling or bubbling finish
Steps for effective spot repair:
- Identify the damaged area: Mark the spots clearly.
- Clean the spot: Use a damp cloth and mild cleaner.
- Lightly sand the area: Use fine sandpaper (220 grit) to smooth edges.
- Apply wood filler: Match the color if needed, and let it dry.
- Sand the filler smooth: Blend with surrounding floor.
- Re-stain or touch up: Use a small brush for precise application.
- Apply finish: Use a small applicator and feather edges.
Reapplying Finish Correctly
Applying finish properly protects the wood and enhances its look. Poor finish application causes peeling, cloudiness, or uneven shine.
Steps to reapply finish correctly:
- Choose the right finish: Oil-based or water-based depending on your floor.
- Prepare the floor: Sand lightly with 220 grit and clean dust.
- Apply thin coats: Use a brush or applicator pad to spread evenly.
- Work with the grain: Avoid streaks and bubbles.
- Allow drying time: Follow manufacturer’s instructions strictly.
- Sand between coats: Light sanding removes dust nibs and improves adhesion.
- Apply 2-3 coats: More coats mean better protection and shine.
Also Read: Hardwood Floor Transition from Room to Hallway
Conclusion
Bad hardwood floor refinishing can cause lasting damage and cost more money. Choose skilled professionals to protect your floors and home value. Pay attention to signs of poor work like uneven surfaces or rough textures. Fix problems quickly to avoid bigger repairs later.
Keep floors clean and dry to help them last longer. Good care means your hardwood floors stay beautiful for years. Don’t rush the job; quality matters most for lasting results.