


You finally got new floors installed — and glue-down vinyl plank seemed like the perfect choice. Waterproof, durable, and great for high-traffic areas. But a few months later, edges start lifting, bubbles appear, or planks sound hollow underfoot.
Glue-down vinyl plank flooring is a great product — but only when installed correctly. When something goes wrong, whether it’s a poorly prepped subfloor, the wrong adhesive, or hidden moisture, problems show up weeks or months later when it’s already gotten worse.
The good news? Most of these problems are fixable — and many can be stopped before they turn into a costly full replacement.
What Is Glue-Down Vinyl Plank Flooring?
Glue-down vinyl plank flooring is bonded directly to the subfloor using a strong adhesive. Once set, the planks don’t shift or move — creating a firm, stable surface that works especially well in high-traffic and moisture-prone areas.
Unlike other vinyl options, there are no click-lock edges or floating layers. Every plank is permanently fixed in place, which makes it one of the most stable flooring choices available — but also one of the least forgiving if something goes wrong during installation.
How It Differs from Floating Vinyl Plank
Floating vinyl plank uses a click-lock system and simply rests on top of the subfloor — nothing is glued down. Glue-down vinyl is permanently bonded, which makes it more stable but harder to repair.
Key differences at a glance:
- Stability: Glue-down is more stable — no shifting or joint separation over time
- Repairability: Floating floors are much easier to repair or replace
- Sound: Glue-down feels and sounds more solid underfoot
- Installation: Floating is more DIY-friendly; glue-down requires more precision
- Subfloor tolerance: Glue-down shows every subfloor imperfection — prep is critical
Where It’s Commonly Used
Glue-down vinyl plank works best in:
- High-traffic areas — hallways, kitchens, and open living spaces
- Basements — where moisture fluctuations make floating floors risky
- Commercial or rental spaces — where durability under heavy use matters
- Laundry rooms and kitchens — where heavy appliances sit for long periods
It’s not ideal for rooms with extreme temperature swings or where easy future removal is a priority.
The Most Common Problems with Glue-Down Vinyl Plank Flooring
Even a quality floor can run into serious issues when installation isn’t done right. Here are the 7 most common problems homeowners face — and what’s actually causing them.
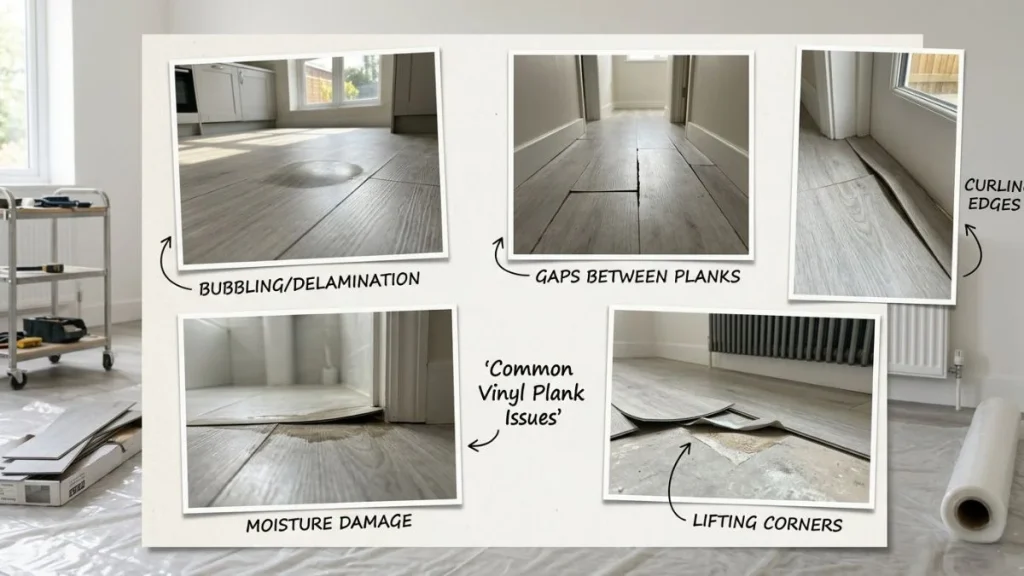
Planks Lifting or Peeling at the Edges
This is the #1 complaint with glue-down vinyl plank. It usually starts at doorways or room edges and spreads fast if ignored.
Main causes:
- Wrong or low-quality adhesive
- Moisture on the subfloor before installation
- Poor adhesive coverage near the edges
- Temperature changes weakening the bond
Bubbling and Bulging in the Middle of Planks
Bubbles form when the plank loses contact with the subfloor beneath it. It’s a sign the adhesive failed — or was never properly applied in that spot.
Main causes:
- Trapped moisture under the plank
- Uneven adhesive spread
- Debris or dust left on the subfloor
Adhesive Failure and Bond Breakdown
Over time, the adhesive bond can weaken — especially in rooms with heavy moisture or harsh cleaning products.
Main causes:
- Using the wrong adhesive type
- Chemical floor cleaners breaking down the bond
- Insufficient cure time after installation
Buckling and Warping
Buckling happens when planks have nowhere to expand and start pushing against each other. Left untreated, it gets worse every season.
Main causes:
- No expansion gaps left at walls
- High indoor humidity
- Direct sunlight and heat exposure
Subfloor Problems Showing Through
Glue-down floors have zero tolerance for subfloor imperfections. Every dip, bump, or crack beneath the plank will eventually show on the surface.
Main causes:
- Skipping subfloor leveling before installation
- Old adhesive residue left on the subfloor
- Soft spots or cracks in the existing subfloor
Gapping Between Planks
When planks start separating at the seams, it’s usually a sign the adhesive didn’t hold — or the floor wasn’t given time to acclimate before installation.
Main causes:
- Seasonal humidity and temperature changes
- Inadequate adhesive coverage between planks
Adhesive Bleed-Through and Discoloration
Excess adhesive can seep up through the seams and leave sticky, discolored lines on the surface. It’s one of the harder cosmetic problems to fix after the fact.
Main causes:
- Too much adhesive applied during installation
- Wrong adhesive type for the plank thickness
- Pressing planks down too hard before adhesive sets
Why These Problems Happen — Root Causes Explained
Most glue-down vinyl plank flooring problems don’t happen by accident. They trace back to a few key mistakes made before or during installation. Understanding the root causes helps you fix current issues — and avoid repeating them.
Installation Errors That Lead to Long-Term Damage
Bad installation is behind the majority of glue-down flooring failures. The most common mistakes include:
- Skipping manufacturer installation guidelines
- Not allowing the adhesive to reach the right tack level before laying planks
- Rushing through the process without proper drying time between steps
- Failing to roll the floor with a weighted roller after installation
These errors might not show up immediately — but they almost always surface within the first 6 to 12 months.
The Role of Moisture in Almost Every Problem
Moisture is the single biggest enemy of glue-down vinyl plank flooring. It weakens adhesive bonds, causes planks to swell, and creates the perfect conditions for bubbling, lifting, and warping.
The problem is that moisture issues are often invisible at installation time. A subfloor that looks dry can still have high moisture content beneath the surface. That’s why testing subfloor moisture levels before installation is non-negotiable — not optional.
A simple moisture meter test before laying a single plank can prevent thousands of dollars in repairs later.
Choosing the Wrong Adhesive
Not all adhesives are created equal — and using the wrong one is a fast track to flooring failure. There are two main types:
- Pressure-sensitive adhesive — allows slight repositioning and remains slightly flexible after curing. Best for most residential glue-down vinyl plank installations.
- Hard-set adhesive — creates a permanent, rigid bond. Better suited for commercial spaces with heavy rolling loads.
Using a hard-set adhesive where a pressure-sensitive one is recommended — or vice versa — can cause the bond to fail prematurely. Always follow the flooring manufacturer’s adhesive recommendations. Switching products to save a few dollars is one of the most expensive mistakes you can make.
How to Fix Glue-Down Vinyl Plank Flooring Problems
The good news is that not every problem requires a full floor replacement. Many common glue-down vinyl plank issues can be fixed with the right approach and a little patience. Here’s how to tackle each one.
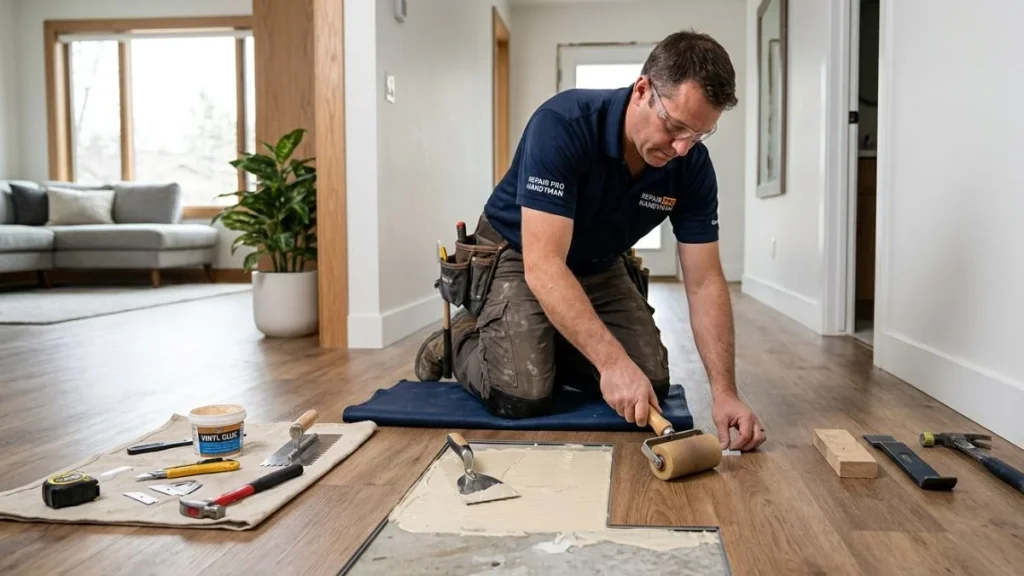
Fixing Lifting and Peeling Edges
This is one of the more straightforward fixes — if you catch it early.
Steps:
- Gently lift the peeling edge without forcing it further
- Clean any old adhesive residue from both the plank and subfloor
- Apply fresh pressure-sensitive adhesive to the subfloor
- Press the plank firmly back into place
- Use a roller or heavy books to hold it down for 24 hours
If the plank has cracked or warped during the lifting process, replacement is the better option.
Fixing Bubbles and Bulges
Small bubbles can often be fixed without removing the plank entirely.
Steps:
- Use a syringe-style adhesive injector to push fresh adhesive under the bubble
- Press the plank flat and wipe away any excess adhesive immediately
- Place a weighted object over the area for at least 24 hours
For larger bubbles where the plank has visibly warped, full plank removal and re-gluing is the only reliable fix.
Addressing Buckling and Warping
Before attempting any physical repair, address the root cause first — usually excess humidity.
Steps:
- Reduce indoor humidity using a dehumidifier
- Allow the floor to stabilize for several days
- If planks have returned to a flatter position, re-glue any lifted edges
- If warping is severe and permanent, affected planks need to be replaced
Trying to force buckled planks flat without fixing the humidity issue will only lead to the same problem again.
Fixing Subfloor Issues After Installation
This is the trickiest fix because the floor is already down. Options are limited but not zero.
- For minor dips or soft spots, self-leveling compound can sometimes be injected or worked in at the edges
- For widespread subfloor problems, full plank removal, subfloor repair, and reinstallation is often the only real solution
- Managing expectations here is important — post-installation subfloor fixes are rarely perfect
Removing Old Adhesive and Starting Fresh
Sometimes the best fix is a clean start. Removing old adhesive properly is critical before re-installation.
What you’ll need:
- Floor scraper
- Heat gun to soften stubborn adhesive
- Manufacturer-approved adhesive remover
Work in small sections, keep the area ventilated, and never rush this step. A poorly cleaned subfloor will cause the same problems all over again on the new installation.
How to Prevent These Problems from Happening
Most glue-down vinyl plank flooring problems are completely avoidable. The fixes covered earlier are useful — but prevention is always cheaper and less stressful than repair. Here’s what to get right from the start.
Proper Subfloor Preparation
This is the most important step in the entire installation process. A clean, flat, and dry subfloor is the foundation everything else depends on.
Before laying a single plank:
- Fill any cracks, dips, or soft spots with a suitable floor patching compound
- Sand down any high spots
- Clean the surface thoroughly — no dust, grease, or old adhesive residue
- Test moisture levels with a moisture meter and confirm they’re within the flooring manufacturer’s acceptable range
The industry standard for subfloor flatness is 3/16 of an inch per 10-foot radius. Anything beyond that needs to be corrected before installation begins.
Acclimating the Flooring Before Installation
Vinyl plank flooring needs time to adjust to the temperature and humidity of the room it’s going into. Skipping this step causes planks to expand or contract after installation — leading to gapping or buckling.
As a general rule, allow the flooring to acclimate in the installation room for at least 48 hours before laying it down. Keep the room at its normal living temperature and humidity during this period.
Choosing the Right Adhesive
Always follow the flooring manufacturer’s adhesive recommendations — no exceptions. The right adhesive for one product may cause bond failure on another.
- Never substitute adhesive types to cut costs
- Check that the adhesive is compatible with your specific subfloor material
- Apply it evenly using the correct trowel size as specified by the manufacturer
Hiring a Qualified Installer
If you’re not confident in a full DIY installation, hiring the right professional makes all the difference. Before hiring, ask:
- Do they have experience specifically with glue-down vinyl plank?
- Will the installation be done in compliance with the manufacturer’s warranty requirements?
- Do they test subfloor moisture levels before starting?
A good installer won’t skip subfloor prep or rush the adhesive cure time to finish faster. If a quote seems unusually low, that’s often the first sign that corners will be cut.
Glue-Down vs. Floating Vinyl Plank — Which Has Fewer Problems?
This is one of the most common questions homeowners ask before choosing a vinyl plank installation method. The honest answer is — it depends on the situation. Both methods have their strengths and weaknesses.
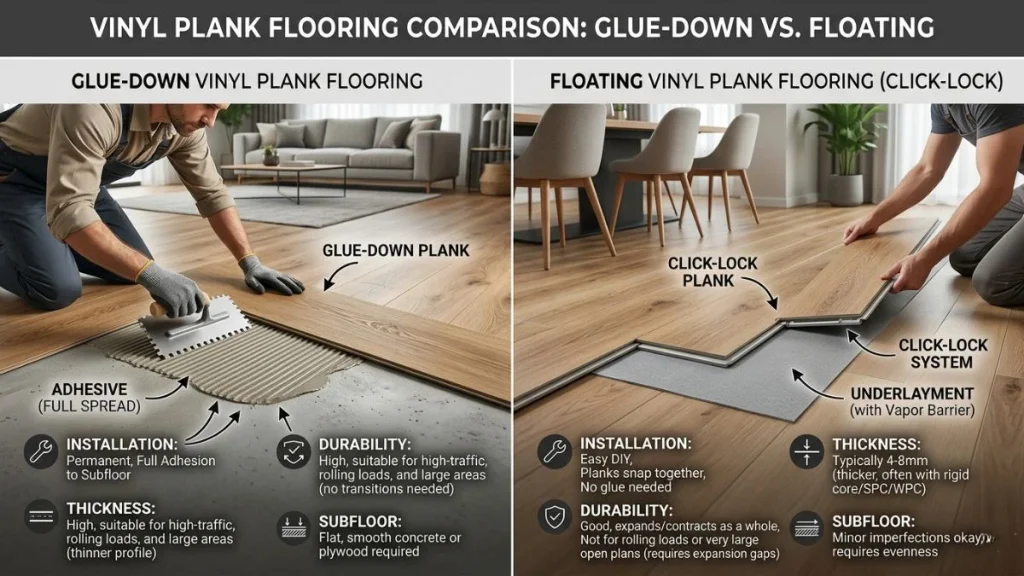
Here’s a straightforward comparison:
| Factor | Glue-Down | Floating |
| Stability | Excellent | Good |
| Repairability | Difficult | Easy |
| DIY Friendly | No | Yes |
| Subfloor Tolerance | Low | Moderate |
| Sound Underfoot | Solid | Slightly hollow |
| Moisture Resistance | High (when done right) | Moderate |
| Removal | Labor-intensive | Quick and easy |
| Cost of Installation | Higher | Lower |
When Glue-Down Is the Better Choice
Glue-down makes more sense when long-term stability is the priority. It’s the stronger option for:
- Basements and below-grade rooms with moisture concerns
- High-traffic commercial or rental spaces
- Rooms with heavy fixed appliances
- Large open areas where floating floors tend to shift over time
When Floating Is the Better Choice
Floating vinyl plank is the smarter pick when ease of installation and future flexibility matter more. It works better for:
- DIY installations where precision gluing isn’t realistic
- Rooms where future renovation or floor replacement is likely
- Spaces with minor subfloor imperfections that aren’t worth fully correcting
- Homeowners who want a simpler, lower-cost installation
Which One Has Fewer Problems Overall?
Floating vinyl plank tends to have fewer installation-related problems simply because it’s more forgiving. There’s no adhesive to fail, no moisture trapped under a glued surface, and damaged planks can be swapped out without a full repair job.
Glue-down, however, outperforms floating in stability and longevity — when installed correctly. The problems with glue-down don’t come from the product itself. They almost always come from shortcuts taken during installation.
If you’re willing to do the prep work properly, glue-down is a superior long-term floor. If you want a simpler, more flexible option — floating is the safer everyday choice.
When to Replace Instead of Repair
Not every damaged glue-down vinyl plank floor is worth fixing. Sometimes repair is just delaying the inevitable — and knowing when to walk away from a repair job can save you both time and money.
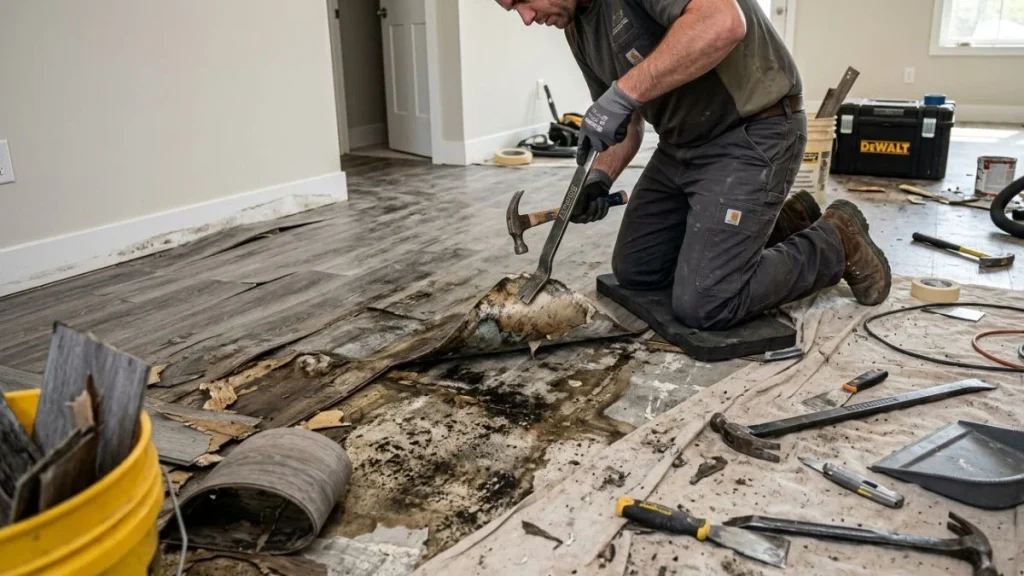
Signs the Damage Is Beyond Repair
Some problems go too deep for a surface-level fix. Consider full replacement when:
- Multiple planks across different areas are lifting, bubbling, or warping at the same time
- The subfloor beneath is water-damaged, soft, or structurally compromised
- Mold or mildew is present under the planks
- The adhesive has failed across a large portion of the floor
- Buckling or warping has permanently deformed the planks and they won’t lie flat
If the damage is isolated to one or two planks, repair is usually the right call. When it’s spread across the floor — replacement makes more sense.
Repair vs. Full Replacement — Cost Comparison
| Repair | Full Replacement | |
| Best for | Isolated damage | Widespread failure |
| Average cost | $100 – $400 | $3 – $7 per sq ft |
| DIY possible | Sometimes | Rarely |
| Long-term value | Moderate | High |
Repairs are cost-effective for small areas. But if repair costs are climbing toward 50% of what a full replacement would cost — replacement is the smarter investment.
Choosing a Better Product for the Re-Install
If you’re replacing the floor, take the opportunity to avoid repeating the same mistakes. Before re-installing:
- Choose a product with a thicker wear layer (12 mil or above for high-traffic areas)
- Confirm the product is rated for the room’s moisture level
- Stick with a reputable brand that offers a solid manufacturer warranty
- Decide whether glue-down is still the right method — or whether floating makes more sense for your situation
Questions to Ask Your Flooring Contractor
Before signing off on a replacement job, ask:
- What caused the original failure and how will it be prevented this time?
- Will the subfloor be fully inspected, repaired, and moisture-tested before installation?
- What adhesive will be used and is it manufacturer-approved?
- Does the installation come with a workmanship warranty?
A contractor who can answer these questions confidently is one worth hiring.
You May Like Also: How to Fix Hollow Spots under Vinyl Plank Flooring
Conclusion
Glue-down vinyl plank flooring is a solid, long-lasting choice — but only when it’s installed the right way. Most of the problems covered in this article don’t come from the flooring itself. They come from rushed installations, skipped subfloor prep, wrong adhesive choices, and ignored moisture issues.
The moment you notice something off — an edge lifting, a bubble forming, a plank that sounds hollow — don’t wait. Small problems with glue-down floors have a way of turning into expensive ones fast.
Fix what you can early. Know when to call a pro. And if a full replacement is on the table, use it as a chance to do things right from the ground up.


