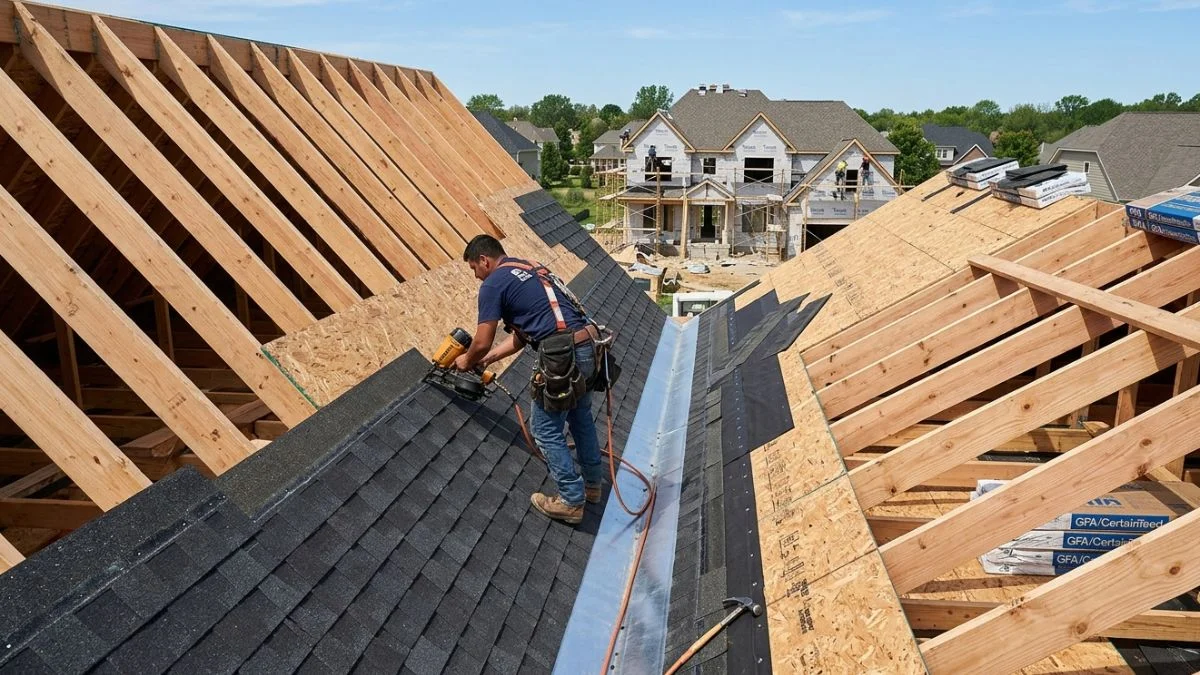
When two roofs with different pitches meet, the valley where they join becomes a critical spot for your home’s protection. If this area isn’t built right, you could face leaks, water damage, and costly repairs.
Understanding how to properly join roofs with different slopes can save you time, money, and stress. You’ll discover simple, effective ways to handle valley joining that keep your roof strong and your home safe. Keep reading to learn the key tips that every homeowner needs to know.
Valley Roof Basics
The valley is a crucial part where two roof sections meet, creating an inside angle. This area collects rainwater and snow, directing it to gutters. Understanding valley roof basics helps ensure strong, leak-free roof joints, especially when the two roofs have different slopes or pitches. Proper design and installation keep your home dry and safe.
What Is A Valley Roof?
A valley roof forms where two roof surfaces join at an angle. This angle creates a channel that directs water downwards. Valleys can be inside corners or outside edges, but inside valleys are the most common. They are important for roof drainage and structural integrity.
Types Of Roof Valleys
- Open Valley: Exposes metal flashing between shingles or tiles.
- Closed Valley: Shingles or tiles cover the valley, hiding the flashing.
- Woven Valley: Shingles from both sides weave together over the valley.
Challenges Of Joining Roofs With Different Pitches
Different roof pitches create complex valley angles. This makes water flow unpredictable and increases leak risks. Roofers must carefully calculate angles and choose proper materials. Strong flashing and precise cutting prevent gaps and water damage.
Materials Used For Valley Flashing
| Material | Advantages | Disadvantages |
| Aluminum | Lightweight, rust-resistant, easy to shape | Can dent easily, less durable in harsh weather |
| Galvanized Steel | Strong, durable, cost-effective | Can rust if coating fails |
| Copper | Long-lasting, attractive, corrosion-resistant | Expensive, requires skilled installation |
Steps To Install A Valley On Roofs With Different Pitches
- Measure the valley angle accurately.
- Cut flashing material to fit the valley shape.
- Install underlayment to protect against leaks.
- Secure flashing with nails or screws.
- Lay shingles or tiles carefully over the flashing.
- Seal edges with roofing cement or sealant.
Roof Pitch Differences
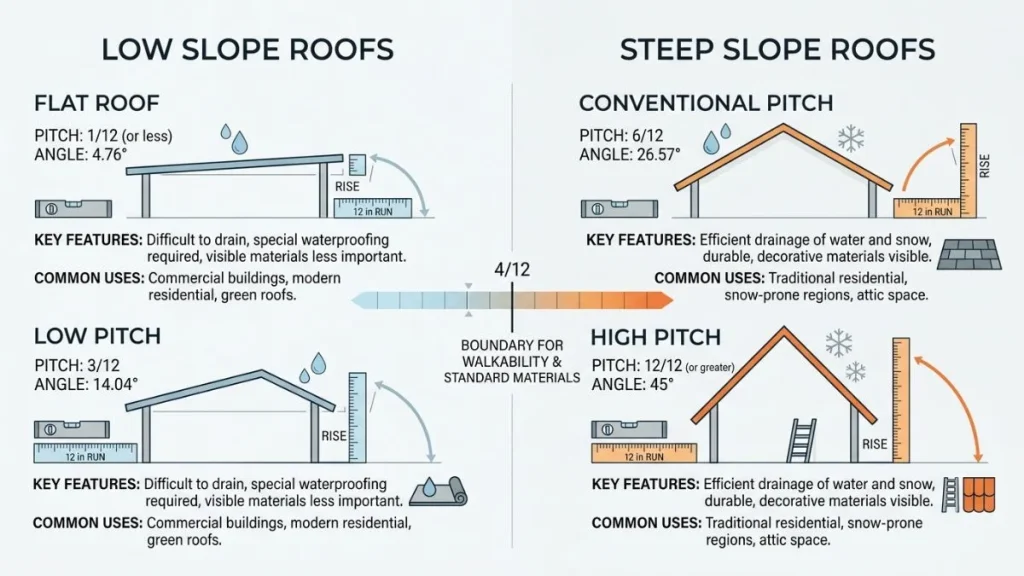
Valleys form where two roofs meet, creating a channel that guides water away. When these roofs have different pitches, the valley design must adjust. Roof pitch differences affect how the valley is built, its strength, and water flow.
Measuring Roof Pitch
Roof pitch shows how steep a roof is. It is measured by the rise (vertical height) over the run (horizontal length). The pitch is usually written as a ratio, like 4:12. This means the roof rises 4 inches for every 12 inches of run.
Steps to measure roof pitch:
- Find a spot on the roof that is flat and easy to access.
- Use a level to measure the horizontal run of 12 inches.
- Measure the vertical rise from the end of the level to the roof surface.
- Write the pitch as rise over run (e.g., 6:12).
Common roof pitches:
| Pitch (Rise:Run) | Degree Angle | Description |
| 2:12 | 9.5° | Low slope, often used for sheds |
| 4:12 | 18.4° | Moderate slope, common for homes |
| 8:12 | 33.7° | Steep slope, good for snow areas |
Knowing the exact pitch helps in planning the valley. It ensures the roof parts join properly. Different pitches need different angles and flashing details. This prevents water backup and damage.
Impact On Roof Design
Valleys joining roofs with different pitches need special care. The steeper roof will shed water faster than the lower slope. This difference affects the valley’s shape and materials.
Key impacts on design include:
- Valley angle: Must be adjusted to fit both pitches smoothly.
- Flashing size: Larger flashing may be needed to cover gaps.
- Water flow: Faster water from steep roofs requires better drainage.
- Material choice: Stronger materials help handle stress where pitches differ.
Valley design affects roof strength. A well-designed valley supports the roof’s structure. It also reduces leak risk. Builders may use custom cuts for shingles or metal to fit the valley.
Proper valley design handles these challenges. It keeps the roof safe and dry. Understanding pitch differences is the first step.
Valley Design Challenges
Valleys form where two roof sections meet, guiding rainwater and snow down to gutters. When these roofs have different pitches, designing the valley becomes tricky. The difference in angles creates unique challenges that affect water flow, material fitting, and structural integrity.
Understanding The Angle Differences
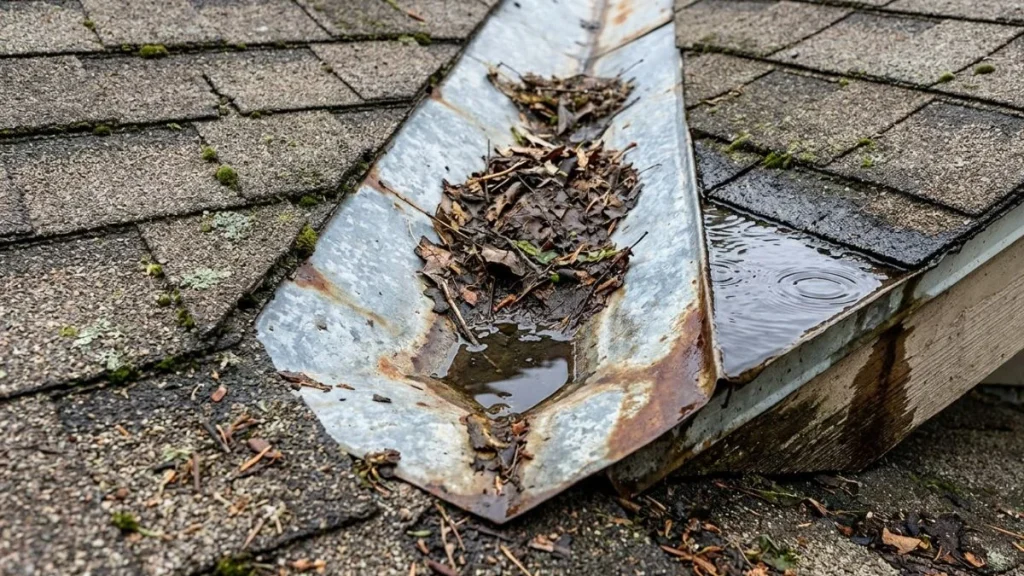
Each roof slope has its own pitch or steepness. When they join, the valley must connect these angles smoothly. A steep roof next to a low-pitched roof can create sharp valleys or gaps. This uneven meeting point can cause water to pool or leak.
Key points:
- Sharp angles increase water speed in the valley
- Water may splash or overflow from gutters
- Improper angle matching can damage roofing materials
Material Selection And Installation
Valleys need strong, flexible materials to handle different pitches. Metal flashing is common but must be cut and bent carefully. Poor installation leads to cracks or gaps over time.
| Material | Advantages | Challenges |
| Metal Flashing | Durable, water-resistant | Needs precise fitting, can crack if bent wrong |
| Valley Liners | Flexible, easy to install | Less durable, may wear faster |
| Roll Roofing | Cost-effective, good for low slopes | Prone to damage on steep pitches |
Water Drainage And Leak Prevention
Valleys must direct water efficiently to avoid leaks. Different pitches can cause water to back up or hit valley edges hard. This stress can wear down sealants and cause leaks.
Steps to improve drainage:
- Install continuous metal flashing along the valley
- Use waterproof membranes under shingles
- Ensure gutters are large enough for heavy water flow
- Inspect and maintain valleys regularly
Construction Techniques
Joining two roofs with different pitches requires careful construction techniques. The valley where the roofs meet must be strong and waterproof. Proper methods help prevent leaks and ensure long-lasting durability. These techniques also improve the roof’s look and function.
Understanding Roof Valley Basics
A valley is the internal angle formed where two roof slopes meet. It carries water away from the roof. When roofs have different pitches, the valley becomes more complex.
- Steeper pitch: Water flows faster.
- Lower pitch: Water flows slower, which can cause pooling.
- Matching valleys: Requires precise cutting and fitting of materials.
Flashing Installation Techniques
Flashing protects the valley from water damage. It directs water off the roof surface. Correct flashing is essential for different roof pitches.
- Use metal flashing with enough width to cover both roofs.
- Bend the flashing to fit the valley’s angle smoothly.
- Nail the flashing securely but avoid piercing the lowest side to prevent leaks.
- Seal edges with waterproof sealant to stop water entry.
Shingle Or Roofing Material Layout
Shingles must fit properly along the valley. The arrangement varies with roof pitch differences.
| Roof Pitch | Shingle Cutting Method | Installation Tip |
| Steep | Cut shingles diagonally along the valley line | Overlap shingles from the steeper roof over the lower pitch |
| Low | Use longer shingles or metal valley liners | Ensure water flows without obstruction |
Framing And Support Adjustments
The roof framing must adjust to join different pitches smoothly.
- Use valley rafters cut at precise angles.
- Install blocking between rafters for extra support.
- Check that all framing is level and strong before roofing.
Flashing And Waterproofing
Valleys where two roofs with different pitches meet require careful flashing and waterproofing. This area is prone to water runoff, which can cause leaks if not properly protected.
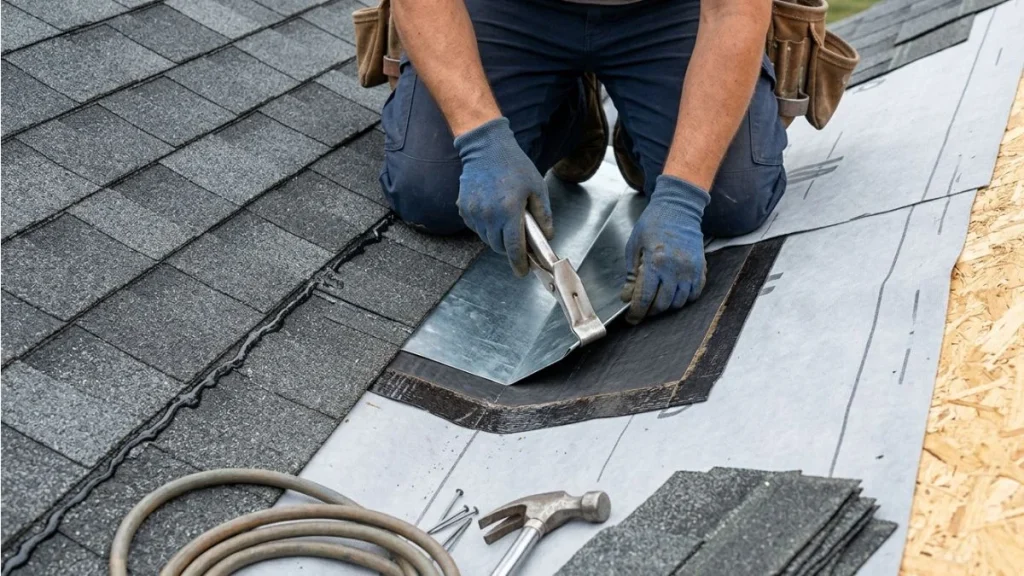
Flashing acts as a barrier, directing water away from the joint and into the gutters. Waterproofing ensures that water does not seep into the roofing structure, preventing damage to the interior of the building. Proper installation and maintenance of flashing and waterproofing materials are essential for a durable, leak-free roof valley.
Types Of Valley Flashing
Different types of valley flashing suit various roof styles and materials. Choosing the right flashing type helps protect the valley from water damage and extends the roof’s lifespan.
- Open Valley Flashing: The metal flashing is exposed and installed over the roof deck. It is visible from above and often used with metal or slate roofs.
- Closed Valley Flashing: The roofing material covers the metal flashing, hiding it from view. Common with asphalt shingles and provides a cleaner look.
- Woven Valley Flashing: Shingles are woven together over the metal flashing, creating a strong, water-resistant seal. It works well on steep pitches.
- California Valley Flashing: Shingles from both sides extend into the valley, overlapping the metal flashing. This method offers good water runoff protection.
Each flashing type fits different roof pitches and materials. Proper choice improves water flow and reduces leak risk.
Preventing Leaks
Leaks in roof valleys cause costly damage. Effective waterproofing and correct flashing installation stop water from entering the roof structure.
Steps to prevent leaks in valleys:
- Install a waterproof underlayment: Use self-adhesive or peel-and-stick membranes under the flashing. These create a watertight seal.
- Use quality flashing material: Aluminum or galvanized steel works well. These metals resist rust and last long.
- Ensure tight seams: Overlap flashing pieces by at least 4 inches. Seal joints with roofing cement or compatible sealant.
- Proper nail placement: Avoid nailing through flashing whenever possible. Nails can create leak paths.
- Regular inspection and maintenance: Check valleys after storms. Clear debris and repair damaged flashing immediately.
Common signs of leaks:
- Water stains on ceilings or walls
- Mold or mildew near the valley
- Loose or damaged shingles
- Rust spots on flashing
Following these steps keeps roof valleys dry and secure. Good flashing and waterproofing protect the home from water damage and costly repairs.
Material Choices
Choosing the right materials for a valley joining two roofs with different pitches is important. The valley is where two roof slopes meet, creating a channel for water to flow. This area must be strong and watertight to prevent leaks. Different materials handle water and weather differently, so picking the right one helps the roof last longer and stay safe.
Metal Valley Flashing
Metal flashing is a popular choice for valleys. It fits well in tight spaces and stops water from seeping under the roof. Common metals include:
- Aluminum – lightweight and resistant to rust.
- Galvanized steel – strong and affordable.
- Copper – durable but more expensive.
Metal flashing bends easily to match different roof pitches. It offers excellent protection against rain and snow.
Open Valley Vs. Closed Valley Materials
Two main valley styles affect material choices:
- Open Valley: The valley is visible, usually lined with metal flashing. It requires metal that stands out and handles wear well.
- Closed Valley: Shingles or tiles cover the valley. The material must be flexible to fit the roof shape and layer well.
Shingles And Tiles In Valleys
Shingles and tiles are common roofing materials but need care in valleys. Types include:
| Material | Benefits | Considerations |
| Asphalt Shingles | Easy to install, affordable | Needs metal flashing underneath for valley |
| Wood Shingles | Natural look, good insulation | Requires regular maintenance in valleys |
| Clay or Concrete Tiles | Durable, stylish | Heavy, needs strong support and proper flashing |
Proper layering and sealing keep valleys safe from water damage with these materials.
Maintenance Tips
The valley where two roofs with different pitches meet needs special care. This area collects water and debris, making it prone to leaks and damage. Regular maintenance helps keep the valley strong and prevents costly repairs.
Inspect The Valley Regularly
Check the valley every few months, especially after storms. Look for:
- Cracks or gaps in the flashing
- Loose or missing shingles
- Signs of rust or corrosion
- Debris buildup like leaves or twigs
Early spotting of problems stops small issues from growing.
Clear Debris Promptly
Remove leaves, branches, and dirt often. Debris blocks water flow, causing pooling and leaks. Use a soft broom or leaf blower for gentle cleaning.
Check And Repair Flashing
Flashing protects the valley from water damage. Look for loose or bent metal pieces. Seal small gaps with roofing cement. Replace damaged flashing fast to avoid leaks.
Maintain Proper Drainage
Water must flow smoothly through the valley. Keep gutters and downspouts clear. Ensure the valley slope directs water away from the roof and foundation.
Watch For Roof Material Issues
Different pitches may cause shingles to wear unevenly. Inspect for curling, cracking, or missing shingles. Replace damaged shingles promptly to protect the valley.
| Maintenance Task | Frequency | Tools Needed |
| Valley Inspection | Every 3-6 months | Flashlight, ladder |
| Debris Removal | Monthly or after storms | Soft broom, leaf blower |
| Flashing Repair | As needed | Roofing cement, metal shears |
| Gutter Cleaning | Every 3 months | Gloves, gutter scoop |
Conclusion
Valleys join two roofs with different slopes smoothly. Proper planning helps avoid leaks and damage. Use the right materials for strong, lasting valleys. Skilled installation keeps water flowing off the roof. Regular checks catch problems early and save money. A well-built valley adds to your home’s safety.
You Should Read Also: Splicing a Floor Joist
Simple steps protect your roof in the long run. Care and attention make all the difference here.