

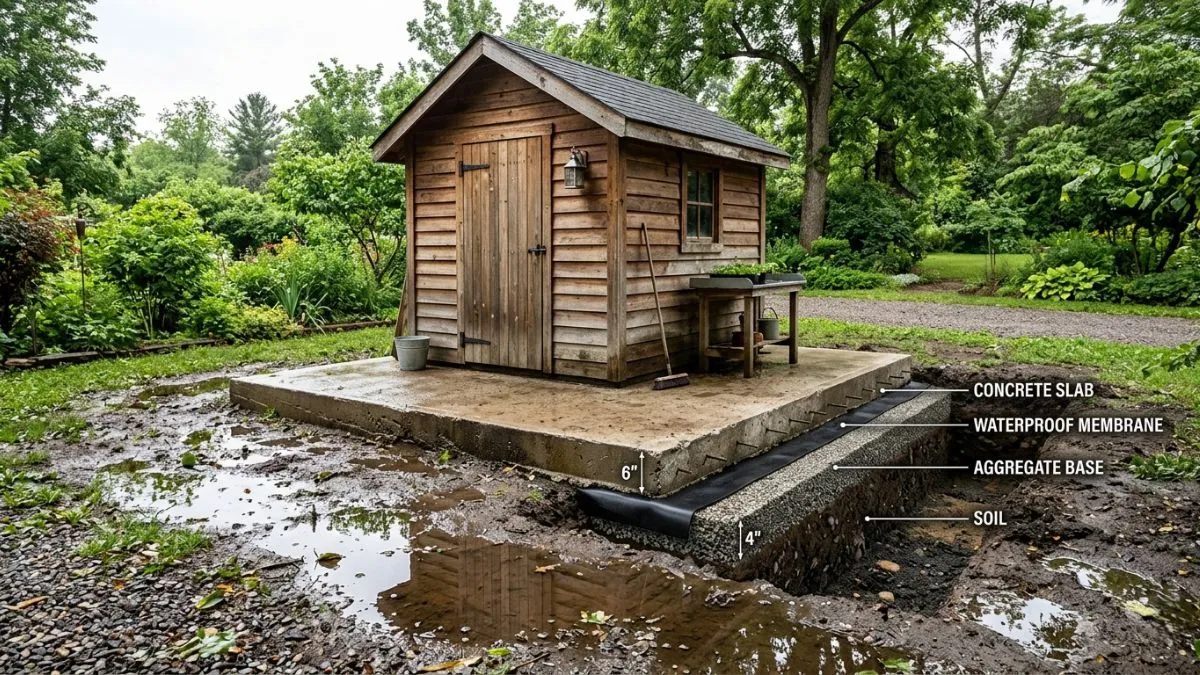
Are you building a shed on a concrete slab or thinking about it? One crucial step you can’t afford to skip is waterproofing.
Without proper protection, water can seep into your shed, causing damage to your tools, stored items, and even the slab itself. Imagine the frustration of finding your shed flooded after a heavy rain. This guide will show you simple, effective ways to keep your shed dry and safe.
Choosing The Right Concrete Slab
Choosing the right concrete slab is crucial for building a durable shed. A well-chosen slab supports the structure and protects it from moisture and ground movement. This choice affects the shed’s lifespan and usability. Understanding the benefits and common issues of concrete slabs helps in making a smart decision. Proper slab selection works as a strong base for waterproofing efforts, keeping the shed dry and stable.
Benefits Of Concrete Slabs For Sheds
Concrete slabs provide a solid and stable foundation for sheds. This stability prevents the shed from shifting or sinking over time. Concrete also offers excellent protection against moisture from the ground, reducing the risk of wood rot and mold inside the shed.
- Durability: Concrete slabs can last for decades without major repairs.
- Low Maintenance: Unlike wood floors, concrete does not need frequent upkeep.
- Moisture Barrier: Properly sealed slabs reduce water seepage.
- Support for Heavy Loads: Concrete can hold heavy equipment stored in the shed.
- Easy to Clean: Smooth concrete surfaces are simple to sweep or hose down.
Common Issues With Concrete Slabs
Concrete slabs can face problems that affect the shed’s stability and waterproofing. Cracks often form due to ground movement or poor installation. Water can seep through these cracks, causing dampness inside the shed.
- Cracking: Temperature changes and settling soil cause cracks.
- Poor Drainage: Water pooling around the slab can damage the foundation.
- Improper Thickness: Thin slabs may not support heavy loads well.
- Lack of Sealant: Unsealed slabs absorb moisture, leading to mold growth.
- Uneven Surface: Slopes or bumps cause structural issues and water pooling.
Signs of slab problems include:
- Visible cracks or gaps in the concrete
- Wet spots or water stains inside the shed
- Uneven floors that cause doors to stick
- Mildew or musty smells
Waterproofing Materials
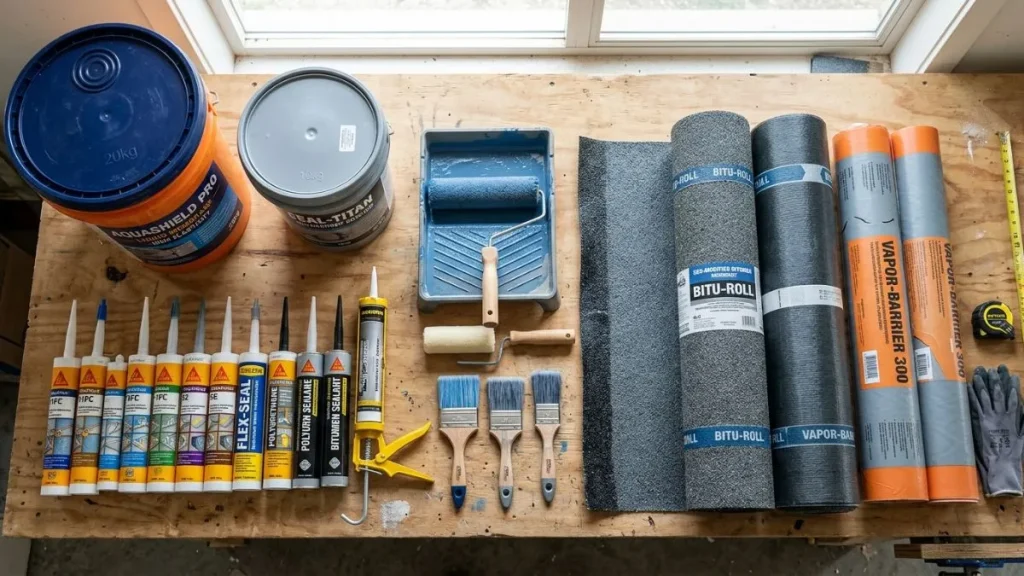
Waterproofing a shed built on a concrete slab requires the right materials to prevent water damage. Choosing effective waterproofing materials protects the shed’s foundation and interior. These materials block moisture, stopping leaks and mold growth. The main categories are liquid waterproofing membranes, sheet membranes, and sealants and coatings. Each has unique features and uses for concrete slab protection.
Liquid Waterproofing Membranes
Liquid waterproofing membranes are popular for their easy application and strong protection. They come as a liquid that you brush, roll, or spray onto the concrete slab. When dry, they form a seamless, flexible layer that stops water from entering.
Benefits of liquid waterproofing membranes:
- Easy to apply on irregular surfaces
- Creates a seamless, joint-free barrier
- Flexible, allowing for small movements in the concrete
- Good adhesion to concrete
- Resistant to UV rays and weather conditions
Common types include acrylic, polyurethane, and bituminous membranes. Acrylic membranes dry quickly and are water-based, making them eco-friendly. Polyurethane offers higher durability and elasticity. Bituminous membranes provide excellent waterproofing but have a strong odor and take longer to dry.
| Type | Dry Time | Flexibility | Best Use |
| Acrylic | 1-2 hours | Moderate | General waterproofing |
| Polyurethane | 6-8 hours | High | Areas with movement |
| Bituminous | 24+ hours | Low | Heavy-duty protection |
Applying liquid membranes requires a clean surface and sometimes multiple coats. The result is a tough, water-resistant layer that extends the shed’s life.
Sheet Membranes
Sheet membranes come as large, thin sheets made from materials like rubber, PVC, or bitumen. These sheets roll out over the concrete slab and stick or bond to the surface. They form a continuous barrier against water.
Key features of sheet membranes:
- Pre-formed and uniform thickness
- Strong resistance to punctures and tears
- Good for flat or slightly sloped surfaces
- Durable and long-lasting
Sheet membranes often require heat or adhesive to fix them to the slab. The joints between sheets must be sealed carefully to avoid leaks. They are ideal for heavy-duty waterproofing and areas prone to standing water.
Some common sheet membrane materials include:
- EPDM Rubber: Highly flexible and UV resistant.
- PVC: Durable and easy to install.
- Modified Bitumen: Combines asphalt with polymers for toughness.
Sheet membranes offer a reliable, physical barrier. Their strength makes them suitable for sheds in wet climates or places with frequent rainfall.
Sealants And Coatings
Sealants and coatings are liquid products applied to concrete surfaces to fill cracks and create a water-resistant layer. They often serve as a first line of defense in waterproofing.
Advantages of sealants and coatings:
- Easy to apply with a brush or roller
- Fill small cracks and gaps
- Prevent water penetration
- Can be used alone or under other membranes
- Affordable and widely available
Common sealant types include silicone, polyurethane, and acrylic. Silicone sealants are flexible and water-repellent. Polyurethane offers durability and strong adhesion. Acrylic coatings dry fast and provide a breathable layer.
Choosing the right sealant depends on the concrete condition and exposure level. Sealants work best on smooth, crack-free slabs or as extra protection over membranes.
Here is a comparison of popular sealant types:
| Sealant Type | Flexibility | Durability | Best Use |
| Silicone | High | Moderate | Crack sealing |
| Polyurethane | Moderate | High | Heavy wear areas |
| Acrylic | Low | Low | Surface coating |
Sealants and coatings improve the waterproofing life of a shed’s concrete slab. They are simple solutions for small repairs and extra moisture defense.
Preparing The Slab Surface
Preparing the slab surface is a crucial step in shed on concrete slab waterproofing. A clean and well-prepared slab ensures the waterproofing material adheres properly. It also prevents water from seeping through cracks or pooling on the surface.
Cleaning And Repairing Cracks
Start by removing dirt, dust, and debris from the concrete slab. Use a broom or a pressure washer to clean the surface completely. Dirt and loose particles reduce the effectiveness of waterproofing products. After cleaning, inspect the slab carefully for cracks or holes. Even small cracks can let water seep in and cause damage over time.
Follow these steps to repair cracks:
- Remove loose concrete: Use a chisel and hammer to clear out damaged parts of the crack.
- Clean the crack: Blow out dust or wash with water, then let it dry fully.
- Fill the crack: Use a concrete patching compound or epoxy filler to seal the crack.
- Smooth the surface: Level the patch with a trowel to match the slab surface.
Ensuring Proper Drainage
Proper drainage prevents water from pooling around the shed’s concrete slab. Standing water can seep into cracks and cause damage over time. It also promotes mold and mildew growth. To maintain good drainage, the slab should be slightly sloped away from the shed walls.
Key points to ensure proper drainage:
- Slope the slab: Aim for a slope of about 1/4 inch per foot away from the shed.
- Clear gutters and downspouts: Make sure rainwater flows away from the slab.
- Install drainage channels: Use gravel or drain pipes around the slab edges to guide water away.
- Keep soil graded: Soil near the slab should slope downward to avoid water pooling.
Waterproofing Application Techniques

Waterproofing a shed on a concrete slab requires careful application to protect the structure from moisture damage. Waterproofing application techniques ensure a tight seal that blocks water from seeping through the slab and walls. Choosing the right method depends on the shed’s design, local climate, and budget. Effective application improves the shed’s lifespan and keeps stored items dry and safe.
Applying Liquid Membranes
Liquid membranes are popular for waterproofing concrete slabs due to their seamless and flexible properties. These membranes are applied as a liquid and then cure to form a rubber-like coating that adheres tightly to the concrete surface. This creates a strong barrier against water infiltration.
Steps for applying liquid membranes:
- Clean the slab surface thoroughly to remove dirt, dust, and loose particles.
- Repair cracks and holes using a suitable filler or patching compound.
- Prime the slab if recommended by the product instructions.
- Apply the liquid membrane evenly using a brush, roller, or spray.
- Allow the membrane to dry completely before adding a second coat, if needed.
The key advantages of liquid membranes include:
| Feature | Benefit |
| Seamless coating | Prevents water from finding gaps or joints to enter |
| Flexibility | Adapts to slab movement without cracking |
| Easy application | Can be applied on irregular surfaces and corners |
Liquid membranes suit DIY projects and professional jobs alike. They offer strong protection but require proper curing time to achieve full effectiveness.
Installing Sheet Membranes
Sheet membranes come as large rolls of waterproof material that get installed directly onto the concrete slab. These membranes are usually made of bitumen, rubber, or synthetic materials. They provide a tough physical barrier against water and mechanical damage.
Installation involves these steps:
- Prepare the surface by cleaning and smoothing the slab.
- Apply primer to help the membrane stick well.
- Roll out the membrane carefully, avoiding wrinkles or air pockets.
- Overlap seams by a few inches and seal edges with adhesive or heat welding.
- Inspect the installation to ensure full coverage and tight seals.
Sheet membranes are often preferred for:
- Large, flat slabs requiring fast coverage
- Areas exposed to sharp objects or heavy foot traffic
- Projects needing a proven, durable waterproof layer
While sheet membranes provide solid protection, they require skilled installation. Improper overlap or poor adhesion can lead to leaks. Inspect seams regularly for damage and repair if needed.
Using Sealants On Joints
Concrete slabs have joints, cracks, and gaps where water can enter. Sealants are flexible materials designed to fill these vulnerable spots. They create a tight, waterproof bond between slab sections and around edges.
Common sealants include silicone, polyurethane, and acrylic compounds. Each type suits different conditions and surface types.
Application tips for sealants:
- Clean the joint to remove dirt and loose particles.
- Apply a backer rod inside deep joints to control sealant depth.
- Use a caulking gun to apply sealant smoothly and evenly.
- Smooth the sealant with a spatula or finger to ensure good adhesion.
- Allow sufficient curing time before exposing to water or foot traffic.
Sealants are essential for maintaining a waterproof barrier, especially where slabs meet walls or other structures. They also accommodate slight movement without cracking, preserving the integrity of the waterproofing system.
Additional Moisture Protection Methods
Protecting a shed built on a concrete slab from moisture is crucial for its durability. Besides basic waterproofing, there are additional moisture protection methods that help keep water and dampness at bay. These methods create extra barriers against moisture, preventing damage such as mold, rot, and cracks. Two effective ways to boost moisture protection are installing vapor barriers and using insulation layers. Both methods work together to maintain a dry and stable environment inside the shed.
Installing Vapor Barriers
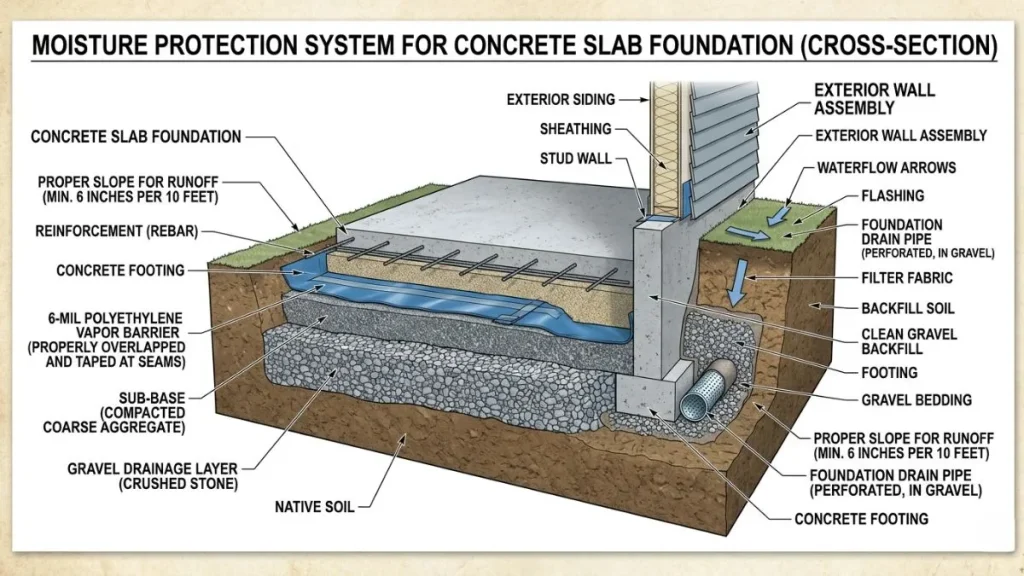
A vapor barrier is a material that stops moisture from passing through the concrete slab. Concrete is porous, so it can let water vapor rise from the ground into the shed. A vapor barrier blocks this moisture before it reaches the slab surface. This process helps keep the shed floor dry and prevents mold growth.
Common materials used for vapor barriers include:
- Polyethylene sheets (6 mil or thicker)
- Foil-faced membranes
- Rubberized asphalt membranes
Installing a vapor barrier involves laying the material directly on the ground before pouring the concrete slab. The sheets must overlap by at least 6 inches, with seams sealed using waterproof tape. The edges should extend up the shed walls slightly to block moisture fully.
| Vapor Barrier Type | Benefits | Typical Use |
| Polyethylene Sheet | Affordable, easy to install | Most common for shed slabs |
| Foil-faced Membrane | Reflects heat, moisture resistant | Used in colder climates |
| Rubberized Asphalt | Durable, strong waterproofing | High moisture areas |
Properly installed vapor barriers reduce water damage risk and improve shed comfort. They also help maintain the concrete’s strength by limiting moisture exposure.
Using Insulation Layers
Insulation layers add another defense against moisture and temperature changes. They help keep the shed warmer in winter and cooler in summer. Insulation also reduces condensation on the concrete slab, which can cause dampness and mold.
Types of insulation used under or around concrete slabs include:
- Rigid foam boards (extruded or expanded polystyrene)
- Spray foam insulation
- Fiberglass batts (in framed walls around slab edges)
Rigid foam boards are the most common choice for slab insulation. They are placed below or beside the concrete slab to create a thermal break. This layer stops cold from moving through the slab and prevents moisture buildup.
Spray foam insulation seals cracks and gaps, blocking air and moisture leaks. Fiberglass batts are less common but useful if the shed has framed walls around the slab perimeter.
| Insulation Type | Pros | Cons |
| Rigid Foam Boards | Strong, moisture resistant, easy to install | Costly compared to other types |
| Spray Foam | Seals gaps, excellent air barrier | Requires professional installation |
| Fiberglass Batts | Affordable, widely available | Absorbs moisture if wet |
Adding insulation layers enhances the shed’s energy efficiency and protects the concrete slab from moisture damage. It also creates a more comfortable space for storage or work.
Maintenance And Inspection Tips
Maintaining and inspecting your shed’s concrete slab waterproofing is key to keeping water out. Regular care helps avoid costly repairs and keeps the shed dry. Checking the waterproof layer often ensures it works well over time. Catch problems early to protect the concrete and the items inside the shed.
Regular Checks For Damage
Performing regular checks on the waterproofing is essential. Look closely at the concrete slab surface for any cracks, holes, or signs of wear. Water can enter through even the smallest damage.
- Inspect the slab monthly for any visible cracks or discoloration.
- Check edges and corners where water tends to collect.
- Look for peeling or blistering of the waterproof coating.
- Examine nearby soil drainage to ensure water flows away from the shed.
Use a simple table to track your inspection results:
| Date | Area Inspected | Condition | Action Needed |
| 2024-06-01 | Slab surface | No cracks | None |
| 2024-06-01 | Edges | Minor peeling | Touch-up required |
Taking photos during each inspection helps spot changes over time. Use a flashlight to check darker areas. Early signs of damage include small cracks, surface dullness, and soft spots. Fix these issues quickly to keep the waterproofing effective.
Reapplying Waterproofing Products
Waterproofing products wear out over time. Reapplying them keeps the concrete slab protected against water damage. Follow the product instructions carefully for best results.
Steps to reapply waterproofing:
- Clean the surface thoroughly to remove dirt and debris.
- Repair any cracks or holes before applying the product.
- Apply the waterproofing product evenly using a brush, roller, or sprayer.
- Allow enough drying time between coats if multiple layers are needed.
Keep a schedule for reapplication based on the product’s lifespan, usually every 2 to 5 years. Use these tips to ensure proper application:
- Choose a waterproofing product suitable for concrete slabs.
- Apply in dry weather to avoid trapping moisture.
- Wear gloves and protective gear during application.
Below is a simple maintenance schedule example:
| Task | Frequency | Notes |
| Inspection | Monthly | Check for damage and wear |
| Reapplication | Every 3 years | Depends on product used |
| Minor Repairs | As needed | Fix cracks before reapplying |
Regular reapplication keeps the waterproof layer strong. It prevents water from seeping under the slab and causing damage. Proper maintenance saves time and money over the long term.
You Should Read Also: Repairing Concrete Slab After Plumbing
Conclusion
Waterproofing your shed’s concrete slab protects it from water damage. It keeps the slab strong and prevents cracks. Good waterproofing stops mold and dirt buildup. A dry slab helps your shed last longer. Choose the right materials for your climate.
Regular checks catch problems early. Taking care of the slab saves money and effort later. Simple steps can make a big difference. Protect your shed foundation and enjoy a safe, dry space.


