Is your kitchen sink leaking into the basement? If so, you’re facing a problem that can cause serious damage to your home.
Water dripping where it shouldn’t can lead to mold, structural issues, and costly repairs. But don’t worry—you’re not alone, and there are clear steps you can take to fix it. You’ll learn how to identify the cause of the leak, what risks it brings, and how to stop it before it gets worse.
Signs Of Leaks Reaching The Basement
When a kitchen sink leaks, water can travel down through walls and floors. This water may reach the basement, causing damage. Early detection is vital to prevent serious problems. Recognizing the signs of leaks reaching the basement helps protect your home. Watch for changes that suggest water is moving below the kitchen. These signs often appear before major damage occurs.
Visible Water Stains
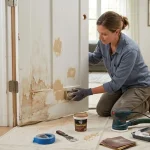
Water stains are one of the easiest signs to spot. They often show as discolored patches on basement walls or ceilings. These stains can be yellow, brown, or even dark gray. Stains usually grow larger if leaks continue.
Look closely for these clues:
- Irregular shapes: Water stains rarely form perfect circles or squares.
- Fuzzy edges: Edges of water stains often look blurry or soft.
- Peeling paint: Paint near water stains may bubble or peel.
- Cracked plaster: Water can weaken plaster, causing cracks.
Here is a simple table showing common water stain colors and what they might mean:
| Stain Color | Possible Cause |
| Yellow | Fresh water leak |
| Brown | Old water damage or rust |
| Dark gray/black | Mold growth |
Check stains regularly. If new stains appear or old ones grow, the leak may be active.
Musty Odors
A strong musty smell in the basement often signals water problems. When water leaks from a kitchen sink, it creates damp areas. These areas encourage mold and mildew growth. Mold releases a musty odor that is hard to ignore.
Signs of musty odors include:
- Smell stronger after rain or sink use
- Odor near walls or floor corners
- Noticeable only in the basement
- Persistent smell despite cleaning
Mold and mildew thrive in wet, dark places. Even a small leak can cause mold to grow quickly. The smell may worsen over time, affecting air quality.
Air circulation helps reduce odors. Use fans or dehumidifiers to dry the basement. Still, the source of the leak must be fixed to stop the smell completely.
Damp Basement Walls
Damp walls in the basement suggest water intrusion. These walls feel wet or cold to the touch. Moisture may appear as dark patches or a shiny surface. Over time, damp walls weaken the structure and promote mold.
Check for these signs of dampness:
- Walls that remain wet after dry weather
- Efflorescence—white, powdery salt deposits on walls
- Soft spots or crumbling areas on the wall surface
- Condensation forming on walls or windows
Damp walls often result from leaks or poor drainage. Water from a kitchen sink leak may seep through floors or pipes into basement walls.
Keep walls dry by:
- Fixing leaks immediately
- Improving basement ventilation
- Using waterproof coatings on walls
Ignoring damp walls can lead to costly repairs and health risks.
Pooling Water
Pooling water in the basement is a serious sign of leaks. This water collects in low spots, creating puddles or small pools. Pooling water often appears after using the kitchen sink or after rain.
Watch for these warning signs:
- Wet basement floors near the kitchen wall
- Water rising from floor drains or sump pump areas
- Visible drops of water or dripping sounds
- Increased humidity or foggy basement windows
Pooling water damages floors, carpets, and stored items. It encourages mold growth and attracts pests. Quick action is necessary to stop leaks and remove standing water.
Use these steps for managing pooling water:
- Remove water with a wet vacuum or mop
- Dry the area using fans and dehumidifiers
- Inspect plumbing for leaks
- Seal cracks in walls or floors
Pooling water means leaks have progressed and need urgent repair.
Immediate Steps To Take
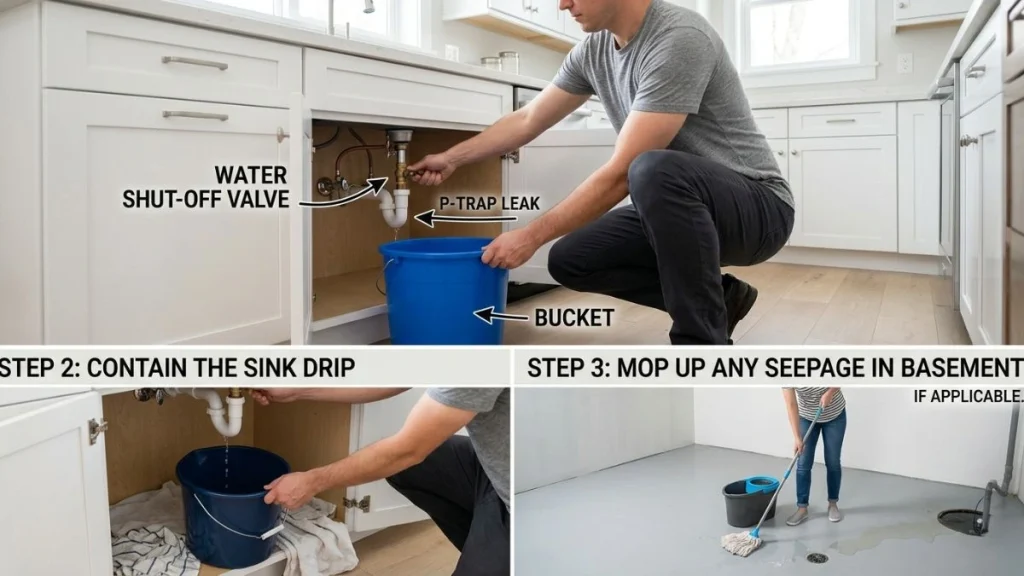
Discovering a kitchen sink leaking into the basement causes stress and damage risk. Acting fast limits water damage and saves repair costs. Follow these immediate steps to take after spotting a leak under your kitchen sink. Each step helps control the situation before professional help arrives.
Turning Off Water Supply
Stop the water flow to prevent more basement flooding. Locate the water shutoff valve under the sink or near the main water line. Turn the valve clockwise to close it completely. If unsure, turn off the main water valve for the house.
- Step 1: Check under the sink for individual hot and cold water valves.
- Step 2: Turn valves clockwise until tight.
- Step 3: If leak continues, shut off the main water supply.
Turning off water stops damage and makes repairs safer. Keep a wrench nearby to help turn stubborn valves. After shutting off water, open the faucet to release pressure and drain remaining water in pipes.
| Valve Location | Action | Purpose |
| Under kitchen sink | Turn valves clockwise | Stop water flow to sink only |
| Main water valve | Turn off completely | Stop water supply to entire house |
Clearing Under-sink Area
Remove all items stored beneath the sink. Water can damage stored goods and create mold risk. Clearing the area helps you see the leak source clearly.
- Take out cleaning supplies, trash bins, and tools.
- Place towels or buckets to catch dripping water.
- Dry the area with rags to prevent slipping and further damage.
Cleaning the space improves safety and repair access. Check for wet spots on cabinet floors and walls. Use a flashlight to spot hidden leaks or cracks. Removing clutter prevents accidental spills or injuries during repair.
Keep a list of removed items. This helps return everything to its place after fixing the leak. Use plastic containers or bags to store small items temporarily.
Inspecting Visible Pipes
Look closely at pipes under the sink for cracks, corrosion, or loose fittings. Visible damage often shows the leak source.
- Check pipe joints and connections for water drops or rust.
- Feel pipes for moisture or wetness along their length.
- Look for signs of water stains or mold on cabinet walls.
Use a flashlight and mirror to view hard-to-see spots. Tighten loose connections carefully with a wrench, but avoid overtightening. Note any pipe damage that requires replacement.
| Inspection Area | What to Look For | Action |
| Pipe joints | Water droplets, rust, loose nuts | Tighten or replace fittings |
| Pipe surface | Cracks, corrosion, wetness | Mark for repair or replacement |
| Cabinet walls | Water stains, mold | Clean and dry area |
Using Temporary Seals
Apply quick fixes to stop or slow the leak before professional repair. Temporary seals buy time and reduce water flow.
- Use waterproof tape or plumber’s tape on small pipe cracks.
- Wrap a rubber patch or piece of inner tube around the leak spot.
- Secure patches with hose clamps or zip ties tightly.
Do not rely on temporary fixes for long. They only limit water loss temporarily. Ensure the area is dry before applying tape for better adhesion. These patches help control leaks while waiting for a plumber.
Temporary pipe patching steps 1. Dry leak area with towel 2. Wrap rubber patch around leak 3. Secure with hose clamp tightly 4. Apply waterproof tape over patch
Keep monitoring the leak after applying patches. Replace temporary fixes with permanent repairs soon for safety and water savings.
Tools And Materials For Repair

Discovering a kitchen sink leaking into the basement is stressful. Quick action with the right tools and materials can prevent costly damage. Preparing before repair saves time and effort. This section covers essential items needed for fixing leaks under your kitchen sink.
Pipe Wrenches And Pliers
Pipe wrenches and pliers are basic tools for plumbing repairs. They help loosen or tighten pipes and fittings safely. Using the correct size wrench prevents damage to plumbing parts.
Here are the key types:
- Adjustable Pipe Wrench: Grips round pipes firmly without slipping.
- Slip-Joint Pliers: Versatile tool for gripping and turning small fittings.
- Channel Lock Pliers: Adjustable for different pipe sizes, ideal for tight spaces.
Using these tools correctly avoids stripping nuts or cracking pipes. Always apply steady pressure and turn slowly. Keep the jaws clean and free from rust for better grip.
Plumber’s Tape And Sealant
Plumber’s tape (Teflon tape) and sealants prevent leaks by sealing pipe threads tightly. They fill gaps where water could escape. Using them properly is crucial for a lasting repair.
Steps to use plumber’s tape:
- Clean pipe threads thoroughly.
- Wrap tape clockwise around threads 3-5 times.
- Smooth the tape to remove wrinkles.
- Screw pipe or fitting tightly.
Common sealants include silicone and pipe joint compound. Silicone sealant is flexible and waterproof, perfect for joints exposed to moisture. Pipe joint compound offers a strong bond but requires drying time.
Here is a quick comparison:
| Material | Use | Drying Time | Water Resistance |
| Plumber’s Tape | Sealing threaded joints | None | Excellent |
| Silicone Sealant | Sealing gaps and joints | 24 hours | Excellent |
| Pipe Joint Compound | Sealing threaded connections | Several hours | Good |
Replacement Pipes And Fittings
Damaged pipes and fittings cause leaks under the sink. Carrying the right replacement parts ensures smooth repair. Measure existing pipes before buying new ones.
Common materials include:
- PVC Pipes: Lightweight, easy to cut, for drain lines.
- Copper Pipes: Durable, used in water supply lines.
- Brass or Chrome Fittings: Connect pipes and fixtures securely.
Keep these replacement fittings handy:
- Elbow joints for changing pipe direction
- Couplings to join two pipes
- Slip nuts and washers for sink traps
Choose parts matching pipe size and type to avoid leaks. Bring a sample piece to the store for accurate matching. Use a pipe cutter or hacksaw to remove damaged sections cleanly.
Bucket And Towels
A bucket and towels are vital for controlling water during repairs. They catch drips and prevent basement flooding. Place the bucket under the pipe before loosening fittings.
Use absorbent towels or rags to wipe spills quickly. Keep several towels nearby for drying pipes and hands. Wet spots can cause mold and damage if left unattended.
Tips for effective cleanup:
- Empty the bucket regularly to avoid overflow.
- Use old towels that can be washed or discarded.
- Wear gloves to protect your hands from dirty water.
Having these simple materials ready creates a safer work area. They reduce mess and speed up the repair process.
Diy Repair Techniques
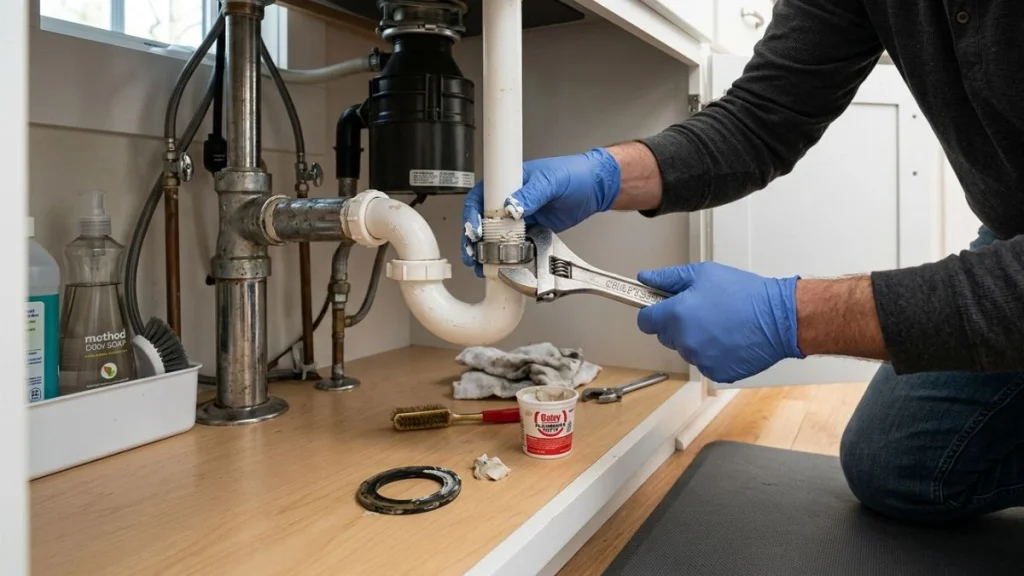
Kitchen sink leaks causing water to drip into the basement can damage your home structure and create mold problems. Tackling these leaks by yourself saves money and prevents further harm. DIY repair techniques focus on easy, clear steps anyone can follow. Fixing leaks early stops small issues from turning into costly repairs.
Tightening Loose Connections
Loose pipe connections often cause leaks under the kitchen sink. These connections include nuts, washers, and joints linking pipes. Start by turning off the water supply to avoid spills. Use a wrench or pliers to check all visible connections. Tighten each nut gently to avoid cracking pipes.
Common areas to check:
- Slip nuts on drain pipes
- Compression fittings
- Water supply lines to the faucet
Follow these tips:
- Place a bucket below pipes to catch drips.
- Hand-tighten each nut first.
- Use a wrench for a quarter turn more if needed.
- Turn water back on and watch for leaks.
| Tool | Use |
| Adjustable wrench | Tighten nuts without damaging fittings |
| Slip-joint pliers | Grip and turn pipe connections easily |
| Bucket | Catch water during repairs |
Check connections again after a few hours. Tightening may solve minor leaks quickly.
Replacing Damaged Pipes
Cracked or corroded pipes cause basement leaks. Replacing these pipes prevents water damage and mold growth. Start by shutting off the main water valve. Drain water from pipes by opening faucets. Identify damaged sections and measure their length for replacement.
Follow this step-by-step guide:
- Use a pipe cutter or hacksaw to remove the damaged pipe.
- Clean pipe ends using sandpaper or a pipe cleaning tool.
- Attach new pipes using proper connectors and fittings.
- Apply plumber’s tape on threads for a tight seal.
- Turn water back on and check for leaks.
Materials needed:
- Replacement pipes (PVC, copper, or PEX)
- Pipe cutter or hacksaw
- Pipe fittings and connectors
- Plumber’s tape
Use this table to identify pipe types:
| Pipe Type | Common Use | Notes |
| PVC | Drain and waste pipes | Easy to cut and join with solvent cement |
| Copper | Water supply lines | Durable but requires soldering |
| PEX | Flexible water supply lines | Requires special fittings |
Replacing pipes takes time but stops leaks and protects your home.
Fixing Faucet Seals
Worn or damaged faucet seals cause water to drip under the sink. Fixing these seals requires disassembling the faucet and replacing washers or O-rings. Begin by turning off the water valves under the sink. Open the faucet to release pressure.
Steps to repair faucet seals:
- Remove faucet handles using a screwdriver.
- Unscrew the packing nut to access the valve stem.
- Take out old washers or O-rings.
- Match new seals exactly by size and shape.
- Install new washers or O-rings carefully.
- Reassemble the faucet and test for leaks.
Tools and materials to prepare:
- Screwdrivers (flathead and Phillips)
- Replacement washers and O-rings
- Wrench or pliers
- Plumber’s grease for smooth operation
Use plumber’s grease on new seals to extend their life. Tighten parts but avoid over-tightening which may cause damage. Check for leaks after repair and retighten if necessary.
Clearing Blockages In Drains
Clogged drains increase pressure and cause leaks under sinks. Clearing blockages restores water flow and prevents leaks. First, remove standing water from the sink. Place a bucket below the drain trap to catch water and debris.
Effective methods to clear blockages:
- Plunger: Create suction to dislodge clogs.
- Drain snake or auger: Reach deep blockages inside pipes.
- Baking soda and vinegar: Natural solution to break down minor clogs.
Step-by-step drain clearing:
- Remove the P-trap under the sink carefully.
- Check for visible debris and clean it out.
- Use a drain snake to clear deeper clogs.
- Reassemble the trap and run water to test flow.
Safety tips:
- Wear gloves to avoid contact with dirty water.
- Never use harsh chemical drain cleaners with old pipes.
- Keep tools clean after use to prevent rust.
Clearing blockages improves sink drainage and stops leaks caused by pressure build-up.
Read Also: How To Fix Leaking Pipe Under Sink
Dealing With Basement Water Damage

A kitchen sink leaking into the basement can cause serious water damage. Water in the basement creates problems like dampness, mold, and weakened walls. Dealing with basement water damage quickly helps protect your home and health. This section explains key steps to manage the damage and keep your basement safe and dry.
Drying And Ventilation
Removing water and drying the basement is the first step after a leak. Standing water causes wood and drywall to swell and warp. Use these tips to speed up drying:
- Remove all water with a wet vacuum or mop as soon as possible.
- Open windows and doors to increase air flow if weather allows.
- Use fans and dehumidifiers to pull moisture from the air and surfaces.
- Keep the basement temperature warm to help evaporation.
Drying usually takes several days. Check walls, floors, and furniture for dampness often. Damp materials can hide behind walls or under floors, so thorough drying is critical.
| Drying Tools | Purpose |
| Wet vacuum | Remove standing water |
| Fans | Circulate air to speed evaporation |
| Dehumidifier | Lower humidity to prevent mold |
| Heaters | Keep temperature warm for drying |
Mold Prevention
Mold grows quickly in wet basements and harms health. Preventing mold requires controlling moisture and cleaning affected areas. Follow these steps:
- Dry wet areas fast. Mold needs 24-48 hours to start growing.
- Clean surfaces with a mixture of water and detergent or a mold cleaner.
- Discard porous materials like soaked carpets, drywall, or insulation that mold can grow inside.
- Use mold-resistant paints to protect basement walls.
- Keep humidity below 60% using a dehumidifier.
Regularly inspect the basement for mold signs: musty smell, black or green spots. Early action stops mold from spreading.
Repairing Structural Damage
Water can weaken basement walls, floors, and supports. Fixing structural damage keeps your home safe. Here are common repairs:
- Inspect cracks and holes. Use hydraulic cement or epoxy to seal small cracks.
- Replace damaged drywall or insulation. Cut out wet parts and install new materials.
- Check wooden beams for rot. Remove and replace rotten wood to avoid collapse.
- Consult a professional for large cracks or foundation problems.
Ignoring damage may lead to costly repairs later. Fix problems early to keep your basement strong.
| Damage Type | Repair Method |
| Cracks in walls | Seal with hydraulic cement or epoxy |
| Wet drywall | Remove and replace sections |
| Rotten wood | Cut out and replace beams |
| Foundation issues | Hire a structural engineer |
Waterproofing Solutions
Stop water from entering the basement again with waterproofing. These solutions reduce future leaks and damage:
- Apply sealants to basement walls and floors to block moisture.
- Install a sump pump to remove water that collects under the basement.
- Improve drainage around your home by grading soil away from the foundation.
- Repair gutters and downspouts to direct rainwater away from the basement.
- Consider interior or exterior waterproof membranes for extra protection on walls.
Regular basement maintenance and waterproofing reduce the risk of leaks. These steps protect your home and keep your basement dry.
Conclusion
A kitchen sink leaking into the basement can cause big problems fast. Fixing leaks early saves money and stops water damage. Check pipes often and tighten loose parts. Use a bucket to catch drips until you repair the leak. Call a plumber if the problem seems too hard.
Small steps now protect your home later. Don’t wait for the leak to get worse. Keep your basement dry and your home safe. Simple care prevents costly repairs down the road.