Is your second story floor uneven and causing you headaches? You’re not alone, and fixing it might be easier than you think.
When your floor isn’t level, it affects everything—from furniture placement to safety. But don’t worry—this guide will walk you through simple steps to get your floor flat and steady. By the end, you’ll have the confidence to tackle the problem yourself and enjoy a smoother, safer upstairs space.
Ready to transform your floor? Let’s get started.
Preparing The Work Area
Preparing the work area is the first key step in leveling a second story floor. This stage sets the foundation for a smooth and safe project. A clean, organized space helps identify any issues with the floor and makes the leveling process easier. Proper preparation also reduces risks of accidents or damage to your home. Taking time to prepare saves effort later and improves the quality of the final result.
Clearing The Floor
Start by removing all furniture, rugs, and decorations from the second story room. A clear floor allows full access to the surface that needs leveling. It also prevents damage to your belongings during the work. Use the following steps for thorough clearing:
- Move heavy items to another room or floor.
- Take down wall hangings or shelves that might get in the way.
- Vacuum or sweep the floor to remove dust and debris.
- Check corners and under windows for hidden clutter.
After clearing, inspect the floor carefully. Look for nails, screws, or loose boards that can affect leveling. Use a bright light or flashlight to spot uneven spots. Mark these areas with chalk or tape for repair.
Ensuring Safety Measures
Safety is crucial during any home renovation task. Preparing the work area includes setting up precautions to avoid injuries and property damage. Use these safety tips before starting the floor leveling:
- Wear protective gear: Safety glasses, gloves, and a dust mask keep you safe from dust and sharp objects.
- Keep tools organized: Place tools on a stable table or toolbox to prevent tripping hazards.
- Check for electrical wiring: Identify and avoid wires under the floor to prevent shocks.
- Ensure good lighting: Bright lights help you see uneven spots and avoid mistakes.
- Ventilate the area: Open windows or use fans to reduce dust and fumes.
Marking High And Low Spots
Marking high and low spots on a second story floor is a key step in leveling. Uneven floors cause problems with furniture, doors, and flooring installation. Identifying where the floor dips or rises helps you plan the right corrections. This process requires simple tools and careful observation. You can find the uneven areas by checking the floor surface in detail. The goal is to mark these spots clearly for the next steps, such as sanding high points or filling low points.

Using A Level And Straightedge
The most basic tools for finding uneven spots are a level and a straightedge. A spirit level shows if the floor slopes up or down. A straightedge, usually a long, flat board, helps spot small bumps or dips.
Here is how to use these tools effectively:
- Place the straightedge on the floor across different sections.
- Look for gaps between the straightedge and floor, indicating low spots.
- Check the level on the straightedge to find the slope direction.
- Mark the spots where the level bubble moves away from center.
For accuracy, test in multiple directions — lengthwise, widthwise, and diagonally. Use a pencil or chalk to mark high spots with an “H” and low spots with an “L.”
| Tool | Purpose | How to Use |
| Spirit Level | Check slope direction | Place on floor or straightedge, observe bubble position |
| Straightedge | Identify gaps and uneven spots | Lay flat on floor, look for gaps underneath |
Marking high and low points clearly helps avoid confusion later. This step prevents missing spots that could cause problems with flooring or furniture.
Mapping Floor Variations
After marking, create a detailed map of the floor’s high and low points. This map guides you on which areas need sanding or filling. Mapping saves time and helps plan materials needed.
Follow these steps to map floor variations:
- Divide the floor into sections using chalk lines or tape.
- Label each section with a number or letter.
- Record the location of each high and low spot within sections.
- Note the severity of each variation (mild, moderate, severe).
Addressing Low Spots
Addressing low spots is a key step in leveling a second story floor. Low spots can cause uneven surfaces, leading to problems when installing flooring materials. These dips may result from settling, poor framing, or previous repairs. Fixing them ensures a smooth, stable floor that looks good and lasts long. Two common ways to handle low spots are applying self-leveling compound and using shims or plywood. Both methods have their uses depending on the size and depth of the low spots.
Applying Self-leveling Compound
Self-leveling compound is a popular choice for fixing low spots on second story floors. It is a liquid material that spreads easily and settles flat, creating a smooth surface. This method works best for low spots that are shallow or moderately deep, usually up to 1 inch. The compound fills in dips and hardens quickly, saving time and effort.
Steps to apply self-leveling compound:
- Clean the floor surface thoroughly to remove dust, dirt, and loose debris.
- Seal any cracks or holes to prevent the compound from leaking underneath.
- Mix the self-leveling compound according to the instructions on the package.
- Pour the mixture onto the low spots and spread it using a trowel or gauge rake.
- Allow the compound to flow and level itself naturally.
- Wait for the compound to dry completely before walking on or installing flooring.
Using Shims Or Plywood
Shims and plywood offer a mechanical way to fix low spots, especially deeper ones. Shims are thin pieces of wood or plastic that fill gaps under the floor joists or subfloor. Plywood can be layered to build up the floor height in uneven areas. This method provides strong, long-lasting support and can handle larger dips.
How to use shims or plywood:
- Locate the low spots by using a level across the floor.
- Lift the subfloor slightly at the low spots if possible.
- Place shims between the joists or under the subfloor to raise the low areas.
- For bigger depressions, add thin layers of plywood to increase thickness.
- Secure the shims or plywood with screws or nails.
- Check the level again and adjust as needed.
Correcting High Spots
Correcting high spots is an important step in leveling a second story floor. High spots can cause uneven surfaces, making the floor unsafe and difficult to install new flooring. These raised areas must be fixed before moving forward. The process involves either sanding or grinding down the high points or replacing damaged sections that cause unevenness. Properly addressing high spots ensures a smooth, flat floor that looks good and lasts long.
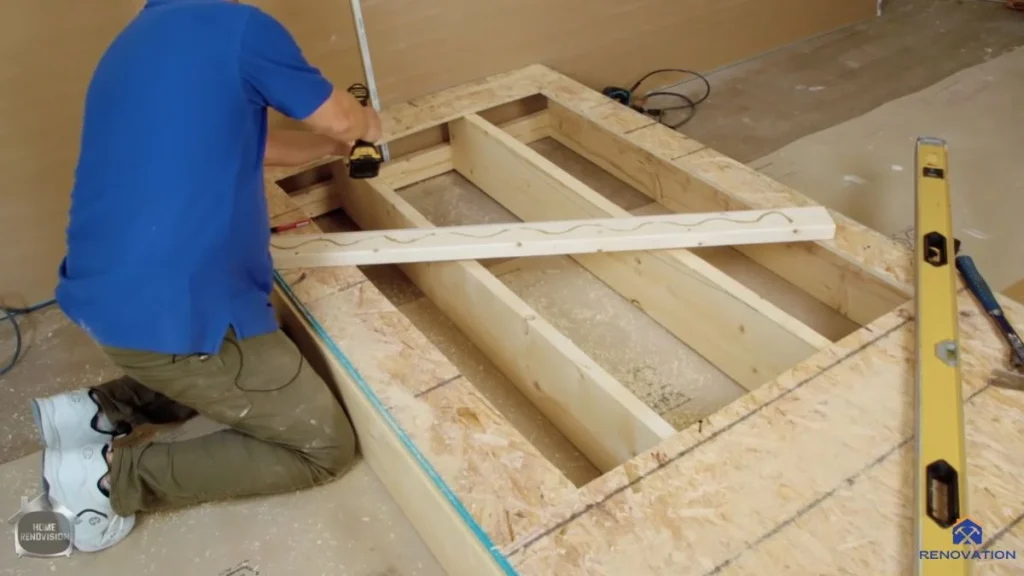
Sanding Or Grinding Down
Sanding or grinding down is a common method to remove high spots on a second story floor. This technique works well when the raised areas are not too large or deeply damaged. Use a floor sander or angle grinder with a diamond cup wheel to carefully shave off the high points.
Steps to follow:
- Mark the high spots using a straightedge or level.
- Wear safety gear such as goggles, mask, and ear protection.
- Start sanding or grinding gently, checking progress often.
- Remove debris frequently to avoid clogging the tool.
- Stop once the surface is even with the surrounding floor.
Sanding or grinding down high spots improves floor flatness. It prepares the surface for underlayment or new flooring installation. This method saves time and materials compared to replacing entire sections.
Replacing Damaged Sections
Sometimes high spots come from damaged or swollen floor sections. These areas may be too uneven or weak to fix with sanding or grinding. Replacing damaged sections creates a stable, level floor.
Steps to replace damaged sections:
- Identify and mark the damaged or high spot area.
- Cut out the damaged portion using a circular saw or reciprocating saw.
- Remove debris and clean the cut area.
- Measure and cut a new piece of subfloor or plywood to fit.
- Secure the new section with screws or nails.
- Check level and make minor adjustments if needed.
Reinforcing The Floor Structure
Reinforcing the floor structure is a key step to level a second story floor safely and effectively. A floor that is not strong enough can sag or move, causing problems with walls, doors, and windows. Strengthening the floor helps to support the weight of the floor and anything placed on it. Proper reinforcement also prevents future damage and adds stability to the entire home. This process often involves working with the joists and adding support beams. Both methods improve the floor’s ability to carry loads and reduce movement.
Sistering Joists
Sistering joists means attaching new joists next to old, weak, or damaged ones. This method increases the floor’s strength without removing the existing structure. It is a common way to fix uneven floors or joists that have sagged over time.
To sister joists, first identify which joists need reinforcement. Then, cut new joists to the exact length of the existing ones. Use strong wood, like 2×8 or 2×10 lumber, matching the size of the old joists.
Steps to sister joists:
- Remove any debris or nails from the old joist surface.
- Apply construction adhesive to the side of the old joist.
- Place the new joist tightly against the old one.
- Use screws or nails to fasten the two joists together every 12 inches.
- Add metal joist hangers or brackets if extra support is needed at ends.
Benefits of sistering joists:
- Increases floor load capacity
- Reduces floor bounce and sagging
- Preserves original floor layout
- Does not require removing floorboards
Adding Support Beams
Adding support beams is another effective way to reinforce a second story floor. Support beams carry much of the floor’s weight and transfer it to strong points like walls or columns. Installing new beams helps fix floors that have large spans or weak joists.
Start by finding the best place to add a beam. Usually, this is under the floor’s lowest point or where joists are longest without support. Measure the span and calculate the size of the beam needed for proper support.
Common beam materials include:
- Solid wood (like Douglas fir or pine)
- Laminated veneer lumber (LVL)
- Steel beams (for very heavy loads)
Steps to add a support beam:
- Install strong posts or columns to hold the beam.
- Lift the floor slightly if needed to place the beam underneath.
- Secure the beam to the posts and existing floor framing.
- Connect joists to the new beam using joist hangers or nails.
Adding support beams improves floor stability and stops sagging. It can also allow for larger open spaces without extra columns inside the room.
Final Level Check
After installing and adjusting the subfloor, the final level check ensures your second story floor is perfectly flat. This step prevents future problems like uneven flooring, cracks, or door issues. Checking the level carefully helps you deliver a smooth, professional finish. Use precise tools to confirm the floor’s flatness before moving on to the next stage.
Using Laser Level Tools
Laser level tools provide a fast and accurate way to check the floor level. These devices project a straight laser line across the floor, revealing any dips or high spots. The bright laser beam is easy to see, even in daylight. It covers a large area, so you can check the entire floor quickly.
To use a laser level:
- Place the laser level on a stable surface or tripod in the room’s center.
- Turn on the laser and let it project a horizontal line around the room.
- Measure the distance from the floor to the laser line at multiple points.
- Note any variations in height between points.
Verifying With Spirit Level
A spirit level is a simple, reliable tool for the final floor check. It has a small vial filled with liquid and an air bubble. The bubble’s position shows if the floor is level or sloped. Spirit levels come in different lengths, but a 4-foot level works well for second story floors.
Follow these steps to verify the floor with a spirit level:
- Place the spirit level on the floor surface at one end of the room.
- Check the bubble position. It should be centered between the lines.
- Move the level to various spots across the floor, including corners and the center.
- Mark areas where the bubble moves away from center.
Use the following tips for best results:
- Clean the floor before testing to avoid false readings.
- Check the level on both the length and width of the room.
- Double-check spots that seem uneven.
If the bubble is off-center, use shims or sanding to correct the floor. The spirit level gives a clear, visual check. It is handy for confirming the laser level results. This tool is affordable and easy to use for any DIYer.
Preparing For Flooring Installation
Preparing a second story floor for flooring installation is a critical step to ensure a smooth, level surface that lasts. Proper preparation prevents future issues like cracking, uneven wear, or water damage. This phase requires careful cleaning, priming, and waiting for materials to cure fully. Skipping these steps can lead to poor adhesion and weak flooring performance. Focus on thorough preparation to create the best base for your new floor.
Cleaning And Priming Surface
Start by removing all dust, dirt, grease, and debris from the floor surface. A clean surface is essential for strong bonding between the floor and leveling compounds or adhesives.
- Sweep and vacuum the entire area to clear loose particles.
- Use a mild detergent solution to mop the floor, removing any stains or oils.
- Allow the floor to dry completely before proceeding.
After cleaning, apply a primer designed for your leveling compound or adhesive. Priming improves adhesion and seals the surface to prevent moisture absorption.
Allowing Materials To Cure
After cleaning and priming, the next step is to allow materials to cure fully. Curing means the floor and applied compounds harden properly, reaching maximum strength.
Rushing this process causes weak spots or surface cracks. Patience here improves long-term floor stability and appearance.
- Check manufacturer guidelines for recommended curing times.
- Keep the area dry and well-ventilated during curing.
- Avoid heavy traffic or placing objects on the floor until curing finishes.
Common curing times for leveling compounds range from 12 to 48 hours. Concrete subfloors may need up to 7 days to dry completely before installing flooring.
| Material | Typical Curing Time | Conditions to Maintain |
| Self-leveling Compound | 24-48 hours | Keep dry, avoid disturbance |
| Concrete Subfloor | 3-7 days | Good ventilation, no water exposure |
| Primer | 1-4 hours | Room temperature, low humidity |
Proper curing strengthens the bond between layers and ensures a flat, durable base. Skipping or shortening curing risks costly repairs later.
You May Read Also: How to Remove Floor Leveler
Conclusion
Leveling a second story floor takes time and careful work. Start by checking the floor with a level tool. Fix any low or high spots with the right materials. Keep measurements clear and double-check your work often. Taking small steps helps avoid big problems later.
A flat floor makes your home safer and more comfortable. Stick to the process, and you will see good results. This simple guide can help you get the job done right.