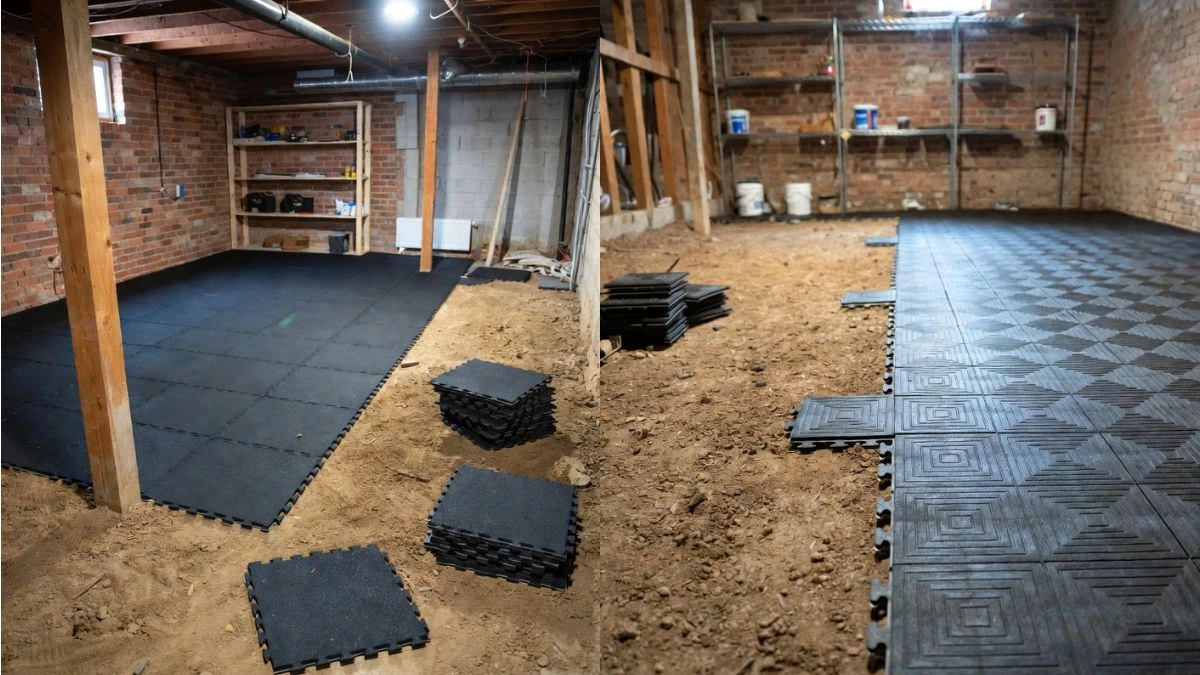
Is your basement floor just bare dirt, making the space feel unfinished and uncomfortable? You’re not alone, and the good news is—you don’t have to live with it that way.
Covering a dirt floor in your basement can transform the area into a cleaner, more usable space for storage, a workshop, or even a cozy hangout. But where do you start? This guide will walk you through simple, effective ways to cover your dirt floor so you can enjoy a basement that looks great and feels more inviting.
Choosing Flooring Options
Covering a dirt floor in a basement improves comfort, cleanliness, and usability. Choosing the right flooring option depends on budget, durability, and moisture control. Some floors need extra preparation, while others install quickly. Below are common, practical ways to cover a basement dirt floor. Each method offers unique benefits and challenges. Pick the one that fits your needs and skills best.
Concrete Overlay
A concrete overlay creates a solid, smooth surface over the dirt floor. It involves pouring a thin layer of concrete after preparing the base. This option makes the basement more stable and easy to clean.
- Preparation: Remove debris and level the dirt floor.
- Vapor Barrier: Lay plastic sheeting to stop moisture from rising.
- Reinforcement: Use wire mesh or rebar for strength.
- Pouring Concrete: Spread a 2-4 inch layer of concrete evenly.
- Finishing: Smooth the surface with a trowel.
Plywood Subfloor
Plywood subfloor is a quick, affordable way to cover dirt floors. It creates a raised platform that keeps wood off the ground. This helps reduce moisture damage.
- Level the Dirt: Fill low spots and compact the soil.
- Lay Vapor Barrier: Use plastic sheeting to block moisture.
- Install Sleepers: Place pressure-treated wood strips on the plastic.
- Attach Plywood: Screw plywood sheets onto the sleepers.
Interlocking Floor Tiles
Interlocking floor tiles offer a simple, DIY-friendly solution. They snap together over the dirt floor or existing concrete. Tiles come in plastic, rubber, or foam materials.
Steps to Install:
- Clean and level the dirt surface.
- Lay down a vapor barrier if moisture is a concern.
- Start from one corner and click tiles together.
- Cut tiles to fit edges with a utility knife.
Epoxy Coating
Epoxy coating seals and protects concrete floors. For dirt floors, it requires first installing a concrete base. Epoxy forms a hard, shiny surface resistant to stains and water.
Installation Process:
- Prepare and level the dirt floor.
- Pour and cure a concrete slab.
- Clean the concrete thoroughly.
- Apply epoxy primer and let dry.
- Spread epoxy coating evenly with a roller.
- Allow curing for several days before use.
Epoxy suits finished basements needing a polished look. It requires more prep work but yields a professional finish. Use quality epoxy for best results.
Installing A Vapor Barrier
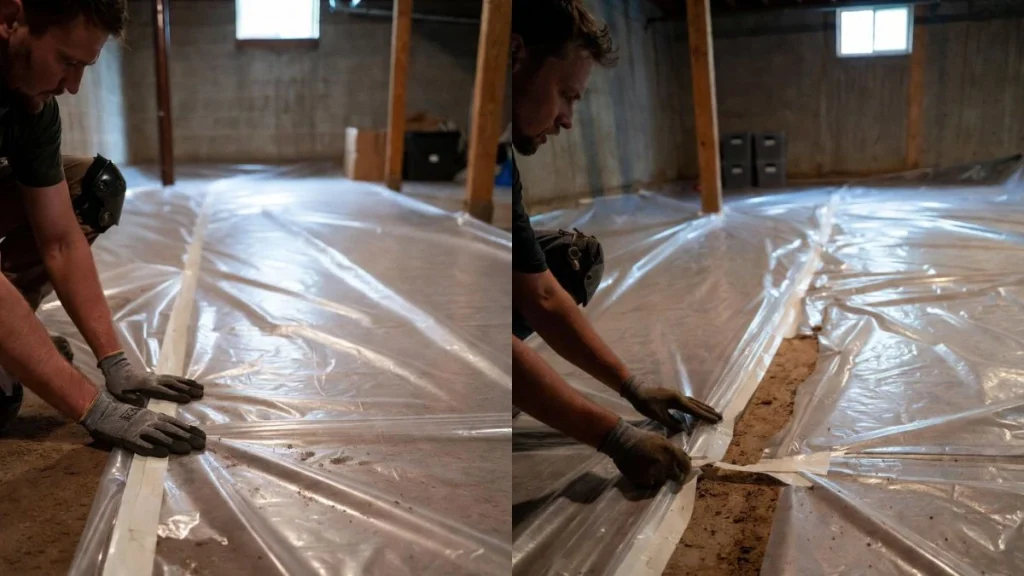
Installing a vapor barrier is a crucial step in covering a dirt floor in the basement. It helps stop moisture from rising through the ground and damaging your basement space. A good vapor barrier keeps the floor dry and prevents mold, mildew, and wood rot.
Types Of Vapor Barriers
Several types of vapor barriers suit different basement needs. Choosing the right one depends on your budget, basement size, and moisture level. Here are common types:
- Polyethylene Plastic Sheets: This is the most popular choice. It is affordable and easy to install. Usually available in 6-mil or thicker sheets for better durability.
- Foil-Backed Vapor Barriers: Reflects heat and blocks moisture. Often used under concrete slabs or flooring for extra protection.
- Rubberized Asphalt Sheets: Thicker and more durable. Provides excellent moisture and vapor resistance but costs more.
- Spray-On Vapor Barriers: Applied as a liquid that dries into a waterproof layer. Good for irregular surfaces but needs professional installation.
- Polyethylene sheets remain the best choice for most DIY basement projects. They offer a strong moisture barrier at a low cost. Thick sheets resist tears and punctures better. Overlap edges by at least 12 inches to stop moisture from slipping through joints.
Proper Installation Techniques
Proper installation of a vapor barrier guarantees long-lasting protection. Start by cleaning the dirt floor. Remove rocks, roots, and debris for a smooth surface. Level the ground if possible. Spread a layer of crushed stone or sand for extra drainage and protection.
- Roll out the vapor barrier: Lay the polyethylene sheet flat across the floor.
- Overlap seams: Overlap edges by 12 inches or more to seal joints.
- Tape seams: Use waterproof tape designed for vapor barriers to seal overlaps securely.
- Seal edges: Extend the barrier a few inches up the walls. Tape or fasten it to prevent moisture entry.
- Protect the barrier: Place a layer of gravel or sand over the vapor barrier to prevent punctures during further work.
Good installation prevents moisture from seeping into your basement floor. It also prepares the space for adding flooring or concrete over the barrier. A well-installed vapor barrier extends the life of your basement floor and keeps the area dry and safe.
Laying The Flooring Material
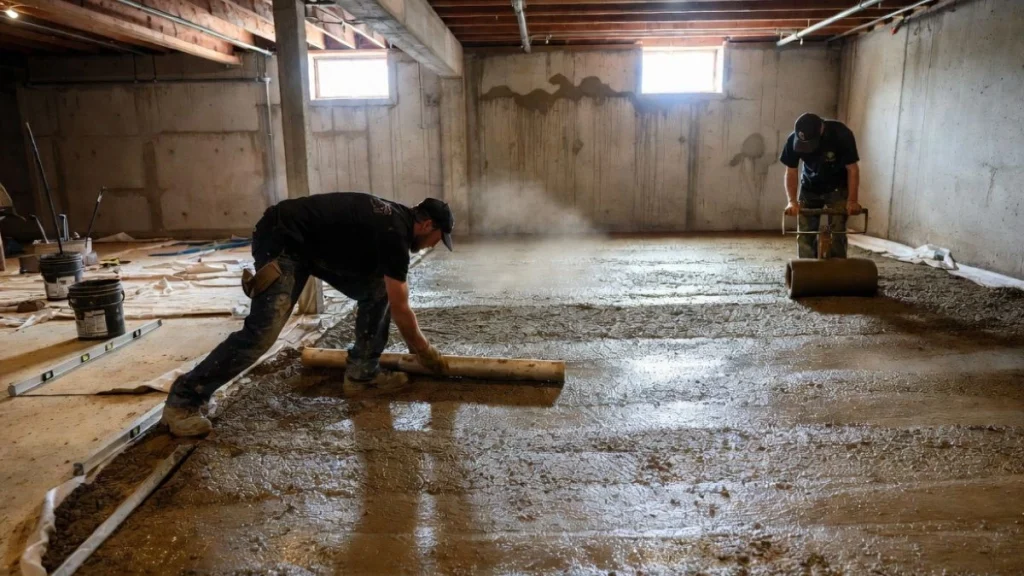
Laying the flooring material on a dirt floor in the basement transforms the space into a clean, usable area. This step is crucial for comfort and durability. Choosing the right material and installing it carefully prevents moisture and dirt problems.
Step-by-step Installation
Follow these steps to lay flooring on a dirt basement floor:
- Prepare the surface: Remove any loose dirt, rocks, or debris. Level the ground as much as possible.
- Install a moisture barrier: Lay heavy-duty plastic sheeting over the dirt to block moisture. Overlap edges by 6 inches and tape seams.
- Add a layer of gravel: Spread 2-3 inches of crushed gravel on top of the plastic. This helps with drainage and stability.
- Compact the gravel: Use a hand tamper or plate compactor to press the gravel firmly into place.
- Install a subfloor: Place plywood or concrete board panels over the gravel for a stable base. Leave small gaps between panels for expansion.
- Lay the chosen flooring: Install vinyl, laminate, or carpet tiles on the subfloor according to the manufacturer’s instructions.
Gathering the right tools and materials makes the job easier and faster. Here is what you need for laying flooring on a dirt basement floor:
| Item | Purpose | Notes |
| Plastic sheeting | Moisture barrier | Minimum 6 mil thick |
| Crushed gravel | Drainage and base | 2-3 inches layer |
| Hand tamper | Compact gravel | Manual or powered |
| Plywood or concrete board | Subfloor base | Thickness: 3/4 inch recommended |
| Measuring tape | Measure space | At least 25 feet |
| Utility knife | Cut materials | Sharp blade |
| Flooring material | Final floor surface | Choose moisture-resistant types |
Finishing Touches
After installing your new floor over the dirt basement, finishing touches ensure durability and comfort. These final steps protect your work and improve the space’s overall look and function. Paying attention to details like sealing, insulation, and maintenance helps keep the floor stable and clean for years.
Sealing Edges And Cracks
Sealing all edges and cracks is essential to stop moisture and pests from coming through the basement floor. Dirt floors often have small gaps where water and bugs can enter. Use a high-quality sealant to fill these spaces.
- Clean the area: Remove loose dirt and dust before sealing.
- Choose the right sealant: Use waterproof caulk or concrete sealant.
- Apply evenly: Run a smooth bead of sealant along all edges and cracks.
- Let it dry: Follow the product instructions for drying time.
Sealing also helps keep the floor warmer by blocking cold air. Check the sealed areas regularly and reapply sealant if cracks appear. Below is a simple checklist for sealing:
| Step | Action | Tip |
| 1 | Clean edges and cracks | Use a brush or vacuum |
| 2 | Apply sealant | Use a caulking gun for control |
| 3 | Smooth sealant | Use a damp finger or tool |
| 4 | Wait to dry | Check product instructions |
Adding Insulation
Adding insulation under or around your new basement floor improves warmth and energy efficiency. Dirt floors can feel cold, especially during winter. Insulation reduces heat loss and makes the space more comfortable.
Several insulation types suit basement floors:
- Foam board insulation: Easy to cut and install, moisture-resistant.
- Rigid fiberglass panels: Good thermal resistance but must be protected from moisture.
- Spray foam insulation: Fills gaps well and seals air leaks.
Place insulation between the dirt and the floor covering. Ensure a vapor barrier is present to prevent moisture buildup. Here is a simple process to add insulation:
- Clear the dirt floor surface.
- Lay a plastic vapor barrier over the dirt.
- Install insulation panels or spray foam evenly.
- Cover insulation with plywood or subfloor material.
Proper insulation lowers heating costs and helps avoid mold problems. Check insulation thickness and type for your climate zone.
Maintaining The New Floor
Maintaining the new floor ensures it stays safe, clean, and attractive. Regular care extends its life and prevents damage.
Key maintenance tasks include:
- Keep the floor dry: Use a dehumidifier or fans to reduce moisture.
- Clean regularly: Sweep or vacuum dirt and debris often.
- Inspect for damage: Check for cracks, loose boards, or gaps.
- Re-seal edges: Fix any cracked or worn sealant promptly.
- Protect the surface: Use rugs or mats in high-traffic areas.
Conclusion
Covering a dirt floor in your basement can improve comfort and cleanliness. Choose the right materials based on your budget and needs. Prepare the floor well to ensure a smooth, lasting finish. Simple steps like adding a vapor barrier help prevent moisture problems.
Regular care keeps your new floor looking good longer. This project can make your basement more useful and inviting. Start with small changes and see big improvements soon.