

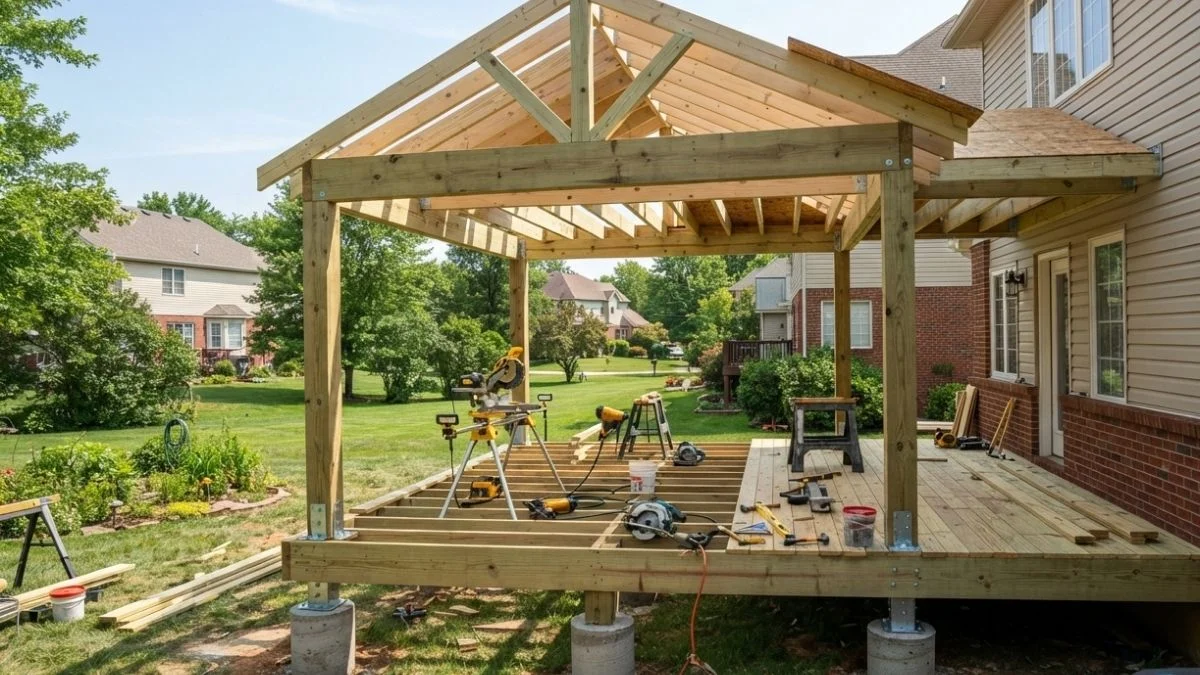
Adding a roof to your deck is one of the best upgrades you can make to your outdoor living space. It gives you shade, weather protection, and a polished look that instantly boosts curb appeal. But here’s the thing — the entire structure depends on how well your roof support posts are attached. Get that wrong, and you’re looking at a wobbly, unsafe, or even collapsed structure down the road.
This guide walks you through everything you need to know about attaching deck roof support posts the right way. Whether you’re a weekend DIYer or someone tackling their first major outdoor project, this step-by-step breakdown will help you build something solid, safe, and built to last.
Before picking up a single tool, understand this: proper post attachment isn’t just about aesthetics — it’s a structural and safety requirement. A post that shifts, leans, or pulls away from its anchor can bring down the entire roof. That’s why we’re going to cover every detail, from footings to final inspection.
Understanding Deck Roof Support Posts

What Are Deck Roof Support Posts?
Deck roof support posts are the vertical structural members that carry the weight of your deck roof and transfer that load down into the ground through footings. They sit between the roof beam above and the footing below, acting as the backbone of your entire covered deck structure.
These posts are different from the posts that support your deck frame. Deck frame posts only carry the weight of the decking and people on it. Roof support posts carry an entirely different load — the weight of roofing materials, rain, snow, and wind pressure. That’s why they need to be sized, positioned, and attached correctly.
Without properly installed support posts, even a well-built roof becomes a liability. They need to be perfectly plumb, securely anchored at the base, and firmly connected to the beam at the top. Any weakness in those connections creates risk.
Types of Deck Roof Support Posts
| Post Type | Best For | Key Benefit |
| Pressure-Treated Wood (6×6) | Most residential covered decks | Strong, affordable, widely available |
| Pressure-Treated Wood (4×4) | Smaller pergolas or light structures | Easier to handle, budget-friendly |
| Steel Posts | Modern or commercial builds | Extremely strong, slim profile |
| Composite Posts | Low-maintenance builds | Rot-proof, no sealing required |
For most homeowners building a standard covered deck, pressure-treated 6×6 lumber is the go-to choice. It handles heavy loads, resists moisture and insects, and meets most local building codes.
Do You Need a Permit?
Yes — in most cases, you do. Any structural addition to a home, including a covered deck roof, typically requires a building permit. This isn’t just red tape. Permits exist to make sure your structure meets safety codes that protect you, your family, and future buyers of your home.
Skipping a permit can result in fines, forced demolition, and serious problems when you try to sell your home. Always check with your local building department before breaking ground.
Planning and Preparation Before You Start
Measuring and Laying Out Post Locations
Accurate layout is everything. Misplace a post by even a few inches and your beam won’t line up, your roof won’t sit level, and the whole project becomes a headache.
Use batter boards and string lines to mark out your post positions before any digging begins. Standard post spacing for covered decks is typically 8 to 10 feet apart, but this depends on your beam size and roof load. Measure twice, mark clearly, and double-check diagonal measurements to confirm your layout is perfectly square.
Calculating Load Requirements
Your posts need to handle two types of load:
- Dead Load — the permanent weight of roofing materials, beams, and framing
- Live Load — temporary weight like snow accumulation, wind pressure, and maintenance workers on the roof
In areas with heavy snowfall, load calculations become especially important. A 6×6 post can typically support significantly more load than a 4×4, which is why 6×6 is almost always the right call for roof support applications.
If your roof span is large or your region experiences heavy snow or high winds, seriously consider consulting a structural engineer. A one-time consultation fee is far cheaper than a collapsed structure.
Check for Underground Utilities
Before you dig a single hole, call 811 (in the United States). This free service marks the location of underground gas, electric, water, and cable lines on your property. Hitting a buried utility line while digging is dangerous, expensive, and completely avoidable. Make this call at least a few days before your planned start date.
How to Attach Deck Roof Support Posts — Step-by-Step

Dig and Pour the Footings
Your footings are the foundation of everything. They need to go deep enough to sit below the frost line in your region — typically 36 to 48 inches in colder climates, and 12 to 18 inches in warmer areas. Check with your local building department for the exact depth required in your area.
Dig your holes using a post hole digger or power auger. The diameter should be at least three times the width of your post — so for a 6×6 post, you want a footing at least 18 inches wide.
Mix your concrete according to the bag instructions and pour it into the hole. While the concrete is still wet, set your J-bolt or post base anchor in the exact position using your string lines to guide placement. Check that it’s perfectly level and aligned before the concrete begins to set. Fast-setting concrete typically cures enough to work with in 20 to 40 minutes, but wait at least 24 hours before applying any load.
Install the Post Base Anchors
Once your concrete has fully cured, it’s time to install your surface-mount post bases if you didn’t embed them. Position each base over the anchor bolt, slip on the washer, and thread on the nut. Before tightening, use a string line to confirm all bases are in perfect alignment with each other. Even a small misalignment here will cause problems when you set the posts.
Tighten the nuts securely but don’t overtighten to the point of cracking the concrete around the bolt. Once all bases are set, do a final alignment check before moving on.
Cut and Prepare the Support Posts
Measure and cut each post to the correct height. Remember to account for the height of the post base at the bottom and the depth of the beam seat or post cap at the top.
Immediately after cutting, brush all cut ends with a quality wood preservative. Pressure-treated lumber is treated along its length during manufacturing, but cut ends expose untreated wood to moisture. Sealing those ends adds years to your posts’ lifespan.
Pre-drill your bolt holes before installation to prevent the wood from splitting when you drive hardware through it.
Set and Secure the Posts
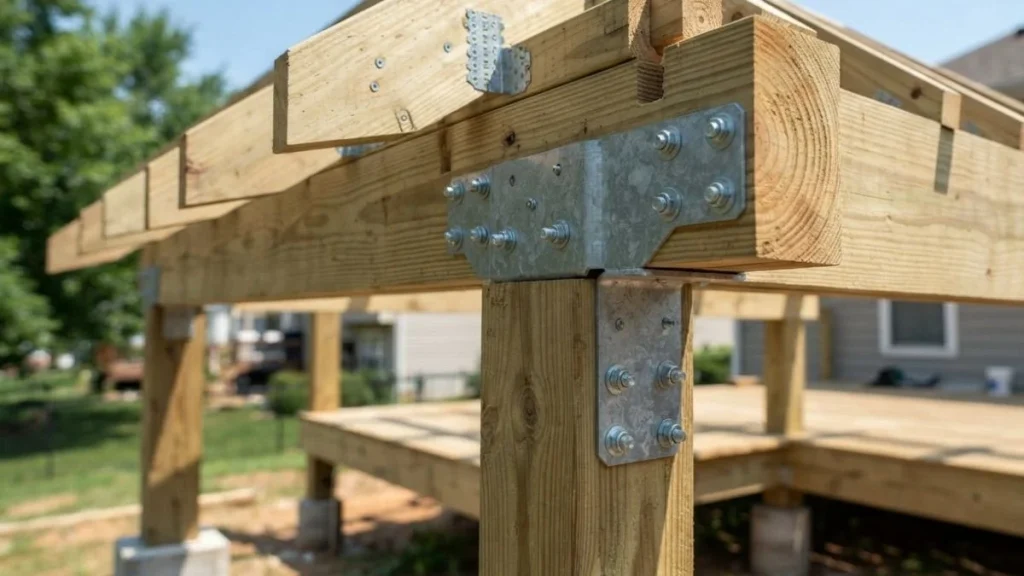
Place each post into its base anchor. Have a helper hold it steady while you tack in a temporary 2×4 brace to keep it upright. Check the post for plumb on two adjacent sides using your 4-foot level. Adjust the temporary bracing until the post is perfectly vertical on both planes.
Once plumb, drive the structural screws or bolts through the post base holes and into the post. Most post base hardware requires specific fastener sizes — follow the manufacturer’s specifications. Don’t substitute regular screws for structural hardware. The difference in shear strength is significant.
Leave the temporary braces in place until the beams are installed and everything is connected.
Attach the Beam to the Top of the Posts
With all posts set and plumb, it’s time to install the beam. Your beam should be sized for the span it covers — a longer span requires a deeper, heavier beam. For most residential covered decks, a doubled 2×10 or 2×12 beam works well for spans up to 12 feet.
Use post caps to connect the beam to the top of each post. Post caps cradle the beam and provide a strong mechanical connection that far outperforms toenailing alone. Set the beam into the post caps, check that everything is level across the entire run, then fasten the beam using the hardware slots in each post cap with the specified structural screws.
Add Diagonal Bracing for Lateral Stability
This step gets skipped more than any other — and it’s one of the most important. Without lateral bracing, your posts can rack side to side under wind load. This is especially true for taller posts.
Knee braces are the most common solution. These are diagonal 4×4 or 2×6 members cut at 45-degree angles and installed between the post and beam on at least two sides of each post. Cut them to fit snugly, then fasten them with structural screws driven through pre-drilled holes. A good knee brace should be a minimum of 24 inches long on each leg.
Final Inspection and Load Test
Before you call the job done, walk the entire structure and inspect every connection point. Check that:
- Every post is still plumb
- All post base fasteners are tight
- Beam-to-post cap connections are fully fastened
- Knee braces are solid with no movement
- No hardware shows signs of damage or improper installation
If your project required a permit, schedule your building inspection before adding roofing materials. The inspector needs to see the structural framing. Once approved, you’re clear to move forward.
Recommended: How to Attach 4×4 Post to Existing Deck for Roof
Common Mistakes to Avoid
Even experienced builders make mistakes on post installation. Here are the most common ones to watch out for:
- Setting posts directly in soil without concrete footings — this leads to rot and shifting within just a few years
- Using 4×4 posts where 6×6 is required for the load
- Skipping the frost line depth on footings, which causes heaving during freeze-thaw cycles
- Not bracing posts during installation, leading to out-of-plumb posts locked in place permanently
- Using interior-grade hardware that will rust and fail outdoors
- Ignoring lateral bracing, which is a leading cause of covered deck failures in high-wind events
- Not sealing cut ends of pressure-treated lumber, accelerating rot at the most vulnerable points
Tips for Long-Lasting Deck Roof Support Posts
Wood Treatment and Weatherproofing
Even pressure-treated posts benefit from a quality exterior wood sealant applied annually. Pay special attention to the areas around the post base, where water tends to pool and wick into the end grain. Use a penetrating oil-based sealant rather than a film-forming product, which can peel and trap moisture underneath.
Inspect your posts every spring for early signs of rot — soft spots, dark discoloration, or a hollow sound when tapped. Catching decay early means a simple repair instead of a full replacement.
Routine Maintenance Schedule
Once a year, go through every connection point on your support posts. Check for rust on hardware, re-tighten any fasteners that have loosened with seasonal wood movement, and re-apply sealant to exposed wood surfaces. This simple annual routine can double the lifespan of your support posts.
Conclusion
Attaching deck roof support posts correctly is the difference between a covered deck that stands strong for decades and one that becomes a safety hazard after a few seasons. The process takes patience, the right materials, and attention to detail — but it’s well within reach for a prepared homeowner.
Follow the steps in this guide, don’t cut corners on hardware or footing depth, and always pull the necessary permits. Your finished covered deck will be something you’re proud of every time you step outside.


