A single missed flashing step or undersized fastener when porch roof attaching ledger board to house for roof can cause water infiltration, rot, and structural failure that voids your homeowner’s insurance.
Most DIY homeowners know they need a ledger board but don’t know which fasteners meet code, how to flash against the house sheathing, or how much load their rim joist can actually handle.
This guide gives you the exact installation sequence, fastener specs, and flashing method to build a code-compliant, weatherproof porch roof connection that lasts.
Why Roof Ledgers Differ from Deck Ledgers
A deck ledger carries horizontal joist loads pulling away from the house. A roof ledger carries something more complex — downward gravity loads from roofing materials, framing weight, and snow, plus lateral thrust from rafter pairs pushing outward against the wall.
That difference in load direction changes everything about how you attach the ledger board to house framing.
Load Path: Roof vs. Deck
Deck ledgers typically bolt into the band joist (rim joist) because that member is designed to resist horizontal pull. Roof ledgers, by contrast, must transfer loads into wall studs or a doubled top plate — not the rim joist, which has no capacity for downward thrust or rafter spread.
This means attaching roof to house frame requires you to locate every wall stud and fasten directly into them, typically with 1/2-inch lag screws or through-bolts at 16-inch spacing or less.
Fastener Requirements
Lag screws work for most patio roof ledger board fastening situations, but through-bolts (carriage bolts passing completely through the ledger, sheathing, and framing) provide stronger shear resistance for heavier roof loads. The IRC (International Residential Code) specifies minimum fastener diameter, embedment depth, and spacing based on the tributary area your ledger supports — not a one-size rule.
Flashing Differences
Deck ledger flashing installation runs horizontally along one plane. Roof ledger flashing under gutters must account for the roof pitch, direct water away from the wall, and integrate with any existing gutter system above. The angle and overlap requirements are stricter because roof runoff volume is significantly higher than deck drainage.
Preparation: Removing Siding and Locating Framing

Skipping siding removal is the most common mistake in ledger board installation. Attaching directly over siding leaves a gap between the ledger and the house sheathing, which concentrates load on fastener heads instead of distributing it across the framing connection — and creates a water trap that rots both surfaces within a few years.
Ledger Board Siding Removal Technique
Mark the ledger location on the wall first, then add 1 inch above and below for flashing clearance. Use a circular saw set to the exact depth of your siding material — typically 3/4 inch for wood lap siding or 7/8 inch for fiber cement. Cut carefully to avoid damaging the house sheathing underneath.
For vinyl siding, use a zip tool to unlock courses and remove them without cutting. Save the pieces — you’ll reinstall them above the flashing after the ledger is set.
Once siding is removed, inspect the exposed roof sheathing and rim joist area for any existing rot or water damage. Fix those problems before proceeding. Installing a ledger over compromised framing negates every other step in this guide.
Locating and Marking Stud Positions
Use a quality stud finder — the Zircon e50 or similar — to locate every stud in the ledger zone. Mark stud centers with a pencil, then verify each mark by driving a small finish nail. Studs in standard framing are at 16-inch centers, but older homes vary.
Snap a chalk line along the ledger’s top edge for alignment. Mark each fastener location clearly before drilling any pilot holes — repositioning a lag screw after drilling weakens the connection point.
Fastening Methods: Lag Screws vs Through-Bolts
Fastener selection determines whether your porch roof structural attachment holds for decades or fails under the first heavy snow load. The choice between lag screws and through-bolts comes down to roof span, tributary load, and how accessible the interior wall is.
Lag Screw Installation for Moderate-Span Roofs
Lag screws are the standard choice for patio roof ledger board fastening on spans up to 10 feet with light to moderate loads. Use 1/2-inch diameter hot-dipped galvanized or stainless steel lags with a minimum 3-inch embedment into the stud — not into sheathing alone, which provides almost no withdrawal resistance.
Always use a 1/2-inch steel washer under each lag head. Without it, the head pulls through the ledger under uplift loads. Space lags at 16 inches on center for standard loads, tightening to 12 inches for roofs with heavier material like tile or in high-snow regions.
Through-Bolt Attachment for Larger Spans and Snow Loads
Through-bolts — typically 1/2-inch carriage bolts passing completely through the ledger, sheathing, and wall framing — provide superior shear strength for heavier porch roof structural attachment methods. They’re the right choice for spans over 10 feet or any roof in a climate with ground snow loads above 20 psf (pounds per square foot).
Use this spacing as a baseline for attaching roof to house frame:
| Roof Span | Light Load (under 20 psf) | Heavy Load (20–40 psf) |
|---|---|---|
| 8 ft | 16 in on center | 12 in on center |
| 10 ft | 14 in on center | 10 in on center |
| 12 ft | 12 in on center | 8 in on center |
Always verify against your local code and the fastener manufacturer’s published load rating tables — Simpson Strong-Tie and FastenMaster both publish free span/load charts for their ledger fastener products.
Flashing Installation as Water Barrier
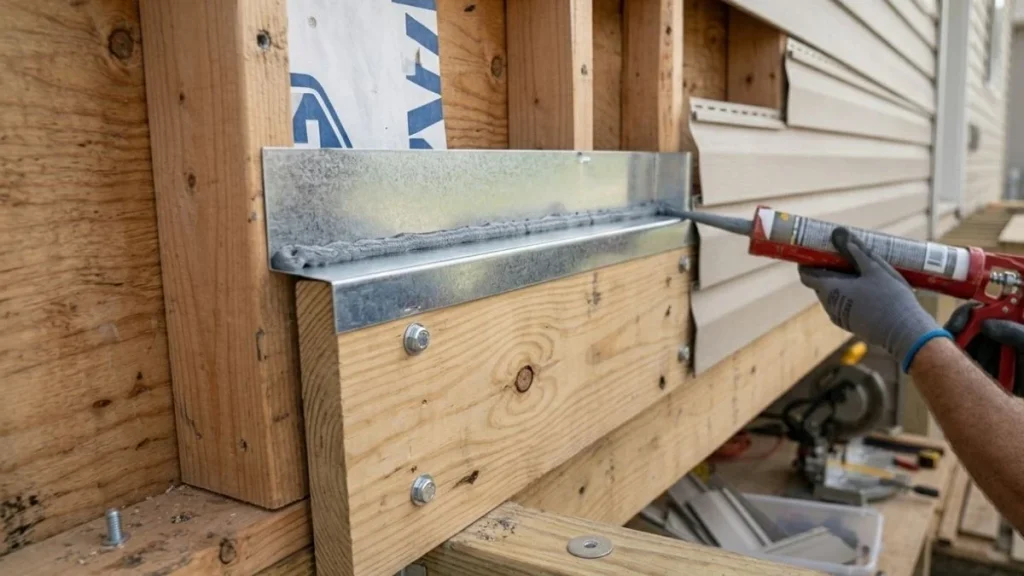
Flashing is not optional trim — it is the only thing preventing water from running behind your ledger board and into the wall cavity. Without proper ledger board flashing installation, even a perfectly fastened ledger will rot the house framing within 5 to 10 years.
How Flashing Seats Against the House
The flashing must slide up behind the existing house siding or roof sheathing above the ledger, then fold down over the ledger’s top face and extend at least 2 inches onto its outer surface. Use a continuous piece of 26-gauge galvanized steel or aluminum step flashing — never rely on sealant alone as a substitute for physical coverage.
Apply a bead of polyurethane sealant (Sikaflex 1a or equivalent) along the top edge where the flashing meets the sheathing, and at both end cuts of the ledger. Every gap is a rot pathway. The flashing itself must remain exposed on the outer face so water sheds freely onto the porch roof below rather than wicking behind the board.
Working Around Existing Gutters and Roof Lines
Roof ledger flashing under gutters requires temporarily removing the gutter section directly above the ledger zone. Most gutters detach from their hangers with a flat bar — mark hanger positions before removal so reinstallation is exact.
Once the gutter is clear, slide the flashing up under the lowest course of roof shingles or under the roof sheathing fascia. It needs a minimum 4-inch run under the existing roofing material to stop ice dam backflow. Reinstall the gutter after flashing is secured, positioning it to drain over the flashing face, not behind it.
Recommended: How to Attach a Ledger Board to a Brick House
Common Installation Mistakes to Avoid
Most ledger failures trace back to 4 repeatable errors. Each one is preventable with the right sequence and materials.
Skipping Flashing or Sealing Gaps Improperly
The most destructive mistake in ledger board flashing installation is using caulk as the primary water barrier instead of physical flashing. Caulk cracks, shrinks, and fails within 3 to 5 years. Flashing physically redirects water — caulk only fills gaps temporarily. Use sealant only as a secondary layer at flashing seams, never as the sole defense.
Fastening Directly Over Siding
Attaching the ledger board to house framing without removing siding first creates a rigid point load on fastener heads instead of a full bearing surface. It also traps moisture between the siding and ledger face. The ledger board siding removal technique exists precisely to eliminate this failure mode — there is no code-compliant shortcut around it.
Cutting Roof Sheathing Unnecessarily
Some builders cut into the roof sheathing to route the ledger flush with the wall — this is almost never necessary and weakens the structural connection between the roof and wall top plate. Work around the sheathing edge instead of through it. If the ledger height conflicts with existing sheathing, adjust the ledger position or use a spacer block rather than cutting structural material.
Misaligning Ledger with Existing Roof Pitch
A ledger set at the wrong height or angle forces every rafter to compensate with non-standard cuts, compounding load distribution errors across the entire porch roof structural attachment. Measure the existing roof pitch first using a digital angle finder, then set the ledger height so your new rafters meet it at a consistent, calculable angle. Mark this on the ledger face before driving a single fastener.
Frequently Asked Questions
Can I attach a ledger directly to house siding without removal?
No. Attaching over siding creates a gap between the ledger and house sheathing that concentrates load on fastener heads, prevents proper flashing installation, and traps moisture against the wall. Every code-compliant porch roof ledger board fastening method requires full siding removal down to the sheathing surface.
What goes between the ledger board and house framing?
Nothing should go between them except flashing at the top edge. The ledger must bear directly against the house sheathing for full surface contact and load transfer. Spacers, foam, or extra sealant layers between the ledger face and sheathing reduce bearing area and introduce compressible material into a rigid structural connection.
How do I know if my house framing is strong enough for a roof ledger?
Inspect the wall studs and top plate in the attachment zone for rot, insect damage, or undersized lumber — standard 2×4 or 2×6 studs at 16-inch centers handle most residential porch roof loads. For spans over 12 feet, roofs with tile or metal material, or any snow load above 30 psf, have a structural engineer verify the wall framing capacity before attaching roof to house frame.
Ready to Build a Code-Compliant Connection
Flashing and fastener placement are not finishing details — they are the structural and weatherproofing foundation that determines whether your porch roof lasts 30 years or fails in 5. Before cutting a single piece of siding, pull your local residential building permit and confirm fastener spacing requirements with your inspector, since IRC minimums are a floor, not a ceiling, and local amendments often require tighter specs.