


Standard joist hangers are not designed for stair stringers — and using them anyway is one of the most common structural mistakes inspectors flag on DIY decks.
The problem is that most homeowners shopping for hardware don’t know joist hangers and stair stringer hangers are different products with different load ratings, angles, and code requirements before they arrive at the lumber yard.
By the end of this guide, you’ll know exactly which connector to use, why it matters structurally, and how to meet IRC code requirements the first time.
Why Standard Joist Hangers Fall Short for Stringers
Standard joist hangers are engineered for horizontal loads — the downward force a floor joist carries along a flat plane. Stair stringers carry load at an angle, typically between 30 and 45 degrees, which shifts how force transfers through the connector and into the rim joist. A standard hanger isn’t shaped or rated to handle that angled load path.
The Load Angle Problem
When you attach stair stringers to a rim joist using a flat joist hanger, the connector fights the natural direction of force. Every step someone takes drives load diagonally down the stringer. That angled force creates a rotating or “peeling” stress on the hanger’s face — exactly the condition flat hangers are not tested for. Simpson Strong-Tie and MiTek both publish load tables for their connectors, and neither lists diagonal stringer applications as an approved use for standard joist hangers.
Inadequate Vertical Support Under Load
Stair tread weight doesn’t distribute the same way floor load does. Each footstep concentrates impact force on a single tread, which transfers as a point load down the stringer into the hanger. Standard hangers lack the seat depth and fastener count to resist that repeated point loading without loosening over time.
What Inspectors and Codes Actually Flag
According to the National Association of Certified Home Inspectors (NACHI), improper stringer attachment is one of the most frequently cited structural deficiencies on residential decks. The IRC requires stringer connections to resist both vertical and lateral forces — a performance threshold standard joist hangers don’t meet at the rim joist connection.
Stair Stringer Hangers: Design and Options
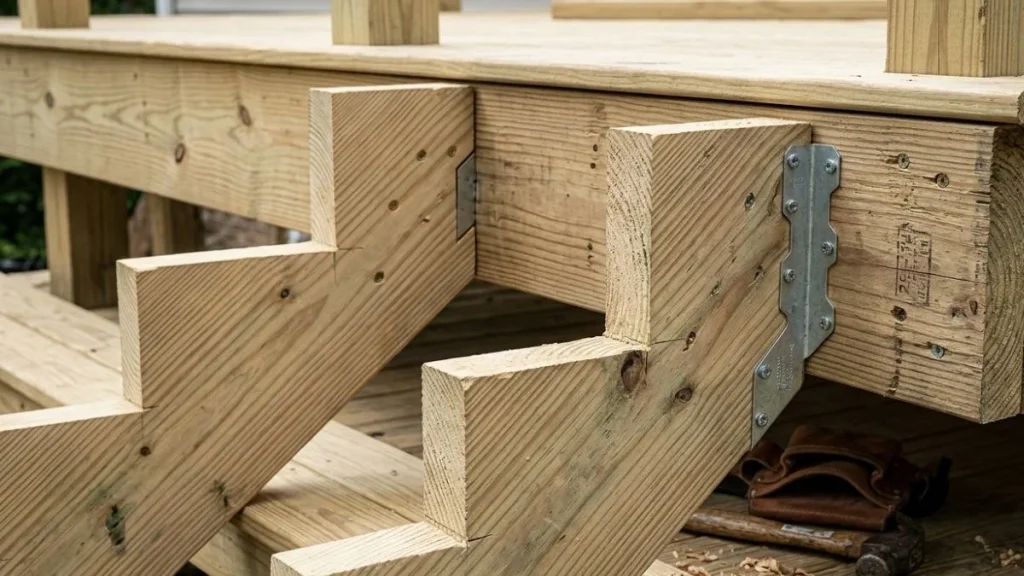
Stair stringer hangers are purpose-built connectors that cradle the top of a stringer at its correct angle and transfer load directly into the rim joist. They come in two installation styles and several structural configurations depending on stringer size and pitch.
Visible vs. Concealed Installation Styles
Visible stringer hangers bolt or nail underneath the stringer where you can see them. This makes inspection straightforward — you can confirm fastener count, check for corrosion, and adjust the bracket position before finalizing the connection. Most standard deck stair framing uses this approach.
Concealed stair stringer hangers, sometimes called hidden hanger technology, wrap around the stringer from behind so no metal shows on the face of the stairs. The structural function is identical, but the finished look is cleaner. Homeowners replacing a front porch staircase often prefer this style for curb appeal. Installation requires more precision because you can’t visually confirm the seat engagement as easily.
Specialized Hanger Types
Adjustable stair stringer brackets accommodate variable pitch angles, typically between 25 and 65 degrees, making them practical when your stair slope doesn’t fall on a standard increment. These are useful on remodel projects where the existing rise and run doesn’t match common deck stair framing ratios.
For heavier applications, heavy-duty options rated for 2×10 and 2×12 stringers carry significantly higher loads. Simpson Strong-Tie’s LSSU series and MiTek’s adjustable stringer connectors both publish allowable loads in their technical data sheets — typically ranging from 1,500 to over 3,000 pounds depending on fastener requirements and lumber size. Always match the connector’s rated capacity to your calculated stringer load before purchasing.
Attachment Methods: Hangers vs. Lag Bolts
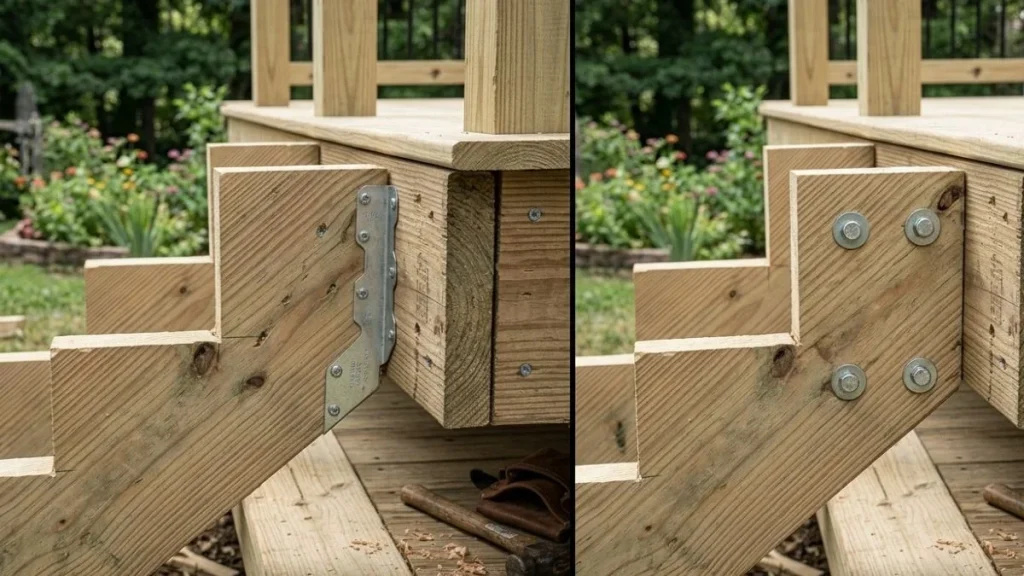
Two approved stringer attachment methods exist for deck stair framing: dedicated stringer hangers and direct lag bolt connections through the rim joist. Each has specific installation requirements and trade-offs.
Stringer Hanger Installation Path
- Position the hanger on the rim joist at the correct height so the stringer sits at the intended angle without shimming.
- Nail or bolt the hanger to the rim joist using only the fastener type specified in the manufacturer’s load table — typically 10d or 16d joist hanger nails, not deck screws.
- Seat the stringer fully into the hanger cradle before driving any fasteners through the hanger’s stringer-side holes.
- Fill every fastener hole in the connector. Skipping holes reduces the rated load capacity proportionally.
Note that deck screws are not a code-compliant substitute for joist hanger nails. The IRC and connector manufacturers both prohibit them because screws are brittle under the shear forces present in stringer connections.
Lag Bolt Alternative
Lag bolts driven directly through the rim joist and into the end grain of the stringer are a legitimate alternative for many residential applications. The standard specification calls for two 1/2-inch lag bolts per stringer, minimum 3 inches of thread penetration into the stringer, spaced at least 1.5 inches from the stringer edge.
Here’s the trade-off: lag bolts alone rely entirely on end-grain withdrawal resistance, which is weaker than side-grain connections. Stringer hangers distribute load across a broader bearing surface, making them the stronger option under repeated impact loading. Local building departments sometimes require hangers specifically for stairs with more than 4 risers — confirm your jurisdiction’s requirements before choosing a method.
Installation Mistakes and Structural Confidence
Most stringer connection failures trace back to 4 specific mistakes made during installation — not product defects. Knowing them in advance eliminates the most common causes of callbacks, failed inspections, and unsafe stairs.
Notching Stringers to Fit the Wrong Hanger
Some DIYers notch the top of a stringer to make it sit flush in a standard joist hanger. This is a structural mistake. Notching removes wood from the most stress-concentrated point on the stringer — the top where it bears against the rim joist connection. The IRC explicitly restricts notching in structural members, and no manufacturer load rating accounts for a notched stringer. Use the correct stringer hanger instead.
Fastener Sizing and Spacing Errors
Undersized fasteners and incorrect spacing are the two most common fastener requirements violations inspectors find. A 1/4-inch bolt where a 1/2-inch is specified doesn’t carry half the load — it can fail catastrophically under dynamic stair loading. Always cross-reference Simpson Strong-Tie or MiTek’s published installation tables, not general hardware store guidance.
Misaligned Hangers
A hanger installed even slightly out of plumb forces the stringer to bear unevenly across the connector seat. This concentrates load on one edge of the hanger rather than distributing it across the full bearing surface, accelerating connector fatigue and loosening fasteners over time.
Material Compatibility for Outdoor Exposure
Galvanized connectors meet minimum requirements for standard deck stair framing, but stainless steel is the correct choice near saltwater or when using ACQ-treated lumber. ACQ treatment is chemically aggressive and accelerates corrosion in standard galvanized hardware — Simpson Strong-Tie’s ZMAX coating or stainless product lines are both rated for ACQ contact.
Choosing Your Attachment Method: Decision Framework
The right stringer attachment method depends on 4 specific variables: exposure conditions, stringer count, your inspection access needs, and budget. Work through each one before purchasing hardware.
Outdoor vs. Interior Applications
Outdoor deck stair framing requires corrosion-resistant connectors rated for exterior exposure — at minimum hot-dipped galvanized, and stainless steel when ACQ lumber or coastal conditions are involved. Interior stair stringers in a dry conditioned space can use standard uncoated connectors without corrosion risk. Never use interior-rated hardware outside, even temporarily.
Single vs. Multiple Stringer Setups
A single stringer carries the full stair load through one rim joist connection point. This demands a higher-capacity connector — typically a heavy-duty adjustable stair stringer bracket rated for your calculated load. Three-stringer setups distribute weight across more connection points, which reduces the demand on any individual hanger and gives you more flexibility on connector selection.
DIY Confidence and Inspection Access
Visible stringer hangers are the better choice for first-time deck builders. You can confirm full fastener installation and check seating alignment before the inspector arrives. Concealed stair stringer hangers require precise positioning because you lose visual confirmation of the seat engagement after installation.
Budget Reality
A pair of Simpson Strong-Tie stringer hangers costs roughly $10–$25 per stringer depending on size and style. Lag bolts run less than $5 per stringer in materials. The cost difference is small, but the labor difference matters — hangers require exact positioning on the rim joist, while lag bolts are faster to install if your local code permits them. Spend the extra $15 on the correct hanger if your jurisdiction or load conditions require it.
You May Read Also: How to Attach Stair Stringers to Joist
Make the Right Call for Your Stairs
Stair stringers and floor joists carry load differently, and using a standard joist hanger where a stringer hanger belongs is a structural mismatch — not a shortcut. Before you buy any hardware, pull up the Simpson Strong-Tie or MiTek connector selector tool online, enter your stringer size and pitch angle, and confirm the exact product number and fastener requirements for your application. Then check with your local building department to verify whether your jurisdiction requires hangers or permits lag bolts for your stair configuration.


