

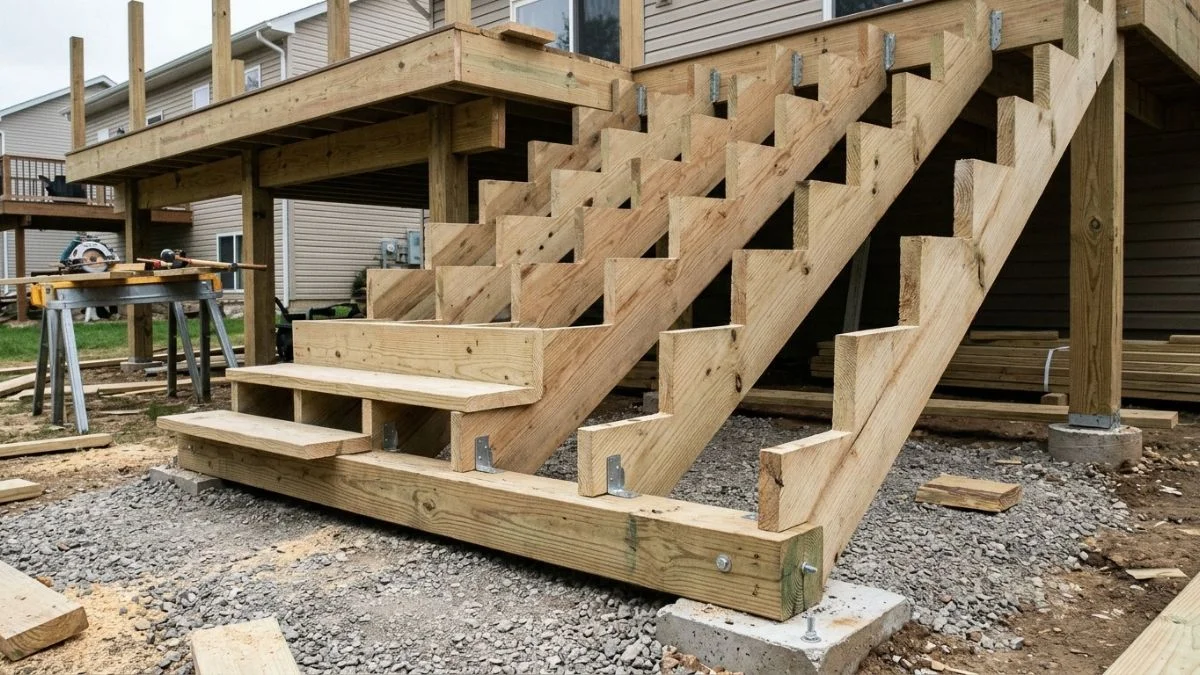
Unsupported or undersized stair stringers are one of the most common structural failures on residential decks — and knowing how to support stair stringers correctly is the difference between a staircase that lasts decades and one that deflects, creaks, or collapses under load.
Most DIY builders and even experienced contractors underestimate how quickly span length, lumber grade, and tread load combine to push a stringer past its safe limits.
This guide gives you exact span thresholds, base plate installation steps, mid-span bracing methods, and the load calculations needed to build stairs that meet code and hold safely.
The 10-Foot Span Rule and When Support Becomes Required
A stair stringer spanning more than 10 feet without mid-span support is operating at the edge of safe structural performance — and often beyond it.
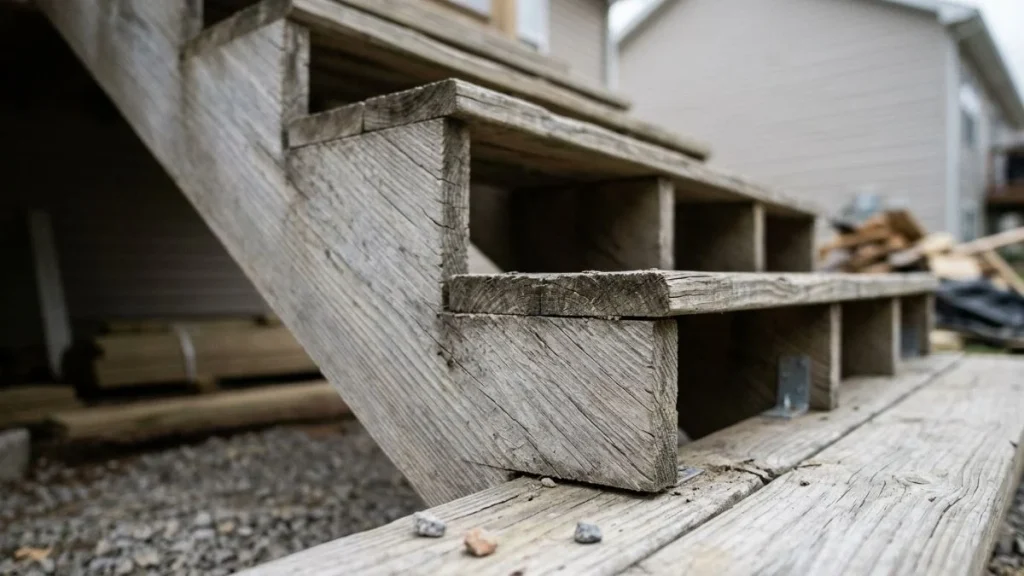
What the 10-Foot Threshold Actually Means
The 10-foot rule is not a hard code requirement but an industry-recognized benchmark based on stringer load distribution and deflection limits for standard lumber grades. A typical 2×12 Southern Yellow Pine or Douglas Fir stringer, cut to standard 7-inch rise and 10-inch run dimensions, loses significant bending resistance as unsupported span increases. Past 10 feet, live load stress — the weight of people moving up and down — creates enough moment force to cause visible deflection mid-span.
The International Building Code requires stair stringers to support a minimum 40 psf (pounds per square foot) live load. For a 36-inch-wide staircase with three stringers, that load distributes across each member. But span length multiplies that stress. A 12-foot unsupported stringer carrying its share of that load can deflect well beyond the L/360 limit engineers use as the threshold for acceptable flex.
How to Spot a Stringer That Has Exceeded Its Safe Span
The warning signs are physical and unmistakable:
- Visible sag or bow along the stringer’s bottom edge
- Pronounced bounce or spring when stepping on mid-stair treads
- Audible creaking under normal foot traffic
- Separation at deck stair connections or the top ledger attachment point
Any one of these signals that structural stair support is inadequate. At that point, stringer span limitations have been exceeded and reinforcement — either mid-span support or full replacement — is required.
Base Plate Installation: Foundation Support Method
Stringer base plate installation transfers vertical load directly into a solid bearing surface, eliminating the cantilevered stress that causes long stringer deflection.
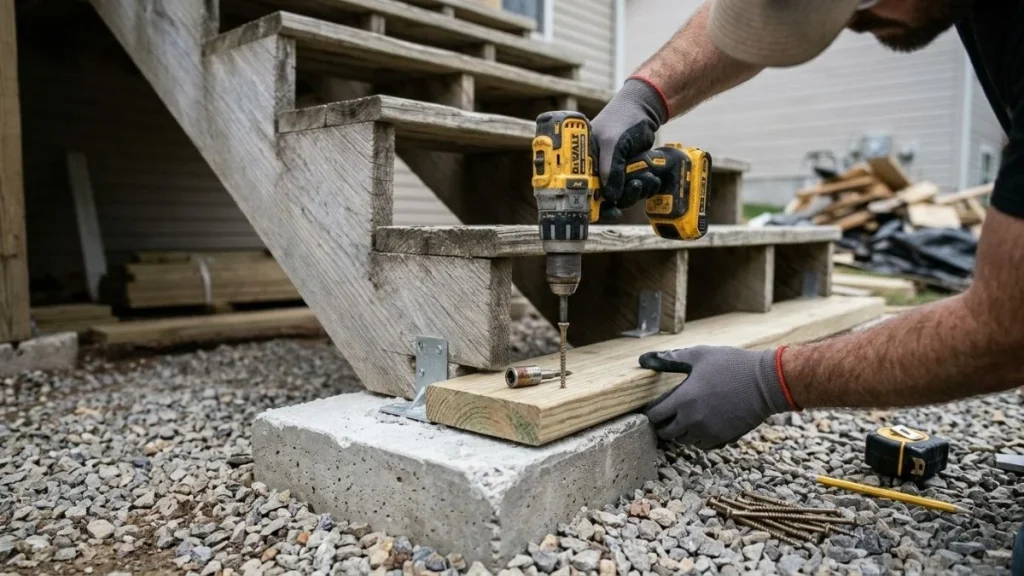
How to Install a Base Plate Correctly
The standard method uses a pressure-treated 2×4 or 2×6 laid flat and perpendicular to the stringer’s bottom edge at the base of the stair run. Each stringer sits on top of this plate, which spreads the concentrated point load across a wider bearing area before transferring it into the concrete footing or deck framing below.
Follow these steps for a solid installation:
- Cut the base plate from #2 or better pressure-treated lumber — UC4B rated for ground contact if the plate will sit on or near concrete.
- Position the plate perpendicular to all stringers simultaneously so load distribution stays even across the full stair width.
- Notch the bottom of each stringer where it meets the plate, creating a 1.5-inch-deep seat cut for a flush, stable bearing surface.
- Fasten each stringer to the plate using two 3-inch structural screws or 16d galvanized nails per connection point.
- Anchor the plate itself to the concrete pad or deck band board using deck stair footing anchors — Simpson Strong-Tie makes code-compliant hardware specifically for this application.
Pressure-Treated vs. Composite Plate Material
Pressure-treated lumber is the default for exterior base plates because it resists moisture, rot, and insect damage. Composite lumber works as a substitute only when the manufacturer’s load rating meets or exceeds the stringer load distribution requirements for your specific stair width and span. Never use standard dimensional lumber — even briefly — in ground-contact or concrete-adjacent applications.
Mid-Span Bracing for Long or Heavy-Load Stringers
When a staircase exceeds 10 feet in total run or carries concentrated loads — hot tub access stairs, commercial-grade deck stairs, or stairs wider than 48 inches — a base plate alone cannot control mid-span deflection.
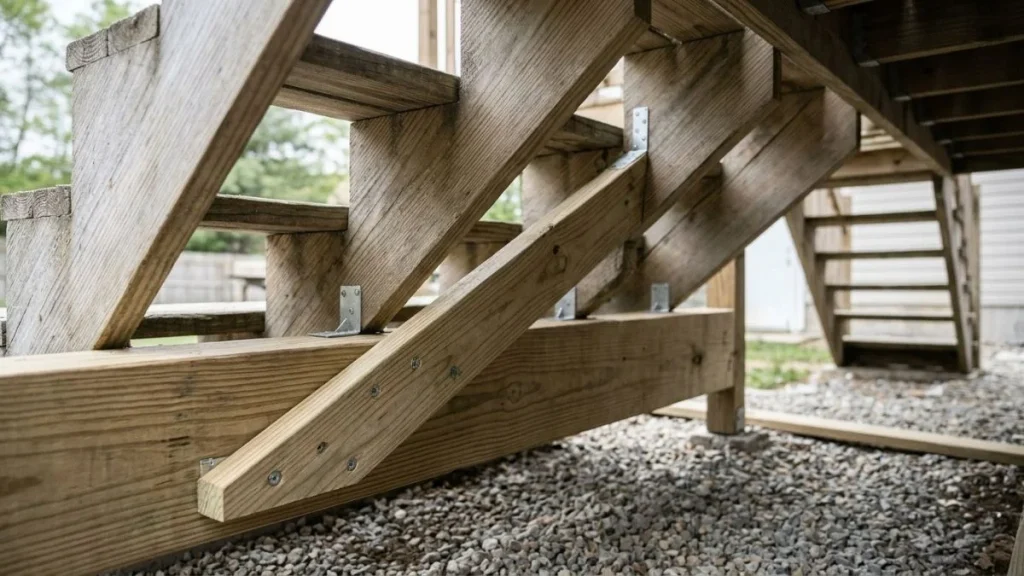
When to Add Mid-Span Support
The base plate handles vertical load at the bottom bearing point. It does nothing to resist the bending moment that builds at the center of a long stringer under live load. Add mid-span support for stair stringers any time the unsupported span exceeds 10 feet, the stair width exceeds 48 inches, or the design load exceeds standard 40 psf residential requirements.
Sizing the Mid-Span Beam Correctly
A mid-span beam runs horizontally beneath all stringers at the halfway point of the stair run, acting as an intermediate bearing support. For most residential applications, a doubled 2×10 or 2×12 pressure-treated beam provides adequate moment and shear resistance. Wider or heavier stairs may require an LVL (laminated veneer lumber) beam — an engineered wood product with significantly higher bending strength than dimensional lumber. Size the beam using span tables published by the American Wood Council, factoring in tributary width and design load.
Diagonal Bracing for Lateral Stability
Vertical mid-span support controls deflection but doesn’t address lateral movement. Diagonal under-stair bracing — typically 2×6 members running at 45 degrees from the mid-span beam to a footing anchor or deck band board — locks the entire assembly against racking.
Use these fastener specifications for diagonal bracing connections:
- Minimum 5/16-inch structural screws or 1/2-inch through-bolts at each end
- Simpson Strong-Tie A34 or equivalent framing anchors at beam-to-stringer connections
- Hot-dipped galvanized or stainless steel hardware for all exterior applications
Rigid bracing controls deflection below the L/360 threshold engineers specify for stair assemblies. Flexible or undersized connections allow micro-movement that accumulates into creaking, loosening fasteners, and eventual structural failure.
Ground-Level Footing Anchors and Frost Line Considerations
A stringer base plate sitting on an unanchored concrete pad will shift, heave, and eventually compromise the entire stair assembly — proper footing anchorage is what keeps the bottom of the stair system fixed under both load and freeze-thaw cycling.
Concrete Anchor Types for Stringer Base Plates
3 anchor types cover the majority of residential stair installations:
- Wedge anchors expand mechanically inside a drilled hole as the nut tightens — reliable for existing concrete pads at least 3.5 inches thick
- Screw anchors (such as Simpson Strong-Tie Titen HD) thread directly into concrete without an expansion sleeve, making them faster to install and removable if needed
- Cast-in-place anchors set into wet concrete during the pour — the strongest option for new footing installations where stringer load distribution demands maximum pullout resistance
For most deck stair footing anchors, a minimum 1/2-inch diameter fastener with 2.5-inch embedment depth meets residential load requirements.
Frost Line Depth and Footing Extension
Here’s what many DIY builders overlook: the concrete pad itself must extend below the local frost line or it will heave seasonally, cracking the base plate connection and throwing the stair assembly out of level. Frost line depth ranges from 0 inches in southern Florida to 60 inches in northern Minnesota. Check your local building department or the IRC frost depth map for the exact requirement in your region.
Stainless Steel vs. Galvanized Hardware
For exterior footing anchorage, hot-dipped galvanized fasteners meet code in most inland applications. Within 1 mile of saltwater, or anywhere deicing salts contact the stairs, specify Type 316 stainless steel anchors. Standard electroplated zinc fasteners corrode within 2-3 years in exterior conditions and should never be used for structural stair connections.
Reinforcing vs. Replacing Existing Problem Stairs
Not every failing staircase needs full demolition — but misreading the symptoms leads to either wasted money on unnecessary replacement or dangerous under-repair.
Mapping Symptoms to Specific Failure Types
| Symptom | Likely Cause | Repair Type |
|---|---|---|
| Bounce or spring at mid-stair | Insufficient mid-span support | Add mid-span beam |
| Creaking under load | Loose deck stair connections or fastener failure | Refasten, add hardware |
| Lateral sway | Missing diagonal bracing | Add diagonal braces |
| Visible sag along stringer bottom | Stringer span limitations exceeded or wood rot | Assess for replacement |
| Base shifting or heaving | Failed or absent footing anchorage | Install deck stair footing anchors |
| Stringer split along cut line | Notch cut too deep, structural integrity lost | Full stringer replacement |
When Reinforcement Is Enough
Long stringer reinforcement works when the existing lumber is structurally sound — no rot, no splits along the grain, no cracks through the stringer’s net section (the thinnest point after tread and riser cuts). If the wood passes a probe test (a sharp awl should not penetrate more than 1/4 inch into sound lumber), reinforcement is viable.
Adding mid-span support to existing stairs without removing treads is straightforward: install the mid-span beam from below, positioning it perpendicular to all stringers at the halfway point, then drive structural screws up through the beam into each stringer. No tread removal required.
When Full Replacement Is the Only Safe Option
Replace stringers immediately when you find any of these conditions:
- Rot penetrating beyond the surface layer into the stringer’s core
- A stringer split or cracked through its net section at a tread cut
- Crush damage at the base plate bearing point
- Stringers originally cut from lumber narrower than 2×12 for spans exceeding 8 feet
Attempting long stair stringers reinforcement over compromised lumber masks the failure without fixing it.
Recommended: Replacing Stair Treads Built into Stringer
FAQ
Can You Reinforce Stair Stringers?
Yes — as long as the existing lumber is structurally sound with no rot, splits, or crush damage. Reinforcement options include adding a mid-span beam from below, installing diagonal bracing for lateral stability, and securing a stringer base plate at the bottom bearing point, all without removing existing treads.
What Is the 27-Inch Rule for Stringers?
The 27-inch rule refers to the minimum required net section depth — the solid wood remaining at the stringer’s thinnest point after tread and riser cuts are made. The International Building Code requires at least 3.5 inches of net section for cut stringers, but many engineers and the Deck Industry Association recommend 5.5 inches minimum to maintain adequate bending strength across the full span.
How Long Can Stair Stringers Span Without Mid-Span Support?
A standard 2×12 Southern Yellow Pine or Douglas Fir stringer can span up to 10 feet without mid-span support under a 40 psf residential live load, assuming proper lumber grade and correct tread cut geometry. Spans beyond 10 feet require a mid-span beam, and spans beyond 13 feet typically require engineered lumber or a structural engineer’s review.
Next Steps: Building Code Compliance and Professional Review
Stringer span length, lumber grade, and footing anchorage work as a system — fixing one element while ignoring the others leaves the staircase structurally incomplete. Pull your local building permit before modifying or replacing any stair stringer, since most jurisdictions require inspection of structural stair connections under the IRC. If your stair run exceeds 13 feet or carries loads beyond standard residential use, hire a licensed structural engineer to review the design before breaking ground.