


Are you noticing holes or cracks in your aluminum siding? These small damages can let in moisture and pests, making your home less safe and less attractive.
You might be wondering what the best way is to fix these holes quickly and effectively. The right materials can save you time, money, and frustration, keeping your siding strong and looking great. Keep reading to discover the easiest and most reliable options you can use to fill holes in your aluminum siding—and get your home back to its best in no time.
Types Of Fillers For Aluminum Siding
Holes in aluminum siding can weaken your home’s exterior and let in moisture or pests. Choosing the right filler restores strength and appearance. Various fillers suit different hole sizes and damage types.
Epoxy Putty
Epoxy putty is a popular choice for filling holes in aluminum siding because of its strong bonding and durability. It consists of two parts that you mix before applying. This putty hardens quickly and sticks well to metal surfaces, creating a solid, weather-resistant patch.
Key benefits of epoxy putty:
- Easy to mold and shape to fit the hole
- Dries hard and can be sanded smooth
- Resists water, heat, and chemicals
- Paintable to match siding color
Use epoxy putty for holes that are small to medium in size. Before applying, clean the damaged area and remove rust or dirt. Knead the putty until the color is uniform. Press it firmly into the hole, then shape the surface with a putty knife. Let it cure for a few hours. Once dry, sand it gently and paint for a neat finish.
Aluminum-based Fillers
Aluminum-based fillers are specially formulated compounds designed to repair aluminum surfaces. These fillers contain aluminum particles, making them strong and compatible with aluminum siding. They bond tightly and provide a long-lasting repair.
Advantages of aluminum-based fillers:
- Excellent adhesion to aluminum
- Resistant to cracking and shrinking
- Can be sanded smooth after drying
- Suitable for dents, holes, and cracks
These fillers work best on medium to larger holes or dents. Prepare the area by cleaning and sanding lightly. Apply the filler with a putty knife, pressing it firmly into the damaged spot. Allow it to dry completely before sanding the surface flat. Finish by painting to protect the repair and blend with the siding.
Use aluminum-based fillers for repairs needing strong, metal-compatible compounds. They ensure the patch will not separate or weaken over time.
Vinyl Siding Repair Kits
Though designed for vinyl siding, some vinyl siding repair kits also work on aluminum siding holes. These kits usually contain flexible filler compounds, patches, and tools. They aim to create a quick, weatherproof fix.
Features of vinyl siding repair kits:
- Includes putty, patches, and applicators
- Simple instructions for DIY repairs
- Weather-resistant and paintable materials
- Good for small holes or cracks
The filler in these kits is often softer than epoxy or aluminum-based fillers. It works well for minor holes or surface damage. Clean the area and follow kit instructions to apply the filler or patch. These kits provide a fast solution but may not be as durable as metal-specific fillers.
Consider vinyl siding repair kits when dealing with small holes or quick fixes. For larger or structural damage, stronger fillers are better.
Choosing The Right Filler
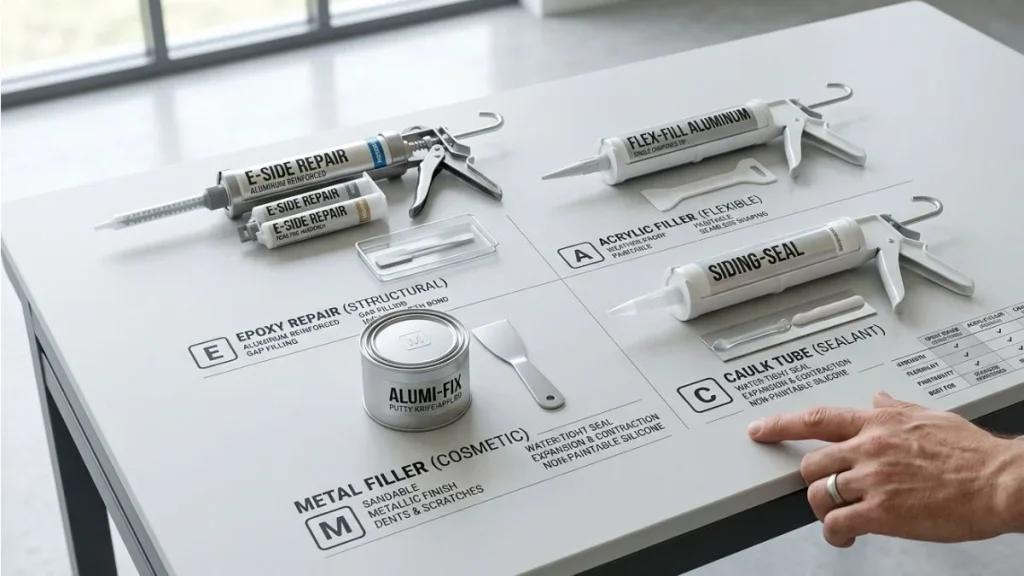
Choosing the right filler for holes in aluminum siding is crucial for a lasting repair. The filler must bond well, protect against weather, and be easy to apply. The wrong choice can lead to more damage, rust, or an unsightly finish.
Size And Depth Of Holes
The size and depth of the hole determine what type of filler works best. Small holes, such as nail holes or tiny dents, need a different approach than large cracks or holes caused by impact.
- Small holes (up to 1/4 inch): Use lightweight fillers like aluminum putty or epoxy. These fill the hole smoothly and sand easily.
- Medium holes (1/4 to 1 inch): Choose a strong patching compound or a fiberglass mesh with filler. This supports the repair and prevents sinking.
- Large holes (over 1 inch): Require a backing material like metal patches or mesh before applying filler. This gives structure and durability.
Here is a quick guide:
| Hole Size | Recommended Filler | Additional Steps |
| Up to 1/4 inch | Aluminum putty or epoxy | Direct application, light sanding |
| 1/4 to 1 inch | Patch compound with fiberglass mesh | Apply mesh, then filler |
| Over 1 inch | Metal patch + filler | Attach patch, fill edges |
Weather Resistance
The filler must withstand rain, sun, and temperature changes. Aluminum siding often faces harsh outdoor conditions. A filler that cannot resist weather will crack, peel, or rot quickly.
Choose fillers with these features:
- Waterproof or water-resistant: Stops moisture from entering and causing rust or mold.
- UV resistant: Prevents breakdown and discoloration from sunlight.
- Temperature tolerant: Works well in freezing cold and hot heat.
Common weather-resistant fillers include:
- Polyurethane-based fillers: Flexible and durable against weather.
- Epoxy fillers: Strong and waterproof but may need primer.
- Silicone sealants: Very weatherproof but less paintable.
Check product labels for terms like “exterior grade,” “waterproof,” or “UV resistant.” These indicate good weather performance.
Ease Of Application
Ease of application affects how smooth and fast the repair goes. Some fillers are ready to use, while others need mixing or special tools.
Consider these points:
- Pre-mixed fillers: Ready out of the container. Good for quick jobs.
- Two-part fillers (epoxy or putty): Require mixing but create strong bonds.
- Application tools: Some fillers need putty knives, brushes, or caulk guns.
- Drying time: Faster drying fillers speed up the repair process.
Here is a comparison table for common filler types:
| Filler Type | Mixing Required | Tools Needed | Drying Time | Ease of Use |
| Pre-mixed putty | No | Putty knife | 30 mins to 1 hour | Easy |
| Two-part epoxy | Yes | Mixing stick, putty knife | 1 to 4 hours | Moderate |
| Silicone sealant | No | Caulk gun | Up to 24 hours | Easy |
Choose a filler that matches your skill level and tools. Simple application helps ensure a neat, long-lasting repair.
Preparing Aluminum Siding For Repair
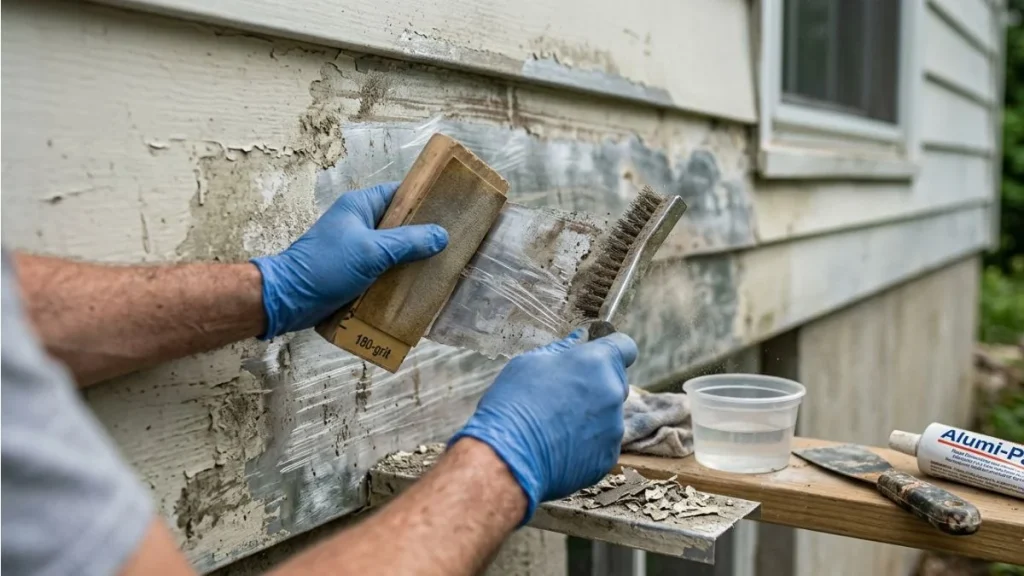
Filling holes in aluminum siding requires careful preparation to ensure the repair lasts long and looks good. Proper preparation helps the filler stick well and prevents future damage. Preparing aluminum siding for repair involves cleaning, removing loose paint, and sanding the surface. These steps create a smooth and clean base, which is essential for effective patching.
Cleaning The Area
Start by cleaning the area around the hole. Dirt, dust, and grime can stop the filler from sticking properly. Use a mild detergent mixed with water to wash the surface. A soft brush or sponge works well to remove dirt without scratching the siding.
- Mix warm water with a small amount of dish soap.
- Use a soft brush or sponge to scrub the area gently.
- Rinse thoroughly with clean water to remove soap residue.
- Allow the siding to dry completely before moving to the next step.
Note: Cleaning removes oils and contaminants that could weaken the repair. Take your time to ensure the surface is spotless. Avoid using harsh chemicals that may damage the aluminum.
Removing Loose Paint And Debris
Next, remove any loose or peeling paint near the hole. Flaking paint can cause the filler to separate from the siding over time. Use a paint scraper or putty knife to gently lift away loose paint. Be careful not to gouge the aluminum.
Also, clear away any debris inside the hole. Dust or small pieces of siding reduce the filler’s grip. Use a soft brush or compressed air to clean the hole thoroughly.
| Tool | Purpose | Tip |
| Paint scraper | Remove loose paint | Use gentle pressure to avoid damage |
| Putty knife | Lift peeling paint and debris | Work at a low angle for best results |
| Soft brush | Clean dust and small debris | Brush inside the hole carefully |
| Compressed air | Blow out dust from holes | Use short bursts to avoid damage |
Tip: Removing loose paint and debris improves filler adhesion and prevents cracks later.
Sanding The Surface
Sanding smooths the edges around the hole and removes any remaining paint flakes. It creates a rough surface for the filler to grip better. Use fine-grit sandpaper, such as 120 to 180 grit, for this task.
Follow these steps for sanding:
- Wrap sandpaper around a sanding block for even pressure.
- Sand gently around the hole, focusing on edges.
- Remove any dust created by sanding with a brush or cloth.
- Wipe the area with a damp cloth to finish.
Warning: Avoid heavy sanding that could thin the aluminum siding. Light sanding is enough to roughen the surface for better filler bonding.
Consistent sanding helps the filler stay in place and prevents peeling. It also improves the finish when you paint over the repair.
Step-by-step Repair Process
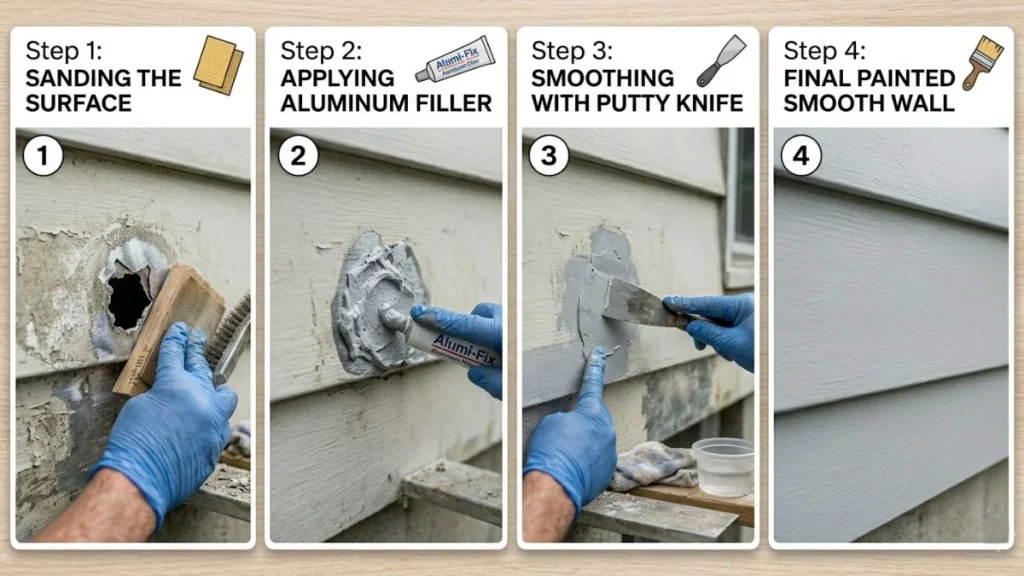
Repairing holes in aluminum siding requires careful attention to detail and the right materials. The step-by-step repair process ensures a smooth, durable fix that blends well with the existing siding. Each stage, from preparing the filler to allowing it to cure, plays a vital role in the success of the repair. Follow these clear steps to restore your siding effectively.
Mixing The Filler
Start with a high-quality aluminum siding filler, usually a two-part epoxy or putty. Proper mixing is critical for strong adhesion and durability. Use a clean surface or mixing board and a putty knife or mixing stick.
- Measure equal parts of the resin and hardener. Accuracy matters to ensure the filler sets correctly.
- Mix thoroughly for about 2-3 minutes until the color is uniform. Incomplete mixing weakens the repair.
- Avoid mixing too much at once. Prepare only the amount needed for the hole size.
Here is a simple mixing guide:
| Filler Type | Mixing Ratio | Recommended Mixing Time |
| Two-Part Epoxy Putty | 1:1 by volume | 2-3 minutes |
| Pre-mixed Filler (No Mixing) | N/A | Not required |
Tip: Mix small batches to avoid waste and quick curing in the container.
Applying The Filler
After mixing, apply the filler directly to the hole on the aluminum siding. The goal is to fill the hole completely and create a stable base for sanding.
- Clean the damaged area to remove dirt and loose paint. Use a wire brush or sandpaper.
- Apply the filler using a putty knife or a plastic spreader. Press firmly to push the filler into the hole.
- Overfill slightly to allow room for sanding later. The filler will shrink a little while curing.
- Work quickly but carefully before the filler starts to harden.
Use these tips for a smooth application:
- Keep the putty knife at a 45-degree angle for better control.
- Remove excess filler around the hole immediately.
- For larger holes, apply filler in layers, letting each layer set briefly.
Smoothing And Shaping
Once the filler has set slightly but is still soft, begin shaping it to match the siding surface. Proper smoothing ensures the repair is less visible and ready for painting.
- Use a damp cloth or sponge to smooth the surface gently before the filler fully hardens.
- After curing, sand the area with medium-grit sandpaper (around 120 grit) to shape the filler.
- Finish sanding with fine-grit sandpaper (220 grit) for a smooth surface.
- Be careful not to sand the surrounding aluminum too much.
Check your progress often by running your hand over the repair. The surface should feel even and blend with the siding.
Use these tools for best results:
| Tool | Purpose |
| Putty Knife | Initial smoothing and shaping |
| Damp Cloth | Smoothing before curing |
| Sandpaper (120 & 220 grit) | Shaping and final smoothing |
Curing Time
Allow the filler to cure fully before painting or exposing it to weather. Proper curing time ensures the repair is strong and long-lasting.
- Follow manufacturer instructions for curing duration. It usually ranges from 1 to 24 hours.
- Keep the repaired area dry and avoid touching it during curing.
- Temperature affects curing speed. Warmer conditions speed it up; cold slows it down.
A simple curing time chart:
| Temperature | Approximate Curing Time |
| 70°F (21°C) | 2-4 hours |
| 50°F (10°C) | 6-12 hours |
| Below 40°F (4°C) | 24 hours or more |
Note: Do not rush to paint or expose the filler to moisture before it cures fully.
Finishing Touches
After filling holes in aluminum siding, the final steps ensure a clean, lasting repair. Finishing touches make the patch blend with the rest of the siding. These steps include sanding, priming, and painting. Each stage improves the repair’s look and protects it from weather damage. Taking time for these details helps keep your siding strong and beautiful for years.
Sanding For Smoothness
Sanding is key to a smooth, even surface after filling the hole. It removes excess filler and rough spots. This step helps the repair blend with the siding’s texture.
Use fine-grit sandpaper (around 220 grit) to avoid scratching the aluminum. Sand gently in a circular motion until the filler is flush with the siding surface.
- Wear a dust mask to protect your lungs.
- Use a sanding block for better control.
- Check the surface by touch and sight to ensure smoothness.
Proper sanding improves paint adhesion and prevents peeling. It also removes small bumps that catch the eye. Take your time and sand evenly across the repaired area.
Priming The Repaired Area
Priming prepares the siding for paint and increases durability. It seals the filler and aluminum, preventing moisture from causing rust or damage.
Choose a primer made for metal surfaces, especially aluminum. These primers stick well and resist peeling.
| Primer Type | Benefits | Drying Time |
| Oil-based primer | Strong adhesion, rust resistance | 4-6 hours |
| Latex primer | Easy clean-up, quick drying | 1-2 hours |
Apply primer with a brush or spray in thin, even layers. Let each layer dry fully before applying the next. Two coats often give the best protection.
Painting To Match Siding Color
Painting is the last step to hide the repair and protect the siding. Matching the paint color helps the patch blend in seamlessly.
Use high-quality exterior paint designed for metal. Look for paints labeled for aluminum or metal surfaces.
- Clean the siding around the repair before painting.
- Test paint on a small hidden area to check color match.
- Apply thin, even coats with a brush or roller.
- Allow each coat to dry before adding another.
Use the same finish as your siding (matte, satin, or gloss). This detail improves the overall look. Avoid thick coats that may drip or peel.
For best results, paint on a dry day with mild temperatures. This helps the paint dry evenly and last longer.
Recommended Read: Hole in Aluminum Siding
Conclusion
Filling holes in aluminum siding keeps your home safe and neat. Use the right filler for a strong, lasting fix. Clean the area well before applying any product. Smooth the surface to match the siding’s look. Let the filler dry completely to avoid problems later.
Small repairs stop water and pests from entering. Save money by fixing holes early. Your siding will look better and last longer. Simple steps make a big difference in home care. Choose quality materials for the best results every time.


