If you’re planning to install or upgrade your kitchen’s range hood, one important choice you’ll face is how to vent it properly. Venting your range hood through the roof can be a smart solution, but it comes with its own set of challenges and benefits you need to know.
Getting this right means better air quality, less cooking odor, and a cleaner kitchen. You’ll discover everything you need to make the best decision for your home, from installation tips to common mistakes to avoid. Keep reading to make sure your kitchen stays fresh and comfortable every time you cook.
Choosing The Right Range Hood
Choosing the right range hood is key to keeping your kitchen fresh and clean. A good range hood removes smoke, odors, and steam while you cook. It also helps reduce grease buildup on walls and cabinets. Venting the hood through the roof is a popular option for many homes.
Types Of Range Hoods
Range hoods come in various styles and designs. Each type serves different kitchen layouts and venting needs. Here are the most common types:
- Under-Cabinet Range Hoods: Installed below kitchen cabinets. They save space and fit well in smaller kitchens.
- Wall-Mounted Range Hoods: Fixed on the wall above the stove. They come in many shapes and sizes for different aesthetics.
- Island Range Hoods: Hang from the ceiling over an island cooktop. Ideal for open kitchens with island cooking areas.
- Downdraft Range Hoods: Built into the cooktop or countertop. They pull air down and out through ducts below.
Each type can be vented through the roof if designed properly. The choice depends on your kitchen layout and cooking habits.
Factors Influencing Vent Placement
Vent placement impacts how well your range hood works. Proper venting sends smoke and odors outside quickly. Roof venting is common but depends on several factors.
Consider these points before deciding on vent placement:
- Roof Height and Pitch: Steep roofs may need longer ducts and special vent caps.
- Duct Length: Keep ducts as short and straight as possible for better airflow.
- Kitchen Location: Vents on exterior walls may be easier to install than through the roof.
- Building Codes: Follow local rules for vent placement and duct materials.
- Noise Level: Longer ducts or roof vents may cause more noise. Choose insulated ducts if needed.
Planning The Roof Vent Installation
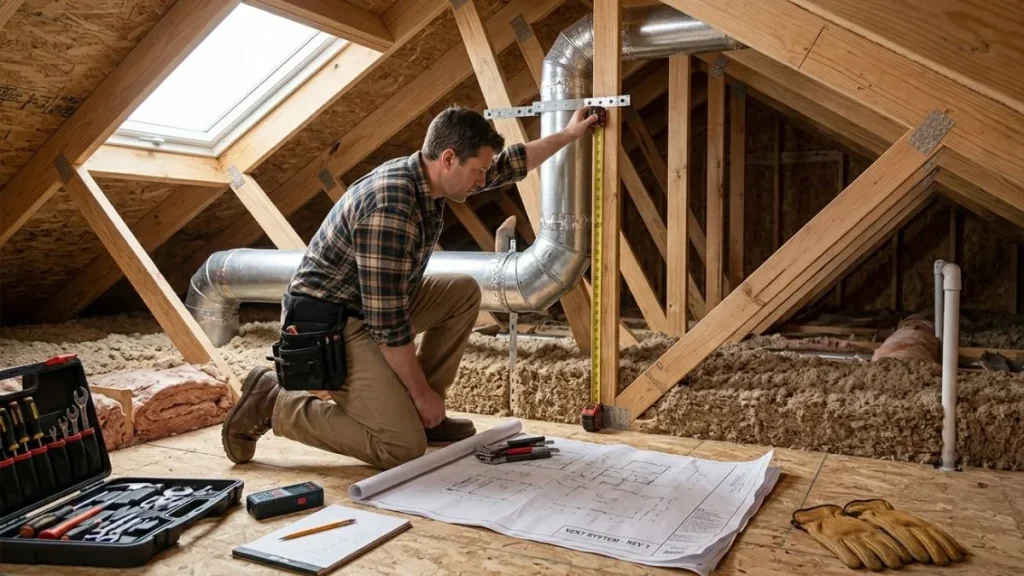
Planning the roof vent installation for a range hood is a critical step to ensure efficient kitchen ventilation. Proper planning helps avoid costly mistakes and ensures the vent works well with the roof’s design. It involves understanding the roof’s structure, choosing the best vent location, and following local building rules.
Assessing Roof Structure
Start by examining the roof’s structure. This step helps identify the best place to cut through the roof safely. Look for the following:
- Roof Type: Identify if the roof is flat, sloped, or has multiple levels.
- Roof Material: Check if the roof is made of shingles, metal, tiles, or other materials.
- Rafters and Joists: Locate the rafters and joists to avoid cutting through them.
- Attic Space: Measure the attic space to ensure enough clearance for the vent pipe.
Use a stud finder or flashlight to inspect the attic. Mark the safe zones for vent placement. Avoid areas with electrical wiring or plumbing.
Determining Vent Location
Choosing the right vent location affects the range hood’s performance. The vent must allow air to escape quickly and safely. Consider these points:
- Direct Path: Plan the shortest, straightest route from the hood to the roof.
- Avoid Obstacles: Check for chimneys, pipes, or vents that may block the path.
- Distance from Roof Edge: Position the vent far enough to prevent wind or rain issues.
- Roof Pitch: Pick a spot where flashing will seal well on the sloped surface.
- Clearance: Ensure enough space above the roof for the vent cap and proper airflow.
Use a tape measure and level to mark the exact spot on the roof. Label it clearly before cutting. Think about maintenance access too. A vent near a ladder or flat area is easier to service.
Checking Local Building Codes
Local building codes set rules for roof vent installations. Following these codes avoids fines and ensures safety. Key items to check include:
- Permits: Confirm if a permit is needed before starting work.
- Vent Size: Match vent pipe size to the range hood’s specifications.
- Roof Penetration Rules: Understand limits on hole size and flashing requirements.
- Distance from Other Vents: Maintain proper spacing from plumbing or exhaust vents.
- Fire Safety: Follow rules about materials and clearances near flammable parts.
- Noise Restrictions: Some areas limit vent noise levels.
Contact the local building department or check online resources. Keep copies of permits and inspection results. This paperwork protects you and adds value to your home.
Step-by-step Installation Process
Installing a range hood vent through the roof improves kitchen ventilation and removes smoke effectively. The step-by-step installation process ensures proper setup and safety. Follow each stage carefully to avoid leaks and maintain roof integrity.
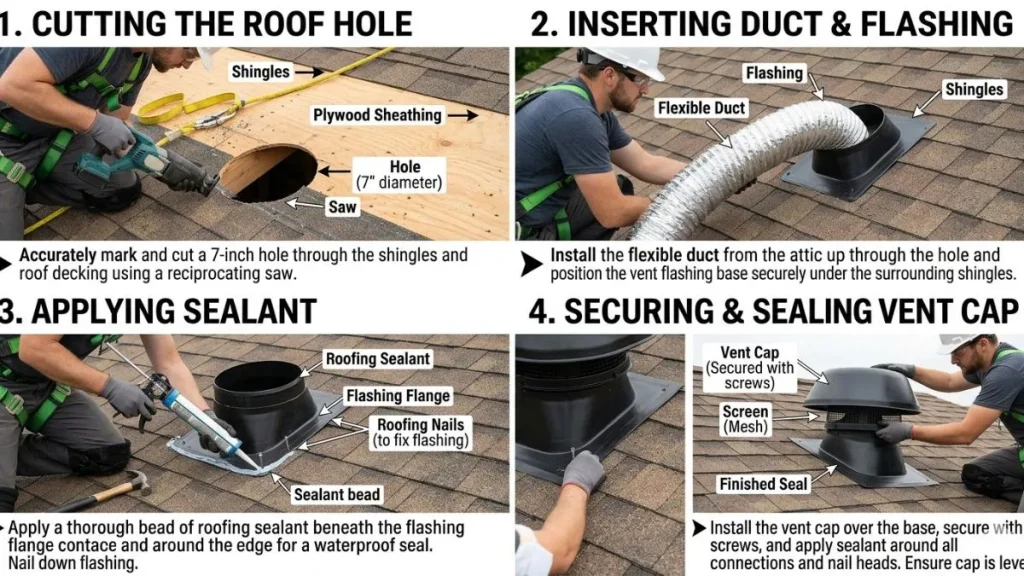
Marking And Cutting The Roof Opening
Start by selecting the right spot on your roof for the vent pipe. It should align vertically with the range hood inside. Use a tape measure to find the exact center point on the ceiling and transfer this mark to the roof exterior.
Before cutting, check for any roof trusses or wiring in the area. Use a stud finder or look inside the attic. Mark the outline of the vent pipe hole with a pencil or chalk. Most vent pipes require a 6 to 8 inch diameter opening.
- Wear safety goggles and gloves to protect yourself.
- Use a reciprocating saw or jigsaw for cutting.
- Cut slowly along the marked line to avoid damage.
After cutting, remove debris and inspect the hole edges. Smooth rough edges with sandpaper or a file. This step prevents damage to the vent pipe and roof materials.
Installing Roof Flashing
Roof flashing creates a waterproof barrier around the vent pipe. Choose flashing that fits your roof type, such as metal for shingles or flexible rubber for flat roofs. Place the flashing base under the shingles above the hole and over the shingles below.
Secure the flashing with roofing nails spaced evenly around the edges. Apply roofing cement under the nails to seal any gaps. Make sure the flashing slopes downward to allow water to run off.
| Flashing Type | Best For | Installation Tip |
| Metal Flashing | Asphalt Shingles | Slide under shingles above hole |
| Rubber Flashing | Flat or Low-Slope Roofs | Seal edges with roofing adhesive |
Check for any gaps after installation. Use roofing caulk around the flashing edges for extra protection. Proper flashing stops water leaks and protects your roof structure.
Securing The Vent Pipe
Insert the vent pipe through the roof opening and flashing. The pipe must fit snugly without gaps. Use sheet metal screws to attach the pipe to the flashing securely. Check that the pipe extends above the roofline by at least 12 inches for proper ventilation.
Seal the joint between the pipe and flashing with high-quality silicone caulk. This step prevents water from entering the roof space. Inside the attic, fasten the vent pipe to roof trusses using metal brackets or straps to keep it stable.
- Use a level to keep the pipe vertical.
- Ensure no bends or kinks in the pipe.
- Allow space for pipe insulation if needed.
Inspect the pipe connections for tightness. Loose pipes can cause noise and reduce vent efficiency.
Connecting The Range Hood Duct
Run the duct from the range hood to the vent pipe in the attic. Use rigid metal ducting for better airflow and durability. Connect the duct to the vent pipe using a metal coupling or adapter.
Secure all joints with foil tape and metal screws to prevent air leaks. Avoid using duct tape, as it degrades over time. Support the duct with straps or hangers to prevent sagging.
| Material | Benefit | Connection Tip |
| Rigid Metal Duct | Best airflow, durable | Use metal screws and foil tape |
| Flexible Duct | Easier to install, less rigid | Minimize bends and length |
Test the range hood to confirm strong airflow through the vent. Check for any noise or air leaks at connections. Correct any issues to ensure efficient kitchen ventilation.
Recommended: How to Install a Roof Vent for a Bathroom Fan
Ensuring Proper Ventilation And Safety
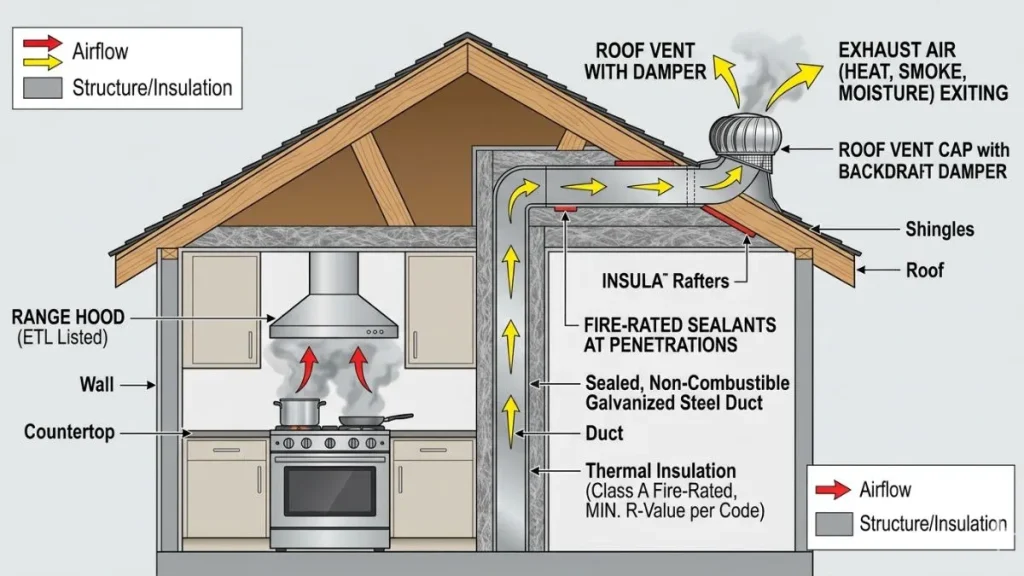
Proper ventilation is vital for a range hood vent that goes through the roof. It helps remove smoke, odors, and moisture from the kitchen. Ensuring safety means preventing leaks, drafts, and fire hazards. Proper installation and maintenance keep the system working well and protect your home.
Sealing And Weatherproofing
Sealing and weatherproofing the roof vent is important to stop water and air from entering your home. Roof vents face rain, snow, and wind, so a tight seal protects the structure and prevents damage.
- Use high-quality flashing: Install metal flashing around the vent pipe. This directs water away and creates a solid barrier.
- Apply roofing sealant: Seal any gaps between the flashing and roof shingles with weatherproof roofing sealant.
- Install a vent cap: A vent cap prevents rain and debris from entering the vent pipe.
- Choose durable materials: Use materials resistant to UV rays and temperature changes.
Proper sealing prevents costly roof repairs and keeps your kitchen air fresh. A simple table shows common sealing materials and their benefits:
| Material | Purpose | Advantages |
| Metal Flashing | Water barrier | Durable, long-lasting, rust-resistant |
| Roofing Sealant | Seal gaps | Flexible, waterproof, easy to apply |
| Vent Cap | Cover vent opening | Prevents rain, debris, pests |
Checking For Leaks
Leaks around the roof vent can cause water damage and mold growth. Regular inspections help catch leaks early before they get worse. Look for signs of water stains, dampness, or mold near the vent area.
Follow these steps to check for leaks:
- Inspect the flashing for cracks or gaps.
- Look under the roof in the attic for water spots.
- Check sealant condition and reapply if cracked or peeling.
- Examine the vent cap for damage or loose fittings.
Use a hose to simulate rain on the vent area. Have someone watch inside for any water entry. Fix leaks immediately to avoid roof damage and poor air quality.
Regular leak checks reduce repair costs and keep the vent working safely. Keep a checklist like this handy:
| Inspection Area | Signs of Leak | Action Required |
| Flashing | Cracks, gaps | Reseal or replace flashing |
| Sealant | Peeling, dry | Apply new sealant |
| Vent Cap | Loose, broken | Secure or replace cap |
Maintaining Airflow Efficiency
Good airflow keeps your kitchen free of smoke and odors. Blocked or inefficient vents reduce performance and can cause heat buildup. Maintain airflow by keeping the vent clear and properly sized.
- Clean vent ducts: Remove grease and dust buildup at least twice a year.
- Use smooth ducting: Avoid flexible or corrugated ducts that trap debris.
- Check duct size: Match duct diameter to hood fan capacity for proper airflow.
- Minimize duct length: Shorter ducts reduce airflow resistance.
- Ensure proper roof vent placement: Position the vent to allow free air exit without obstructions.
Here is an example of typical duct sizes based on hood fan power:
| Fan Power (CFM) | Recommended Duct Diameter |
| Up to 300 | 6 inches |
| 301 – 600 | 7 to 8 inches |
| 601 and above | 10 inches or more |
Proper maintenance improves air quality and extends the life of your range hood system.
Common Challenges And Solutions
Installing a range hood vent through the roof can improve kitchen air quality and reduce cooking odors. This method requires careful planning and skill. Several common challenges can arise during installation.

Dealing With Roof Pitch
The roof pitch affects how the vent pipe passes through the roof. Steep roofs can make vent installation tricky and unsafe. Shallow roofs might not allow enough space for proper vent height and clearance.
Key challenges with roof pitch include:
- Ensuring the vent pipe stays vertical through the roof.
- Choosing the right flashing to fit the roof angle.
- Maintaining roof waterproofing around the vent.
Solutions for roof pitch challenges:
- Use adjustable flashing designed for different roof slopes.
- Install a roof vent cap that matches the pitch angle.
- Work with a professional roofer to ensure a tight seal.
Proper handling of roof pitch ensures a safe and waterproof vent installation. This reduces leaks and improves vent efficiency.
Handling Obstructions
Obstructions inside the attic or roof space can block the vent path. These include beams, wiring, plumbing, or HVAC ducts. Obstructions make it hard to run the vent pipe straight up.
Common obstructions:
- Roof trusses or rafters
- Electrical wiring and junction boxes
- Plumbing vent stacks
- Insulation and ductwork
Steps to manage obstructions:
- Inspect the attic space before cutting the roof.
- Map the location of beams and other obstacles.
- Choose a vent route that avoids major obstructions.
- Use elbows or adjustable pipe sections if needed.
- Consult a professional if structural elements are in the way.
Avoiding Roof Damage
Cutting through the roof creates risk of leaks and damage. Poor sealing or flashing installation causes water to enter the home. Protecting the roof structure is essential.
Common causes of roof damage during vent installation:
- Incorrect flashing size or fit
- Inadequate waterproof sealing
- Damaging shingles or roofing materials
- Poor vent pipe support
Best practices to avoid damage:
- Use proper flashing that matches roof material and pitch.
- Apply high-quality roofing sealant around all edges.
- Replace any damaged shingles around the vent area.
- Secure vent pipe to prevent movement and stress on flashing.
- Inspect the vent roof penetration regularly for leaks.
Conclusion
A range hood vent through the roof helps keep your kitchen air fresh. It removes smoke, heat, and odors quickly. Proper installation is important for good airflow and safety. Choose the right vent size and materials for your home. Regular cleaning keeps the vent working well.
This setup fits many kitchens and roof types. Good ventilation makes cooking more comfortable. Think about roof venting if you want clean air and less noise. Simple steps lead to better kitchen air quality.