Have you ever wondered what happens if there’s no waterproof membrane in your shower? It might seem like a small detail, but missing this crucial layer can cause big problems.
Water can sneak behind your tiles, leading to mold, damage, and costly repairs that you don’t want to face. If you’re planning a bathroom remodel or just want to protect your home, understanding why a waterproof membrane matters is key.
Risks Of Skipping Waterproof Membranes
Skipping a waterproof membrane in a shower may seem like a small shortcut during installation. Yet, this choice brings significant risks that affect the entire bathroom and home structure. A waterproof membrane acts as a critical barrier that stops water from leaking into walls and floors.
Water Damage To Structure
Water leaking inside walls and floors can cause severe damage to a home’s structure. Without a waterproof membrane, water easily penetrates surfaces, leading to the following problems:
- Wood rot: Moisture weakens wood framing and subflooring, causing it to decay and lose strength.
- Warping: Water causes wood and drywall to warp or swell, leading to uneven surfaces and cracks.
- Rust: Metal components like nails and screws can rust, compromising structural integrity.
Constant exposure to water may cause hidden damage that is expensive to fix. Early signs like soft spots or discoloration often go unnoticed. Over time, the structure may become unsafe and require major renovation.
Mold And Mildew Growth
Moist environments without proper waterproofing create perfect conditions for mold and mildew. These fungi thrive in wet areas and spread quickly behind walls and under floors. Risks of skipping waterproof membranes include:
- Health problems: Mold spores can cause allergies, asthma, and respiratory issues.
- Bad odors: Mildew produces unpleasant smells that are hard to remove.
- Damage to surfaces: Mold stains walls, ceilings, and building materials.
Mold growth is often hidden and only noticed after it causes visible damage or health symptoms. Removing mold requires professional cleaning and repair, increasing costs.
Areas prone to mold without waterproof membranes:
- Behind shower walls
- Under shower pans and floors
- Inside wall cavities
Preventing mold starts with stopping water leaks. Waterproof membranes block moisture and keep these areas dry and safe.
Tile And Grout Deterioration
Tiles and grout depend on a dry substrate to last long. Without a waterproof membrane, water seeps beneath tiles, causing several problems:
- Loose tiles: Moisture weakens the adhesive, making tiles fall off.
- Cracked grout: Water causes grout to crack and crumble over time.
- Stains and discoloration: Excess moisture leads to staining and mold in grout lines.
Tiles may look fine on the surface, but hidden water damage can cause them to fail prematurely. Repairing tile and grout damage involves removing and replacing large areas, which is time-consuming and costly.
| Problem | Cause | Result |
| Loose Tiles | Water weakens adhesive bond | Tiles fall off shower walls or floors |
| Cracked Grout | Water penetration and drying cycles | Grout breaks and crumbles |
| Stains and Discoloration | Mold and mineral deposits in grout | Unattractive tile appearance |
Waterproof membranes protect tile and grout from moisture damage. They ensure a long-lasting, beautiful shower finish.
Common Mistakes Without Membranes
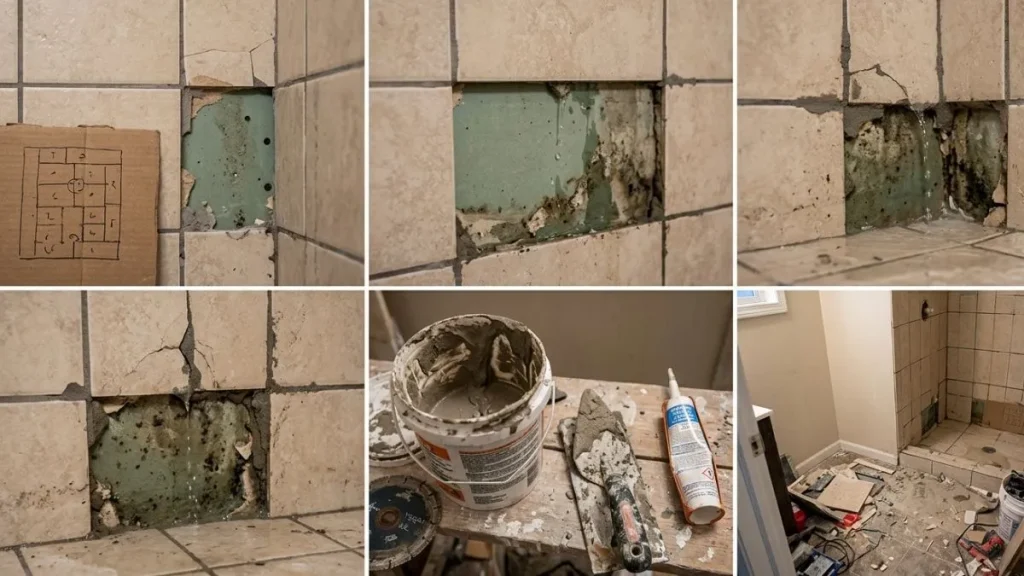
Not using a waterproof membrane in a shower often leads to serious problems. Water can seep into walls and floors, causing mold, damage, and costly repairs. Many homeowners and installers make common mistakes without membranes. These errors reduce the shower’s durability and create health risks.
Improper Surface Preparation
Preparing the surface before installing a shower is crucial, especially without a waterproof membrane. Many skip this step or do it poorly, causing water to penetrate the structure. The surface must be clean, dry, and smooth to prevent gaps where water can enter.
Common errors in surface preparation include:
- Leaving dust and debris on walls or floors
- Ignoring cracks and holes that allow water inside
- Failing to level uneven surfaces
- Not removing old paint or coatings that block adhesion
Proper preparation steps:
- Clean the surface thoroughly with a brush or vacuum.
- Repair cracks with suitable filler or mortar.
- Make sure the surface is flat and even.
- Remove any loose or peeling materials.
Without these steps, water can pool or leak behind tiles. This causes mold growth and damages the shower structure quickly. Proper surface preparation is the first defense against water problems.
Using Incompatible Materials
Choosing the wrong materials is a common mistake when no waterproof membrane is used. Some materials absorb water or do not bond well with others. This creates weak spots that allow moisture to pass through.
Materials to avoid without membranes:
| Material | Issue | Effect on Shower |
| Standard drywall | Absorbs moisture | Softens and crumbles |
| Non-waterproof grout | Porous, lets water through | Mold growth and leaks |
| Low-quality adhesives | Poor bonding with tiles | Tiling loosens and falls off |
Best practices for material use:
- Use cement boards instead of drywall.
- Choose waterproof grout and seal it regularly.
- Apply tile adhesives rated for wet areas.
Using the right materials creates a barrier against water damage. It supports the shower’s strength and safety.
Ignoring Manufacturer Guidelines
Ignoring the instructions from product manufacturers often causes shower failures. Each product has specific rules for installation and care. Not following them reduces the product’s effectiveness, especially without a membrane.
Common overlooked guidelines:
- Incorrect mixing ratios for adhesives or grouts
- Improper drying or curing times before use
- Wrong temperature or humidity during installation
- Skipping recommended sealing or priming steps
Consequences of ignoring guidelines:
- Weakened bonding of tiles and surfaces
- Increased risk of water leaks and damage
- Voiding product warranties
- Shorter lifespan of shower materials
Following the manufacturer’s instructions ensures products work as designed. This is vital for showers without waterproof membranes, where every step counts to prevent water damage.
Signs Of Water Damage In Showers
Showers without a waterproof membrane face serious risks of water damage. Water can seep through tiles and grout, reaching walls and floors. This damage often starts small but worsens over time. Spotting early signs of water damage helps prevent costly repairs and health problems. Knowing what to watch for keeps your bathroom safe and dry.
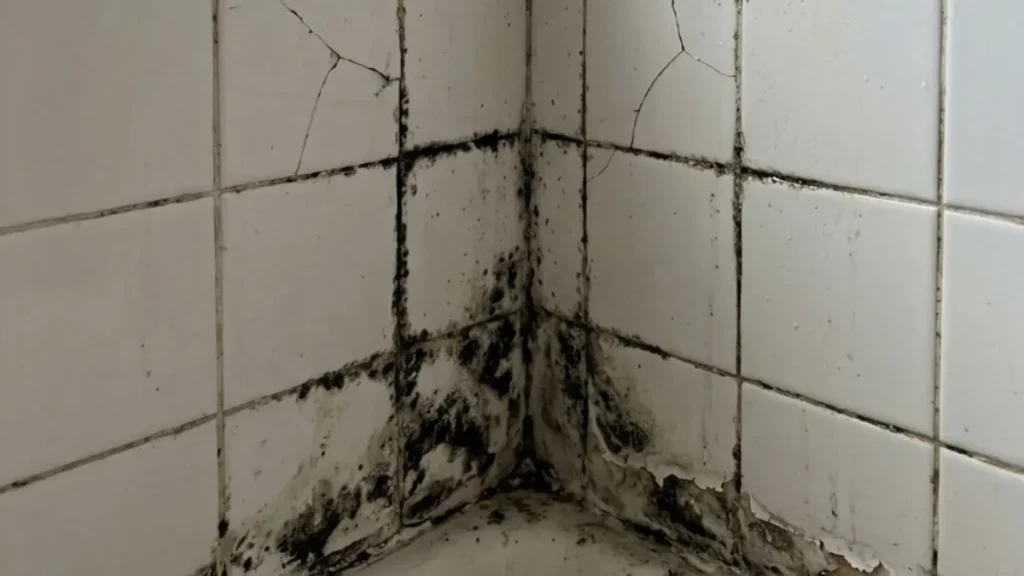
Visible Stains And Discoloration
One of the easiest signs of water damage is visible stains or discoloration on shower walls or ceilings. These spots may look like yellow, brown, or dark patches. They often appear around grout lines, corners, or near the shower base. These stains happen because water soaks into the material and leaves mineral deposits or mold behind.
Look for:
- Yellow or brown spots on tiles or paint
- Dark mold or mildew patches
- Peeling or bubbling paint near the shower
- Discolored grout lines
| Stain Type | Possible Cause | What It Means |
| Yellow/Brown Stains | Water seepage through grout or tiles | Early water damage, needs checking |
| Black or Dark Spots | Mold or mildew growth | High moisture, potential health risk |
| Peeling Paint | Water trapped behind wall surface | Severe water damage, repair needed |
Regularly inspect shower areas for these signs. Early cleaning and fixing leaks can stop damage from spreading.
Soft Or Sagging Walls
Walls that feel soft or sagging near the shower signal serious water damage. Water weakens the wall material, causing it to lose shape and strength. This problem often starts behind tiles or drywall, where leaks go unseen for a while.
Check for these signs:
- Walls that feel spongy or soft to the touch
- Visible sagging or bulging areas
- Tiles that loosen or fall off
- Cracks forming on walls or corners
Soft or sagging walls mean water has soaked deeply into the structure. This damage can cause mold growth inside walls. It also weakens the wall’s support, risking collapse or costly repairs.
Use a simple test:
- Press gently on the wall near the shower.
- Feel for softness or give in the material.
- Note any bulges or uneven spots.
If you notice these signs, act fast. Remove damaged tiles and dry the area. Fix leaks and replace the waterproof membrane to protect walls.
Musty Odors
A strong, musty smell in or near the shower hints at hidden water damage. This odor comes from mold and mildew growing in damp, unseen areas. Water trapped behind walls or under floors creates the perfect environment for mold.
Signs linked to musty odors include:
- Persistent damp smell, even after cleaning
- Odors that worsen after shower use
- Visible mold in hard-to-see spots
- Respiratory irritation or allergies
Musty odors indicate long-term moisture problems. Ignoring this smell can lead to health issues and worsen damage. Mold spores spread quickly and affect indoor air quality.
Tips to handle musty odors:
- Ventilate the bathroom well during and after showers
- Use mold-resistant paint and materials
- Check behind tiles and walls for leaks
- Fix any cracks or gaps that allow water in
Strong musty smells need professional inspection. Removing mold and fixing water damage stops odors and protects your home.
Alternatives To Traditional Membranes
Traditional waterproof membranes in showers are vital for stopping water leaks and protecting walls. Yet, some builders and homeowners choose to skip these membranes or seek alternatives. Alternatives to traditional membranes offer different ways to keep showers water-resistant. These options often simplify installation, reduce costs, or improve durability. Understanding these choices helps decide the best method for a specific shower setup.
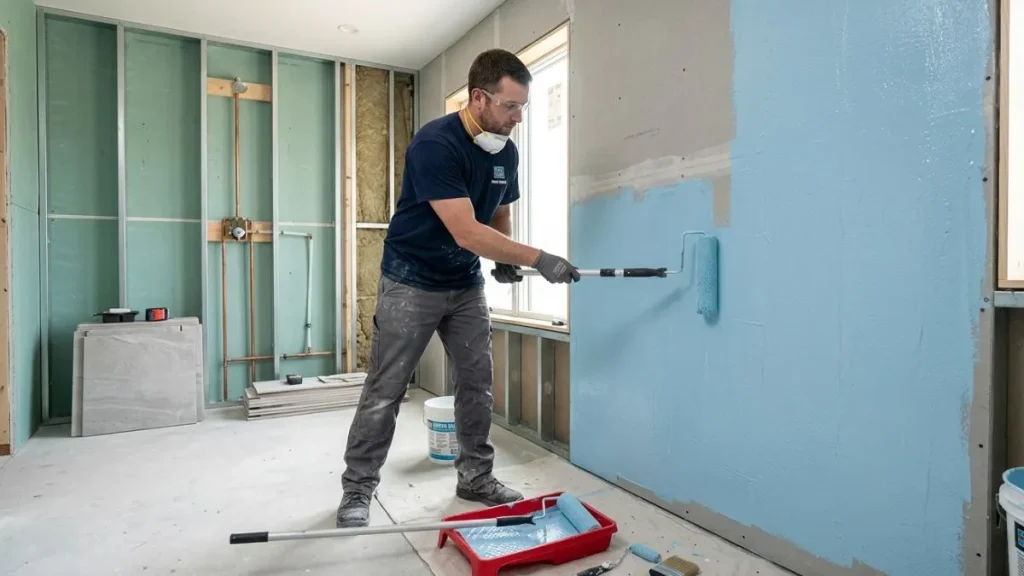
Liquid Waterproofing Solutions
Liquid waterproofing products create a seamless barrier on shower walls and floors. They come as paints or coatings applied with a brush or roller. Once dry, they form a flexible, waterproof layer that adapts to surface shapes and small cracks.
Key advantages of liquid waterproofing:
- Easy application: Can be applied directly on cement board or drywall.
- Seamless protection: No joints or overlaps where water can enter.
- Flexible: Moves with building materials during temperature changes.
Common types include:
| Product Type | Material Base | Typical Use |
| Liquid Rubber | Rubber polymers | Walls and floors |
| Polyurethane Coating | Polyurethane | High moisture areas |
| Cementitious Coating | Cement-based | Concrete surfaces |
Liquid waterproofing works well in small shower areas or for DIY projects. Proper surface prep is vital. The product must cover all surfaces evenly to avoid leaks. Multiple coats usually increase durability. Drying time varies but ranges from a few hours to a full day.
Water-resistant Backer Boards
Water-resistant backer boards replace traditional cement boards in shower walls. These boards resist water penetration better and reduce the need for extra membranes. They come in different materials like fiberglass, foam, or treated wood composites.
Benefits of water-resistant backer boards include:
- Built-in moisture resistance: Reduces mold and mildew growth.
- Lightweight: Easier to cut and install than cement boards.
- Durable: Holds tiles well and stands up to humidity.
Types of water-resistant backer boards:
| Type | Material | Key Features |
| Fiberglass Mesh | Fiberglass and resin | Strong, mold-resistant, easy to handle |
| Foam Core | Polystyrene foam with coated surface | Lightweight, good insulation, water-resistant surface |
| Glass Mat | Glass fiber mats with cement core | Waterproof core, excellent tile adhesion |
Water-resistant backer boards simplify shower construction. They work best with proper sealing at joints and corners. Using waterproof tape and thinset mortar helps create a continuous barrier. These boards help avoid the extra step of laying a traditional membrane.
Pre-formed Shower Pans
Pre-formed shower pans are factory-made bases that include built-in waterproofing. These pans come in various materials like acrylic, fiberglass, or solid surface composites. They replace the need for a custom mortar bed and membrane in the shower floor.
Advantages of pre-formed shower pans:
- Ready to install: Saves time and labor during shower construction.
- Consistent waterproofing: Factory quality controls limit leaks.
- Easy maintenance: Smooth, non-porous surfaces resist mold and stains.
Material options and features:
| Material | Durability | Cost Range | Installation Notes |
| Acrylic | Moderate | $$ | Lightweight, requires careful support |
| Fiberglass | Good | $ | Affordable, flexible, prone to scratches |
| Solid Surface | High | $$$ | Sturdy, seamless, easy to clean |
Pre-formed pans fit into framed shower bases quickly. They usually include built-in slopes to direct water to the drain. Careful measurement and leveling are essential for a smooth fit. These pans eliminate the need for a traditional waterproof membrane under the shower floor.
Best Practices For Shower Waterproofing
Water damage in showers often happens because there is no waterproof membrane. This membrane acts as a barrier that stops water from seeping into walls and floors. Without it, moisture can cause mold, cracks, and structural problems. To protect your shower area, following the best practices for shower waterproofing is essential. These practices help keep water where it belongs and extend the life of your bathroom.
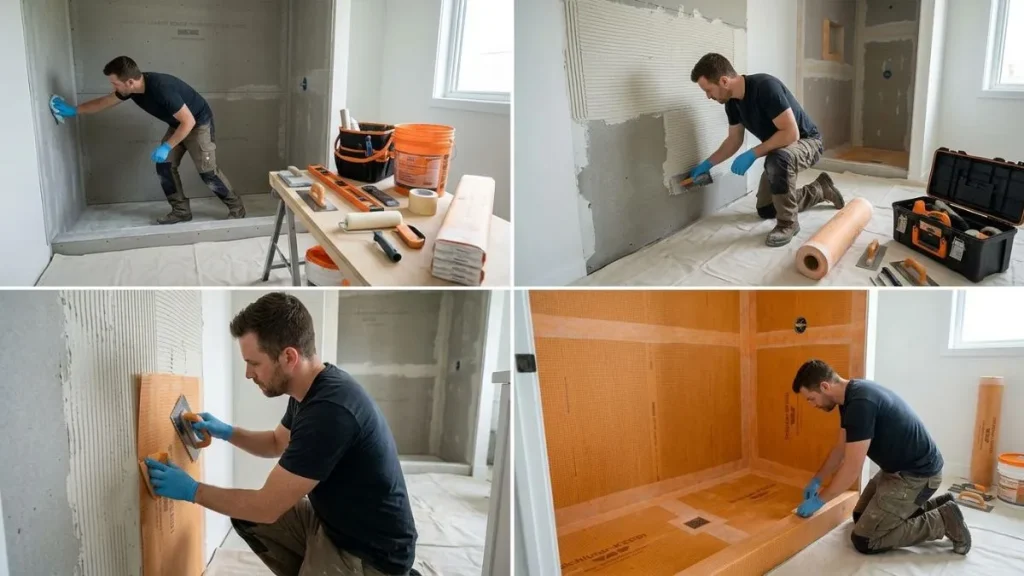
Correct Installation Techniques
Installing a waterproof membrane correctly is the first and most important step. It prevents water from reaching surfaces that can get damaged. Here are some key points for proper installation:
- Choose the right membrane: Use a quality waterproof membrane designed for showers.
- Clean the surface: Make sure walls and floors are clean and dry before applying the membrane.
- Seal all joints: Overlap membrane sheets and seal seams carefully to avoid leaks.
- Apply primer: Use a primer to help the membrane stick better to the surface.
- Follow manufacturer instructions: Each product has specific steps that ensure proper protection.
Here is a simple table showing the typical steps for membrane installation:
| Step | Action | Tips |
| 1 | Surface preparation | Remove dust, dirt, and moisture |
| 2 | Apply primer | Use even strokes, allow drying time |
| 3 | Install membrane | Overlap edges by 2 inches, avoid wrinkles |
| 4 | Seal joints | Use waterproof tape or sealant |
| 5 | Test waterproofing | Check for leaks before tiling |
Correct installation reduces risks of leaks and costly repairs.
Regular Maintenance Tips
Even the best waterproof membrane needs care over time. Regular maintenance keeps your shower dry and safe. Simple checks and cleaning can catch problems early. Here are some maintenance tips:
- Inspect grout and caulk: Look for cracks or gaps and fix them immediately.
- Clean tiles and surfaces: Use mild cleaners to remove soap scum and dirt.
- Check for water stains: Watch for discoloration on walls or ceilings near the shower.
- Ventilate the bathroom: Use exhaust fans to reduce moisture buildup.
- Look for mold: Mold growth can show that water is leaking behind walls.
Professional Inspection Benefits
Hiring a professional to inspect your shower waterproofing offers many advantages. Experts spot hidden issues that are easy to miss. Their experience ensures your shower stays protected. Here is why professional inspection helps:
- Early leak detection: Professionals use tools to find moisture inside walls.
- Quality assurance: They verify if the membrane and installation meet standards.
- Cost savings: Catching problems early avoids expensive repairs later.
- Expert advice: Pros recommend the best products and fixes for your shower.
- Safety check: They ensure mold and mildew are not growing.
Compare DIY and professional inspections in this table:
| Aspect | DIY Inspection | Professional Inspection |
| Tools | Basic visual checks | Moisture meters, thermal cameras |
| Accuracy | Limited to surface issues | Detects hidden leaks and damage |
| Recommendations | General advice | Customized repair plans |
| Cost | Low or none | Moderate, saves money in the long run |
Invest in a professional inspection every few years to keep your shower safe and dry.
Recommended: Waterproofing Between Cement Board and Shower Pan
Conclusion
Skipping a waterproof membrane in your shower can cause big problems. Water may seep into walls and floors. This leads to mold, damage, and costly repairs. Proper waterproofing keeps your home safe and dry. Always choose the right materials and follow good building steps.
A small effort now saves pain later. Protect your shower well to avoid trouble down the road. Simple care means a longer-lasting bathroom. Don’t risk damage by ignoring this key step.