Are you thinking about adding a living space above your garage? Framing a floor over a garage slab can be a smart way to create extra room without expanding your home’s footprint.
But if you’ve never tackled a project like this before, it might feel overwhelming. How do you make sure the floor is strong, level, and safe? What materials and steps do you need to follow?
This guide will walk you through everything you need to know to build a solid, reliable floor over your garage slab—so you can turn that empty space into a comfortable, usable area with confidence.
Assessing Garage Slab Conditions
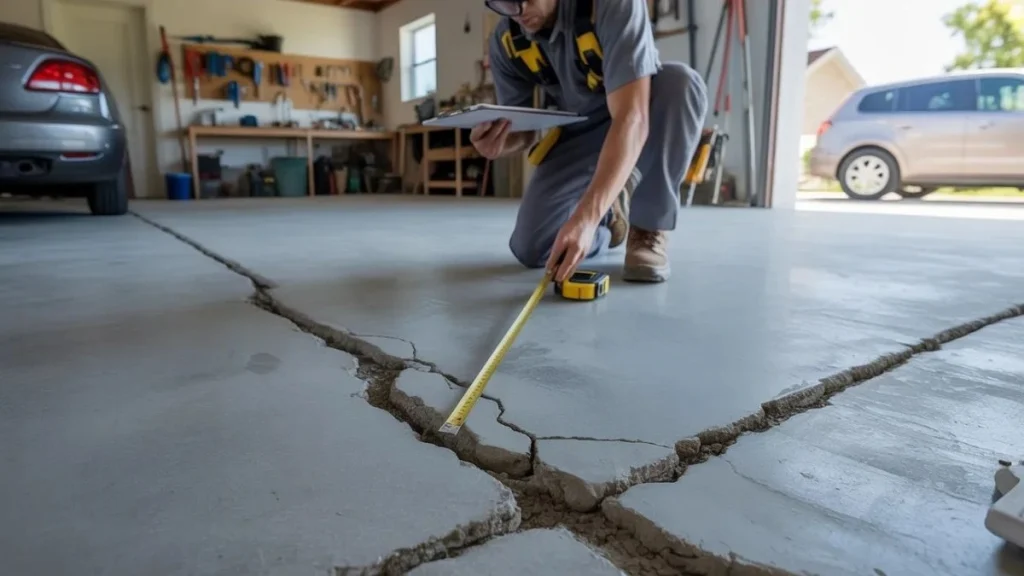
Assessing garage slab conditions is a crucial step before framing a floor over a garage slab. The slab acts as the foundation for the new floor, so its strength and stability must be checked carefully. Poor slab conditions can lead to structural problems, uneven floors, and moisture issues. Proper assessment helps avoid costly repairs and ensures the safety of the new structure.
Checking Slab Thickness And Level
The thickness and level of the garage slab determine its ability to support the new floor framing. Most residential garage slabs are 4 to 6 inches thick. Thicker slabs can handle more weight, but uneven slabs cause problems during framing.
Here are key points to check:
- Slab Thickness: Use a measuring tape or a slab gauge to measure the thickness at different spots.
- Level Surface: A long level or laser level helps check if the slab is flat.
- High or Low Spots: Note any areas that are higher or lower than the rest.
Use this table to record measurements:
| Location | Slab Thickness (inches) | Level Difference (inches) |
| Front Left | 5 | +0.2 |
| Center | 4.5 | 0 |
| Back Right | 5 | -0.3 |
A slab that is too thin or uneven may need reinforcement or grinding before framing. An uneven slab causes problems in attaching the framing members and leads to a crooked floor.
Inspecting For Cracks And Moisture
Cracks and moisture in the garage slab can weaken the foundation and damage the framed floor. Small hairline cracks are common, but wide or deep cracks require attention.
Steps to inspect cracks and moisture include:
- Visual Crack Check: Look closely for cracks wider than 1/8 inch or those that run deeply.
- Moisture Test: Tape a plastic sheet (2 ft x 2 ft) to the slab and leave it for 24 hours. Check for condensation underneath.
- Water Stains: Look for discoloration or efflorescence (white powdery deposits) on the surface.
Common types of cracks and their causes:
| Crack Type | Cause | Action Needed |
| Hairline | Normal shrinkage | No action required |
| Wide or Deep | Foundation settling or stress | Consult a professional |
| Horizontal | Soil pressure | Repair before framing |
Moisture problems can lead to wood rot and mold under the framed floor. Fix drainage issues and use a vapor barrier over the slab to prevent moisture damage.
Planning Floor Framing Layout
Framing a floor over a garage slab requires careful planning to ensure stability and proper function. The layout of the floor framing is crucial for supporting the load and fitting within existing space limits.
Determining Floor Height And Clearance
Setting the correct floor height is essential for comfort and usability. The floor must sit high enough to allow for insulation, plumbing, and electrical wiring under the finished surface. At the same time, clearance above the garage slab should meet building codes and allow for ventilation.
Key factors to consider for floor height and clearance:
- Garage ceiling height: Measure from the slab to the ceiling to find available space.
- Insulation thickness: Choose insulation that fits without reducing headroom.
- Subfloor material: Account for thickness of plywood or other subfloor materials.
- Mechanical systems: Plan space for pipes, ducts, and wiring.
- Building codes: Verify minimum clearance requirements for fire safety and ventilation.
Tip: Add extra space for any plumbing or wiring under the floor. This avoids future problems.
Selecting Joist Spacing And Direction
Joist spacing and direction greatly affect the floor’s strength and stability. Proper spacing prevents sagging and distributes weight evenly.
Common joist spacing options:
- 12 inches on center (o.c.) – strongest and best for heavy loads.
- 16 inches o.c. – standard spacing for most residential floors.
- 24 inches o.c. – saves material but requires thicker joists or stronger material.
Choose joist spacing based on the load the floor must hold and the type of flooring used. Closer spacing supports heavier loads and reduces bounce.
Joist direction usually runs perpendicular to the longest wall or the direction that provides the best support from existing beams or walls. This simplifies framing and improves load transfer.
Choosing Framing Materials
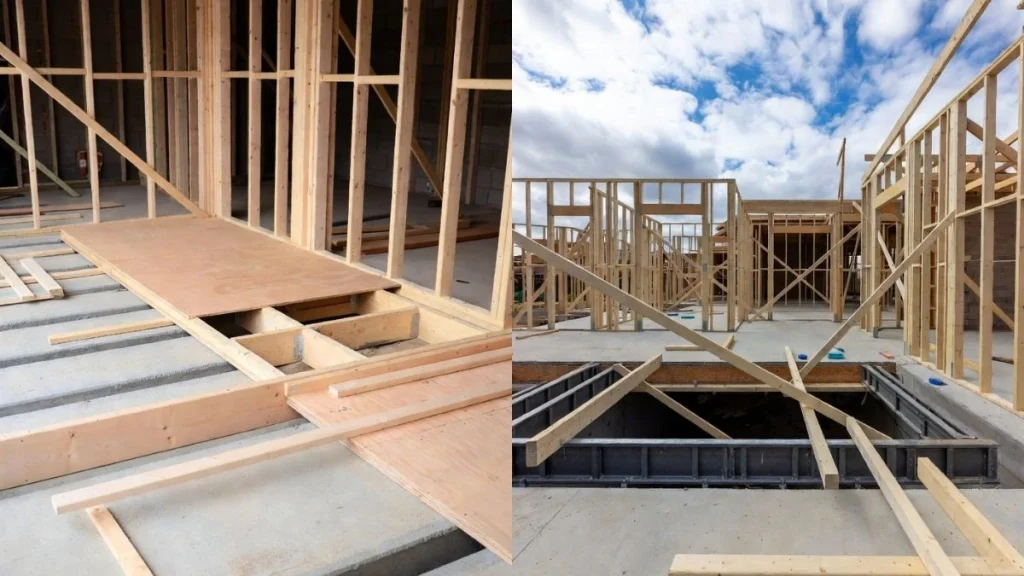
Choosing the right framing materials is crucial for building a strong floor over a garage slab. The materials must support weight, resist moisture, and last for years. Proper selection ensures safety and durability, reducing future repairs and costs.
Wood Options And Treatment
Wood is a common choice for framing floors over garage slabs due to its availability and ease of use. Several types of wood work well, including pine, fir, and cedar. Pine and fir are affordable and strong, while cedar offers natural resistance to decay and insects.
Treated wood is essential for areas exposed to moisture. Treatment helps prevent rot, mold, and insect damage. Here are common wood treatments:
- Pressure-treated wood: Chemically treated to resist moisture and pests.
- Heat-treated wood: Uses heat to kill insects and fungi without chemicals.
- Water-repellent preservatives: Applied to slow water absorption and decay.
Choosing the right wood and treatment depends on your climate and garage conditions. Use a vapor barrier between the slab and wood to reduce moisture problems. Always check local building codes for approved materials.
Metal Framing Alternatives
Metal framing offers a strong, long-lasting option for floors over garage slabs. Steel is the most common metal used because it resists warping, twisting, and insect damage. Metal framing is lighter than wood but very durable.
Steel framing comes in various forms, including cold-formed steel studs and joists. Builders often prefer metal framing for its precision and fire resistance.
- Cold-formed steel: Easy to cut and assemble; great for precise construction.
- Galvanized steel: Coated to resist rust and corrosion.
- Light gauge steel: Provides strength without much weight.
Metal framing requires special fasteners and tools. It does not absorb moisture, so no treatment is needed. Metal framing can be more expensive upfront but reduces maintenance costs over time.
Installing A Moisture Barrier
Framing a floor over a garage slab requires careful attention to moisture control. Installing a moisture barrier prevents water from seeping up through the concrete slab. This step protects wood framing and flooring materials from damage caused by dampness. Moisture barriers stop mold, rot, and structural issues. Proper installation ensures a dry, stable floor above the garage.
Types Of Vapor Barriers
Choosing the right vapor barrier depends on your specific needs and local conditions. Vapor barriers come in several types, each with pros and cons.
- Polyethylene plastic sheets: These are the most common vapor barriers. They come in various thicknesses, typically 6 to 20 mils. Thick sheets offer better durability and puncture resistance.
- Liquid-applied membranes: Applied as a paint or spray, these create a seamless, waterproof layer. They are great for irregular surfaces.
- Foil-faced barriers: These reflect moisture and heat. Often used in colder climates to reduce condensation.
- Rubberized asphalt sheets: Heavy-duty and very effective at blocking moisture, but usually more expensive.
For floor framing over a garage slab, polyethylene sheets of at least 6 mil thickness are popular. They balance cost and performance well. Using a vapor barrier suited for your climate and slab condition extends your floor’s life.
Proper Placement Techniques
Correct placement of the moisture barrier is essential for effective protection. The barrier must cover the entire slab surface without gaps.
Follow these key steps for placement:
- Clean the slab surface. Remove dust, dirt, and debris to ensure the barrier sticks well.
- Lay the barrier flat. Roll out the vapor barrier smoothly to avoid wrinkles or folds.
- Overlap seams. Overlap edges by at least 6 to 12 inches. Seal seams with waterproof tape.
- Extend up the walls. Run the barrier up the garage walls by 4 to 6 inches to stop moisture from entering at edges.
- Protect the barrier. Place a thin layer of insulation or plywood above the barrier before framing.
Use staples or fasteners only around the edges to hold the barrier in place. Avoid puncturing the middle area to prevent leaks. Inspect the barrier for holes or tears before framing.
Keep in mind:
- The barrier should sit directly on the slab, under any subfloor material.
- Do not place the barrier above the framing or flooring.
- Proper sealing at seams and edges prevents vapor from passing through.
Following these techniques creates a strong defense against moisture. It helps maintain a dry and durable floor system over the garage slab.
Framing Floor Joists
Framing floor joists over a garage slab requires careful planning and strong support to create a sturdy floor. The joists carry the weight of the floor and everything on it. Proper framing ensures the floor stays level and safe. This process starts with attaching ledger boards, then securing joists to the slab, and finally using joist hangers and anchors to hold everything together.
Attaching Ledger Boards
The ledger board is the first key element in framing floor joists. It acts as a support beam attached to the garage wall. The ledger board carries one end of the floor joists and transfers the load to the wall structure.
Steps for attaching ledger boards:
- Choose the right wood: Use pressure-treated lumber to resist moisture and decay.
- Locate the correct height: Mark the wall at the height where the floor will sit.
- Secure the ledger: Drill holes and use lag bolts or concrete screws to fasten the board tightly.
- Check level: Use a level tool to ensure the ledger board is perfectly horizontal.
Proper flashing above the ledger board is essential. It prevents water from entering and damaging the wall or ledger wood.
Securing Joists To Slab
The other end of the floor joists must be firmly secured to the garage slab. This step prevents movement and ensures the floor is strong. The slab can be uneven, so measuring and adjusting joist length is important.
Key points for securing joists to slab:
- Measure slab height: Check the slab surface level before cutting joists.
- Use a sill plate: Place a treated sill plate on the slab to protect wood from moisture.
- Anchor the sill plate: Use concrete anchors or epoxy-set bolts to hold the plate in place.
- Attach joists: Nail or screw joists firmly to the sill plate.
This setup creates a stable base and keeps joists above the slab moisture. Moisture can cause wood rot and weaken the floor.
Using Joist Hangers And Anchors
Joist hangers and anchors are metal supports designed to hold joists securely. They provide extra strength and prevent joists from twisting or shifting over time.
Important tips for using joist hangers and anchors:
- Select the right size: Choose hangers that fit the joist dimensions perfectly.
- Use galvanized hangers: These resist rust and last longer, especially in moist areas.
- Attach hangers to ledger and sill plate: Use structural nails or screws recommended by the manufacturer.
- Install anchors in concrete slab: Use wedge anchors or epoxy anchors for strong hold.
Here is a quick comparison of common anchors used:
| Anchor Type | Best For | Installation |
| Wedge Anchor | Heavy loads, solid concrete | Hammer and wrench |
| Epoxy Anchor | Cracked or weak concrete | Drill, inject epoxy, insert anchor |
| Concrete Screw | Medium loads, quick fixes | Drill pilot hole, screw in |
Correct use of joist hangers and anchors ensures a safe, long-lasting floor frame over the garage slab.
Adding Subflooring
Adding subflooring over a garage slab creates a solid base for your new floor. It helps prevent moisture issues and adds insulation. A good subfloor improves comfort and strength. Proper installation ensures the floor stays level and durable. This step is key to a successful floor framing project.
Choosing Subfloor Materials
Picking the right subfloor material affects the floor’s durability and comfort. Common materials include plywood, oriented strand board (OSB), and concrete backer board.
- Plywood: Strong and stable, plywood resists warping and holds nails well.
- OSB: Cost-effective with good strength, but may absorb moisture more than plywood.
- Concrete backer board: Used mainly under tile, it adds water resistance but is heavier.
Consider these factors when choosing:
| Material | Strength | Moisture Resistance | Cost | Best Use |
| Plywood | High | Moderate | Medium | General subflooring |
| OSB | Medium | Low to Moderate | Low | Budget subfloor |
| Concrete Backer Board | High | High | High | Tile underlayment |
Thicker subfloor panels provide better support and reduce squeaks. Thickness of 3/4 inch is common for garage slab floors. Choose materials rated for moisture exposure. Use a vapor barrier between slab and subfloor to protect against dampness.
Installation Tips For Stability
Proper installation is crucial for a strong floor. Start by cleaning and leveling the garage slab. Uneven slabs can cause floor problems later.
- Lay a moisture barrier: Use polyethylene sheeting or roofing felt to block moisture.
- Use sleepers or furring strips: Attach wood strips to the slab to create a level frame. Space sleepers 16 inches apart.
- Secure subfloor panels: Fasten plywood or OSB to sleepers with screws or nails. Leave a 1/8 inch gap between panels for expansion.
- Stagger seams: Offset joints between panels to increase floor strength.
- Check for level: Use a level during installation to keep the floor flat.
Following these steps ensures a stable subfloor. It reduces creaks, warping, and moisture damage. A well-installed subfloor supports all flooring types, from hardwood to carpet.
Insulating And Ventilating The Floor
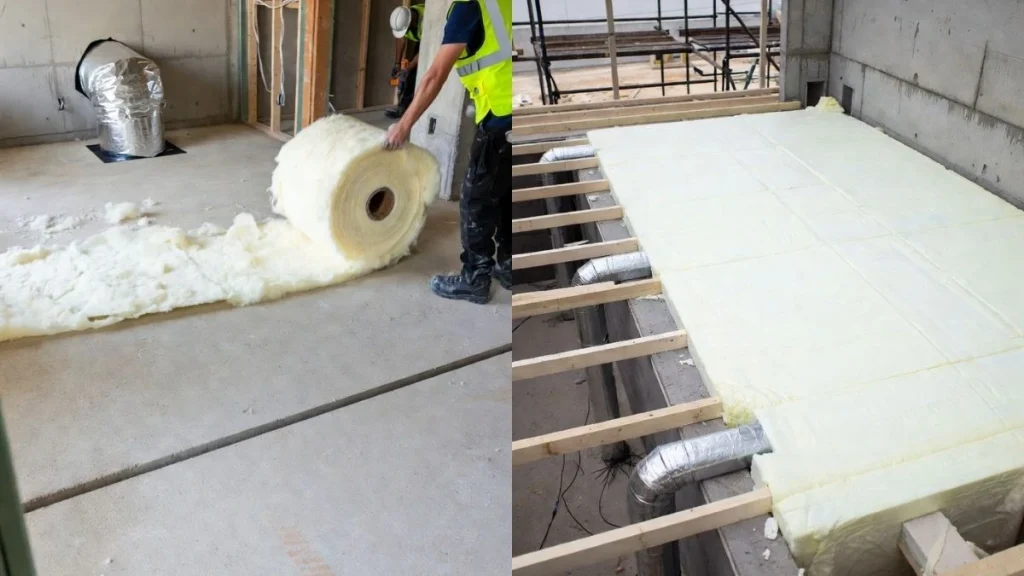
Framing a floor over a garage slab requires careful attention to both insulation and ventilation. These two factors help maintain a comfortable temperature and prevent moisture problems. Proper insulation keeps the floor warm in winter and cool in summer. Good ventilation stops dampness and mold, which can damage the floor and lower indoor air quality.
Insulation Options For Slabs
Insulating a floor over a garage slab improves energy efficiency and comfort. The right insulation reduces heat loss through the concrete slab, which is naturally cold. There are several insulation types to consider:
- Rigid Foam Boards: These are durable and moisture-resistant. Common materials include extruded polystyrene (XPS) and expanded polystyrene (EPS).
- Spray Foam Insulation: This expands to fill gaps and cracks. It offers excellent air sealing and high R-values.
- Fiberglass Batts: Easy to install but less effective if exposed to moisture. Usually placed under the floor framing.
Each insulation type has pros and cons. Here is a simple comparison:
| Insulation Type | R-Value | Moisture Resistance | Installation Ease |
| Rigid Foam Boards | 4-5 per inch | High | Moderate |
| Spray Foam | 6-7 per inch | High | Professional required |
| Fiberglass Batts | 3-4 per inch | Low | Easy |
Positioning insulation directly under the slab or between the floor joists works well. Use a moisture barrier below rigid foam boards to protect from dampness. Spray foam seals air leaks, which improves insulation performance. Fiberglass is best in dry conditions. Proper insulation reduces energy costs and creates a cozy room above the garage.
Ensuring Proper Ventilation
Ventilation is vital for the floor framed over a garage slab. It prevents moisture buildup that can cause mold and wood rot. Good airflow keeps the subfloor dry and extends the structure’s life. Ventilation also helps regulate temperature and improves air quality.
Key methods to ensure proper ventilation include:
- Installing vents: Use foundation or soffit vents to allow fresh air to enter and stale air to exit the space beneath the floor.
- Creating air gaps: Leave space between the slab and framing to promote airflow and prevent moisture trapping.
- Using vapor barriers: Place a plastic sheet below the slab or floor framing to block moisture from rising.
Here is a checklist for effective ventilation:
- Check local building codes for vent size and placement.
- Install vents on opposite sides for cross ventilation.
- Keep vent openings free of debris and blockages.
- Inspect regularly for signs of moisture or mold.
- Consider mechanical ventilation if natural airflow is insufficient.
Combining proper insulation with good ventilation creates a balanced environment. This approach prevents condensation and keeps the floor structure healthy. Ventilation should never be overlooked in framing floors over garage slabs.
Addressing Soundproofing
Framing a floor over a garage slab creates extra living space but often brings noise challenges. Sound from footsteps, voices, or appliances below can travel through the slab and disturb the room above.
Materials To Reduce Noise
Choosing the right materials is key to lowering noise transmission. Some materials absorb sound waves, while others block them. Here are common options:
- Acoustic insulation batts: Made of fiberglass or mineral wool, these fit between joists and reduce airborne noise.
- Mass loaded vinyl (MLV): A dense, flexible material that blocks sound and adds mass to the floor system.
- Resilient channels: Metal strips that decouple the framing from the drywall, reducing vibration transfer.
- Cork underlayment: Natural and eco-friendly, cork dampens impact noises and vibrations.
- Carpet padding or rubber mats: These reduce footstep noise when installed under flooring.
Here’s a comparison of these materials:
| Material | Sound Reduction Type | Installation Location | Cost Level |
| Acoustic Insulation Batts | Absorbs airborne sound | Between joists | Low |
| Mass Loaded Vinyl (MLV) | Blocks sound transmission | Under subfloor or drywall | Medium |
| Resilient Channels | Reduces vibration transfer | Between framing and drywall | Low |
| Cork Underlayment | Dampens impact noise | Under flooring | Medium |
| Carpet Padding/Rubber Mats | Reduces footstep noise | Under carpet or flooring | Low |
Using a combination of these materials creates the best soundproofing effect. Each targets different noise types, like impact or airborne sounds.
Installation Strategies
Proper installation boosts the effectiveness of soundproofing materials. Attention to detail during framing and finishing matters. Here are proven strategies:
- Isolate framing from slab: Use a sill gasket or foam strip between the slab and bottom plate to stop sound vibrations.
- Double layer drywall: Applying two drywall layers with a damping compound between reduces noise transmission.
- Seal gaps and joints: Use acoustical caulk around framing, electrical boxes, and seams to block sound leaks.
- Decouple framing: Install resilient channels or sound clips to separate drywall from framing, cutting vibration paths.
- Use floating subfloor: Build a subfloor that does not touch the slab directly, often using sleepers and soundproof mats.
Final Checks And Finishing Touches
Framing a floor over a garage slab requires precision and care. After the main frame is built, the final checks and finishing touches ensure the floor is safe, level, and ready for use. These steps help prevent problems like uneven floors, squeaks, or structural weaknesses. Paying attention to these details will make the flooring last longer and look better.
Leveling And Squaring The Floor
Start by checking if the floor frame is level. Use a long spirit level or laser level for accuracy. Place the level on different parts of the frame, especially near corners and in the middle. If you find any uneven spots, adjust the joists by adding shims or sanding down high points.
Next, make sure the floor is square. Measure the diagonals from corner to corner. Both diagonal measurements should be the same. If they differ, adjust the frame by shifting the joists slightly until the measurements match.
Key points to check for leveling and squaring:
- Use a reliable level tool for checking flatness
- Measure diagonals to confirm squareness
- Fix uneven areas with shims or sanding
- Recheck after adjustments to ensure accuracy
Preparing For Flooring Installation
After confirming the floor is level and square, prepare the surface for flooring installation. Clean the entire framed area to remove dust, debris, and loose wood pieces. A clean surface helps the flooring materials stick better and prevents damage.
Check the joist spacing to ensure it fits the type of flooring planned. Most flooring materials require joists spaced 16 or 24 inches apart. Adjust if needed to avoid sagging or damage later.
Important preparation steps:
- Remove all dust and debris using a broom or vacuum
- Inspect joist spacing and reinforce if necessary
- Install blocking between joists to add strength
- Lay down a moisture barrier if recommended for your flooring type
Proper preparation reduces risks of flooring problems like squeaks, warping, or cracks. It also helps the flooring last longer and look professional.
You May Like Also: How to Install a Sill Plate on a Concrete Slab
Conclusion
Framing a floor over a garage slab requires careful planning and proper materials. Start with a strong frame to support weight safely. Make sure to add insulation and moisture barriers to protect your space. Follow local building codes to avoid future problems.
Taking these steps helps create a durable and comfortable floor. This simple guide makes the process easier to understand and complete. Your new floor will add value and comfort to your home.