


When did you last look up at your bathroom exhaust fan cover? If it’s caked in dust and grime, it’s already hurting your fan’s efficiency — and creating the perfect conditions for mold and moisture buildup.
The good news is you don’t need a handyman to fix it. Removing a bathroom exhaust fan cover is a simple DIY task that takes just a few minutes with little to no tools.
In this guide, you’ll learn how to safely remove your bathroom exhaust fan cover — whether it uses spring clips or screws — plus tips for covers that won’t budge and how to clean and reinstall everything properly.
Why You May Need to Remove Your Bathroom Exhaust Fan Cover
Most homeowners never think about their bathroom exhaust fan until something goes wrong — the air feels heavy after a shower, a strange noise starts coming from the ceiling, or the cover looks like it hasn’t been touched in years. Your exhaust fan works hard every single day, and the cover takes the brunt of everything floating through your bathroom air — dust, steam, hair, and humidity. Knowing why you might need to remove the cover helps you stay ahead of problems before they turn into costly repairs.
Common Reasons Homeowners Remove the Fan Cover
There are several situations that call for removing your bathroom exhaust fan cover, and not all of them involve something being broken.
Routine Cleaning is the most common reason of all. Dust and lint accumulate on the cover over time, block airflow, and force the motor to work harder. Most professionals recommend cleaning it every six to twelve months — and removing the cover is the only way to do it properly.
Weak airflow, unusual noises, and musty odors are also strong signs the cover needs to come off. A dusty cover can cut fan efficiency significantly, cause the blades to run off-balance, and allow mold to form inside the housing — a problem that only gets worse the longer it’s ignored.
Bathroom renovations or upgrades are another common reason. Repainting the ceiling, replacing fixtures, or simply swapping out an old cover for a newer style all require removing the existing cover first.
How a Dirty Fan Cover Affects Your Bathroom
A dirty exhaust fan cover does more damage than most people realize. When the cover is clogged with dust, moisture lingers in the air longer and settles on walls, grout, and ceilings — creating the perfect environment for mold and mildew to grow. Left unchecked, that moisture can spread behind walls and under flooring, turning a simple cleaning job into an expensive repair.
Beyond mold, a restricted cover forces the fan motor to work harder and run longer, which shortens its lifespan and quietly increases your energy bill every month. It can also send dust and allergens back into your bathroom air each time the fan runs — a real concern for households with allergy sufferers or young children.
The bottom line is simple — a clean fan cover protects your bathroom, your health, and your wallet all at once.
What You Need Before You Start
Before you climb up and start pulling at your bathroom exhaust fan cover, take two minutes to gather what you need and review a few safety basics. This isn’t a complicated job — but like any home maintenance task, a little preparation makes the whole process smoother, safer, and frustration-free.

Tools and Supplies You’ll Need
Removing a bathroom exhaust fan cover requires almost no special equipment. A flathead or Phillips screwdriver is the most important tool — spring clip covers need no tools at all, while screw-mounted covers will need one or the other.
A sturdy step stool is essential for safely reaching the ceiling. For cleaning, have a microfiber cloth, mild dish soap, and warm water ready. A vacuum with a brush attachment is also handy for clearing dust from the fan housing once the cover is off.
- Flathead and Phillips screwdriver
- Step stool or small ladder
- Microfiber cloth and mild dish soap
- Vacuum with brush attachment
- Non-contact voltage tester (optional but recommended)
Safety Precautions to Follow First
Your bathroom exhaust fan is an electrical fixture, so a few basic safety steps are non-negotiable. Always turn off the fan at the wall switch before you start — and for extra safety, flip the bathroom circuit breaker off at your electrical panel as well.
Never yank or force the cover off. Different covers attach differently, and forcing one that hasn’t been properly released can crack the cover or damage the ceiling. Also make sure your step stool is placed on a flat, dry section of the floor — not on a bath mat — and keep your tools within easy reach so you’re never stretching awkwardly at height.
These precautions add just a couple of minutes but make all the difference between a smooth DIY job and an avoidable accident.
How to Remove a Bathroom Exhaust Fan Cover in 5 Simple Steps
Removing a bathroom exhaust fan cover is much simpler than most people expect. Whether your cover has been sitting untouched for years or you just need to clean it out, these five steps will walk you through the entire process safely and correctly — no experience required.
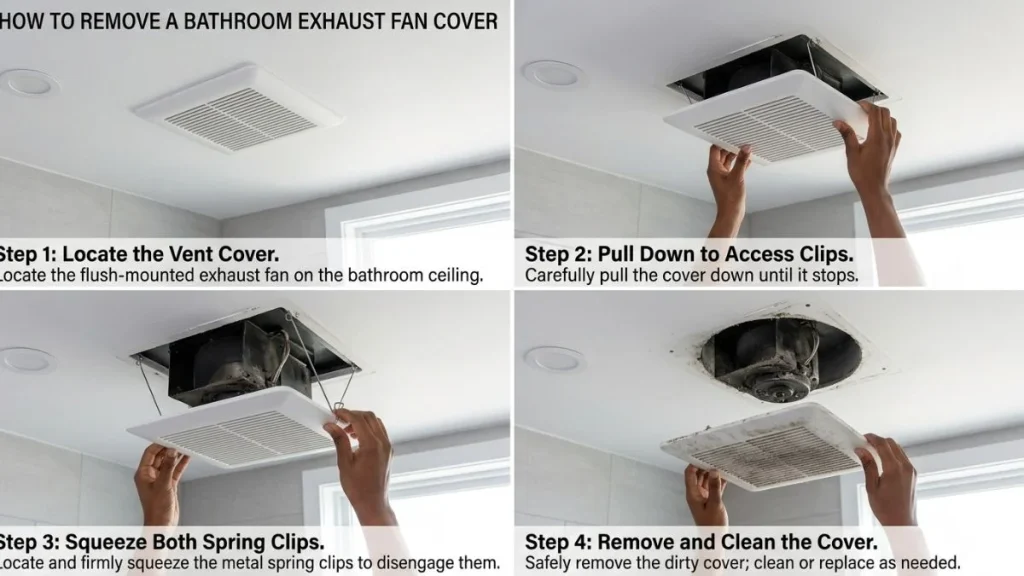
Step 1 .Turn Off the Fan and Gather Your Tools
Before you touch anything, turn off the fan at the wall switch and flip the bathroom circuit breaker off at your electrical panel. This two-step power cutoff takes less than a minute and ensures you’re not working near any live electrical current. Once the power is off, position your step stool directly beneath the fan on a flat, dry section of the floor and have all your tools within easy reach before you climb up.
Step 2. Locate the Type of Cover You Have
Before pulling or twisting anything, take a moment to identify your cover type. Look for visible screws along the edges — if there are none, press gently upward on the cover with both hands and feel for spring tension. That springy resistance means you have a spring clip cover, which is the most common type. If you spot a decorative trim ring, check underneath it for hidden screws. Knowing your cover type before you start prevents damage and saves time.
Step 3. Gently Pull the Cover Down From the Ceiling
Place both hands flat on the cover and apply slow, even downward pressure. The goal is not to force it off — just create enough separation to see how it’s attached. For spring clip covers, this will expose the wire clips inside. For screw-mounted covers, it confirms where the fasteners are. If the cover feels completely stuck and won’t move at all, it may be painted over — carefully run a utility knife along the seam before trying again.
Step 4. Release the Spring Clips or Unscrew the Fasteners
For spring clip covers, locate the two thin wire clips inside the gap and pinch both inward simultaneously to release their grip — keep one hand on the cover so it doesn’t drop suddenly.
For screw-mounted covers, remove each screw one at a time with your screwdriver and always support the cover with your free hand as you remove the last one.
For plug-in covers, lower the cover to expose the wiring plug and disconnect it by gripping the connector firmly — never pull by the wires themselves.
Step 5. Detach the Cover and Set It Aside Safely
With the clips released or screws removed, lower the cover straight down with both hands in a slow, controlled motion — avoid tilting it to prevent dust from falling into your face. Set it flat on a towel on the floor. This is the perfect time to wash it with warm soapy water, let it dry completely, and vacuum out the fan housing and blades before reinstalling.
What to Do After the Cover Is Off
Getting the cover off is only half the job. Once it’s down, you have a rare opportunity to clean everything properly, inspect the fan components up close, and make sure everything is in good working order before putting it all back together. Taking an extra fifteen to twenty minutes at this stage can dramatically improve your fan’s performance and add years to its lifespan.
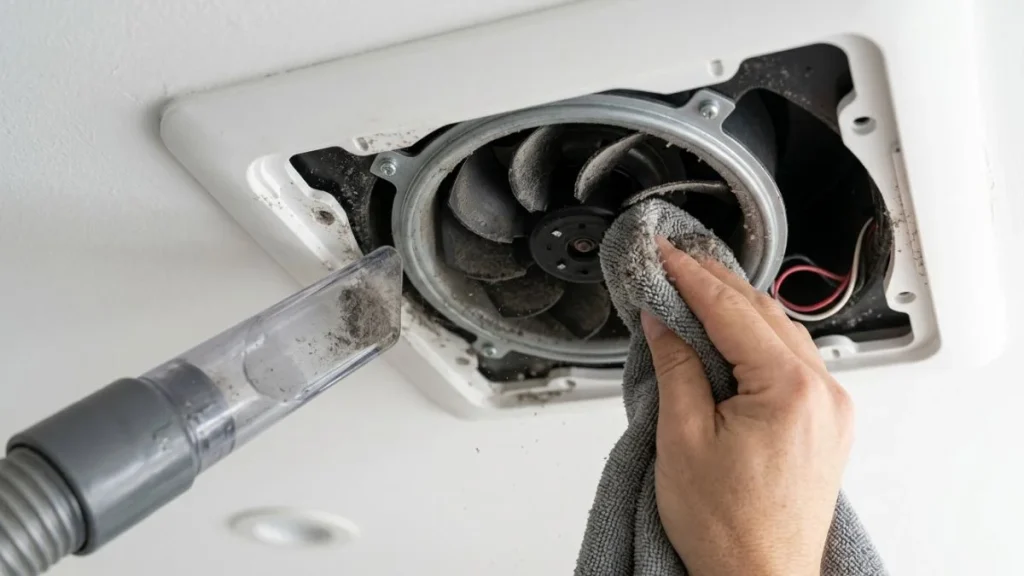
How to Clean a Bathroom Exhaust Fan Cover Properly
Take the cover to your sink and rinse it under warm running water to loosen surface dust. Then soak it in warm soapy water for five to ten minutes to soften any stubborn grime. Use an old toothbrush to scrub the vents and corners where dust packs in tightly, rinse it clean, and set it flat on a dry towel to air dry completely before reinstalling. Never put a damp cover back over an electrical fixture — if you’re short on time, a hair dryer on a low setting speeds up the drying process safely.
How to Clean the Fan Blades and Grille Inside
With the cover off, use a vacuum with a brush attachment to carefully remove loose dust from the fan blades, housing walls, and grille. Work gently — fan blades are fragile, and bending one can throw the fan off balance. For stubborn buildup, wipe the blades with a dry microfiber cloth.
Avoid using wet cloths or liquid cleaners directly inside the housing, as moisture near the motor can cause serious damage. Once clean, spin the blade lightly with your finger — it should rotate freely with no resistance or wobbling. Any stiffness or grinding could mean the motor bearings are wearing out.
When to Replace Instead of Reinstall the Cover
Not every cover that comes off should go back up. If the cover is cracked, warped, or broken during removal, reinstalling it is a short-term fix that won’t hold up for long. If it’s heavily stained with mold that won’t wash off, replacement is the safer and more hygienic choice. Cover replacements are inexpensive — most run between ten and thirty dollars — and are widely available online or at any hardware store. Simply match the replacement using your fan’s model number or measure the existing cover dimensions for a proper fit.
If your fan is more than ten years old and running loudly or moving air weakly, this is also a good moment to consider replacing the entire unit rather than just the cover.
How to Reinstall the Bathroom Exhaust Fan Cover
Reinstalling the bathroom exhaust fan cover is usually quick, but doing it correctly helps keep the fan secure, quiet, and working properly. Before reinstalling, make sure the cover is clean and completely dry. Also check that the fan housing is free from dust or loose debris.
Most bathroom exhaust fan covers use either spring clips or mounting screws. The reinstalling process depends on the type of cover your fan has.

Reattaching Spring-Clip Covers
Spring-clip covers are common in many modern bathroom exhaust fans. These covers use two metal clips attached to the grille.
Start by holding the cover near the fan housing. Gently squeeze the metal spring clips together and insert them into the slots inside the fan unit. Once both clips are in place, carefully push the cover upward until it sits flat against the ceiling.
If the cover hangs unevenly, remove it and check whether both clips are fully inserted. Avoid pushing too hard because older plastic covers can crack under pressure.
Reattaching Screw-Mounted Covers
Some bathroom exhaust fans use screws instead of spring clips. These covers are attached directly to the housing with one or more screws.
Align the cover with the screw holes and hold it steadily in position. Insert the screws by hand first to prevent misalignment. Then tighten them using a screwdriver until the cover feels secure.
Do not overtighten the screws. Too much pressure can damage the plastic cover or strip the mounting holes. The cover should sit firmly against the ceiling without bending.
Quick Check After Reinstalling
After reinstalling the cover, restore power to the fan and turn it on for a quick inspection. Listen for rattling or unusual vibration, which may indicate the cover is not attached correctly.
Check that the cover remains stable while the fan runs. You should also feel proper airflow through the grille. If airflow seems weak or the cover shakes, turn the fan off and adjust the cover again.
A quick final check helps ensure the bathroom exhaust fan works efficiently and stays securely attached over time.
Troubleshooting — Common Problems When Removing a Bathroom Fan Cover
| Problem | Cause | Solution |
| Cover won’t come down | Tight spring clips, dust buildup, or paint sealing the edges | Gently pull from multiple sides, cut paint seal if needed, and wiggle slightly to loosen |
| Spring clips feel stuck | Bent clips, rust, or dirt buildup | Lower the cover slightly, locate clips, and carefully squeeze and release them one by one |
| Screws won’t loosen | Rust or stripped screw heads | Use the correct screwdriver size, apply steady pressure, turn slowly, and use light penetrating oil if needed |
| Plastic cover is cracking | Old, brittle plastic due to heat and moisture | Support the cover with both hands and remove slowly with even pressure |
| Heavy dust inside housing | Long-term lack of cleaning | Place a cloth underneath, wear a mask, and remove slowly to avoid falling dust |
| Cover does not come off at all | Hidden clips or incorrect removal method | Inspect carefully for hidden fasteners and check the fan model instructions before forcing it |
This table helps you quickly identify and solve the most common issues when removing a bathroom exhaust fan cover without causing damage.
Conclusion
Removing and reinstalling a bathroom exhaust fan cover is a simple maintenance task when done carefully. Most covers are either spring-clip or screw-mounted, and understanding the correct method helps prevent damage to the fan or ceiling.
With the right approach, this task can be completed quickly, safely, and without needing professional help in most cases.


