


Most homeowners discover their bathroom plumbing exits through the floor — not the wall — only after the old vanity is already sitting in the driveway, making replacing vanity with plumbing through floor configurations far trickier than a standard swap.
The problem is real: floor-exit plumbing forces you to cut precise holes in the vanity cabinet base, align a p-trap in a confined vertical space, and choose a vanity that physically accommodates pipes rising from below — none of which standard installation guides address.
This guide walks you through measuring, selecting the right vanity, cutting cabinet openings, connecting floor-exit drain and supply lines, and finishing the job to code — so you can complete the project correctly without hiring a plumber for work you can handle yourself.
Selecting and Measuring for the Right Vanity
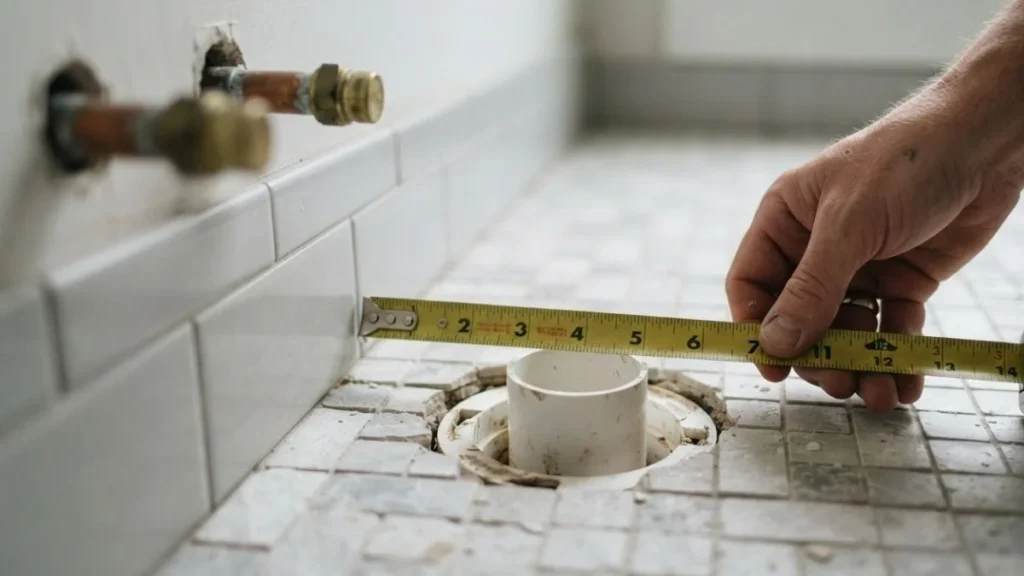
Choosing the wrong vanity for a floor rough-in plumbing configuration means cutting through structural cabinet framing or returning the unit entirely. Measure first, shop second — every time.
How to Take Your Rough-In Measurements
Before visiting any showroom or browsing online, record these 4 measurements from your existing installation:
- Drain center to back wall: Measure from the finished wall surface to the center of the drain pipe. Most floor rough-ins land between 14 and 18 inches from the wall.
- Drain pipe diameter: Standard is 1.5 inches for lavatory drains under the International Plumbing Code (IPC).
- Supply line locations: Measure left and right supply stub-out positions from the drain center and from the floor.
- Pipe height above floor: Note how far each pipe extends vertically — this determines whether a p-trap will fit inside the cabinet.
Take photos from directly above and from both sides. These images replace guesswork when you are standing in a showroom comparing vanity footprints.
Vanity Styles That Work With Vertical Plumbing Entry
Not every cabinet accommodates bathroom pipes coming up through the floor. Three styles handle this configuration well:
- Open-base pedestals: No cabinet floor — pipes pass through freely with no cutting required.
- Wall-hung vanities: Mount above the floor entirely, leaving the plumbing configuration fully exposed and accessible.
- Freestanding cabinets with a recessed base: The toe-kick area sits several inches back from the front edge, often clearing pipe locations without notching.
Traditional fully enclosed vanities with a solid cabinet floor require precise cabinet cutouts and are the hardest to fit around vertical supply and drain pipes.
What to Look for When Shopping
When selecting a vanity for upward-facing drain pipes, confirm these specs before purchasing:
- Interior cabinet depth of at least 18 inches to allow p-trap clearance
- A cabinet base that is either open or pre-drilled for drain access
- Adjustable or removable shelving so pipe height above floor does not become an obstruction
Budget option: IKEA’s GODMORGON series has a removable base panel that simplifies notching around floor pipes. Mid-range: Kohler’s Poplin vanity ships with a back-panel knockout designed for flexible plumbing configuration. Custom-built cabinets from local millwork shops allow you to specify exact cutout placement for any floor rough-in.
Installing the Vanity: Cutting, Positioning, and Securing
The installation sequence matters as much as the cuts themselves. Work out of order and you risk cracking the cabinet base, misaligning the drain, or discovering the vanity footprint does not clear the supply lines after the unit is already against the wall.

Tools You Need Before Starting
Gather these before touching the old vanity:
- Jigsaw: Best for full cabinet cutouts in the base panel — use a fine-tooth blade to prevent splintering
- Hole saw (2–2.5 inch): Ideal for clean circular drain access holes through thin cabinet floors
- Rotary tool (Dremel): Best for tight notching cabinet work around floor pipes where a jigsaw cannot maneuver
- Pencil, tape measure, and painter’s tape: For marking cut lines clearly on cabinet surfaces
- Safety glasses and dust mask: MDF and plywood dust from cabinet cuts is a respiratory irritant
Removing the Old Vanity Without Disturbing Floor Plumbing
Turn off the water at the shut-off valves beneath the existing vanity. If your shut-offs are seized or absent, close the main supply valve instead. Disconnect supply lines at the valve, then disconnect the p-trap at the drain stub-out — have a bucket ready, residual water will spill.
Here’s what most people miss: the old vanity cabinet is often scribed or caulked to the wall and floor. Cut through any caulk bead with a utility knife before pulling the cabinet forward. Forcing it tears drywall and can shift the drain pipe laterally, which misaligns your floor rough-in for the new vanity.
Marking and Cutting Cabinet Openings
Set the new vanity in its approximate position without pushing it fully against the wall. Feed a pencil down to the floor alongside each pipe to transfer the pipe center location onto the cabinet base. For drain access, mark a circle 0.5 inches larger than the pipe diameter — this clearance allows minor adjustments during final positioning.
Use the hole saw for the drain pipe opening. Use the jigsaw or rotary tool for supply line cutouts, which are typically offset left and right of center and benefit from a notched slot rather than a round hole. A notch cut from the cabinet back panel lets you slide the vanity straight back into position instead of lowering it over pipes from above.
Positioning, Leveling, and Securing
Slide the vanity into final position and check level in both directions with a 4-foot level. Shim the base as needed — even a 0.25-inch slope causes p-trap water to pool incorrectly. Once level, secure the vanity by driving 3-inch screws through the back rail into wall studs. For wall-hung units, all weight transfers to the wall — confirm stud location with a stud finder before drilling.
Reconnecting Supply Lines and Drain
Reconnect supply lines using braided stainless steel flexible connectors — 12-inch lines handle most floor rough-in supply positions without kinking. Hand-tighten, then add a quarter turn with a wrench. Do not overtighten; supply line nuts are brass on plastic threads and crack under excess torque.
For the drain, the p-trap must maintain a 1/4-inch-per-foot downward slope toward the drain stub-out. This is an IPC requirement, not a suggestion — insufficient pitch allows solids to settle and cause chronic clogs. Connect the trap arm to the drain stub-out, check slope with a level, then hand-tighten all slip-joint nuts before running water.
When Professional Help Is Necessary

Not every part of a vanity replacement requires a licensed plumber, but specific tasks cross a legal and safety line that DIY cannot cross. Knowing exactly where that line sits saves you from failed inspections, voided homeowner’s insurance claims, and water damage that costs far more than a plumber’s invoice.
What You Can Safely DIY
These tasks fall within homeowner scope in most jurisdictions:
- Removing the existing vanity and disconnecting supply lines at shut-off valves
- Cutting cabinet cutouts and notching cabinet bases around floor pipes
- Selecting and positioning the new vanity over the existing floor rough-in
- Reconnecting supply lines and p-trap to existing stub-outs without modifying pipe locations
- Securing the vanity cabinet to wall studs
The key boundary: you are working with the existing plumbing configuration as-is. No pipe moves, no new connections to the drain stack.
When You Legally Need a Licensed Plumber
The moment the project requires modifying the plumbing beyond existing stub-out locations, most state and local codes require a licensed plumber and a permit. This includes:
- Moving the drain pipe to a new floor rough-in location
- Rerouting supply lines inside walls or below the subfloor
- Adding or relocating shut-off valves tied into the main supply
- Modifying the trap configuration — for example, converting from a floor-entry drain to a wall-exit drain
According to the Uniform Plumbing Code (UPC), drain and vent modifications require inspection before walls or floors are closed. Skipping this step creates a code violation that surfaces during home sale inspections.
Cost Comparison: DIY vs. Adding Plumbing Work
| Scope | Typical Cost Range |
|---|---|
| Vanity replacement only (DIY) | $200–$800 (vanity + supplies) |
| Vanity replacement (hired out) | $500–$1,500 labor + materials |
| Drain pipe relocation (licensed plumber) | $400–$900 additional |
| Full supply + drain reroute | $800–$2,000 additional |
These figures reflect national averages — coastal markets run 20–40% higher.
Red Flags That Signal You Need Professional Assessment
Stop the project and call a licensed plumber if you find any of these during vanity removal:
- Corroded or soft subfloor around the drain pipe — indicates a slow leak that has damaged the floor structure
- No shut-off valves on supply lines — the main must be shut for all work, and valves should be added before reinstallation
- Drain pipe sitting at an angle or visibly shifted from its original vertical plumbing entry position
- Black or gray discoloration on the drain stub-out or surrounding subfloor — signs of mold or long-term moisture intrusion
Any of these conditions means the existing plumbing configuration needs assessment before a new vanity goes in. Installing over hidden damage guarantees a larger, costlier repair within 2–3 years.
Troubleshooting Fit and Leak Issues
Most fit problems with floor rough-in plumbing configurations show up during the dry-fit stage — before any connections are made. Catching them there costs nothing. Discovering them after the sink is mounted and caulked costs an afternoon of rework.
Vanity Footprint Does Not Clear the Pipes
If the cabinet cutouts or notches land on a structural support rail rather than open cabinet floor, you have 3 options:
- Recut the opening: Extend the notch or cutout by 0.5–1 inch in the direction needed — verify you are not cutting into a glued joint or corner block
- Offset the vanity position: Shift the unit left or right by 1–2 inches if the vanity plumbing configuration allows it without creating a visible gap at the wall
- Add a riser platform: A 3/4-inch plywood base under the vanity raises the cabinet floor above the pipe height, converting a tight vertical plumbing entry into a manageable clearance problem
Adjusting Drain Pitch When the New Vanity Changes Height
A taller or shorter vanity changes the p-trap elevation relative to the floor drain stub-out. If the trap arm now runs uphill toward the drain — even slightly — water will not drain correctly and sewer gas can backflow into the bathroom.
Recheck slope every time vanity height changes. The IPC requires 1/4 inch of drop per foot of horizontal run on the trap arm. Adjust by loosening the slip-joint nut at the drain stub-out and repositioning the trap arm angle before retightening.
Sealing the Cabinet Base Against Moisture Intrusion
Bathroom floors accumulate water. Any gap between the vanity base and the finished floor around the pipe penetrations creates a path for moisture to wick under the cabinet and into the subfloor.
Apply a continuous bead of 100% silicone caulk — not latex — around the perimeter of the cabinet base where it meets the floor. Use the same silicone around each pipe penetration through the cabinet floor. DAP All-Purpose 100% Silicone and GE Sealants Advanced Silicone 2 both hold up in wet bathroom environments without shrinking or cracking over time.
Addressing Loose or Corroded Floor Pipes Before Installation
A drain stub-out that wobbles when touched is not a cosmetic issue — it indicates the pipe anchor below the subfloor has failed or corroded. Installing over a loose pipe transfers movement to every connection above it, causing slip-joint fittings to loosen and leak within months.
If the drain pipe moves laterally at floor level, have a plumber secure the fitting below the subfloor before proceeding. If supply stub-outs show white mineral crust or green oxidation at the base, clean them with a wire brush and inspect the threads. Corroded threads on older galvanized supply lines often strip during reconnection — replacement at the valve is cheaper than dealing with a slow leak inside a finished cabinet.
FAQ
How do I measure my floor rough-in before buying a vanity?
Measure from the finished wall surface to the center of the drain pipe, then record the left and right positions of your supply stub-outs relative to that drain center. Also note how far each pipe extends above the floor — this determines whether a p-trap will fit inside the cabinet without additional notching.
What’s the best way to cut holes in a vanity for floor pipes?
Use a 2–2.5 inch hole saw for the drain pipe opening and a jigsaw or rotary tool for supply line cutouts. Mark each cut location by setting the vanity in position and tracing pipe centers onto the cabinet base with a pencil before cutting — measure twice, cut once applies here more than anywhere else in this project.
Do I need a plumber to replace a vanity with floor plumbing?
No, if the existing drain and supply stub-outs stay in their current locations. Disconnecting supply lines, cutting cabinet openings, and reconnecting the p-trap and supply lines to existing floor rough-in stub-outs are all legal homeowner tasks in most jurisdictions. A licensed plumber is required only when pipes need to be moved, rerouted, or modified beyond their current positions.
Ready to Replace Your Vanity
The single factor that determines whether this project goes smoothly is taking complete measurements — drain center, supply positions, and pipe height above floor — before selecting any vanity. Pull the old cabinet today, photograph every pipe from above and both sides, and record all 4 measurements on paper before visiting a showroom or opening a browser tab. Every decision downstream, from cabinet cutout placement to p-trap pitch, depends on those numbers being exact.


