


If you’ve noticed gurgling drains, a faint sewer smell in your home, or spotted a rusty pipe poking through your roof during a recent inspection, your cast iron vent stack might be telling you something important — it’s time for a replacement.
Most homes built before 1980 were fitted with cast iron plumbing, including the vent stack that runs vertically through the house and exits through the roof. These pipes are tough, but they don’t last forever. When they start to fail, the problems they cause go beyond inconvenience. Sewer gases can seep indoors, drains back up, and a deteriorated roof penetration can let water into your home.
The good news? Replacing a cast iron vent stack through the roof is a project that many prepared homeowners can tackle — or at least understand well enough to manage a contractor. This guide walks you through everything: what the vent stack does, how to spot failure, what tools you need, and a clear step-by-step replacement process.
What Is a Cast Iron Vent Stack and What Does It Do?
Before you pick up a saw, it helps to understand exactly what you’re dealing with. A vent stack is a vertical pipe that runs from your home’s drain system up through the roof. It serves two critical functions in your plumbing system.
First, it allows air into the drain pipes so water and waste can flow freely. Without proper venting, you’d have slow drains and that familiar gurgling sound after flushing a toilet. Second, it vents sewer gases — including methane and hydrogen sulfide — safely out of the home through the rooftop opening rather than letting them build up inside your living space.
Cast iron was the go-to material for vent stacks for most of the 20th century, and for good reason. It’s heavy, durable, and naturally resistant to fire. In homes built before 1980, it’s still the most common material you’ll find. The problem is that cast iron has a lifespan of roughly 50 to 70 years. After that, internal rust, scale buildup, and exterior corrosion begin to take a serious toll.
Today, most replacement vent stacks use Schedule 40 PVC or ABS plastic pipe. PVC is lighter, easier to cut and install, resistant to corrosion, and costs significantly less than cast iron. It’s also fully code-compliant in virtually every U.S. municipality when properly installed with the right fittings.
Signs You Need to Replace Your Cast Iron Vent Stack
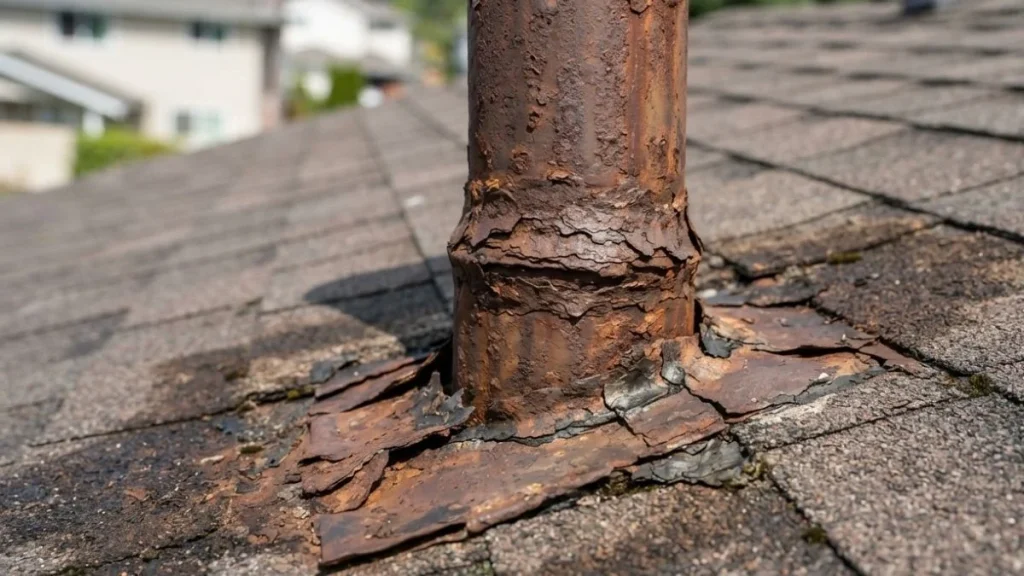
Knowing when to act is half the battle. Cast iron doesn’t fail overnight — it gives you warning signs well before it becomes a full emergency. Here’s what to look for:
Visual warning signs:
- Heavy rust, flaking, or pitting on any exposed section of the pipe
- Dark staining or moisture rings around the roof boot flashing
- Visible cracks or crumbling at pipe joints
- Orange-brown water stains on attic framing near the pipe
Performance warning signs:
- Slow drains in multiple fixtures simultaneously (not just one sink)
- Persistent gurgling from toilets or floor drains
- A sulfur or rotten egg smell that comes and goes indoors
- Drains that back up or run sluggishly after heavy rainfall
If you’re seeing two or more of these signs at the same time, there’s a strong chance the vent stack is the culprit. A licensed plumber can run a camera inspection through the pipe to confirm the extent of the damage before you commit to a full replacement. This step is worth the cost — it can tell you whether you need to replace only the roof section or the entire stack from basement to rooftop.
DIY vs. Hiring a Licensed Plumber
This is an important decision to make before buying a single piece of pipe. Replacing the section of cast iron vent stack that runs through the roof and exits above the shingles is genuinely doable for a capable DIYer with some roofing and basic plumbing experience. However, it requires comfort working on a roof, cutting through cast iron pipe, and making a weathertight flashing installation.
If the damage extends further down into the attic or through interior walls, the project complexity increases significantly. At that point, hiring a licensed plumber is the smarter and safer call.
Permit requirements are another factor most homeowners overlook. In most U.S. cities and counties, replacing a vent stack — even partially — requires a plumbing permit. Skipping this step might seem like a time-saver, but it can create real problems when you sell your home or file an insurance claim. Always check with your local building department before starting work.
Tools and Materials You’ll Need
Getting your materials together before you climb onto the roof saves time and prevents dangerous trips up and down the ladder mid-project.
Tools:
- Reciprocating saw with a metal-cutting blade
- Snap cutter or angle grinder (for clean cast iron cuts)
- Pipe clamp or ratchet strap (to support pipe before cutting)
- Caulking gun
- Roofing pry bar
- Tape measure and marker
- Safety harness with roof anchor
Materials:
| Item | Purpose |
| Schedule 40 PVC pipe (3″ or 4″) | Replacement vent pipe |
| Fernco no-hub flexible couplings | Connects PVC to cast iron |
| New roof boot flashing | Weathertight roof seal |
| Roofing cement and nails | Flashing installation |
| PVC primer and cement | Joining PVC sections |
| Work gloves, eye protection | Personal safety |
Always match the diameter of your new PVC pipe to the existing cast iron stack. Most residential vent stacks are either 3 inches or 4 inches in diameter. Buying the wrong size means an extra hardware store trip at the worst possible time.
How to Replace a Cast Iron Vent Stack Through the Roof — Step by Step
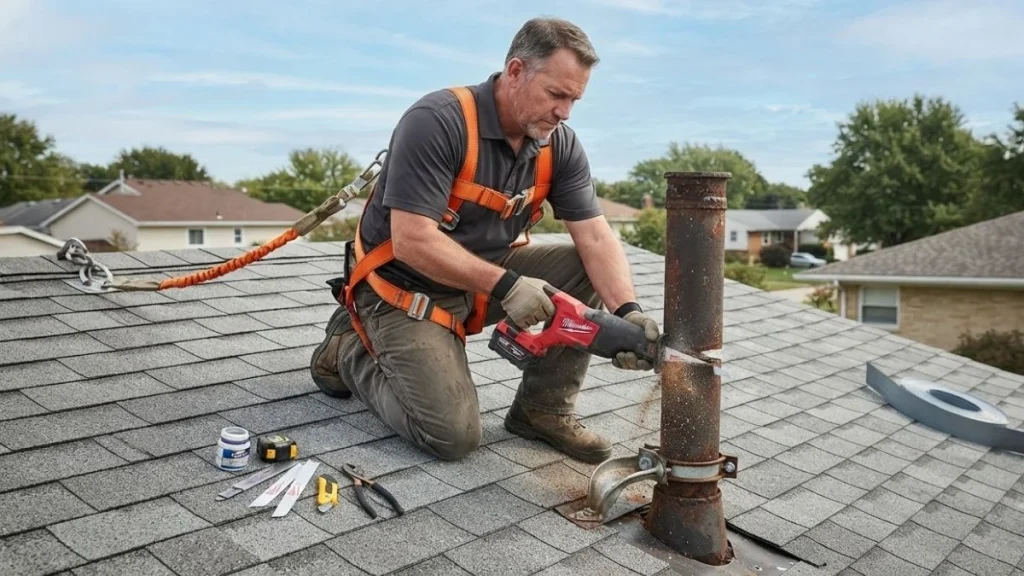
Prep Work and Safety Setup
Start by letting everyone in the household know the plumbing will be temporarily out of service. Set up your roof ladder securely and attach a safety harness anchored to the roof ridge before stepping onto the slope. Have a helper on the ground to hand up materials and assist if needed. Lay out all your tools and materials within reach before you make any cuts.
Remove the Old Roof Boot Flashing
Using a roofing pry bar, carefully lift the shingles surrounding the pipe flashing. Work slowly to avoid cracking the shingles — you’ll want to reuse them if they’re in good shape. Once the shingle edges are lifted, remove the roofing nails holding the flashing base and slide the old boot up and off the pipe. Set it aside for disposal.
Cut and Remove the Old Cast Iron Pipe
This is the most physically demanding step. Before making any cuts, clamp or strap the pipe below your cut point so it doesn’t drop when severed. Mark your cut location on the cast iron pipe — ideally a few inches above the last good section of pipe below the roof deck.
Use a reciprocating saw with a metal-cutting blade or a snap cutter to make the cut. Cast iron is brittle and can crack unpredictably, so keep your cut controlled and your body positioned to the side. Once cut, carefully lift the top section free and lower it to the ground with a rope if needed. Do not drop cast iron pipe — it can crack the section below or damage the roof.
Prepare the Connection Point
Clean the top of the remaining cast iron pipe thoroughly. Remove any rust, debris, or old joint compound from the end. Slide the Fernco no-hub flexible coupling onto the cast iron pipe end — do not tighten the clamps yet. This rubber coupling is what will bridge the connection between old cast iron and new PVC, and it’s the most important fitting in the entire project. Make sure you have the correct size: a 3″x3″ or 4″x4″ Fernco depending on your stack diameter.
Install the New PVC Vent Stack Section
Measure the length of PVC pipe you need, from the top of the Fernco coupling up through the roof to the appropriate height above the roofline. Code in most areas requires the vent pipe to extend a minimum of 6 inches above the roof surface, and 12 inches or more in areas with heavy snow.
Cut your PVC pipe to length, apply PVC primer to both the pipe end and the inside of any couplings, then apply PVC cement and join the pieces. Insert the bottom end of the PVC into the Fernco coupling on the cast iron pipe, check that the pipe is plumb (use a level), then tighten the stainless steel clamps on the Fernco firmly with a screwdriver or nut driver.
Install the New Roof Boot Flashing
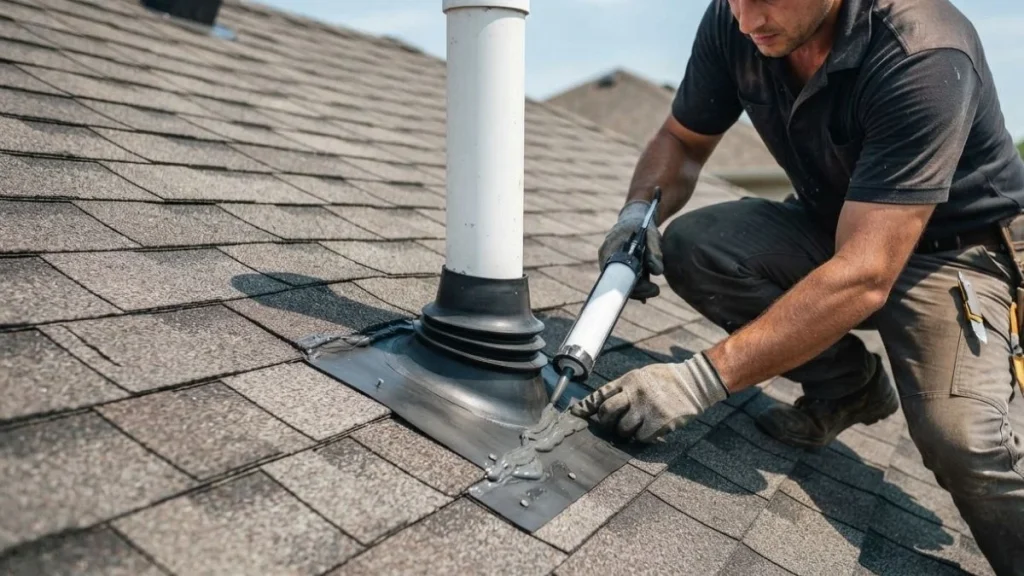
Slide the new rubber roof boot down over the PVC pipe from the top. Position the flashing base flat against the roof deck. The correct layering method is critical here — the upper edge of the flashing base should slide under the shingles above it, while the lower edge sits on top of the shingles below it. This layering directs water away from the penetration and prevents leaks.
Nail the flashing base to the roof deck using roofing nails along the upper and side edges only — never nail the lower edge. Apply roofing cement under any lifted shingle edges and press them back down firmly. Run a bead of roofing sealant around the base of the rubber boot where it meets the pipe.
Final Inspection and Leak Testing
Go into the attic and do a visual inspection of the coupling connection and the underside of the roof penetration. Everything should look tight and dry. Then, run water through all fixtures connected to the stack — flush toilets, run sinks, and fill and drain a bathtub if connected. Check the coupling for any drips or seepage.
After the first significant rainfall, reinspect the attic around the flashing penetration for any signs of moisture. If installed correctly, the new boot flashing will keep the roof sealed for 20 years or more.
Common Mistakes to Avoid
Even experienced DIYers run into problems on this project. Here are the most frequent mistakes and how to sidestep them:
Skipping the permit — This seems minor until you try to sell your home and a buyer’s inspector flags unpermitted plumbing work. Always pull the permit.
Using the wrong coupling size — A Fernco that doesn’t match your pipe diameter won’t seal properly and will eventually leak. Measure twice before purchasing.
Poor flashing installation — Improper shingle layering around the roof boot is the number one cause of water damage following a vent stack replacement. Take your time on this step.
Not supporting the pipe before cutting — If the cast iron pipe drops when cut, it can crack the section below or damage the hub connection lower in the stack. Always clamp the pipe before cutting.
How Much Does It Cost?
| Replacement Type | Estimated Cost |
| DIY — materials only | $150 – $400 |
| Professional — partial roof section | $800 – $1,200 |
| Professional — full stack replacement | $1,500 – $3,000+ |
Costs vary based on pipe length, roof height, attic accessibility, and local labor rates. A full stack replacement from basement to roof in a two-story home with limited attic access can push costs higher. Getting two or three quotes from licensed plumbers is always a smart move before committing.
You May Read Also: How to Install a Roof Vent for a Bathroom Fan
Conclusion
Replacing a cast iron vent stack through the roof is one of those home improvement projects that sounds intimidating but becomes very manageable once you understand each step. The key is preparation — knowing what you’re working with, having the right tools, following the correct installation sequence, and not skipping the permit.
If your cast iron stack is showing signs of age and failure, don’t wait for a cracked pipe or a water-damaged attic ceiling to force your hand. A proactive replacement now costs a fraction of the damage repairs later.
Not sure how far the damage extends? Start with a plumbing camera inspection. It’s a small upfront cost that gives you a clear picture before you commit to any work — and it could save you from a much bigger job than you bargained for.


