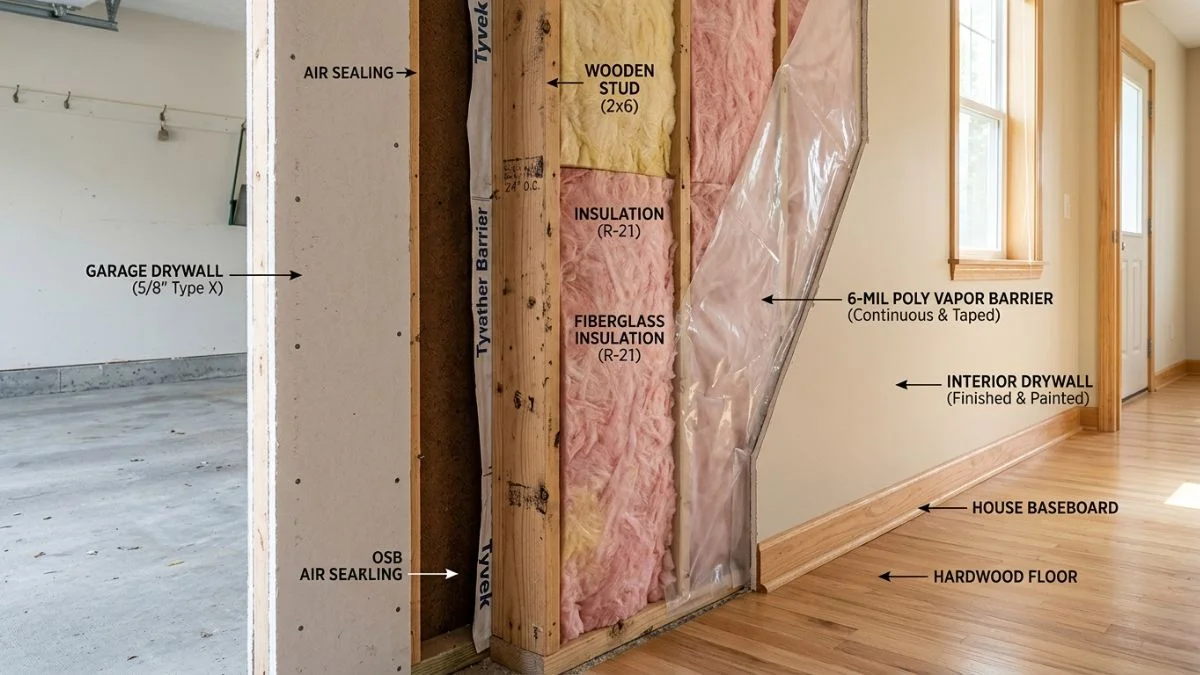
Are you worried about moisture sneaking between your garage and house? A vapor barrier can be the simple solution that protects your home from damage, mold, and costly repairs.
Imagine keeping your living space dry, safe, and energy-efficient just by adding a thin layer in the right spot. You’ll discover exactly why a vapor barrier matters, how it works, and the best way to install it between your garage and home.
Purpose Of Vapor Barriers
The space between a garage and a house can become a hotspot for moisture problems. A vapor barrier plays a key role in controlling this moisture. It is a material designed to stop water vapor from moving through walls and floors. This helps protect the home’s structure and indoor air quality.
Moisture Control Benefits
Vapor barriers reduce the amount of moisture that passes from the garage into the house. Garages often have damp conditions due to vehicles, outdoor tools, and temperature changes. Without a vapor barrier, moisture can seep into walls and floors, causing damage over time.
- Protects building materials: Moisture can weaken wood, drywall, and insulation.
- Prevents condensation: Stops water from forming on cold surfaces inside walls.
- Reduces water damage risk: Limits leaks and structural decay.
Preventing Mold And Mildew
Mold and mildew grow in moist environments. Garages often have high humidity and dampness, making mold growth likely. A vapor barrier stops moisture from entering walls and floors, cutting off mold’s food source.
Benefits of stopping mold and mildew:
- Health protection: Mold spores can cause allergies and breathing problems.
- Maintains home value: Mold damage lowers property worth.
- Prevents unpleasant odors: Mold often causes musty smells indoors.
Signs of mold problems near garage-house junctions include:
- Discolored walls or ceilings
- Peeling paint or wallpaper
- Persistent damp smells
Using a vapor barrier is a simple step to stop these issues. It keeps the area dry and healthy.
Improving Energy Efficiency
A vapor barrier also helps keep energy costs down. Moisture inside walls reduces insulation efficiency. Wet insulation loses its ability to keep heat in or out.
Ways vapor barriers improve energy efficiency:
- Maintains dry insulation for better performance
- Prevents cold drafts caused by damp materials
- Helps keep indoor temperatures stable
Energy savings can be significant with proper vapor barrier installation. Homes stay warmer in winter and cooler in summer. This lowers heating and cooling bills.
| Energy Aspect | Impact Without Vapor Barrier | Impact With Vapor Barrier |
| Insulation Efficiency | Reduced by moisture | Maintained at peak level |
| Heating Costs | Higher due to heat loss | Lower through better heat retention |
| Cooling Costs | Higher due to humidity | Lower with stable indoor climate |
Common Vapor Barrier Materials
Installing a vapor barrier between the garage and the house is essential to control moisture and protect the building structure. Choosing the right material helps prevent mold, wood rot, and insulation damage. Common vapor barrier materials differ in strength, permeability, and installation ease.
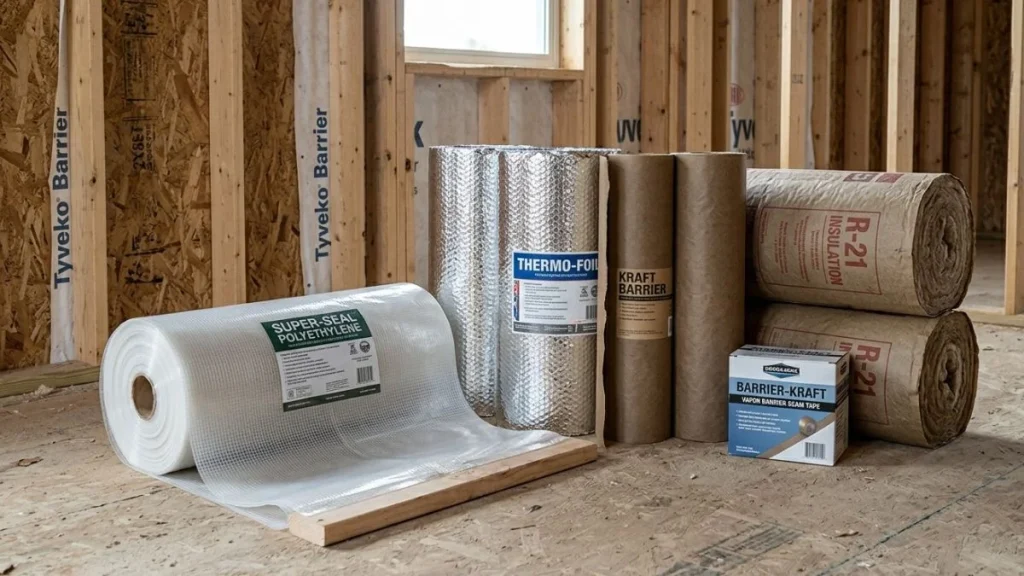
Plastic Sheeting Types
Plastic sheeting is the most common vapor barrier material. It is affordable and easy to install. These sheets block moisture from passing through walls, floors, or ceilings. Most plastic sheeting is made from polyethylene, available in different thicknesses.
- 6-mil polyethylene is the standard choice for residential use. It is durable and offers good moisture resistance.
- 10-mil polyethylene is thicker and stronger. It suits areas with higher moisture levels or where extra durability is needed.
- Visqueen is a brand name often used for plastic vapor barriers. It performs well for garages and basements.
Plastic sheeting is lightweight and flexible. It can be stapled or taped to surfaces. Overlapping seams increases moisture protection. It is important to seal edges properly to stop vapor leaks.
Foam Insulation Options
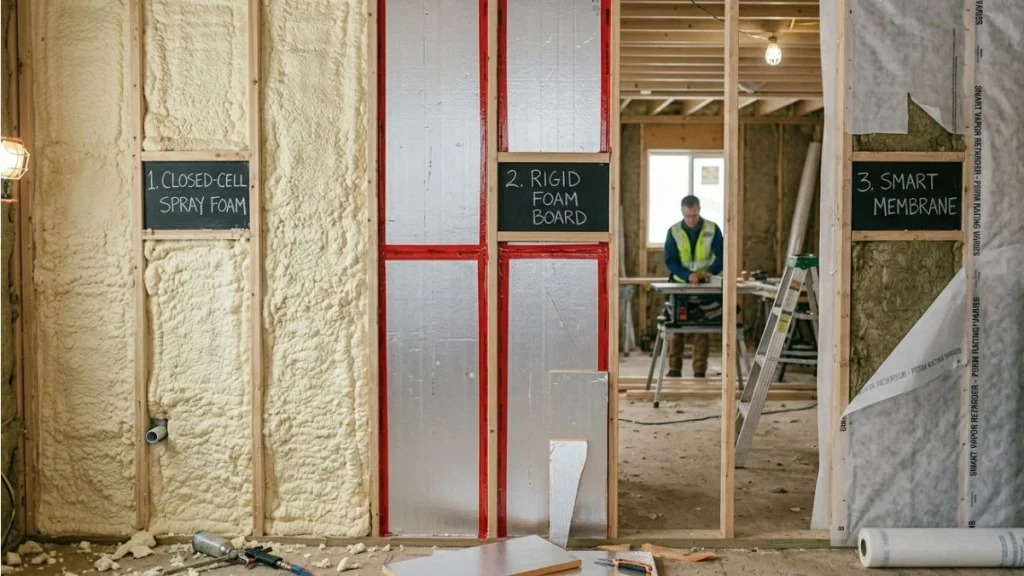
Foam insulation can act as a vapor barrier and thermal insulator at the same time. It comes in rigid panels or spray foam forms. Foam reduces air gaps and helps control moisture effectively.
Types of foam insulation include:
- Rigid Foam Board – made from polystyrene, polyisocyanurate, or polyurethane. It is easy to cut and install on walls or floors.
- Spray Foam – expands to fill cracks and gaps. It creates a tight seal and excellent vapor barrier.
Rigid foam boards are cost-effective and easy to handle. They work well on flat surfaces between the garage and house. Spray foam fits irregular spaces and seals tightly but costs more. Both types block moisture and improve energy efficiency.
Specialized Membranes
Specialized vapor barrier membranes are advanced materials designed for high performance. They combine moisture resistance with breathability to avoid trapped condensation. These membranes are often used in modern construction.
Common types include:
- Peel-and-stick membranes – self-adhesive sheets that stick firmly to surfaces. They provide a strong vapor barrier and easy installation.
- Breathable house wraps – allow water vapor to escape while blocking liquid water. They help prevent mold buildup.
- Foil-faced membranes – reflect heat and moisture, adding insulation value.
Below is a quick guide to specialized membranes:
| Type | Moisture Control | Breathability | Use |
| Peel-and-Stick | High | Low | Sealing joints, walls |
| Breathable House Wrap | Moderate | High | Exterior wall covering |
| Foil-Faced Membrane | High | Low | Reflective insulation |
Specialized membranes offer strong protection against moisture and air leaks. They work well in garages connected to living spaces. Their breathability helps keep wood and insulation dry.
Installation Locations
Installing a vapor barrier between a garage and house is crucial to prevent moisture problems. Proper placement stops damp air from entering living spaces. Knowing the best locations for vapor barrier installation helps protect your home’s structure and improves indoor air quality. Below are key areas to focus on for effective moisture control.
Between Garage And Living Space
The space between the garage and living area is a common point for moisture transfer. Installing a vapor barrier here reduces the risk of mold and mildew. This barrier acts as a shield, stopping humid air from moving through walls and floors.
Key points for installation:
- Place the vapor barrier on the warm side of the wall, usually facing the living space.
- Seal all seams and edges tightly to avoid gaps.
- Use durable materials like polyethylene sheets with at least 6 mil thickness.
- Ensure the barrier covers the entire wall area between garage and house.
Underneath Flooring
Moisture can rise from the ground into flooring, causing damage. Installing a vapor barrier under the floor prevents this upward movement. This step is vital for garages with concrete slabs or wood floors.
Steps for effective installation under flooring:
- Clear the floor area and level the surface.
- Lay a continuous sheet of vapor barrier material, overlapping seams by 6 to 12 inches.
- Extend the barrier up the walls slightly to seal edges.
- Secure the barrier with tape or fasteners made for moisture control.
- Install flooring over the barrier carefully to avoid tears.
Wall And Ceiling Placement
Walls and ceilings shared between the garage and house require vapor barriers to block moisture. Proper placement reduces condensation and keeps insulation dry.
Installation tips for walls and ceilings:
- Install vapor barriers on the warm side of walls and ceilings.
- Use continuous barriers without holes or gaps.
- Seal joints with moisture-resistant tape.
- Combine vapor barriers with proper ventilation to avoid trapped humidity.
Common mistakes to avoid:
- Installing barriers on the cold side, causing trapped moisture.
- Leaving seams unsealed.
- Ignoring ceiling vapor barriers in attached garages.
Keeping walls and ceilings dry prevents structural decay and indoor air problems. Proper vapor barrier placement here protects your home’s integrity over time.
Installation Tips And Best Practices
Installing a vapor barrier between a garage and house protects your home from moisture damage. Proper installation helps keep walls dry, prevents mold, and improves energy efficiency. Following key tips and best practices ensures the barrier works well and lasts long. Careful attention during installation makes a big difference in performance and durability.
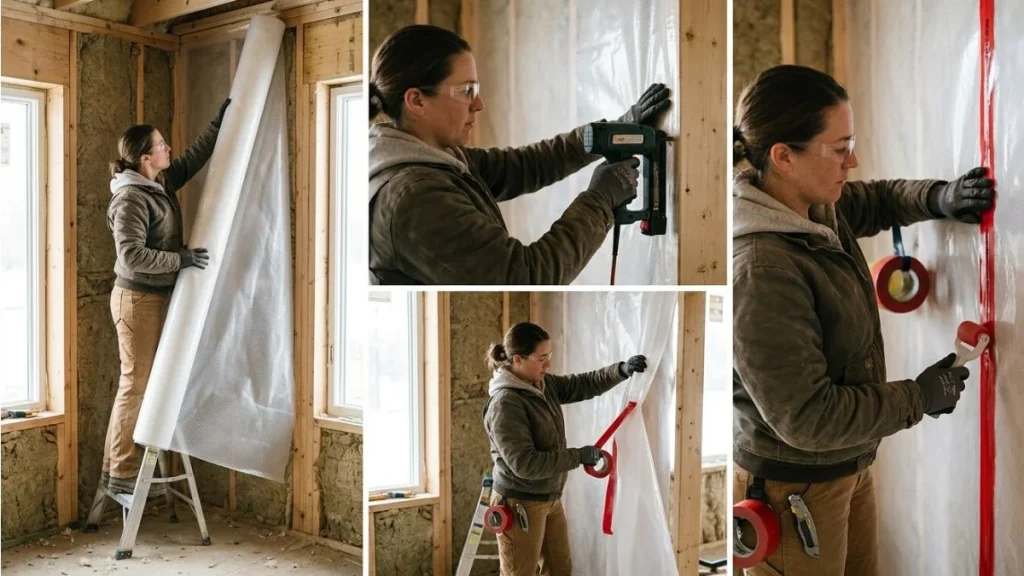
Sealing Joints And Seams
Sealing joints and seams is critical to create a continuous vapor barrier. Moisture can enter through even small gaps, reducing effectiveness.
- Use high-quality tape: Select vapor barrier tape designed for sealing polyethylene sheets or similar materials.
- Overlap sheets: Overlap vapor barrier sheets by at least 6 inches to cover seams fully.
- Clean surfaces: Ensure surfaces are clean and dry before applying tape for better adhesion.
- Press firmly: Press tape firmly along seams to prevent air or moisture leaks.
- Seal corners carefully: Use extra tape or sealant on corners and edges where leaks often occur.
Proper sealing creates a tight barrier that blocks moisture from passing through walls and floors. It also improves insulation performance by stopping drafts. Use a putty knife or roller to smooth tape edges and avoid bubbles. Inspect all seams after installation to catch missed spots.
Avoiding Common Mistakes
Common mistakes can reduce the vapor barrier’s effectiveness. Avoid these errors to ensure a reliable barrier.
- Not overlapping sheets: Leaving gaps between sheets allows moisture to pass through easily.
- Using the wrong materials: Avoid thin plastic or non-vapor-rated materials that tear or degrade quickly.
- Ignoring wall penetrations: Seal around pipes, wires, and vents to prevent leaks.
- Installing on damp surfaces: Moist surfaces trap water and cause mold growth under the barrier.
- Skipping ventilation: Without ventilation, trapped moisture can cause damage behind the barrier.
Check manufacturer guidelines for material type and thickness. Measure and cut sheets to fit accurately. Take time to seal edges and penetrations thoroughly.
Ensuring Proper Ventilation
Ventilation prevents moisture buildup behind the vapor barrier. Without airflow, trapped humidity causes mold and wood rot.
Follow these ventilation tips:
- Install vents: Place air vents in the garage and house walls to allow airflow.
- Use exhaust fans: Fans remove humid air, especially in enclosed garages.
- Maintain gap space: Leave a small gap between the vapor barrier and wall framing for air circulation.
- Check ventilation regularly: Inspect vents and fans to keep them clear of debris.
Proper ventilation balances moisture control with energy efficiency. It helps the vapor barrier stay dry and effective. Without it, trapped moisture can cause structural damage and health issues.
Local Codes And Regulations

Installing a vapor barrier between a garage and a house helps control moisture and protect building materials. Local codes and regulations set clear rules for this installation. Following these rules ensures safety, durability, and energy efficiency. Compliance avoids fines and potential remodeling costs later.
Building Code Requirements
Building codes specify how to install vapor barriers correctly between garages and houses. These rules focus on preventing moisture from damaging walls and floors. Most codes require a continuous, durable barrier that blocks water vapor from passing through.
Common building code points include:
- Material type: Codes often require specific materials like polyethylene sheets or foil-faced insulation.
- Thickness: Vapor barriers must meet minimum thickness standards, usually 6 mil or thicker.
- Placement: Barriers typically go on the warm side of the wall to prevent condensation.
- Sealing: All seams and edges must be sealed tightly to avoid leaks.
- Compatibility: Vapor barriers should not trap moisture inside walls.
| Code Element | Requirement | Reason |
| Material | 6 mil polyethylene sheet or equivalent | Durable moisture block |
| Placement | Warm side of wall assembly | Prevents condensation inside walls |
| Sealing | All seams and edges sealed | Ensures continuous vapor barrier |
Check your local building codes for exact details, as requirements can vary by region. Some areas may have stricter rules due to climate differences. Always use approved materials and methods to meet safety standards.
Inspection Guidelines
Inspectors review vapor barrier installations to ensure they follow building codes. They look for proper material use, placement, and sealing quality. Inspections usually occur during and after installation.
Key inspection points include:
- Material verification: Confirm the barrier material meets code standards.
- Installation check: Ensure the barrier covers all required areas without gaps.
- Sealing evaluation: Inspect taped or sealed seams for air-tightness.
- Attachment methods: Verify the barrier is securely fastened to prevent movement.
- Damage assessment: Look for tears, holes, or punctures and require repairs.
Inspectors use tools like moisture meters to detect hidden moisture issues. They may also verify that the vapor barrier does not block necessary ventilation. Failing inspection means corrections before proceeding. Proper inspection prevents costly repairs later and ensures a healthy building environment.
Permits And Approvals
Permits are often required before installing a vapor barrier between a garage and a house. Local authorities need to approve plans to confirm compliance with safety codes. Applying for permits involves submitting detailed plans and material specifications.
Steps for obtaining permits include:
- Submit an application with project details.
- Provide material and installation specifications.
- Pay permit fees as required.
- Schedule inspections during and after installation.
- Receive final approval before use.
Failing to get permits can lead to fines and orders to remove the barrier. Permits protect homeowners by ensuring work follows safety and quality standards. Always contact your local building department before starting work. They provide guidance on requirements and help avoid delays.
Potential Challenges
Installing a vapor barrier between a garage and a house helps control moisture and protect building materials. Moisture can cause mold, rot, and damage over time. Yet, adding this barrier presents several challenges that affect the project’s success. These challenges involve working with existing structures, managing garage humidity, and balancing costs.
Dealing With Existing Structures
Fitting a vapor barrier in a home with existing structures is tricky. Old walls, floors, and ceilings may not have space for new materials. Some barriers require tearing down parts of the wall or floor. This work can lead to:
- Damage to drywall or plaster
- Uncovering hidden mold or rot
- Interrupting electrical wiring or plumbing
To avoid surprises, check these points before starting:
- Inspect the area for damage or mold.
- Locate wires and pipes.
- Measure space for barrier installation.
In many cases, a professional may recommend using a surface-applied barrier like a vapor-resistant paint or membrane. These options reduce the need for demolition but may offer less protection.
| Barrier Type | Installation Impact | Protection Level |
| Sheet Membrane | May require removing drywall | High |
| Vapor-Resistant Paint | Applied on existing walls | Medium |
| Foam Board | Needs wall cavity space | High |
Handling Garage Humidity
Garages often have high humidity from vehicles, weather, and poor ventilation. Moisture from the garage can move into the house, causing problems. A vapor barrier helps but must be combined with humidity control measures.
Common ways to manage garage humidity include:
- Installing vents or fans for air circulation
- Using a dehumidifier during wet seasons
- Sealing cracks and gaps in garage walls and doors
Without controlling humidity, the vapor barrier may not work well. Moist air can pass through small openings or condense on cold surfaces. This leads to mold growth and damage.
Cost Considerations
Adding a vapor barrier involves costs beyond just materials. Labor, repairs, and extra work can increase expenses quickly. Budgeting helps avoid surprises and ensures quality work.
| Cost Factor | Description | Estimated Range |
| Materials | Vapor barrier sheets, paints, foam boards | $0.50 – $3 per sq. ft. |
| Labor | Installation and preparation work | $1 – $5 per sq. ft. |
| Repairs | Fixing walls, mold removal, electrical work | $200 – $1,500+ |
| Humidity Control | Ventilation, dehumidifiers, sealing | $100 – $1,000+ |
Plan for these points to keep costs reasonable:
- Get multiple quotes from contractors.
- Choose materials that fit your budget and needs.
- Prepare the area to reduce repair work.
- Consider long-term savings from moisture damage prevention.
Alternatives To Vapor Barriers
The space between a garage and a house can be prone to moisture problems. Vapor barriers help stop moisture from moving through walls and floors. Still, some situations call for other methods to control dampness. Alternatives to vapor barriers offer different ways to keep moisture at bay, improving comfort and protecting your home’s structure. These options work well alone or alongside vapor barriers for better results.
Improved Ventilation Systems
Good airflow helps reduce moisture buildup between the garage and house. A well-designed ventilation system moves humid air out and brings fresh air in. This keeps the area dry and prevents mold growth.
Key benefits of improved ventilation include:
- Lower humidity levels
- Less condensation on walls and ceilings
- Reduced risk of mold and mildew
- Better air quality inside the home
Types of ventilation systems suitable for this space include:
| System Type | Description | Best Use |
| Passive Ventilation | Uses vents and openings to allow natural airflow. | Small garages with good outdoor air access. |
| Exhaust Fans | Mechanical fans remove moist air quickly. | Garages with limited natural ventilation. |
| Heat Recovery Ventilators (HRVs) | Exchange indoor and outdoor air while saving heat. | Homes needing energy-efficient ventilation. |
Installing vents near the garage floor and ceiling improves air movement. Fans should run regularly, especially during humid days. Adding a humidity sensor can automate fan use, saving energy and maintaining dry air.
Use Of Vapor-resistant Paints
Vapor-resistant paints provide a simple moisture control option. These paints create a barrier on walls and ceilings that slows water vapor from passing through. They reduce dampness and protect surfaces from damage.
Advantages of vapor-resistant paints include:
- Easy application on existing walls
- Cost-effective compared to structural changes
- Can be combined with other moisture control methods
- Improves durability of painted surfaces
These paints are especially useful on drywall and concrete surfaces between the garage and house. Look for paints labeled “moisture-resistant” or “vapor barrier” for the best effect.
Application tips:
- Clean and dry surfaces before painting.
- Apply multiple coats for better coverage.
- Allow proper drying time between coats.
- Inspect regularly and touch up damaged areas.
Vapor-resistant paints are not a full substitute for vapor barriers but add protection in areas prone to moisture. They improve the overall moisture defense of your home.
Thermal Breaks And Insulation
Thermal breaks and insulation reduce moisture by controlling temperature differences. Cold surfaces can cause condensation, so keeping temperatures steady helps prevent this issue.
Thermal breaks are materials placed between warm and cold areas to stop heat transfer. Insulation adds a layer that keeps indoor air warm and dry.
Benefits of thermal breaks and insulation include:
- Reduced condensation risk
- Improved energy efficiency
- Enhanced comfort in adjacent rooms
- Protection of building materials from moisture damage
Common materials used:
| Material | Purpose | Installation Area |
| Foam Board Insulation | Acts as a thermal break and moisture barrier | Between garage wall and house framing |
| Spray Foam Insulation | Seals gaps and insulates hard-to-reach areas | Wall cavities and ceiling joints |
| Rigid Foam Panels | Provides continuous insulation layer | Exterior garage walls |
Proper installation is crucial. Insulation must fit tightly without gaps. Thermal breaks should be placed to separate cold garage walls from warm house interiors.
These methods work best combined with vapor barriers or paints. Together, they create a strong defense against moisture problems between the garage and house.
Conclusion
A vapor barrier stops moisture from moving between garage and house. It helps keep walls dry and prevents mold growth. This simple step protects your home’s structure and air quality. Good installation is key to avoid leaks and damage. Choose the right materials for your climate and garage type.
Regular checks ensure the barrier works well over time. A dry home feels healthier and lasts longer. Small efforts now save big repairs later. Think about adding a vapor barrier to improve your home’s comfort and safety.