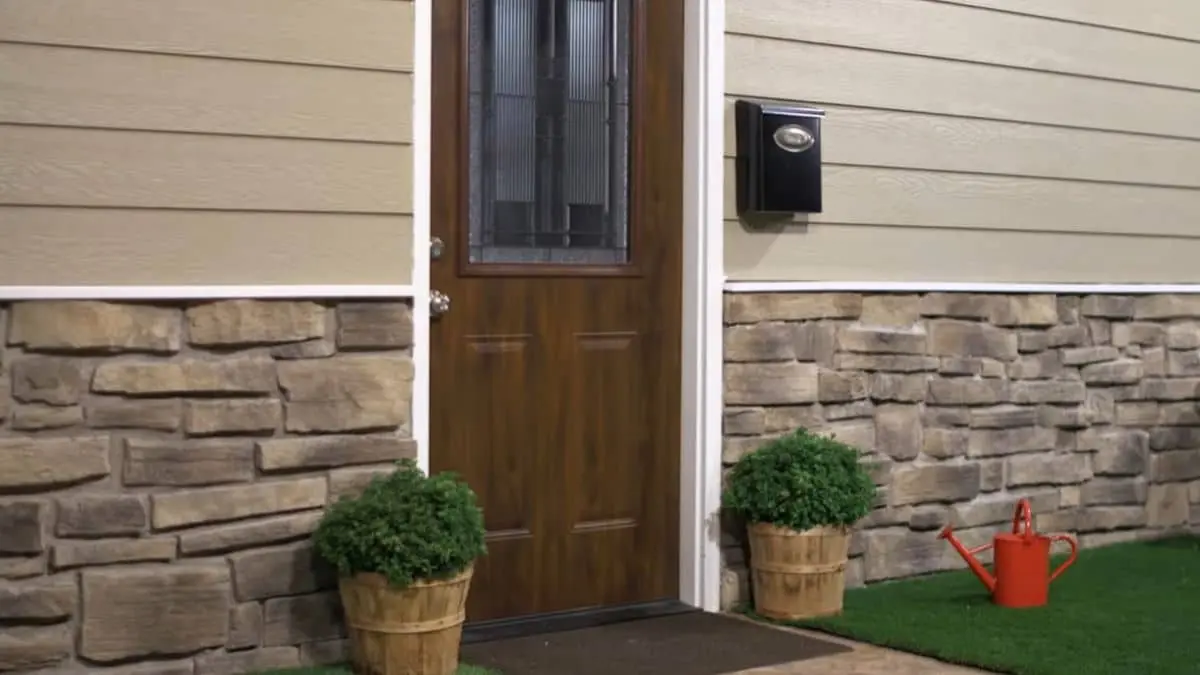
A well-executed stone to siding transition enhances curb appeal, adds character, and ensures structural durability. This design choice is common in modern and traditional homes, where homeowners want the timeless elegance of stone combined with the versatility of siding.
However, transitioning between these materials requires careful planning. Differences in thickness, texture, and expansion rates can create alignment issues, moisture concerns, or an unbalanced aesthetic if not properly addressed.
This guide explores the best practices for achieving a seamless stone-to-siding transition, covering installation techniques, material compatibility, transition trim options, and expert insights to ensure a durable and visually appealing result.
Know about the Stone to Siding Transition
A stone to siding transition is more than just a decorative feature—it plays a crucial role in both aesthetics and structural integrity. This transition must be carefully designed to ensure a smooth, cohesive look while preventing moisture infiltration and other long-term issues.

What Is a Stone to Siding Transition?
A stone to siding transition refers to the junction where stone cladding meets siding on a home’s exterior. This transition can occur at various points, such as along the lower section of exterior walls, around entryways, on accent walls, or between different sections of the house.
Since stone and siding differ in thickness, texture, and installation methods, they require specialized transition techniques. These may involve using a trim board, J-channel, flashing, or expansion joints to ensure both materials align properly and function as a single, cohesive exterior system.
The transition also serves a practical purpose. Stone is highly durable and resistant to weather damage, making it an excellent material for the base of a home, while siding is lightweight, cost-effective, and easier to install. Combining both allows homeowners to achieve a high-end look without the full cost of stone cladding.
Benefits of a Well-Executed Stone to Siding Transition
A properly planned stone to siding transition offers multiple benefits, enhancing both the home’s visual appeal and long-term performance.
Increased Property Value
Homes with a well-designed exterior finish tend to have higher resale value. Buyers often look for homes with stone accents, as they add an upscale feel while maintaining practicality.
Structural Integrity
Stone and siding have different expansion and contraction rates due to temperature changes. If not installed correctly, gaps, cracks, or misalignment can occur over time. Using proper transition techniques—such as a drainage plane, flashing, and backer rods—helps prevent these issues.
Moisture Management
One of the biggest concerns with mixing materials is water infiltration. Stone veneer is porous, and improper transitions can allow moisture to seep behind the siding, leading to rot, mold, or structural damage. Incorporating weathertight barriers, flashing, and capillary breaks prevents these problems.
Design Versatility
A stone-to-siding transition provides flexibility in exterior design. Homeowners can use stone around entryways, lower wall sections, or as accent features, blending it with different types of siding, such as vinyl, fiber cement, or wood. This approach allows for creative, customized home exteriors without overwhelming the design.
Cost-Effective Material Use
Covering an entire home in stone is expensive and labor-intensive. A transition allows homeowners to enjoy the look of natural stone while using budget-friendly siding for the majority of the exterior. This strategic mix reduces costs while maintaining a durable, stylish finish.
Design Considerations for a Seamless Transition
A successful stone to siding transition requires careful design planning to achieve both aesthetic harmony and structural stability. Poor transitions can make a home look disjointed, while well-executed designs enhance curb appeal and ensure long-term durability. The key design elements include choosing complementary colors and textures, determining optimal placement, and selecting the right transition style to blend both materials seamlessly.

Choosing Complementary Colors and Textures
Stone and siding have distinct visual characteristics, making color and texture selection crucial for a cohesive design. The goal is to create a harmonious contrast where both materials complement rather than compete with each other.
For a natural, balanced look, homeowners should consider the undertones of both materials. Warm-toned stone, such as brown, beige, or rust-colored varieties, pairs well with siding in earthy hues like tan, olive, or cream. Cooler-toned stone, including gray, slate, or blueish shades, works best with siding in white, charcoal, or cool blue tones. The combination should feel intentional, avoiding clashing tones that disrupt the visual flow of the exterior.
Texture also plays a significant role in how the transition appears. Stone provides a rough, organic surface, while siding is generally smooth or slightly textured. When selecting siding materials like fiber cement, vinyl, or wood, choosing a texture that complements the stone—rather than creating an abrupt change—helps establish continuity. For example, a wood grain texture in fiber cement siding can provide a softer transition against rugged stone, while board and batten siding adds depth that pairs well with stacked stone patterns.
A well-planned color and texture combination enhances the architectural style of the home, ensuring the transition looks natural rather than forced.
Best Placement for Stone and Siding Transitions
Where stone meets siding is just as important as how it meets. The placement of this transition significantly impacts both the home’s visual appeal and functional performance.
The most common and effective placement is at the base of exterior walls, where stone serves as a durable, protective layer against moisture, dirt, and impact damage. This grounded aesthetic gives the home a strong foundation, while siding covers the upper portion, reducing material costs and installation complexity.
Another strategic placement is around entryways, columns, or accent walls, where stone adds depth and character. Entryways with stone bases create a grander, more inviting appearance, while siding on the upper sections keeps the design from feeling too heavy. Similarly, stone accents around garage doors or chimney bases help break up large expanses of siding, adding contrast without overwhelming the facade.
For homes with multiple exterior sections, such as protruding gables or bump-outs, stone can be used selectively to highlight these areas. The transition should always align with natural architectural breaks, such as trim boards or structural seams, to avoid awkward stopping points.
Transition Styles: Clean Lines vs. Blended Edges
The way stone and siding meet impacts the overall design style. The two main transition styles are clean lines and blended edges, each offering a distinct visual effect.
A clean-line transition is the most common and modern approach. This method uses trim boards, J-channels, or metal flashing to create a crisp, defined separation between stone and siding. The result is a sharp, structured look that works well with contemporary, colonial, or craftsman-style homes. Clean transitions also help mask differences in material thickness, ensuring a flush finish where the two meet.
Alternatively, a blended edge transition softens the visual break between materials by allowing stone to gradually fade into the siding. This is achieved by using irregular stone shapes or stacked stone veneer that extends into the siding, creating a natural, organic flow. This style is commonly seen in rustic, farmhouse, or Mediterranean designs, where a more integrated look enhances the home’s character.
Both styles have their advantages, with clean lines offering precision and structure, while blended edges provide a more natural aesthetic. The choice ultimately depends on the architectural style of the home and personal design preferences.
Installation Best Practices for a Durable Transition
A well-executed stone to siding transition requires proper installation techniques to ensure both aesthetic appeal and long-term durability. Poor installation can lead to structural weaknesses, water infiltration, and material failure over time.

Preparing the Surface for Proper Adherence
Before installing stone and siding, the surface must be properly prepared to ensure strong adhesion and prevent future issues like moisture damage or detachment. The preparation process varies depending on the type of substrate (wood sheathing, concrete, or masonry) and the materials being used.
For stone installation, especially manufactured or natural stone veneer, a strong underlayment system is essential. A weather-resistant barrier (WRB), metal lath, and mortar scratch coat provide a solid base for stone adherence. If the stone is applied over concrete or masonry, a bonding agent or modified mortar is necessary for proper adhesion. The surface must be clean, dry, and free of dust, oils, or debris that could weaken the bond.
Siding materials like vinyl, fiber cement, or wood also require a stable and even surface. Proper furring strips or backer boards ensure the siding is aligned correctly with the stone, preventing uneven transitions. Flashing and moisture barriers must be installed to direct water away from vulnerable transition points, reducing the risk of leaks or rot.
Ensuring proper preparation before installation lays the foundation for a long-lasting transition that withstands environmental exposure and structural movement.
Transition Techniques: How to Blend Stone & Siding
Creating a seamless transition between stone and siding requires a well-planned approach that balances both materials without awkward gaps or uneven alignment. The transition method depends on the materials used, the desired aesthetic, and the structural requirements of the exterior.
A common technique for achieving a clean, defined transition is using trim boards or flashing between materials. A horizontal or vertical trim strip (typically made from PVC, fiber cement, or composite wood) creates a sharp boundary, giving the transition a polished and professional look. This method is ideal for modern and traditional homes where crisp lines enhance the architectural design.
For a more integrated, natural transition, stone can be tapered or staggered into the siding. This involves extending individual stone pieces irregularly into the siding area, softening the boundary and creating a blended effect. This technique is often used in rustic or craftsman-style homes to enhance the organic flow between materials.
Another key consideration is the depth difference between stone and siding. Since stone is thicker than most siding materials, a transition ledge or stepped backing may be required to create an even surface. Using foam backer boards or furring strips beneath the siding helps match the depth, preventing an awkward overhang or uneven edge.
The transition should always align with natural architectural breaks, such as foundation lines, columns, or entryways, to make the change feel intentional rather than abrupt.
Recommended For You: Brick to Siding Transition
Common Mistakes to Avoid
Improper installation can lead to aesthetically unappealing results and costly repairs. Avoiding common mistakes ensures a smooth transition that lasts for years.
One of the most frequent errors is failing to account for water drainage at the transition point. Without proper flashing, weep screeds, or moisture barriers, water can seep behind materials, leading to rot, mold, and structural damage. Installing Z-flashing or metal transition flashing prevents water from infiltrating the joint where stone meets siding.
Another mistake is ignoring material expansion and contraction. Siding materials like vinyl and fiber cement expand and contract with temperature changes, while stone remains relatively stable. If no expansion gap is left, siding can warp or buckle over time. Using flexible caulking or expansion joints helps accommodate movement without compromising the transition.
Misalignment between materials is another issue that affects both appearance and durability. If stone and siding are installed at different depths without proper backing, it creates an uneven, unpolished look. Ensuring that both materials meet at a consistent depth avoids this problem.
Skipping surface preparation is also a critical error. Installing stone veneer over an unprimed surface or siding over an uneven substrate weakens the attachment, leading to premature failure. Always follow manufacturer guidelines for underlayment, bonding agents, and weatherproofing.
Cost Factors and Budgeting for Stone to Siding Transitions
A stone to siding transition can significantly enhance a home’s exterior, but costs vary based on materials, labor, and additional structural modifications. Proper budgeting ensures that homeowners can achieve a high-quality finish without unnecessary expenses.
Cost Breakdown of Materials & Labor
The total cost of a stone to siding transition depends on the type of stone, siding material, labor rates, and additional installation requirements. Costs typically range between $20 to $50 per square foot for stone veneer installations, while siding materials can cost anywhere from $5 to $15 per square foot, depending on the type.
- Stone Materials: Natural stone is the most expensive option, typically costing between $25 to $50 per square foot, including materials and installation. Manufactured stone veneer offers a similar aesthetic at a lower price, usually ranging from $10 to $25 per square foot. Faux stone panels, made from polyurethane, cost around $5 to $15 per square foot and are easier to install.
- Siding Materials: Vinyl siding is the most affordable choice, priced between $5 to $8 per square foot, while fiber cement siding costs $7 to $12 per square foot. Wood siding, such as cedar, is more expensive, ranging from $10 to $15 per square foot, and requires ongoing maintenance.
- Labor Costs: Professional installation can cost between $40 to $75 per hour, depending on location and complexity. Stone installation is labor-intensive, often requiring specialized masons, which increases the overall expense. On average, labor costs for a stone and siding transition range from $1,500 to $5,000, depending on the project size.
- Additional Costs: Proper underlayment, including weather-resistant barriers, mortar, and flashing, can add $2 to $5 per square foot to the budget. If the transition requires structural modifications, such as building a ledge or adding trim boards, costs may increase further.
For a standard home exterior project covering 500 square feet, total costs can range from $7,500 to $25,000, depending on material selections and labor requirements.
Budget-Friendly Alternatives
Homeowners looking for a cost-effective stone to siding transition can explore several options to reduce expenses while maintaining visual appeal.
One of the most affordable alternatives is using faux stone panels instead of natural or manufactured stone. Faux stone costs significantly less, is lightweight, and can be installed without mortar or professional masonry, reducing labor costs. It provides a realistic stone appearance while saving 30% to 50% on material and installation expenses.
Another cost-saving approach is limiting stone coverage to accent areas instead of applying it across an entire wall. Focusing on entryways, columns, or lower wall sections creates an upscale look while keeping costs lower. Using stone veneer only on the first three feet of a wall and transitioning to siding above reduces material costs by up to 40% compared to full-height installations.
Choosing pre-cut stone veneer panels instead of individually laid stones speeds up installation, lowering labor costs. Some homeowners opt for DIY installation for siding and use professionals only for the stonework, cutting overall labor costs by 20% to 30%.
Opting for cost-effective siding materials such as vinyl or fiber cement instead of wood or premium composite siding also helps manage expenses. Vinyl siding offers durability and affordability, with minimal maintenance compared to wood siding, which requires regular staining or sealing.
For those wanting a high-end appearance without the high price, incorporating trim or molding between stone and siding enhances the transition without increasing material costs. A painted or stained trim board can provide a polished finish at a fraction of the price of complex masonry work.
Conclusion
A well-executed stone to siding transition enhances both the structural integrity and visual appeal of a home. Choosing the right materials, ensuring proper installation, and following design principles are key to achieving a seamless and durable result.
From selecting complementary colors and textures to understanding moisture control techniques, each step plays a crucial role in maintaining a long-lasting transition. Homeowners should also consider cost factors, including material and labor expenses, while exploring budget-friendly alternatives like manufactured stone veneer.
Whether opting for a clean, defined edge or a blended, natural transition, careful planning and expert installation ensure a polished finish that elevates a home’s exterior. With the right approach, a stone to siding transition not only adds curb appeal but also increases property value, making it a worthwhile investment.