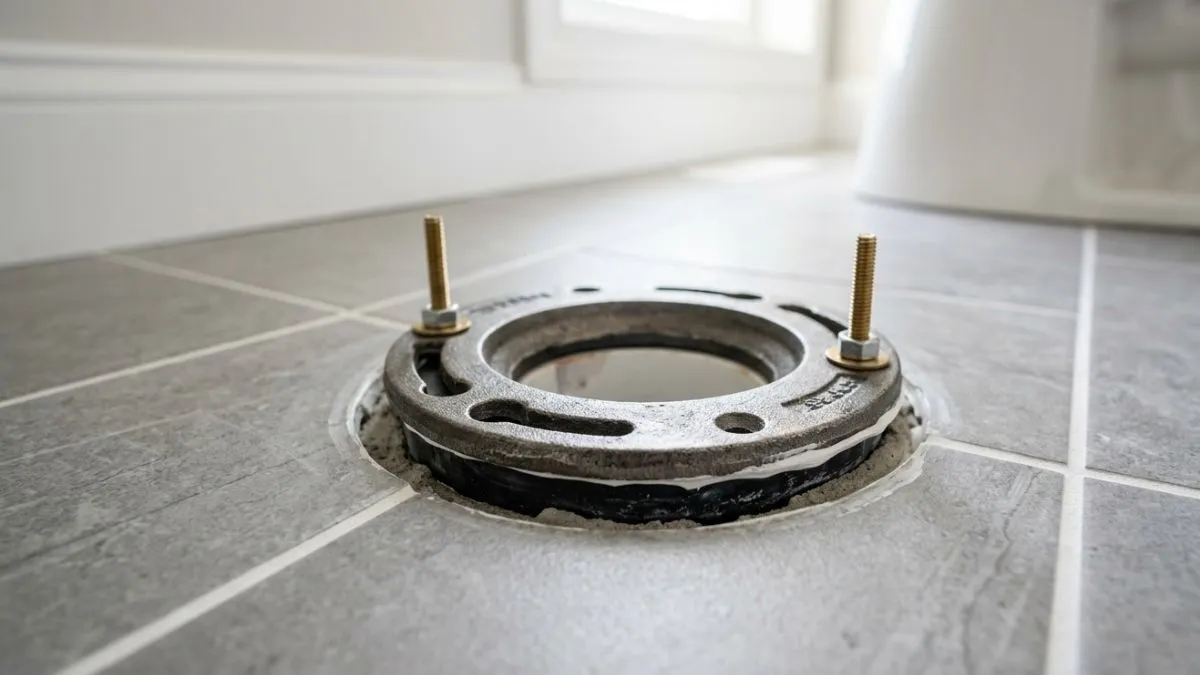
If you’re dealing with a bathroom remodel or fixing a toilet, understanding the position of your toilet flange is key. When the flange sits above the finished floor, it can cause leaks, wobbly toilets, or even damage to your plumbing.
You might not realize how important this small part is until problems start popping up. You’ll discover why the height of your toilet flange matters, how to tell if it’s installed correctly, and simple steps to fix it if it’s not.
Toilet Flange Basics
The toilet flange above finished floor plays a crucial role in bathroom plumbing. It is a small but vital part that connects the toilet to the drain pipe and secures it to the floor. Proper flange placement above the finished floor is key for a tight seal and stable toilet setup.
Purpose And Function
The primary role of the toilet flange is to connect the toilet to the home’s waste pipe. It creates a stable base that holds the toilet firmly in place. The flange also forms a seal between the toilet and the drain pipe to prevent leaks and odors.
Key purposes of a toilet flange include:
- Securing the toilet: The flange is bolted to the floor, and the toilet is fastened to it, keeping the fixture steady.
- Sealing the drain connection: Wax rings or rubber seals sit between the flange and toilet base to stop water and gas leaks.
- Proper height alignment: The flange must sit slightly above the finished floor to allow a good seal and avoid damage to the toilet base.
Without the flange, toilets would wobble and waste water or sewer gas could escape. It ensures safety and hygiene in the bathroom.
| Function | Description |
| Mounting | Holds the toilet firmly on the floor using bolts. |
| Sealing | Prevents leaks between the toilet and drain pipe. |
| Drain Connection | Connects the toilet outlet to the home’s sewer system. |
| Height Adjustment | Sits above finished floor for proper toilet fit. |
Common Materials
Toilet flanges come in different materials, each with advantages and drawbacks. Choosing the right material depends on the plumbing system and durability needs.
Common materials include:
- PVC (Polyvinyl Chloride): Lightweight, inexpensive, and resistant to corrosion. It is the most common flange material for plastic drain pipes.
- ABS (Acrylonitrile Butadiene Styrene): Similar to PVC but black in color. It is strong, easy to cut, and popular in some plumbing systems.
- Cast Iron: Heavy and durable, used mostly in older homes or commercial buildings. It resists crushing but can rust over time.
- Brass: Strong and corrosion-resistant. Brass flanges last long but cost more. They provide a secure fit and good sealing.
- Stainless Steel: Very durable and rust-proof. Used in high-end or commercial installations.
Importance Of Flange Height
The toilet flange above finished floor is a key part of the bathroom plumbing setup. Its height plays a crucial role in how well the toilet fits and functions. The flange connects the toilet to the drainpipe and holds it in place. If the flange height is not right, it can cause leaks, damage, or poor toilet performance. Proper flange height ensures a secure seal and a stable toilet. It also helps prevent water damage and bad odors.
Impact On Toilet Installation
The height of the toilet flange affects the ease and success of the toilet installation. A flange that sits at the correct height makes the process smoother and helps the toilet fit perfectly on the floor. The right height allows the wax ring to seal properly between the toilet base and the flange. This stops water leaks and keeps sewer gases out of the bathroom.
Here are some key points about flange height impact:
- Proper alignment: The flange must line up with the toilet drain opening for a tight fit.
- Wax ring effectiveness: Correct flange height ensures the wax ring compresses enough to seal.
- Stability: The toilet stays firmly in place without rocking or shifting.
- Floor compatibility: The flange height should match the finished floor level for a flush fit.
The table below shows typical flange height recommendations:
| Flange Height | Description | Suitability |
| 0 to 1/4 inch above floor | Ideal height for most toilets | Ensures a good seal and stability |
| More than 1/4 inch above floor | May cause poor wax ring seal | Needs adjustment or flange extender |
| Below floor level | Leads to toilet rocking and leaks | Requires flange raising or repair |
Issues With Incorrect Height
Incorrect flange height causes many problems during and after toilet installation. A flange too low or too high can stop the wax ring from sealing properly. This leads to leaks, water damage, and foul smells. A toilet may rock or move, causing discomfort and damage to the floor.
Common problems from wrong flange height include:
- Leaks: Water can escape from the base, damaging floors and subflooring.
- Unstable toilet: Movement can crack the toilet or the flange.
- Bad odors: Sewer gases can enter the bathroom due to poor sealing.
- Difficulty installing: The toilet may not sit flat or bolt down securely.
Fixing flange height issues often involves:
- Adding a flange extender to raise the height.
- Replacing or repairing the flange if damaged or too low.
- Ensuring the flange sits just above the finished floor.
Always measure flange height before installing a toilet. Use a level and tape measure to check the flange position. Correct flange height prevents costly repairs and keeps the toilet working well for years.
Installing Flange Above Finished Floor
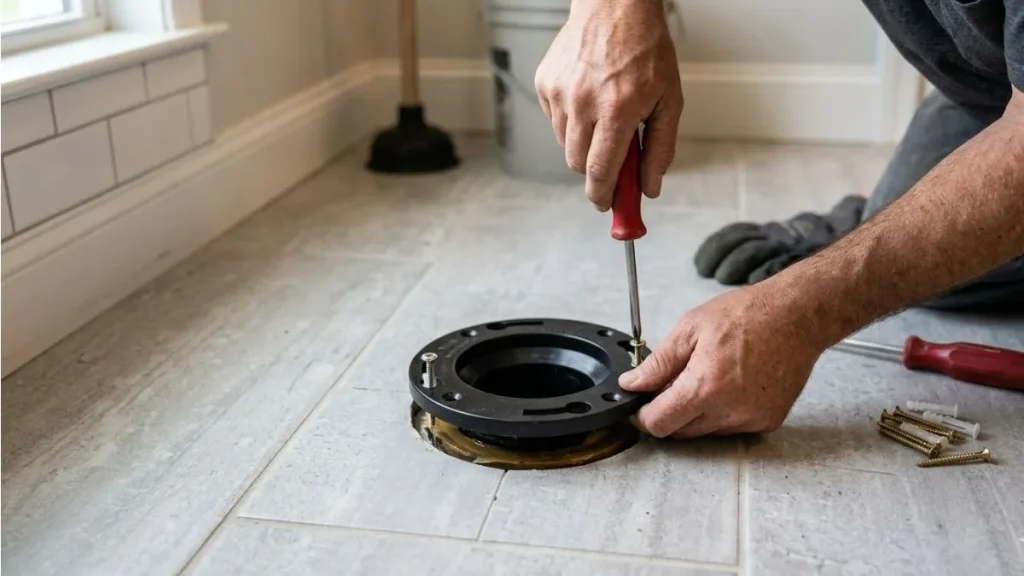
The toilet flange connects the toilet to the drain pipe and secures it to the floor. Installing the flange above the finished floor is crucial when the floor height changes or when replacing old flooring. This method ensures a tight seal and proper toilet alignment. Proper flange height prevents leaks and wobbling, which can cause damage over time.
When To Raise The Flange
Raising the toilet flange above the finished floor is necessary in several situations. The flange must sit flush with or slightly above the finished floor to create a secure connection between the toilet and drain pipe. Common reasons to raise the flange include:
- New flooring installation: Adding tile, hardwood, or vinyl increases floor height.
- Replacing old flange: The old flange may be damaged or corroded.
- Uneven floor height: The flange sits too low compared to the finished floor.
- Prevent leaks and wobbling: Proper flange height creates a tight wax ring seal.
Check the flange height by measuring from the finished floor to the top of the flange. The flange should be about 1/4 inch above the finished floor. If it sits lower, raising it prevents toilet instability and possible water damage.
| Flange Height | Result |
| Below Finished Floor | Risk of leaks and toilet wobbling |
| Flush with Finished Floor | Proper seal and stability |
| Above Finished Floor | Ideal for added floor height |
Tools And Materials Needed
Installing a toilet flange above the finished floor requires specific tools and materials for a secure fit. Having the right items improves efficiency and ensures a proper installation.
- Toilet flange extender: Raises the flange height to match the finished floor.
- Wax ring or wax-free seal: Creates a watertight seal between toilet and flange.
- Measuring tape: Checks flange height and floor thickness.
- Screwdriver or drill: Tightens flange screws securely.
- Flange bolts and nuts: Secure the toilet to the flange.
- Putty knife: Removes old wax ring and cleans the flange surface.
- Pipe cleaner or brush: Cleans the drain pipe opening.
- Level: Ensures flange and toilet sit evenly.
Using the proper tools prevents damage and guarantees a solid installation. For example, a flange extender is essential if the new floor adds more than 1/4 inch. Wax rings come in different thicknesses; choose one that matches the flange height.
| Tool/Material | Purpose |
| Toilet Flange Extender | Raises flange above finished floor |
| Wax Ring | Seals toilet to flange |
| Measuring Tape | Measures flange and floor height |
| Drill/Screwdriver | Tightens screws securely |
| Putty Knife | Removes old wax and cleans flange |
| Level | Ensures even installation |
Step-by-step Installation Guide
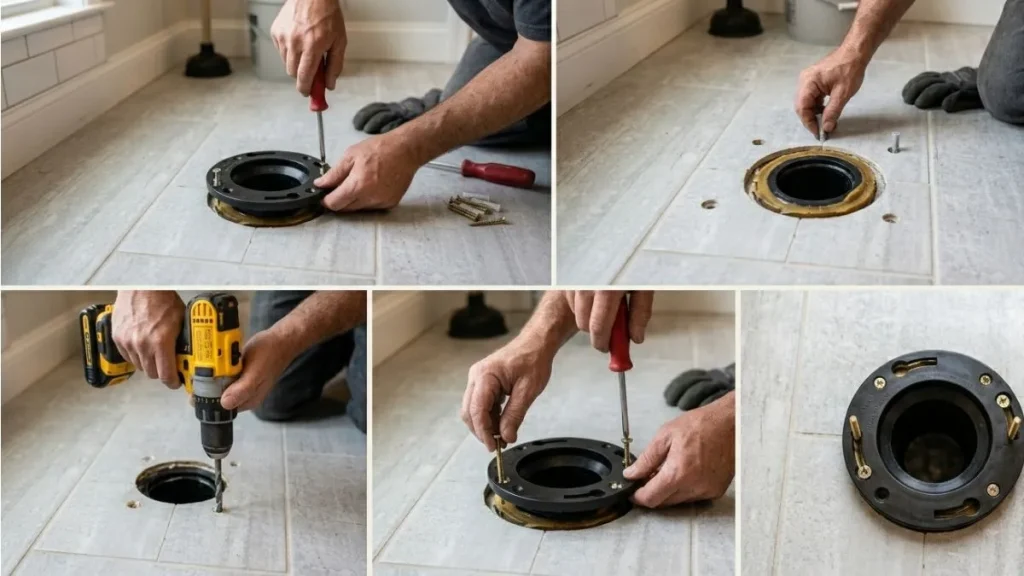
Installing a toilet flange above the finished floor is a common plumbing task that ensures a secure and leak-free connection between the toilet and the drain pipe. This step-by-step installation guide will help you replace or install a new flange properly. The process involves removing the old flange, preparing the floor surface, securing the new flange, and finally sealing and testing the installation. Each step is crucial for a long-lasting and stable toilet setup.
Removing The Old Flange
Start by turning off the water supply and draining the toilet tank. Flush the toilet to empty most of the water. Use a sponge or towel to soak up any remaining water in the bowl.
Next, disconnect the water line from the toilet tank. Remove the toilet by lifting it straight up and setting it aside on a protective surface. Old wax rings may stick to the toilet base or flange, so scrape them off carefully.
To remove the old flange, follow these steps:
- Inspect the flange for screws or bolts securing it to the floor.
- Use a screwdriver or drill to remove all screws or bolts.
- If the flange is glued or cemented, gently pry it up with a putty knife or pry bar.
- Clean the drain pipe opening to remove debris or old wax.
Important: Wear gloves to protect your hands from sharp edges or old wax residues.
Preparing The Floor Surface
Preparing the floor surface is key for a smooth flange installation. The floor should be clean, dry, and level. Remove any old wax, dirt, or debris that could affect the flange’s fit.
Check the floor height around the drain pipe. The flange must sit above the finished floor level for a proper seal with the wax ring.
Use these tips to prepare the surface:
- Sand or scrape uneven areas to create a flat surface.
- Fill any cracks or holes near the flange area with floor-leveling compound.
- Allow the compound to dry completely before proceeding.
- Verify the drain pipe is at the correct height for the new flange.
Securing The New Flange
Place the new flange over the drain pipe, making sure it sits evenly on the floor. The flange bolt slots should align with the toilet base bolts.
Follow these steps to secure the flange:
- Insert the flange onto the drain pipe, ensuring a snug fit.
- Use screws or bolts to attach the flange firmly to the floor.
- Tighten the fasteners evenly to avoid flange movement.
- Check that the flange is level and does not rock.
- Install flange bolts upright in the slots for toilet mounting.
Tip: Use corrosion-resistant screws or bolts to extend flange life.
Proper flange installation prevents leaks and keeps your toilet stable for years.
Sealing And Testing
Sealing the flange is critical to stop water leaks and sewer gas odors. Apply a new wax ring or a wax-free seal ring on top of the flange before setting the toilet.
Steps to seal and test the installation:
- Place the wax ring evenly on the flange surface.
- Carefully lower the toilet onto the flange, aligning bolts.
- Press down firmly to compress the wax ring and create a seal.
- Secure the toilet with nuts on the flange bolts, tightening evenly.
- Reconnect the water supply and turn it on.
- Flush the toilet several times to check for leaks.
- Inspect around the base for any water seepage.
Important: Do not overtighten nuts to avoid cracking the toilet base.
If leaks appear, remove the toilet and replace the wax ring. Repeat the sealing and testing steps until the flange is leak-free and secure.
Common Problems And Fixes
The toilet flange above the finished floor plays a crucial role in securing the toilet to the drain pipe and ensuring a tight seal. Many common problems arise from improper installation or wear over time. These issues can cause leaks, wobbles, or even damage to the flange itself.
Leaks And Wobbles
Leaks and wobbles are the most frequent issues with a toilet flange above the finished floor. A loose flange or a broken wax ring often causes water to leak from the base of the toilet. Wobbles happen when the flange is not firmly attached or if the floor around it is uneven.
Common causes of leaks and wobbles:
- Damaged or old wax ring seal
- Loose or broken flange bolts
- Flange sitting too high or too low compared to the floor
- Uneven or damaged flooring
Simple fixes for leaks and wobbles:
- Replace the wax ring with a new one to ensure a tight seal.
- Tighten or replace the flange bolts to secure the toilet firmly.
- Use flange extenders if the flange is too low relative to the finished floor.
- Install shims under the toilet base to level it on uneven floors.
Flange Damage
Flange damage causes many toilet problems. A cracked or broken flange cannot hold the toilet securely. Damage happens from age, stress, or improper installation. Plastic flanges break more often than metal ones.
Signs of flange damage:
- Visible cracks or breaks on the flange
- Flange moves or shifts when touched
- Toilet bolts spin without tightening
How to fix damaged flanges:
- Small cracks: Use a flange repair kit to fill and reinforce the area.
- Broken flange: Remove the old flange and install a new one.
- Loose flange: Secure it to the floor with screws or anchors.
Plastic flange repair kits include epoxy and metal straps. They provide a quick fix for minor damage. For severe damage, replace the flange with a metal or heavy-duty plastic flange. This ensures long-term strength and stability.
Incorrect Alignment
Incorrect alignment of the toilet flange affects sealing and stability. The flange must sit flat and centered over the drain pipe. Misalignment causes leaks and makes toilet installation difficult.
Common alignment issues:
- Flange not centered on drain pipe
- Flange tilted or raised unevenly
- Flange installed too high or too low
Steps to fix alignment problems:
- Remove the toilet and flange carefully.
- Check the drain pipe position and flange fit.
- Adjust or replace the flange to sit flat and centered.
- Use flange spacers or extenders to correct height.
- Test alignment before final installation.
Proper flange alignment prevents leaks and wobbles. It also makes toilet installation smoother and more secure. Use a level and measuring tape to confirm correct flange placement above the finished floor.
Flange Height Code Requirements
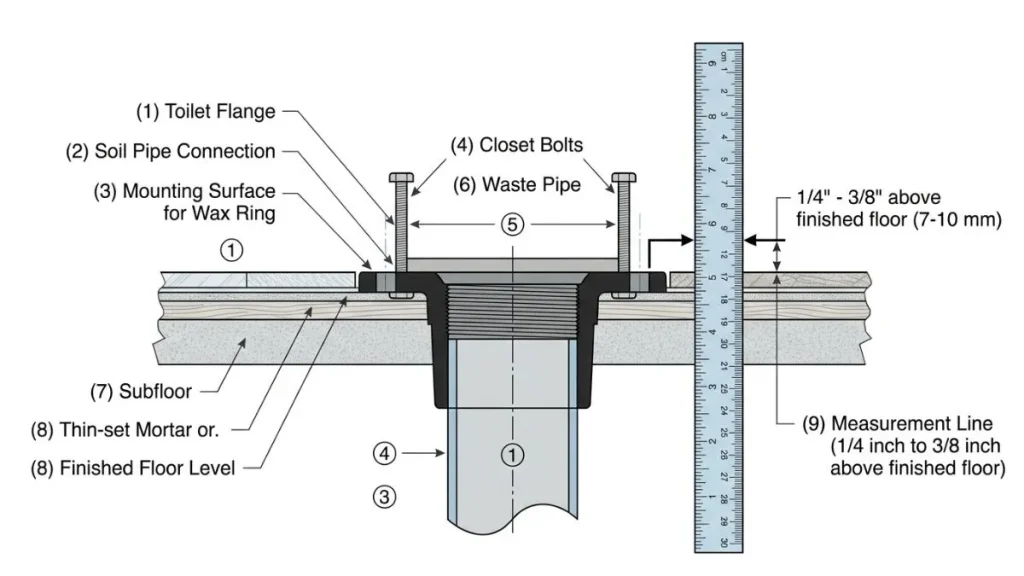
The toilet flange height above the finished floor plays a vital role in plumbing installation. It ensures a proper seal between the toilet and the drain pipe. Meeting the correct flange height code requirements avoids leaks and damage. Flange height must align with local building codes to maintain plumbing integrity and safety.
Building Codes To Follow
Building codes specify the proper height of the toilet flange above the finished floor. This height usually ranges from 1/4 inch to 1/2 inch. The flange should sit slightly above the finished floor to ensure a tight connection with the toilet’s wax ring. A flange set too low or too high can cause leaks or toilet rocking.
Key points from building codes include:
- The flange must be securely fastened to the floor.
- The flange height should allow the wax ring to compress properly.
- Flange height below the finished floor is not recommended.
- Proper height prevents sewer gas escape and water damage.
Variations By Region
Flange height codes vary across regions. Different states and municipalities set their own plumbing standards. It is important to check local regulations before installation. Some areas allow a flange height up to 3/4 inch, while others strictly require less than 1/2 inch.
Common regional differences include:
- Permitted flange height range
- Type of flange materials allowed
- Installation methods and fastening requirements
- Inspection rules and approval processes
Below is an example of flange height limits in different regions:
| Region | Allowed Flange Height | Notes |
| California | 1/4 to 1/2 inch above floor | Strict sealing and fastening rules |
| Texas | Up to 3/4 inch above floor | More flexibility in flange height |
| New York | 1/4 inch above floor | Requires inspection before covering |
Consult local plumbing codes or a professional plumber to confirm the correct flange height for your area. Following regional rules helps avoid costly repairs and ensures a safe toilet installation.
Read Also: Toilet Water Supply Line Through Floor
Conclusion
A toilet flange above the finished floor needs careful placement. It helps keep your toilet stable and leak-free. Make sure the flange sits at the right height. This prevents problems like wobbly toilets or bad smells. Use proper tools and check measurements twice.
Small mistakes can cause big troubles later. Fixing the flange correctly saves time and money. Take your time and follow simple steps. A well-installed flange makes your bathroom work well for years. Easy to do, hard to forget.