
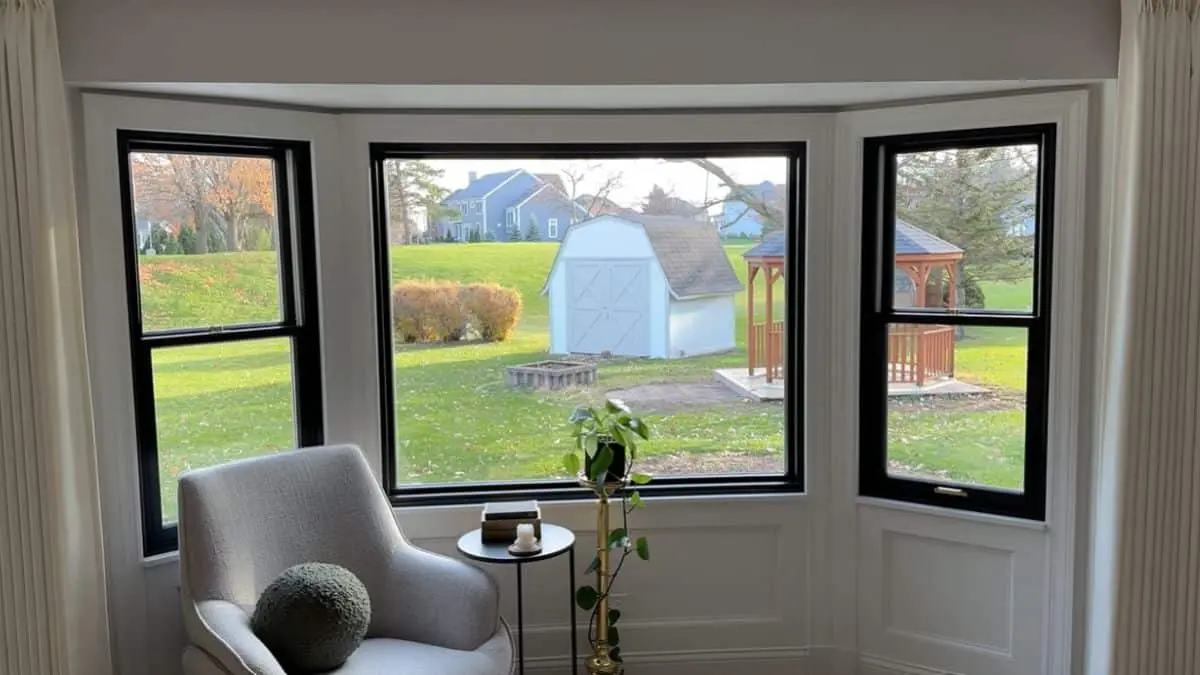
Wainscoting around windows without casing is a popular design trend that adds depth and texture to a room. It involves installing panels of wood or other materials onto the wall around the window frame, creating a decorative border.
This technique can be used to enhance the look of any type of window, from small to large, and can be customized to fit any style or color scheme. Whether you’re looking to add a touch of elegance to your home or simply want to update your current decor, wainscoting around windows without casing is an affordable and easy way to achieve a fresh and modern look.
We’ll explore the benefits of this design trend and provide tips on how to install wainscoting around your windows without casing.
Advantages Of Wainscoting Around Windows Without Casing
Enhances the Aesthetic Appearance
Wainscoting around windows without casing brings a timeless charm and elegance to any room. The decorative panels create a visually appealing frame around the windows, making them stand out as architectural features. The clean lines and detailed textures of wainscoting can transform plain windows into focal points, adding depth and character to your space. Whether your home is modern, traditional, or somewhere in between, this design choice creates a polished and sophisticated look.
Fits Well With Different Styles and Designs
One of the greatest benefits of wainscoting is its versatility. It seamlessly blends with a variety of interior styles and designs. For a classic or traditional look, you can opt for raised panel wainscoting or beadboard. If your style leans toward contemporary or minimalist, flat or shiplap-style wainscoting works beautifully. The ability to paint or stain the wainscoting in any color allows it to complement the existing decor, making it a flexible option for any home.
Easy to Install and Maintain
Wainscoting around windows is relatively simple to install, even for DIY enthusiasts. The process requires basic tools, materials, and attention to detail. Once installed, wainscoting is easy to maintain, as it protects the walls from scuffs, scratches, and general wear and tear. A quick wipe with a damp cloth keeps it looking fresh, and occasional touch-ups with paint can maintain its pristine appearance for years.
Materials Required for Wainscoting Around Windows Without Casing
Here are the essential materials and tools you’ll need to install wainscoting around windows without casing:
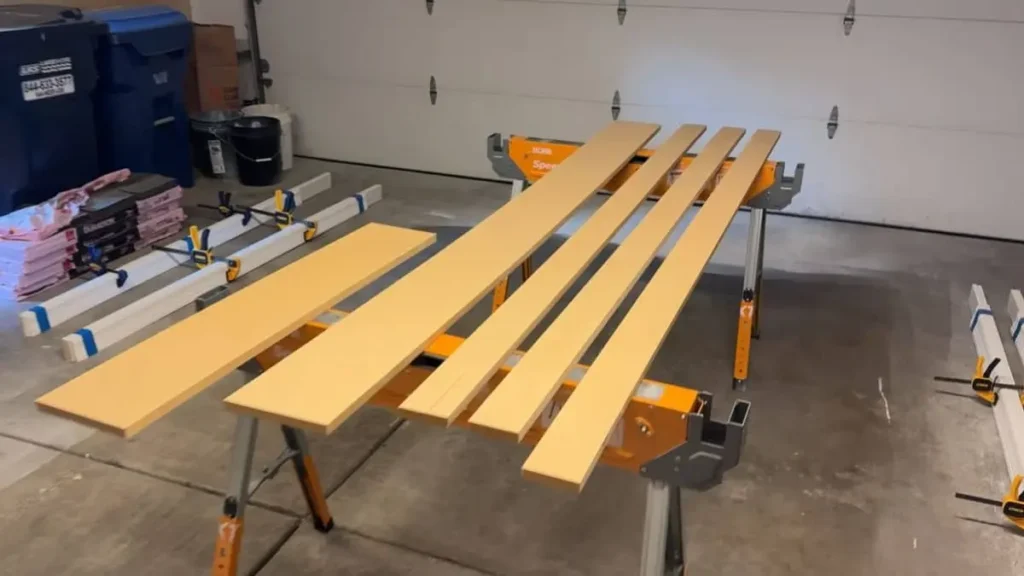
1. Wainscoting Panels
Wainscoting panels are the main component for achieving this decorative finish. They come in various styles, including beadboard, raised panel, flat panel, or shiplap. Choose a style that complements the overall design of your space. Pre-cut panels are available for added convenience, or you can cut them to custom sizes to fit your window layout perfectly.
2. Adhesive
Adhesive is used to attach the wainscoting panels securely to the wall. Choose a strong construction adhesive designed for wood or composite materials. This ensures that the panels stay firmly in place over time, even in high-traffic areas.
3. Nail Gun
A nail gun is an essential tool for fastening the wainscoting panels to the wall quickly and efficiently. It allows for precise placement of nails without splitting the panels or leaving visible marks, ensuring a clean and professional finish.
4. Caulk
Caulk is necessary to fill in any gaps or seams between the panels, window edges, or wall surface. It creates a seamless and polished look while preventing dust and debris from accumulating in the crevices. For best results, choose paintable caulk, which can be painted over to match the wainscoting.
5. Paint
Paint adds the final decorative touch, enhancing the overall appearance of the wainscoting. Choose a color that complements your room’s design or matches the trim and walls for a cohesive look. You can also opt for contrasting colors to make the wainscoting pop. High-quality, durable paint is recommended to ensure long-lasting beauty.
Installing Wainscoting Around Windows Without Casing
Welcome to our step-by-step guide to installing wainscoting around windows without casing. Wainscoting can add charm and character to any room, and when installed around windows, it can create a beautiful and polished look.
Measure The Window Area
Before you begin, it’s essential to measure the area around the window where you plan to install the wainscoting. Use a tape measure to determine the height and width of the space, and take note of any obstacles such as trim or molding that may affect the installation.
Cut The Wainscoting Panels
Using the measurements you’ve taken, carefully cut the wainscoting panels to fit around the window. Be sure to use a saw or appropriate cutting tool to achieve precise and clean cuts. This step will ensure that the panels fit seamlessly around the window without any gaps or inconsistencies.
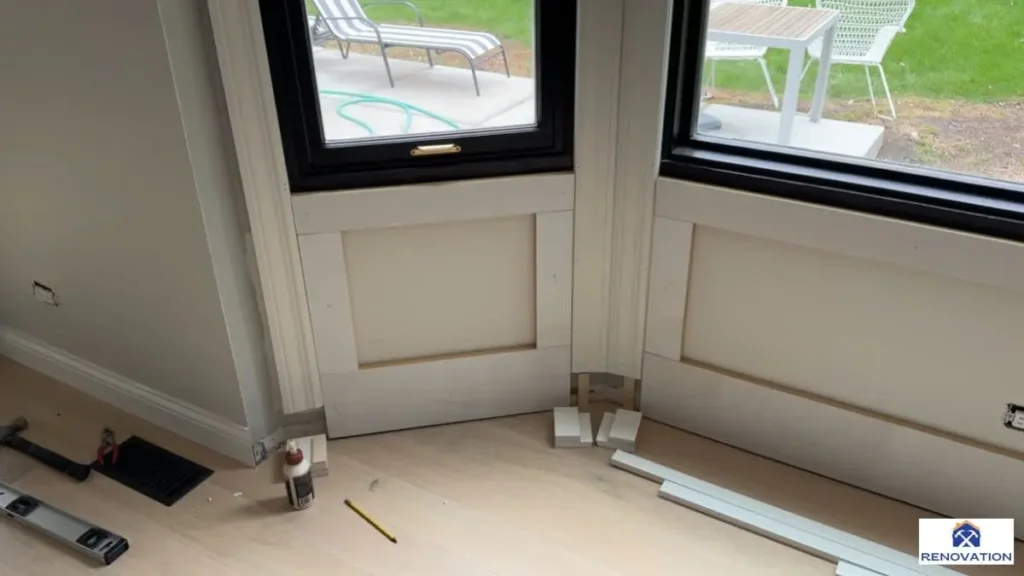
Apply The Adhesive
Once the panels are cut to size, apply a strong adhesive to the back of each panel. Be sure to follow the manufacturer’s instructions for the specific adhesive you are using. Apply the adhesive generously to ensure a secure and long-lasting bond between the wainscoting and the wall.
Install The Wainscoting Panels
Carefully position the wainscoting panels around the window, pressing them firmly against the wall to secure them in place. Use a level to ensure that the panels are straight and aligned correctly. Take your time during this step to achieve a professional-looking installation.
Fill Gaps With Caulk
After the panels are installed, use caulk to fill any gaps or seams between the wainscoting and the wall. This will create a seamless and polished appearance while also preventing any moisture or drafts from seeping through the gaps.
Recommended Post: Filling Gaps around Window Frames
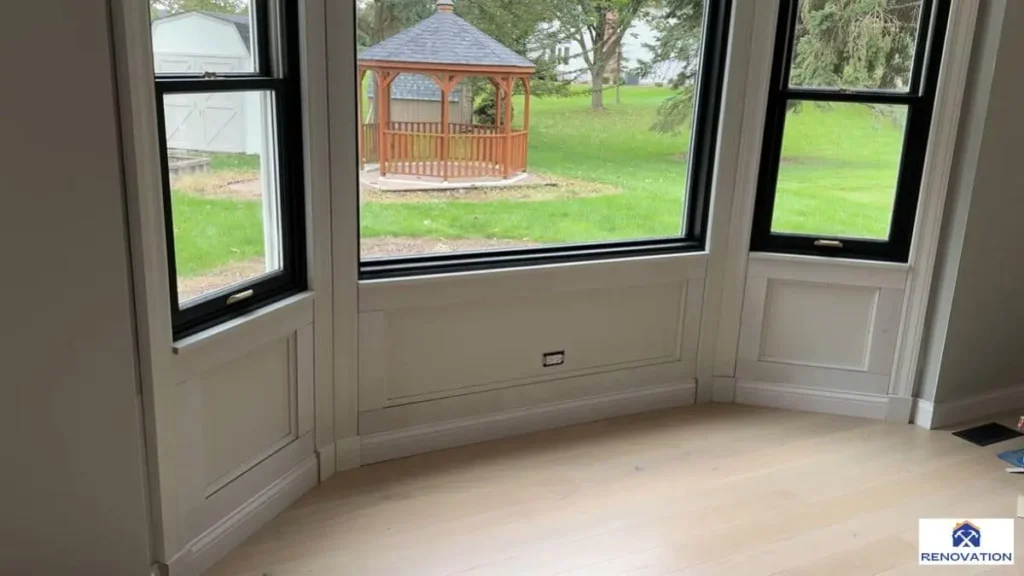
Paint The Wainscoting
Once the caulk has dried, it’s time to paint the wainscoting to your desired color. Choose a high-quality paint that is suitable for the material of your wainscoting panels. Apply the paint evenly, ensuring full coverage and a smooth finish.
Tips For Maintaining Wainscoting Around Windows Without Casing
When it comes to maintaining wainscoting around windows without casing, there are a few essential tips to keep in mind. Wainscoting adds elegance and charm to any room, but without proper maintenance, it can lose its appeal over time.
Avoid Using Abrasive Cleaners
Abrasive cleaners can damage the delicate surface of wainscoting. Instead, opt for gentle, non-abrasive cleaners specifically formulated for painted surfaces. Always test a small, inconspicuous area before applying any cleaner to the wainscoting to ensure it won’t cause damage.
Regularly Clean And Dust
Regular cleaning and dusting can prevent dirt and grime from building up on the wainscoting. Use a soft, lint-free cloth to gently wipe down the surface, taking care to reach all the grooves and crevices. This simple maintenance task can help preserve the beauty of the wainscoting.
Touch Up Any Scratches Or Chips In The Paint
Over time, wainscoting may develop scratches or chips in the paint. It’s important to address these imperfections promptly to prevent further damage. Keep some extra paint on hand in the same shade as the wainscoting, and touch up any areas that need attention to keep the wainscoting looking flawless.
Conclusion
Enhancing windows with wainscoting adds charm and character to any space. The timeless elegance of this design choice can transform a room effortlessly. By opting for wainscoting around windows without casing, you can achieve a seamless and sophisticated look that will leave a lasting impression on your guests.

