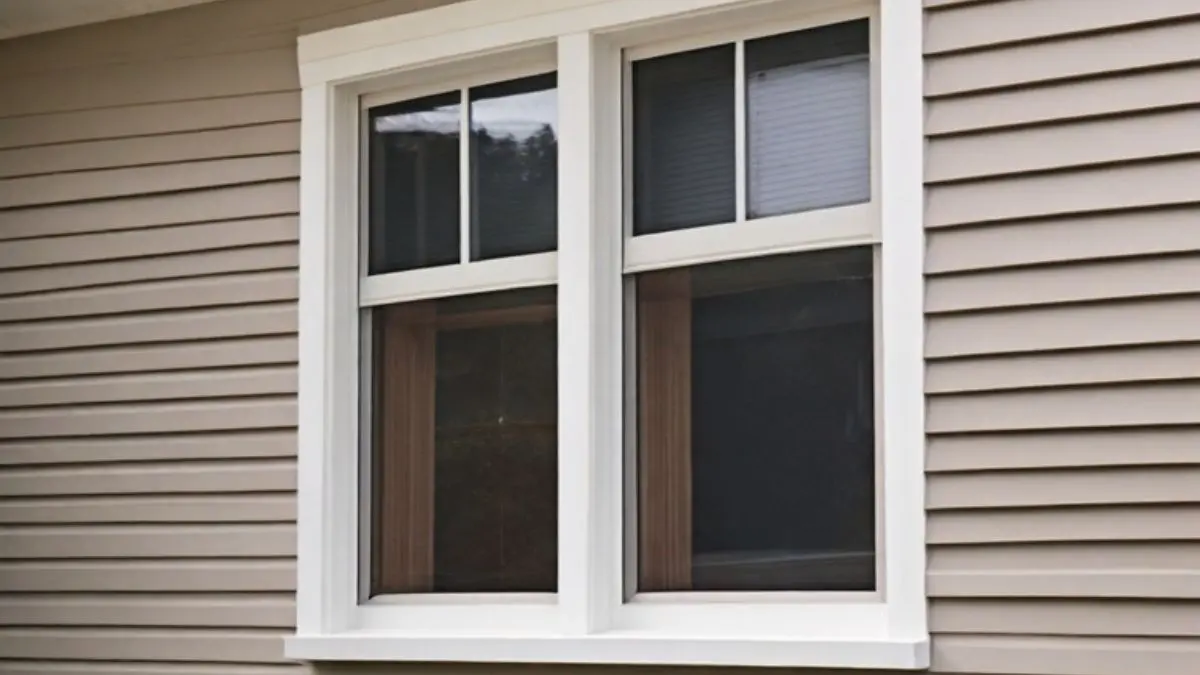
Vinyl siding with a built-in J-channel offers a seamless and efficient solution for finishing window openings. Unlike traditional J-channels that require separate installation, built-in options simplify the process, reduce labor time, and create a cleaner aesthetic.
Properly installing vinyl siding around windows is essential for durability, weather resistance, and visual appeal. A well-fitted J-channel prevents water infiltration, protects the window edges, and enhances the overall siding performance. However, incorrect installation can lead to moisture damage, warping, and costly repairs.
This guide covers everything you need to know about using vinyl siding with built-in J-channels around windows. You’ll learn about its benefits, installation process, common challenges, and expert tips to ensure a flawless finish.
Vinyl Siding With Built-In J-Channel
What Is a Built-In J-Channel?
A built-in J-channel is an integrated trim component in vinyl siding panels, designed to hold the edges of windows, doors, and other exterior openings securely. It eliminates the need for separately installing a J-channel trim piece, streamlining the siding installation process.
In traditional vinyl siding installations, a J-channel is added around windows to create a finished look and direct water away from the structure. With a built-in J-channel, this functionality is pre-molded into the siding panel itself, allowing for a cleaner and more efficient setup.
The built-in J-channel forms a small groove along the siding’s edge, providing a space for window edges to fit securely. This feature not only improves the overall aesthetic but also enhances the structural integrity of the installation by reducing the number of seams and gaps where moisture could penetrate.
Why Use Vinyl Siding With Built-In J-Channel?
Vinyl siding with an integrated J-channel simplifies installation by eliminating the need for separate trim pieces, reducing time, effort, and errors. It provides better moisture protection by creating a tighter seal around windows, preventing water damage and mold. With fewer seams, it enhances durability, minimizing shifting, warping, and long-term maintenance. The seamless design offers a polished, modern look, making it ideal for contemporary homes.
While the initial material cost may be higher, reduced labor and installation time make it a cost-effective choice. This all-in-one solution ensures efficiency, durability, and visual appeal.
How to Install Vinyl Siding Around Windows With Built-In J-Channel

Installing vinyl siding around windows with a built-in J-channel requires precision to ensure a weather-tight, professional-looking finish. A proper installation not only enhances the exterior appearance of a home but also prevents moisture infiltration, ensuring long-term durability.
Necessary Tools & Materials for Installation
| Tools | Materials |
| Utility knife | Vinyl siding panels with built-in J-channels |
| Tin snips | Underlayment or house wrap |
| Circular saw with fine-tooth blade | Caulk or sealant for waterproofing |
| Measuring tape | Corrosion-resistant nails or screws |
| Level | |
| Chalk line | |
| Siding removal tool | |
| Hammer or power drill |
Having these tools and materials ready ensures a smooth and efficient installation process, preventing delays and ensuring precise fittings.
Prepare the Window Area
Proper preparation of the window area is crucial for a seamless installation. Start by ensuring the window frame is clean and dry. Remove any old caulking, dirt, or debris that might interfere with the siding’s adhesion. If any gaps or cracks are present around the window, seal them with weatherproof caulk to prevent water infiltration.
Next, apply a high-quality house wrap or underlayment around the window to create an additional moisture barrier. This step is especially important in areas prone to heavy rainfall, as it helps prevent water from seeping behind the siding and causing structural damage over time.
Before proceeding, check the level of the window trim. Misaligned windows can lead to an uneven siding installation, affecting both aesthetics and functionality. If necessary, make adjustments to ensure the window is properly aligned.
Cutting and Fitting the Siding Panels
Accurate cutting and fitting of the vinyl siding panels are essential for a professional finish. Measure the distance from the edge of the window to the existing siding and transfer these measurements onto a siding panel. When marking the cut lines, leave a small expansion gap of approximately ¼ inch to allow for the natural expansion and contraction of vinyl due to temperature changes.
Using a circular saw with a fine-tooth blade or tin snips, carefully cut the siding panel along the marked lines. If necessary, smooth the edges with a utility knife to remove any rough or jagged cuts.
Test-fit the siding piece around the window before securing it. The built-in J-channel should sit snugly around the window trim, with no excessive gaps or misalignment. Adjust the panel as needed to ensure a precise fit.
Securing the Siding Panels Around the Window
Once the siding panels are properly cut and fitted, secure them in place using corrosion-resistant nails or screws. Drive the fasteners into the nailing slots on the panel, leaving a small gap of about 1/16 inch between the nail head and the siding. This gap allows the siding to move slightly with temperature changes, preventing warping or buckling.
Start securing the panel from the center and work outward to maintain an even alignment. Ensure that each panel locks into the previous one securely while leaving room for expansion. Avoid driving nails too tightly, as this can restrict movement and cause the siding to crack over time.
Double-check that the built-in J-channel properly frames the window, providing a tight and uniform fit. If any gaps are visible, make minor adjustments before proceeding.
Finishing Touches & Sealing
After securing the siding panels, apply exterior-grade caulk around the window edges where necessary to create a watertight seal. Focus on the areas where the built-in J-channel meets the window trim, as these points are most vulnerable to moisture penetration.
Inspect the entire installation to ensure there are no visible gaps or misaligned panels. If any sections appear loose or uneven, make the necessary adjustments to achieve a smooth and cohesive look.
Finally, clean the work area and remove any debris or leftover materials. Step back and examine the completed installation to confirm that the siding around the window appears seamless and properly aligned.
Related Read: Siding Around Electric Meter: A Step-by-Step Guide
Common Challenges & Expert Solutions
Installing vinyl siding around windows with a built-in J-channel can come with certain challenges, especially for those unfamiliar with the process. Issues like warping, improper water drainage, and difficulty cutting siding accurately can compromise both the durability and aesthetics of the installation.
Warping or Buckling Issues
One of the most common issues with vinyl siding installation is warping or buckling, which occurs when the material expands due to temperature changes and doesn’t have enough room to move. This can lead to unsightly bulges or distortions in the siding, affecting both its appearance and performance.
Solution:
To prevent warping, it’s essential to leave an expansion gap of about ¼ inch between the siding and any fixed edges, such as window trims and corners. When securing the siding, avoid nailing it too tightly.
Instead, drive nails through the center of the nailing slots, leaving about 1/16 inch of space between the nail head and the siding. This allows the panels to expand and contract naturally without buckling.
Additionally, using high-quality, UV-resistant vinyl siding can help reduce excessive expansion caused by prolonged sun exposure. Ensuring proper ventilation behind the siding can also minimize temperature-related expansion and contraction.
Improper Water Drainage
Water infiltration is a serious concern if the vinyl siding and J-channel are not installed correctly. If water gets trapped behind the siding, it can lead to mold growth, rotting of the underlying structure, and long-term damage to the home.
Solution:
To ensure proper water drainage, start by installing a high-quality house wrap before placing the siding. This acts as a secondary barrier, preventing moisture from reaching the sheathing. The J-channel should always be sloped slightly downward at the bottom of the window to direct water away from the structure.
Overlapping the siding panels correctly is also crucial. Each panel should interlock tightly with the next, with no gaps that could allow water infiltration. Applying exterior-grade caulk at critical junctions—such as where the J-channel meets the window frame—provides extra protection against moisture penetration. However, avoid over-sealing the bottom of the J-channel, as this could trap water instead of allowing it to drain properly.
Difficulty Cutting Vinyl Siding Accurately
Cutting vinyl siding accurately can be challenging, especially when working around windows. Inaccurate cuts can lead to uneven edges, gaps, or a poor fit that affects the siding’s overall appearance and effectiveness.
Solution:
Using the right tools makes a significant difference. A circular saw with a fine-tooth blade is ideal for making straight, precise cuts. When working in colder temperatures, avoid using power saws, as vinyl can become brittle and crack under pressure. Instead, use tin snips or a utility knife to score and snap the material cleanly.
To ensure accuracy, always measure twice before cutting. Marking cut lines with a pencil or chalk line before making the cut helps maintain precision. When cutting panels for window openings, use a template or guide to achieve consistent and professional results. Keeping extra siding pieces on hand allows for adjustments if any mistakes occur.
J-Channel Not Sitting Flush Against the Window
A J-channel that doesn’t sit flush against the window can create gaps that compromise the siding’s appearance and its ability to effectively divert water. This issue is often caused by improper cutting, incorrect alignment, or structural inconsistencies in the window trim.
Solution:
To ensure a flush fit, measure the window opening carefully before cutting the J-channel. When installing, align it properly with the window trim and check for any uneven surfaces. If the window trim is not level, use shims to create a more even surface for the J-channel to rest against.
If the J-channel appears too rigid to fit properly, slightly warming the vinyl with a heat gun can make it more flexible, allowing it to conform better to the window’s shape. However, avoid excessive heating, as this can warp the material.
Ensuring the J-channel interlocks correctly with the adjacent siding panels also helps maintain a smooth and uniform appearance. If necessary, make small adjustments by trimming or repositioning the pieces before securing them in place.
Recommended Post: How to Update Vinyl Siding
Maintenance Tips for Vinyl Siding With Built-In J-Channel

Proper maintenance of vinyl siding with a built-in J-channel is essential for preserving its appearance, durability, and weather resistance. Over time, exposure to the elements, moisture buildup, and seasonal changes can impact the siding’s integrity. Regular upkeep not only extends the lifespan of the material but also prevents costly repairs. Below are key maintenance strategies, including cleaning, moisture control, and seasonal adjustments.
Regular Cleaning & Inspection
Dirt, mold, and algae can accumulate on vinyl siding over time, especially in shaded or humid areas. Regular cleaning not only enhances the siding’s appearance but also prevents long-term staining and deterioration.
To clean vinyl siding effectively, use a mixture of mild detergent and water. A soft-bristle brush or a low-pressure garden hose works best for removing surface dirt. Avoid using high-pressure washers, as excessive force can damage the siding, force water behind the panels, and loosen the J-channel. For stubborn stains, a solution of water and white vinegar can help remove mildew and grime.
During cleaning, inspect the siding for any cracks, warping, or loose panels. Pay close attention to the areas around windows, as improper J-channel alignment can create gaps that allow moisture infiltration. If any sections appear loose, gently secure them back in place, ensuring the panels can still expand and contract naturally.
Preventing Moisture Build-Up
Moisture is one of the biggest threats to vinyl siding and the underlying structure. If water gets trapped behind the siding due to improper drainage, it can lead to mold growth, wood rot, and reduced insulation effectiveness. Ensuring that water flows away from the house is critical to maintaining the siding’s integrity.
Check that the J-channel is properly installed and slightly sloped to direct water away from the window. Any caulking around window frames should be intact and free of cracks to prevent leaks. However, avoid sealing the bottom of the J-channel completely, as this can trap water instead of allowing it to drain.
Keeping gutters and downspouts clear of debris also helps prevent water from splashing onto the siding and seeping behind the panels. Trim back trees and bushes near the siding to allow airflow, reducing the chances of excessive moisture accumulation.
Seasonal Adjustments & Repairs
Vinyl siding expands and contracts with temperature changes. During summer, excessive heat can cause slight expansion, while winter temperatures make the material contract. If the siding was installed too tightly, seasonal expansion may lead to buckling, while contraction can create visible gaps.
At the start of each season, inspect the siding for any signs of movement or shifting. If panels appear too tight against each other, gently reposition them to allow for proper expansion space. If gaps become visible during colder months, ensure they are within the recommended range (around ¼ inch) to accommodate seasonal changes.
Winter weather can also cause ice buildup along windows and siding edges. If ice dams form, they may push against the siding and create gaps for moisture to enter. Clearing ice accumulation and ensuring attic insulation is adequate can help prevent this issue.
For minor repairs, such as replacing a cracked panel or readjusting a loose J-channel, carefully remove the affected section using a zip tool, make the necessary corrections, and snap it back into place. If significant damage occurs, replacing the affected section promptly prevents further issues from developing.
FAQs: Common Questions
What is a built-in J-channel in vinyl siding?
A built-in J-channel is an integrated groove in vinyl siding designed to hold the edges of siding panels around windows, doors, and other openings. It eliminates the need for separate trim pieces, creating a seamless and professional finish while also helping with water drainage.
Why is my vinyl siding warping around windows?
Warping occurs due to improper nailing, excessive heat, or lack of expansion space. Vinyl siding should be nailed loosely to allow for natural expansion and contraction. Reflective surfaces like windows can also concentrate heat, causing warping. Using heat-resistant siding or installing shade barriers can help.
What is the best way to cut vinyl siding for window openings?
The best way to cut vinyl siding is by using tin snips, a circular saw with a fine-tooth blade, or a utility knife. Score the siding first and then snap it for a clean cut. Always measure carefully to avoid gaps or misalignment.
Can you replace just the J-channel on vinyl siding?
Yes, but replacing a built-in J-channel requires removing the surrounding siding panels first. Use a zip tool to unlock the siding, carefully remove the damaged section, and install a new piece. Ensure a secure fit before snapping the siding back into place.
How often should vinyl siding be cleaned and maintained?
Vinyl siding should be cleaned at least once a year using a mild detergent and water. Regular inspections for cracks, loose panels, and moisture buildup help maintain its durability and appearance.
Does vinyl siding expand and contract with temperature changes?
Yes, vinyl siding expands in heat and contracts in cold weather. To prevent buckling or gaps, it must be installed with a small allowance for movement. Fasteners should not be too tight to allow for natural shifts.
Conclusion
Installing vinyl siding around windows with a built-in J-channel offers a seamless, durable, and low-maintenance solution for protecting your home’s exterior. Proper installation is key to preventing common issues like warping, water damage, and misalignment.
Regular cleaning, moisture control, and seasonal inspections help maintain the siding’s appearance and longevity. By following best practices and addressing potential challenges, you can ensure a professional finish that enhances both the durability and curb appeal of your home.
You May Also Like: Installing Vinyl Siding on Uneven Walls