
Installing a toilet drain through a floor joist demands careful planning to maintain the structural integrity of your home. Floor joists are vital components that support the weight of your floors, and improper modifications can weaken them, posing serious safety risks.
This guide explains expert techniques and detailed steps to ensure a secure installation that complies with building codes and preserves your home’s stability. Whether you’re working on a new project or updating an existing system, mastering the correct methods is essential for a durable and efficient plumbing solution.
Can I Run the Toilet Drain Through the Floor Joist?
Yes, you can run a toilet drain through a floor joist, but careful planning is required to ensure proper installation and compliance with plumbing codes. When doing this, you must consider factors such as the drain pipe’s size, the joist’s location, and maintaining the floor’s structural integrity.
It’s important to avoid weakening the joist by cutting or notching it too much, as this can compromise the floor’s support. Additionally, the drain should be installed at the correct slope for proper drainage, and you may need to use appropriate fittings and materials to ensure the connection is secure and leak-free.
Always check local building codes and, if needed, consult with a professional plumber to ensure the installation meets all requirements for a safe and effective plumbing system.
Tools and Materials Needed
Having the right tools and materials is essential for successfully installing a toilet drain through a floor joist. Using proper equipment ensures precision, reduces errors, and speeds up the process. Below is a detailed list of tools and materials categorized for your convenience.
Measurement and Marking Tools
Accurate measurements and markings are critical to ensure the proper placement of the toilet drain through the floor joist. Make sure to have the following tools on hand:
- Measuring Tape – For precise distance measurements between the floor joists and the drain pipe.
- Pencil or Marker – To mark drilling points and cutting areas on the wood.
- Square Tool – To ensure markings are level and perpendicular, providing clean and accurate cuts.
Cutting Tools
Cutting through floor joists safely and efficiently requires reliable cutting tools:
- Hole Saw – Ideal for creating circular openings in wood for the drain pipe to pass through.
- Reciprocating Saw – Useful for more extensive cuts or to make adjustments when the space for your drain pipe needs additional clearance.
- Drill with Spade Bits – For boring smaller, controlled holes in the joist as needed.
Plumbing Tools
Handling pipes and fittings requires plumbing-specific tools to ensure a secure and leak-free installation:
- Pipe Cutter – Essential for cutting PVC or ABS pipes to the right length without causing cracks or jagged edges.
- Pipe Reamer or Deburring Tool – Helps smooth the edges of cut pipes for easier fitting and connection.
Fastening and Support Tools
To secure the drain pipe and provide necessary support, these tools will come in handy:
- Screws and Drill Driver – For attaching brackets or support hangers to the joist.
- Pipe Straps or Hangers – To hold pipes firmly and maintain proper alignment through the joist.
Materials Needed
Below is a list of materials essential for installing a toilet drain through a floor joist:
- Drain Pipes – Typically made of PVC or ABS; ensure they meet your local plumbing code requirements for size and type.
- Pipe Fittings – Including elbows, T-joints, and adapters to create the appropriate pipe configuration.
- Solvent Cement and Primer – Necessary for securely bonding PVC pipe fittings.
- Sealant Tape – Used for watertight connections at threaded joints.
- Pipe Insulation (Optional) – To reduce noise or prevent pipe condensation in certain environments.
Safety Gear
Lastly, prioritize your safety by using personal protective equipment:
- Safety Goggles – Protects eyes from wood splinters or pipe shavings during cutting and drilling.
- Gloves – Safeguards hands from sharp edges or irritants like solvent cement.
- Dust Mask – Prevents inhalation of wood dust or fine particles.
Having all these tools and materials organized and accessible before beginning the project will make the process smoother and more effective, ensuring a solid and durable toilet drain installation.
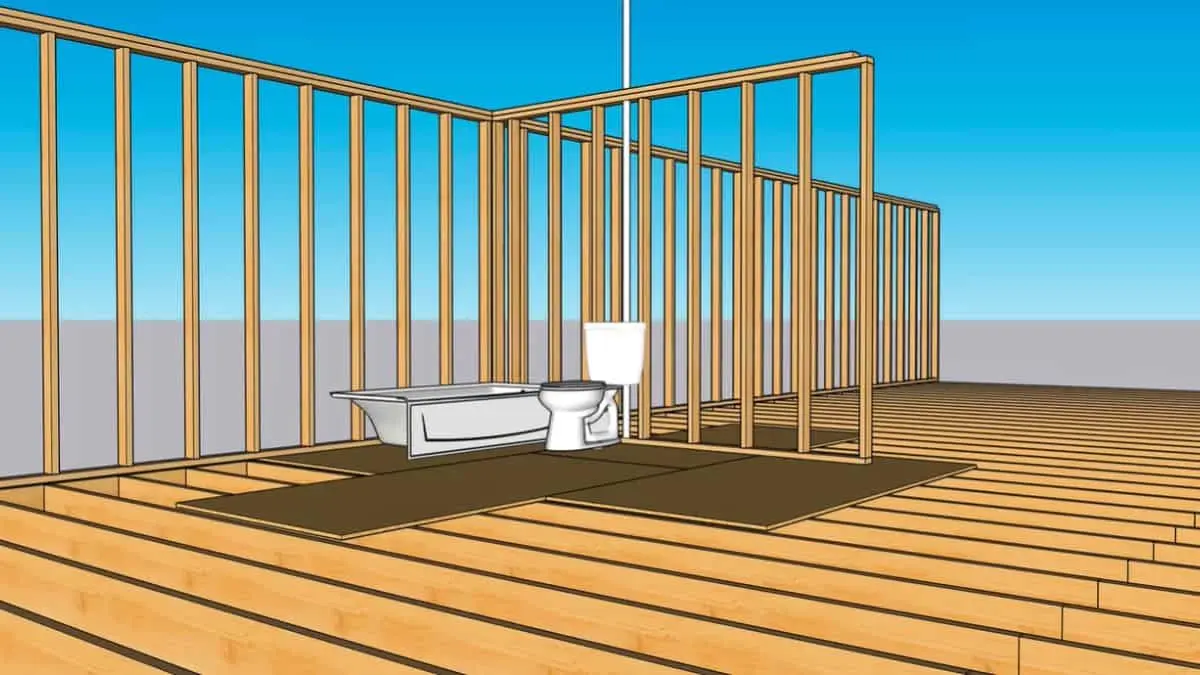
Installing a Toilet Drain Through a Floor Joist

Step 1: Assess the Floor Joist Structure
Before starting the installation process, it’s essential to evaluate the floor joist structure to ensure that it can accommodate the required modifications. Identify the location of the joists underneath the flooring using a stud finder, and mark their positions. Check if the joists provide enough space for the toilet drain’s diameter without compromising the structural integrity. If the joist is in an unsuitable location, you may need to reinforce the joist after cutting or consider rerouting the drain.
Step 2: Determine the Placement of the Toilet Flange
The toilet flange connects the toilet to the drainpipe and seals the fixture to the floor. Mark the exact location of the toilet flange on the floor, ensuring it aligns with the center of the toilet’s base and works with the room’s layout. Remember to account for the required clearance from walls or fixtures, typically around 12 inches from the back wall for standard toilets.
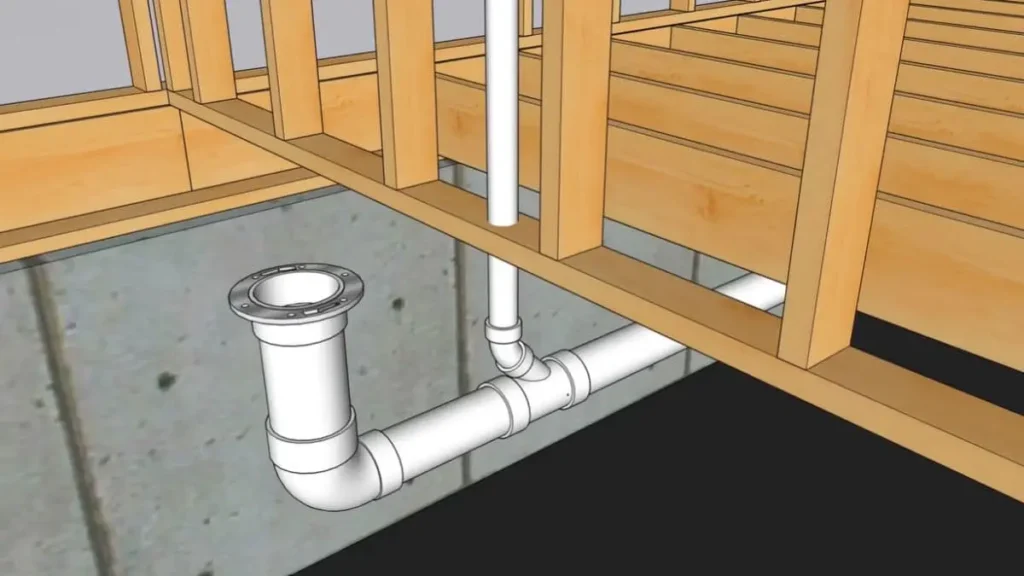
Step 3: Cut the Hole for the Drainpipe
Using the measurements of the drainpipe diameter, cut a hole through the subfloor and the selected floor joist. Use a hole saw or jigsaw for precision and avoid enlarging the opening more than necessary. If you need to cut into a joist, ensure the cut is small and clean to minimize weakening the structure. Always follow local building codes regarding permissible joist modifications.
Step 4: Reinforce the Floor Joist (if necessary)
If cutting the joist compromises its integrity, reinforce it before proceeding. You can do this by installing a sister joist—a second joist attached alongside the existing one—or by using steel plates or blocking to add stability. Proper reinforcement will prevent structural issues or sagging in the future.
Step 5: Install the Drainpipe
Position the drainpipe through the hole, ensuring it is centered and slopes appropriately for efficient drainage (typically a 1/4-inch drop per foot of pipe). Connect the pipe to the main plumbing system or soil stack according to local regulations. Use PVC or ABS solvent cement to secure the pipe joints firmly and create a leak-free connection.
Step 6: Mount the Toilet Flange
Attach the toilet flange to the drainpipe, ensuring it sits flush against the floor surface. Secure the flange to the subfloor using screws, making sure it is properly aligned and level. This step is crucial for maintaining a watertight seal when the toilet is installed.
Step 7: Test the Drain System
Before installing the toilet, check the drain system for leaks. Run a small amount of water through the pipe and inspect all joints for signs of dripping or seepage. Address any issues immediately to avoid complications later.
Related Read: Toilet Water Supply Line Through Floor
Safety Considerations Before Installation
When undertaking a toilet drain installation through a floor joist, safety should always be your top priority. This section outlines essential safety precautions to follow, ensuring that your project proceeds smoothly and without incident.
Assess Structural Integrity
Before cutting into a floor joist, it is crucial to evaluate its structural integrity. Floor joists provide support for your flooring and cutting through them improperly can weaken the structure of your home. Consult building codes and consider seeking advice from a structural engineer if necessary. Ensure that your planned cuts will not compromise the overall stability of the joist or surrounding framework.
Use Proper Tools and Equipment
Always use the correct tools for the job to ensure both precision and safety. Essential tools for this project include a power drill, a hole saw, and a jigsaw. Make sure your tools are in good condition and appropriate for cutting through joists. Additionally, wear safety gear such as gloves, protective glasses, and dust masks to minimize injury risks during the installation process.
Avoid Over-Cutting the Joist
When cutting a hole in a joist for the toilet drain, the size and placement of the hole are critical. According to building codes, the diameter of the hole should not exceed a specific percentage of the joist’s total width. Over-cutting can compromise the joist’s load-bearing capacity. Always double-check measurements, mark accurately, and cut with care to preserve the strength of the joist.
Reinforce the Joist if Necessary
If your installation requires a larger hole or extensive modification to the joist, reinforcement may be necessary to maintain structural safety. Reinforcing methods can include adding sister joists on either side of the modified joist or installing metal brackets for additional support. This step ensures that the floor can continue to bear its intended load safely even after the modifications.
Recommended Post: How to Reinforce Floor Joists for Plumbing
Verify Compliance with Local Building Codes
Building codes exist to ensure safety and structural integrity in construction projects. Before performing any work, consult your local building authority to confirm that your planned installation complies with local regulations. Non-compliance can not only result in unsafe conditions but may also affect your ability to sell or insure your home in the future.
Plan for Safe Electrical and Plumbing Clearance
Floor joists often house electrical wiring or plumbing lines, making it critical to locate these before cutting. Use a stud finder or wiring detector to identify hidden wires or pipes within the joist area. Accidentally cutting into electrical lines or water pipes can be extremely dangerous and lead to costly repairs, so take precautions to avoid these risks.
Work in a Clean and Stable Environment
A clean workspace contributes to a safer installation process. Clear the area of debris, secure loose tools, and ensure the floor surface around the installation site is stable to reduce the chance of accidents. If working in tight or awkward spaces, use proper support or padding to avoid unnecessary strain on your body while completing the task.
Common Challenges and Their Solutions
While installing a toilet drain through a floor joist can be straightforward with the right tools and preparation, several challenges may arise during the process. In this section, we’ll address some of the most common issues and provide practical solutions to ensure your installation is successful.

Misalignment of Drain Pipe and Toilet Flange
Challenge: What if the drain pipe and toilet flange are misaligned?
Misalignment between the drain pipe and toilet flange can prevent proper sealing, leading to leaks or improper drainage. This issue often arises when the hole through the joist is not precisely cut, or when the pipe isn’t installed at the correct angle.
Solution:
- Measure Twice, Cut Once:
Ensure the hole you cut in the floor joist is in the correct location. Use a measuring tape to mark the spot where the drain pipe will pass through.
Tip: Double-check that the drain pipe’s angle matches the toilet flange’s inlet angle for a perfect connection. - Adjust the Flange Placement:
If misalignment occurs after installation, you may need to reposition the flange or use an adjustable flange to correct the angle.
Tip: Use a wax ring to ensure a tight seal around the flange and prevent leaks once it is aligned.
Cutting Through a Floor Joist
Challenge: How do you deal with cutting through a floor joist?
Cutting through a floor joist to install the drain pipe can be challenging because floor joists are crucial structural elements. Improper cutting can weaken the floor’s integrity, leading to sagging or even structural failure.
Solution:
- Use the Right Tools:
A hole saw or oscillating tool is ideal for making precise cuts in the joist. These tools minimize damage and help maintain the strength of the joist.
Tip: Select the appropriate size hole saw to match the diameter of your drain pipe. - Reinforce the Joist:
If the joist needs to be cut extensively, you may need to reinforce it with a sister joist or by adding a metal bracket to ensure the floor’s structural integrity remains intact.
Tip: Consult with a structural engineer if you are unsure whether the joist can bear the weight after cutting.
Difficulty in Accessing the Drain Area
Challenge: What if access to the drain area is limited or difficult?
Working in tight spaces, such as basements with low ceilings or narrow crawl spaces, can make it difficult to install the drain pipe and flange.
Solution:
- Use Compact Tools:
In confined areas, compact tools like mini pipe cutters and flexible tubing are helpful for working with limited space.
Tip: Consider using a flexible drain hose that can bend easily to reach the necessary connections. - Plan the Layout:
Before starting, plan the layout of the drain pipe carefully. Ensure you have enough room to work and that all connections can be made without obstruction.
Tip: Take measurements and visualize the pipe’s route to avoid unnecessary adjustments later.
Leaks Around the Drain Pipe
Challenge: How do you fix leaks around the drain pipe?
Leaks are one of the most common issues during toilet drain installations. They may occur due to improper sealing around the pipe, flange, or fittings.
Solution:
- Check Connections and Seals:
Ensure that all connections are tightly sealed, using the appropriate plumbing sealants or thread sealant tape. A loose connection or improperly sealed fitting can lead to leaks.
Tip: Always check the condition of the wax ring, which is essential for preventing leaks around the toilet flange. - Tighten Fittings Properly:
Make sure all plumbing fittings are tightened securely without over-tightening, which could cause damage to the fittings or threads.
Tip: Use a torque wrench to apply the correct amount of pressure when tightening the connections.
Water Flow Issues Post-Installation
Challenge: What if there are water flow issues after installation?
After installing the toilet drain, you might experience poor water flow or drainage, which could be caused by blockages or an improper slope of the drain pipe.
Solution:
- Check for Clogs:
If the water is draining slowly or backing up, check for blockages in the drain pipe. A clog could occur if debris or construction materials were left behind during installation.
Tip: Use a plumbing snake or drain auger to clear any blockages within the pipe. - Ensure Proper Slope:
The drain pipe must slope downward at a minimum of 1/4 inch per foot to allow water to flow freely.
Tip: Use a level to ensure the pipe maintains a proper slope throughout its length.
Read Also: Running Romex Through Floor Joists
Conclusion
Installing a toilet drain through a floor joist is a crucial step in ensuring the proper functioning of your bathroom plumbing system. While the process may seem complex, with the right tools, materials, and techniques, it can be accomplished with relative ease. By following the step-by-step guide, addressing common challenges, and implementing expert tips, you can achieve a flawless installation that ensures long-term performance and reliability.
Remember, safety is always a top priority, so take the necessary precautions to protect yourself and your property during the installation. If you encounter issues or are unsure at any stage, don’t hesitate to consult a professional plumber to ensure the job is done correctly and up to code.
Whether you’re a DIY enthusiast or a seasoned expert, mastering the installation of a toilet drain through a floor joist will enhance your home improvement skills and ensure a successful bathroom renovation project.

