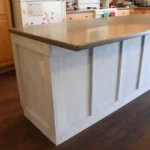
A kitchen remodel can be exciting, but it often comes with its fair share of challenges—especially when it disrupts daily routines. One of the biggest inconveniences homeowners face during the process is losing access to a functional sink. Without a proper setup, tasks like washing dishes, prepping meals, or even rinsing fruits and vegetables can become unnecessarily complicated.
A temporary sink during a kitchen remodel offers a practical solution, allowing you to maintain essential kitchen functions while minimizing stress. Whether you’re planning a simple DIY setup or investing in a portable sink unit, having a well-thought-out temporary sink ensures cleanliness, convenience, and efficiency throughout your renovation.
This guide will walk you through why a temporary sink is essential, how to choose the right setup, and the best ways to maintain functionality during your kitchen remodel.
Why You Need a Temporary Sink During a Kitchen Remodel
A kitchen sink is one of the most frequently used fixtures in any home. During a remodel, losing access to this essential feature can cause significant disruption. Setting up a temporary sink during a kitchen remodel ensures you can maintain basic kitchen functions, reduce stress, and keep your household running smoothly. Below, we explore why this is a critical step in any kitchen renovation project.
The Importance of Maintaining Functionality
A functioning sink is vital for daily tasks like washing dishes, rinsing fruits and vegetables, and filling pots with water. Without it, even simple chores can become frustrating and time-consuming. Using other sinks in the house, such as those in the bathroom, can lead to clogged drains and sanitation issues, as they are not designed to handle kitchen grease or food debris.
A temporary sink provides a dedicated space for these tasks, ensuring your workflow is not entirely disrupted. For families with children or busy schedules, maintaining a semblance of normalcy during the remodel can make the process less overwhelming. It allows you to avoid relying on disposable utensils or frequent takeout, saving both money and resources.
Avoiding Common Remodeling Challenges
Without a plan for a temporary sink, homeowners often face unanticipated challenges. Kitchen renovations can last several weeks or even months, depending on the scope of work. During this time, not having a functional sink can lead to:
- Increased mess in shared spaces, such as the bathroom or laundry room, where kitchen tasks are redirected.
- Strain on household plumbing due to improper disposal of food particles or grease.
- Inconvenience caused by repetitive trips to a distant sink or faucet, especially for tasks like filling large containers or cleaning cookware.
A temporary sink mitigates these issues by offering a dedicated and convenient solution. It helps maintain hygiene, prevents plumbing problems, and minimizes the overall impact of the renovation on your daily life.
Benefits of Planning Ahead
Planning for a temporary sink during the early stages of your remodel offers several advantages. It reduces stress and allows you to focus on the exciting aspects of your renovation, such as selecting countertops or designing cabinetry.
When you plan ahead, you can:
- Identify the most suitable location for your temporary sink, such as near existing plumbing or in a utility space.
- Choose materials and equipment that fit your needs and budget, whether it’s a simple DIY setup or a portable sink unit.
- Ensure your remodeling schedule is not delayed by scrambling to create an alternative solution after construction begins.
Additionally, a well-thought-out temporary sink setup can contribute to a smoother remodeling process for contractors. It keeps the kitchen area clean and accessible, helping the team work efficiently without worrying about accommodating your daily needs.
Recommended: How to Wash Dishes During Kitchen Remodel
Choosing the Right Location for Your Temporary Sink
Selecting the best location for your temporary sink is a crucial step in maintaining functionality and minimizing disruptions during a kitchen remodel. The right placement can streamline daily tasks, improve accessibility, and ensure convenience for the duration of the renovation. Below, we delve into key factors to consider and explore some ideal locations for setting up your temporary sink.
Factors to Consider Before Set Up a Temporary Sink
When deciding where to place your temporary sink, several factors come into play. Evaluating these elements ensures a practical and efficient setup that meets your household’s needs.
Proximity to Plumbing
Access to existing water lines and drainage is one of the most important considerations. Placing your sink near an operational faucet or drain, such as in a bathroom, laundry room, or utility area, minimizes the need for complex plumbing modifications.
Space Availability
The location should have sufficient space to accommodate the sink and allow for comfortable use. It should also provide room for additional items like dish racks, soap dispensers, or buckets if necessary.
Accessibility
Choose a spot that is easily accessible for all members of the household. Avoid cramped or inconvenient areas that may create obstacles or make tasks cumbersome.
Ventilation and Cleanliness
Ensure the location is well-ventilated and easy to clean. A poorly ventilated area can lead to unpleasant odors, while a cluttered or unsanitary space may make the setup impractical for food-related tasks.
Impact on Daily Activities
Consider how the placement of the sink might affect the flow of daily activities. For instance, setting it up in a heavily trafficked area could create congestion or inconvenience.
Ideal Locations to Set Up a Temporary Sink
Once you’ve assessed the factors above, consider these ideal locations for your temporary sink. Each offers its own benefits and can be tailored to suit your specific needs.
Laundry Room
The laundry room is often a top choice for temporary sinks. It typically has access to both water supply and drainage, making it a convenient and practical option. Additionally, laundry rooms are designed to handle cleaning tasks, so they can accommodate the occasional splash or mess.
Bathroom
Bathrooms provide an alternative if the laundry room isn’t available. They come equipped with sinks and drainage, though their smaller size may limit the available workspace. To avoid clogs or plumbing issues, be cautious about disposing of food waste or grease in bathroom sinks.
Utility or Mudroom
Utility rooms or mudrooms are excellent choices if they have a sink or water hookup. These areas are usually less trafficked, providing a quiet and functional workspace. Their utility-oriented design also makes them easy to clean and maintain.
Outdoor Areas
If weather permits, setting up your temporary sink outdoors can be an effective solution. Portable sinks or makeshift setups can connect to an outdoor faucet and drain into a garden or bucket. This option keeps your indoor spaces free of clutter and mess, though it may be less convenient during inclement weather.
Garage or Basement
For homeowners with extra space in the garage or basement, these areas can serve as practical locations for a temporary sink. They often have access to plumbing and offer ample space for a full setup. However, ensure the area is well-lit and organized to maintain functionality.
Setting Up Your Temporary Sink
Establishing a temporary sink is a key part of managing a kitchen remodel effectively. A well-organized setup allows you to maintain essential kitchen tasks without major inconvenience.

Materials and Equipment Needed
The materials and equipment you need will depend on the complexity of your setup and the resources available. However, a few core components are typically required to create a practical temporary sink:
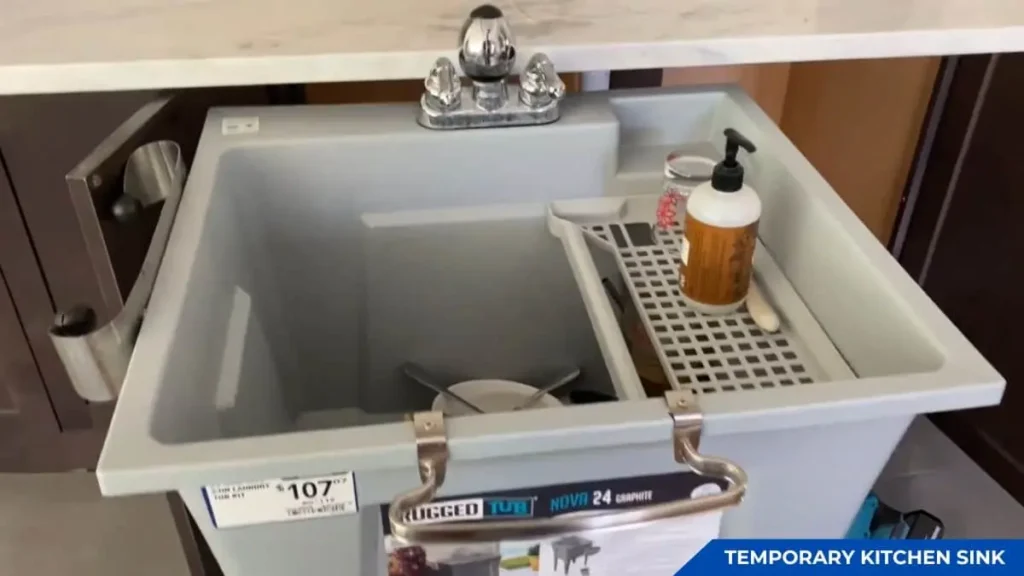
Sink Basin: A simple, lightweight basin, such as a plastic tub or a portable sink unit, serves as the sink’s foundation. Choose one with enough depth to handle dishes and other cleaning tasks efficiently.
Water Source: Access to a faucet or hose is essential. If using an outdoor setup, a garden hose connected to an outdoor spigot can act as your water supply. Indoors, a nearby bathroom or laundry faucet may suffice.
Drainage Solution: A proper drainage system is critical to avoid water pooling or flooding. Options include directing wastewater into a nearby drain or using a bucket to collect water for later disposal.
Support Structure: To ensure stability, place the sink basin on a sturdy table, countertop, or portable stand. If the sink is heavy or will hold large volumes of water, ensure the support can handle the weight.
Accessories and Cleaning Supplies: Have basic supplies like dish soap, sponges, drying racks, and hand towels nearby. These items keep the setup organized and make daily tasks easier.
Set Up a Temporary Sink: Step-by-Step Guide
Creating a temporary sink setup is straightforward if you follow a clear process. Here’s a step-by-step guide to get you started:
Step 1: Choose the Location
Select a location that meets your household’s needs and aligns with the guidelines mentioned in the previous section. Ensure the space is accessible, well-ventilated, and close to a water source.
Step 2: Prepare the Base
Set up a stable surface for the sink basin. A folding table, countertop, or utility cart can work well. For outdoor setups, ensure the surface is level and protected from strong winds or rain.
Step 3: Position the Sink Basin
Place the basin securely on the base. If using a portable sink unit, follow the manufacturer’s instructions to assemble it properly. Check that the basin is positioned at a comfortable height to reduce strain during use.
Step 4: Connect the Water Supply
Attach the water supply to the nearest faucet or hose connection. For indoor setups, use a sink faucet adapter or a splitter for multi-purpose use. Outdoors, connect a garden hose to a spigot. Test the connection to ensure proper water flow without leaks.
Step 5: Set Up the Drainage System
Install a drainage solution to handle wastewater. Indoors, this may involve routing water into a bathtub or utility drain. Outdoors, ensure water is collected in a bucket or directed away from your home to avoid pooling.
Step 6: Organize Cleaning Supplies
Arrange dishwashing essentials like soap, sponges, and drying racks around the sink. Keep items easily accessible but not cluttered. Use bins or shelves for additional storage if needed.
Step 7: Test the Setup
Run water through the system to check for leaks or drainage issues. Adjust connections and placement as needed to ensure everything functions smoothly.
Cost-Effective Solutions for Temporary Sinks
A temporary sink is essential during a kitchen remodel, but it doesn’t have to be expensive. There are several cost-effective ways to set up a functional sink, ranging from DIY approaches to renting or purchasing portable units.

DIY Temporary Sink Options
Creating a DIY temporary sink is one of the most economical choices. With a bit of creativity and basic materials, you can construct a functional setup:
Using a Plastic Basin
A plastic basin is a simple yet effective solution. Place it on a stable surface near a water source, such as a bathroom faucet or garden hose. Drain the water into a bucket or directly into an outdoor area with proper drainage. This method is inexpensive, portable, and easy to assemble.
Repurposing Existing Materials
Look around your home for items you can repurpose. For example:
- Use a sturdy table or folding cart as the base.
- Repurpose a laundry sink or old tub for the basin.
- Attach a temporary faucet adapter to a nearby tap for water supply.
Creating a Gravity-Fed System
For outdoor use, consider a gravity-fed sink. Mount a water container with a spigot on a raised surface and let gravity provide water flow. Collect wastewater in a bucket placed below the sink. This method requires minimal investment and works well for light cleaning tasks.
Renting or Buying Portable Sinks
Portable sinks offer convenience and functionality, making them an excellent option if you’re willing to spend a bit more.
Renting Portable Sinks
If you only need a temporary sink for a short time, renting can save money. Many equipment rental companies offer portable sink units designed for events or temporary setups. These sinks often come with self-contained water tanks and drainage systems, eliminating the need for external plumbing. Renting is ideal for those who want a hassle-free solution without committing to a purchase.
Buying Portable Sinks
For longer remodels or frequent use, purchasing a portable sink can be a worthwhile investment. These sinks are available in various styles, including:
- Manual Pump Sinks: Operated by a foot pump to draw water from a tank.
- Electric Sinks: Equipped with built-in heaters and pumps for added convenience.
- Foldable Models: Compact and easy to store when not in use.
Portable sinks range in price, but budget-friendly options are available starting at $100. These units are versatile and can be reused for outdoor events, camping, or gardening.
Budget-Friendly Alternatives
If a DIY setup or portable sink isn’t feasible, consider these affordable alternatives:
Utilizing Nearby Facilities
Make use of other sinks in your home, such as those in bathrooms or laundry rooms. While not ideal for heavy cleaning, these sinks can handle basic tasks like washing dishes or filling water containers.
Community or Shared Spaces
In some cases, community facilities like clubhouses or shared kitchens can serve as temporary solutions. Check with neighbors or local community centers to explore this option.
Simplified Outdoor Setup
An outdoor sink doesn’t need to be elaborate. Place a large water container with a tap on a sturdy surface and use a bucket for wastewater collection. This minimal setup is sufficient for basic cleaning and doesn’t require any plumbing.
Maintaining Hygiene and Efficiency
A temporary sink is crucial during a kitchen remodel, but its functionality depends on how well you maintain hygiene and optimize its use. Keeping the sink clean and establishing a smooth workflow ensures it remains a practical and sanitary solution throughout the renovation process.
Tips for Keeping the Temporary Sink Clean
Regular Cleaning Routine
A temporary sink can quickly accumulate grime from washing dishes, food preparation, and other daily tasks. Establishing a regular cleaning schedule prevents buildup and keeps the sink hygienic. After each use:
- Rinse the basin thoroughly with warm water.
- Wipe down surfaces with a disinfectant or soapy water to remove food residue and bacteria.
Use Appropriate Cleaning Supplies
Ensure you have basic cleaning supplies nearby, such as:
- Dish soap for cleaning dishes and utensils.
- Antibacterial wipes or spray for disinfecting surfaces.
- A scrub brush or sponge dedicated to the temporary sink to avoid cross-contamination.
Manage Wastewater Properly
If your temporary sink uses a bucket for drainage, empty it frequently to prevent odors and bacterial growth. Wash the bucket with soap and water daily and sanitize it with a diluted bleach solution weekly.
Prevent Clogging
To avoid drainage issues, use a sink strainer to catch food particles and debris. Dispose of solids in a trash bin rather than rinsing them down the drain or into the bucket.
Best Practices for Kitchen Workflow
Organize Your Cleaning Area
A well-organized cleaning area improves efficiency and reduces stress. Keep essential items like dish soap, sponges, and drying racks within easy reach of the sink. Use a designated container for dirty dishes to streamline the washing process.
Prioritize Tasks
With limited sink space, prioritizing tasks ensures smooth operation. Wash items in batches, starting with cleanest items like glasses and finishing with dirtier items like pots and pans. This reduces the need for frequent water changes.
Adopt Time-Saving Techniques
Efficiency is key when using a temporary sink. To save time:
- Pre-rinse dishes and utensils to remove large food particles before washing.
- Fill a basin with soapy water for soaking and cleaning multiple items at once.
- Air-dry dishes on a rack instead of towel-drying to reduce effort.
Optimize for Multi-Purpose Use
In small spaces, the temporary sink often serves multiple purposes. Ensure it is ready for different tasks like rinsing produce, washing dishes, and cleaning tools by maintaining its cleanliness and keeping the area clutter-free.
Set Clear Rules for Shared Use
If multiple family members use the sink, establish clear guidelines to avoid confusion and maintain efficiency. For example, designate specific times for dishwashing or assign responsibilities for cleaning the sink and surrounding area.
Conclusion
A temporary sink is an essential solution for maintaining convenience, hygiene, and efficiency during a kitchen remodel. By choosing the right location, setting it up with the proper materials, and adopting cost-effective options, you can create a practical system that meets your household needs throughout the renovation process.
Planning ahead and maintaining cleanliness in your temporary sink ensures it remains functional and supports a smooth kitchen workflow. Whether you opt for a DIY setup, rent a portable sink, or explore budget-friendly alternatives, the key is to prioritize usability and sanitation.
A well-thought-out temporary sink setup not only minimizes disruption to your daily routine but also reduces stress and improves the remodeling experience. With the strategies outlined in this guide, you can focus on your kitchen transformation while continuing to manage your household efficiently.
Remember, a temporary inconvenience can be easily managed with the right approach—making your dream kitchen closer than ever.