Is cold air sneaking in through the bottom of your exterior door? Are dust, insects, or moisture finding their way into your home? These are signs that it’s time to seal the bottom of your exterior door.
Sealing the bottom of an exterior door fixes these issues by blocking air leaks, improving energy efficiency, and protecting your floors from water damage.
Today, we’ll walk you through the clear steps and expert tips for a DIY door seal project. Whether you aim to stop a drafty door or keep bugs out, you’ll find practical solutions to weatherproof your exterior door effectively.
Why You Need to Seal the Bottom of Your Exterior Door
Unsealed gaps under exterior doors cause energy loss, discomfort, and potential damage to your home. Fixing a drafty door saves money and improves living conditions.
Save on Energy Bills
Air leaks under doors force heating and cooling systems to work harder. The U.S. Department of Energy reports that sealing gaps can reduce energy costs by 10-20% annually. A properly sealed exterior door keeps indoor temperatures stable, lowering utility bills.
Boost Home Comfort
Drafts from unsealed doors make rooms feel cold in winter and warm in summer. Stopping air leaks in a door ensures consistent indoor comfort. Sealing the bottom creates a barrier against outdoor air, making your home cozier year-round.
Keep Pests Out
Gaps under doors allow insects, rodents, and spiders to enter. According to Terminix, 30% of home pest issues stem from unsealed entry points. Sealing gaps under doors blocks these unwanted guests, protecting your home.
Protect Against Moisture
Water seeping under doors damages flooring and promotes mold growth. The Environmental Protection Agency notes that mold can develop within 48 hours of water exposure. A threshold seal prevents moisture intrusion, safeguarding wood, tile, or carpet floors.
Increase Home Value
Well-maintained homes with exterior door insulation appeal to buyers. The National Association of Realtors states that energy-efficient upgrades, like weatherproofing, can boost home value by up to 3%. Sealing door bottoms enhances curb appeal and marketability.
Types of Door Bottom Seals and Weather Stripping
Choosing the right seal for your exterior door ensures effective weatherproofing and durability. Four main types of door bottom seals address different needs, budgets, and installation preferences. Each offers unique benefits for sealing gaps under doors.

Door Sweeps
Door sweeps attach to the bottom of a door to close gaps against the threshold. They are affordable, costing $10-$30, and simple to install. Common materials include rubber, vinyl, or aluminum, with rubber offering flexibility for uneven surfaces.
Rubber sweeps suit cold climates, while aluminum provides durability. Door sweep installation takes 15-30 minutes, making it ideal for DIY projects. However, sweeps may wear out after 2-3 years of heavy use.
Threshold Seals
Threshold seals are installed on the floor beneath the door, creating a tight seal when the door closes. They cost $20-$50 and excel on uneven floors. Materials like vinyl, rubber, or metal ensure longevity, with metal lasting up to 10 years.
These seals handle high foot traffic and resist weather damage. Threshold seal installation requires precise measurements but enhances exterior door insulation. Some models need screws, which may challenge beginners.
Door Draft Stoppers
Door draft stoppers are fabric or foam barriers placed under the door without permanent installation. They cost $5-$15 and suit renters or temporary fixes. These stoppers block drafts and light but offer limited durability.
Unlike sweeps or thresholds, door draft stoppers are not ideal for exterior doors exposed to rain or snow. They work best indoors or in mild climates but need frequent replacement after 6-12 months.
Automatic Door Bottom Seals
Automatic door bottom seals retract when the door opens and seal when it closes. They cost $50-$100 and provide a sleek, high-end solution. Rubber or silicone seals ensure soundproofing and excellent under-door air blocker performance.
Installation takes 1-2 hours and may require drilling. These seals last 5-7 years and suit homes prioritizing aesthetics and energy efficiency. Their higher cost and complexity may deter casual DIYers.
Step-by-Step Guide to Sealing the Bottom of an Exterior Door
Sealing the bottom of an exterior door stops drafts, pests, and moisture, improving comfort and energy efficiency. This DIY project takes 30-60 minutes and requires basic tools. Follow these 6 detailed steps to install a door bottom seal or threshold seal for lasting weatherproofing exterior door results.

Step 1: Assess the Door and Gap
Measure the gap under the door to choose the right seal size. Gaps typically range from 1/8 to 1/2 inch. Use a measuring tape for accuracy.
Clean the door bottom and threshold with soap and water to ensure strong adhesion. Check for uneven floors or door misalignment, which may require adjustable seals.
Step 2: Choose the Right Seal
Select a seal based on door material and climate. Rubber seals work best for cold weather, while vinyl suits milder conditions. Metal doors need adhesive-backed seals, unlike wood doors, which accept screws.
- Door sweeps: Ideal for quick, affordable door sweep installation ($10-$30).
- Threshold seals: Best for uneven floors, offering durable threshold seal performance ($20-$50).
- Automatic seals: High-end option for soundproofing and aesthetics ($50-$100).
Consider durability and ease of installation. Rubber seals last 2-3 years, while metal thresholds endure up to 10 years.
Recommended for You: Best Adhesive for Weather Stripping
Step 3: Prepare the Seal
Cut the seal to match the door’s width using a hacksaw for metal or a utility knife for rubber/vinyl. Most exterior doors are 36 inches wide, but measure yours to confirm.
Test-fit the seal before permanent installation. Ensure it touches the threshold without dragging, as excessive friction wears seals faster. Sand rough edges for a clean fit, especially on DIY door seal projects.
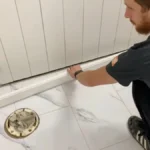
Step 4: Install the Door Bottom Seal
Installation varies by seal type. Follow these methods for a secure fit.
Installing a Door Sweep
Position the sweep on the door’s bottom edge, aligning it to cover the gap. Mark screw holes with a pencil.
Drill pilot holes if needed, then fasten the sweep with provided screws or adhesive. Ensure the sweep brushes the threshold lightly for optimal sealing gaps under doors. Installation takes 15-20 minutes.
Installing a Threshold Seal
Place the threshold seal on the floor beneath the closed door. Mark screw or adhesive placement. Clean the floor surface thoroughly.
Secure the threshold with screws or adhesive, ensuring a snug fit when the door closes. Metal thresholds require a drill, while vinyl may use adhesive. This step enhances exterior door insulation and takes 20-30 minutes.
Step 5: Test and Adjust
Open and close the door to check for smooth operation. Inspect for remaining gaps using a flashlight to spot light leaks. Apply caulk to small gaps for extra seal under door protection, drying in 24 hours.
Adjust the seal if it drags or leaves gaps. Tighten screws or reposition adhesive-backed seals. A properly installed seal reduces air leaks by up to 90%, per the U.S. Department of Energy.
Step 6: Maintain Your Door Seal
Clean seals every 3-6 months with mild soap to prevent wear. Inspect for cracks or detachment, especially after extreme weather.
Replace rubber seals every 2-3 years or sooner if damaged. Metal thresholds need less frequent replacement but check screws annually. Regular maintenance ensures long-term stop air leaks in door performance.
Related Read: How to Fix Gap at Bottom of French Doors
Tips for Maximizing Energy Efficiency and Weatherproofing
Sealing the bottom of an exterior door boosts energy savings and comfort, but additional steps enhance exterior door insulation. These 4 practical tips help to achieve better weatherproofing exterior door results and maintain long-term efficiency.

Seal All Door Edges
Gaps around the sides and top of a door allow air leaks, reducing the effectiveness of a bottom seal. Apply weather stripping, like foam or rubber strips, to these edges. A comprehensive door sealing cuts energy loss by up to 25%.
Weather stripping costs $5-$20 and installs in 10-15 minutes. Ensure strips fit snugly without obstructing door movement for optimal stop air leaks in door performance.
Consider a Storm Door
Storm doors add an extra layer of protection against drafts, rain, and heat. They cost $100-$400 and improve insulation by 15%, according to the U.S. Department of Energy. Aluminum or fiberglass storm doors with glass panels allow light while blocking weather.
Professional installation takes 1-2 hours, but DIY options save $50-$100. Storm doors also protect the main door, extending its lifespan.
Use a Smart Thermostat
Smart thermostats monitor energy use and adjust heating or cooling to maintain efficiency. Models like Nest or Ecobee, priced at $100-$250, detect savings from sealing efforts. A smart thermostats reduce energy bills by 10-12% annually.
Pairing a sealed door with a smart thermostat maximizes exterior door insulation benefits. Setup takes 30 minutes and requires no special tools.
Inspect Seals Seasonally
Weather changes wear out seals over time. Check door seals every 3-6 months, especially before winter or rainy seasons. Look for cracks, loose screws, or worn rubber.
Replace damaged seals promptly to maintain sealing gaps under doors. Cleaning seals with soap and water every 6 months prevents dirt buildup, ensuring a tight fit.
Conclusion
Sealing the bottom of an exterior door saves energy, blocks pests, and protects your home from moisture. Follow the steps in this guide to install a durable seal that enhances comfort and cuts utility costs. Choose the right seal for your door and climate to ensure long-lasting, weatherproof exterior door results. Share your DIY success or ask questions in the comments below.
You May Read Also: Gap Under Exterior Door Threshold? Seal It Now