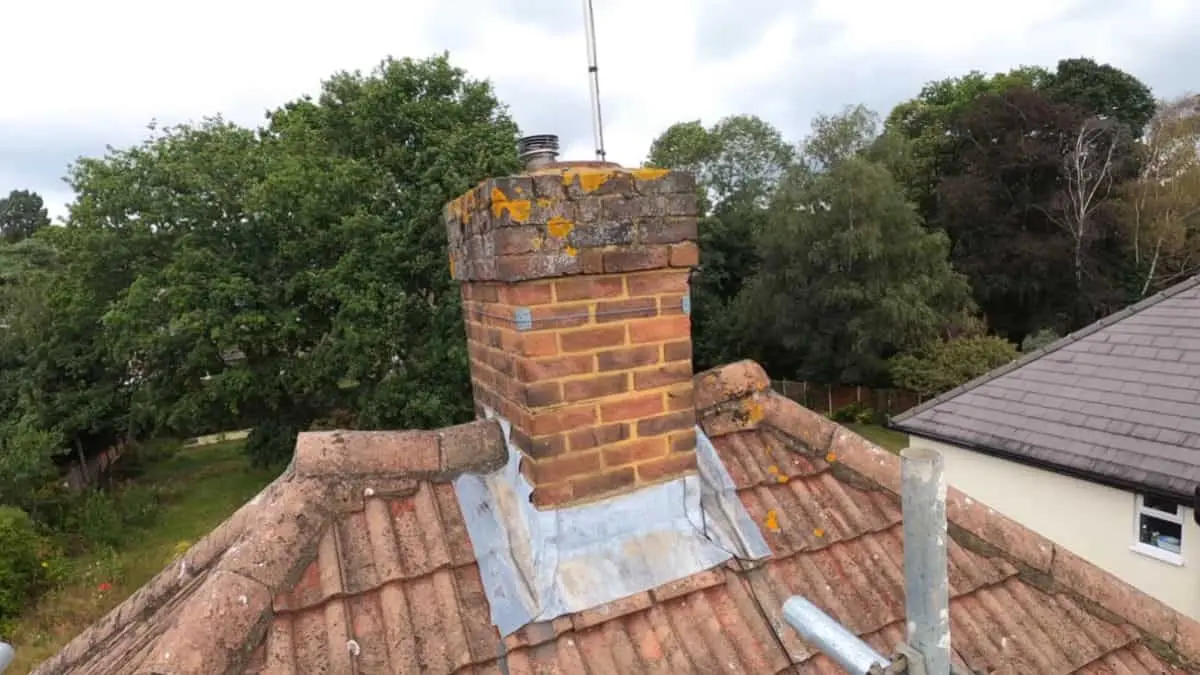
Homeowners often choose to remove a chimney above the roof line to modernize their home’s appearance, fix persistent roof leaks, or reduce maintenance costs. The process involves carefully demolishing the chimney stack above the roof and sealing the area to prevent water damage. This task requires attention to safety, structural integrity, and proper roof patching.
Whether tackling a DIY chimney removal or hiring a professional, understanding the steps ensures a successful project. This guide explains the process, costs, safety tips, and roof repair techniques for removing a chimney above the roof line effectively.
Why Remove a Chimney Above the Roof Line?
Homeowners decide to remove a chimney above the roof line for practical and aesthetic reasons.
Common Reasons for Chimney Removal
Homeowners often remove unused chimneys to address specific issues or achieve design goals. Key reasons include:
Modernizing home exteriors: Brick chimneys may not match contemporary architectural styles, such as minimalist or industrial designs.
Preventing roof leaks: Aging chimneys with cracked mortar or damaged flashing often cause water damage to roofs and interiors.
Reducing maintenance: Chimneys require regular cleaning and repairs, which can be costly and time-consuming.
Optimizing roof space: Partial chimney removal creates usable roof space for additions like skylights or solar panels.
Benefits of Removing a Chimney Stack
Removing a chimney above the roof line offers several advantages for homeowners. These include:
Improved energy efficiency: Sealing unused chimney flues prevents heat loss, reducing heating and cooling costs.
Enhanced roof durability: Proper roof patching after chimney removal strengthens the roof against weather damage.
Increased home value: A modernized exterior can appeal to buyers, especially in markets favoring sleek designs.
Reduced repair costs: Eliminating the chimney stack avoids future expenses for masonry or flue maintenance.
Step-by-Step Guide to Remove Chimney Above Roof Line
Removing a chimney above the roof line requires careful planning, proper tools, and attention to safety to ensure a smooth process and a leak-free roof. Here is a detailed guide to demolishing the chimney stack and patching the roof, suitable for experienced DIYers or as a reference for overseeing professional work. Follow these steps to achieve a safe and effective chimney removal.
Step 1: Assess the Chimney and Roof
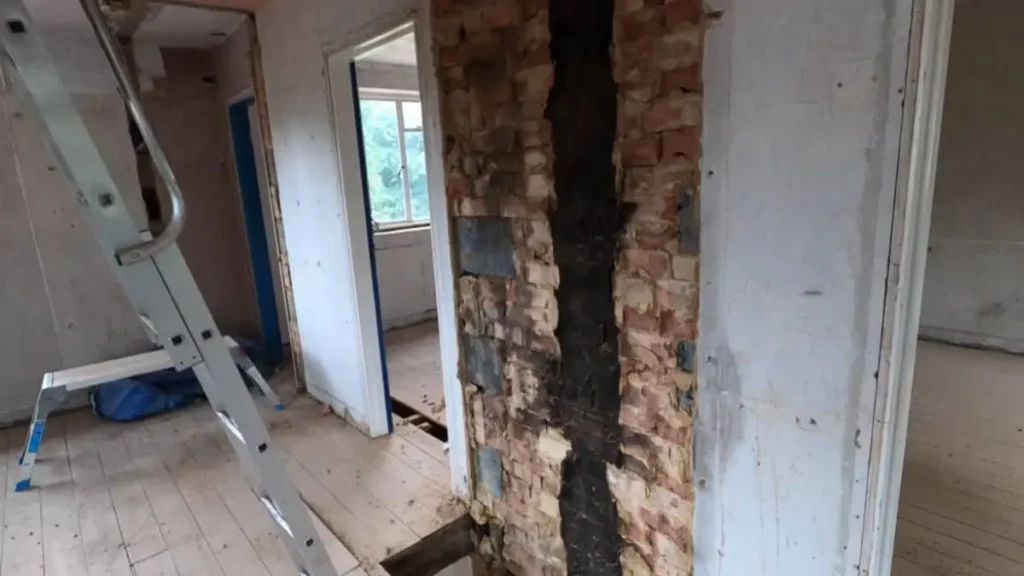
Before starting, evaluate the chimney and roof to identify potential challenges. A thorough assessment prevents structural damage and ensures compliance with local regulations. Inspect the chimney for cracks, loose bricks, or signs of deterioration, which can complicate demolition. Check if the chimney is tied to load-bearing walls, as 15% of chimneys in older homes are.
This requires a structural engineer’s consultation, costing $300 to $1,000. Examine the roof’s condition, noting the type of shingles and flashing around the chimney. Obtain necessary permits, as 90% of municipalities require them for chimney demolition, with fees ranging from $50 to $200. Failure to secure permits can lead to fines of $100 to $500.
Step 2: Gather Tools and Safety Equipment
| Item | Purpose |
| Sledgehammer | Breaks down bricks during demolition |
| Masonry Chisel | Removes bricks with precision |
| Reciprocating Saw | Cuts through masonry for faster demolition |
| Ladder | Provides safe roof access |
| Scaffolding | Ensures stable platform for roof work |
| Roofing Harness | Prevents falls during roof work |
| Tarps | Protects roof and collects debris |
| Wheelbarrow | Transports debris off-site |
| Hard Hat | Protects head from falling debris |
| Safety Goggles | Shields eyes from dust and debris |
| Gloves | Protects hands from sharp bricks and tools |
| Dust Mask | Prevents inhalation of silica dust |
Step 3: Prepare the Work Area
Preparation protects the roof and surrounding areas during demolition. Cover the roof with tarps to shield shingles from falling bricks, which can damage asphalt shingles costing $100 to $300 to replace. Set up scaffolding or a secure ladder to access the chimney safely. Carefully remove existing roof flashing and shingles around the chimney base using a pry bar to avoid tearing the underlayment.
Inside the home, cover the fireplace opening with plastic sheeting to prevent dust from entering, as chimney demolition generates significant debris. Clear nearby gutters and downspouts to avoid blockages. Proper preparation reduces cleanup time and prevents costly roof repairs.
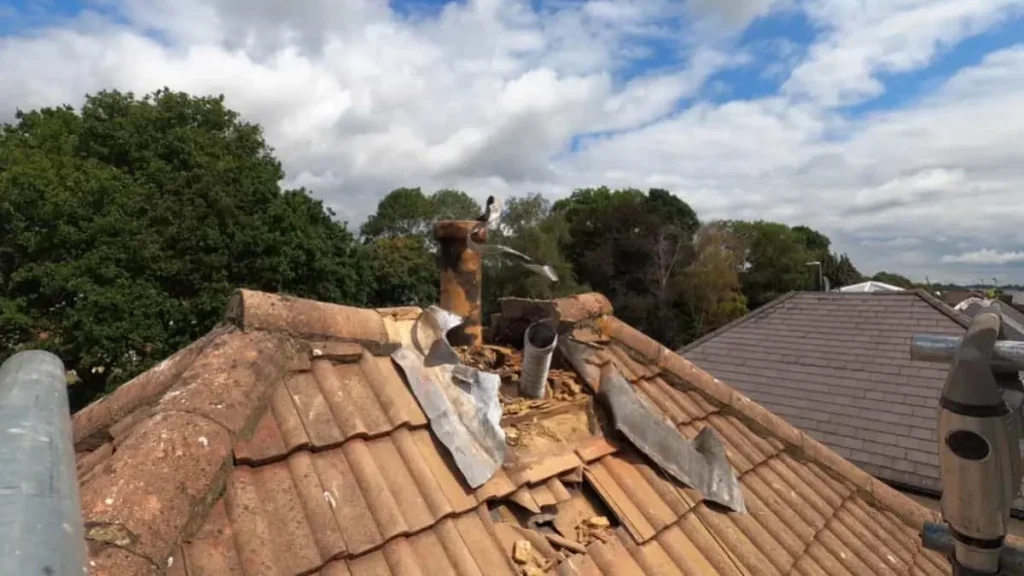
Step 4: Demolish the Chimney Above Roof Line
Demolition requires controlled techniques to safely remove the chimney stack. Begin at the top, breaking down bricks layer by layer with a sledgehammer or masonry chisel. A reciprocating saw with a masonry blade speeds up the process for $50 to $150. Work in small sections to avoid overloading the roof, as a single-story chimney can weigh 500 to 1,000 pounds.
Collect debris in buckets and lower it using a rope or chute to prevent damage to landscaping or siding below. For multi-story chimneys, consider professional help, as they require advanced scaffolding and structural checks. Dispose of debris at a local landfill, with fees averaging $20 to $50 per load.
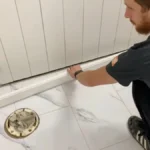
Step 5: Patch and Seal the Roof
Patching the roof properly prevents leaks and maintains structural integrity. Install plywood or oriented strand board (OSB) over the chimney hole, securing it to the roof deck with nails. This costs $10 to $30 for materials. Apply a waterproof membrane, such as peel-and-stick underlayment, over the patch, priced at $50 to $100 per roll.
Install new flashing around the patched area to direct water away, using aluminum flashing costing $20 to $50. Replace shingles to match the existing roof, blending seamlessly to maintain appearance. Seal all edges with roofing cement, which costs $5 to $15 per tube, to ensure a watertight finish. A poorly sealed roof can lead to leaks costing $500 to $2,000 to repair.
Step 6: Clean Up and Inspect
Final cleanup and inspection ensure the project’s success. Remove all debris, tools, and tarps from the roof to prevent damage. Dispose of remaining bricks and materials responsibly, as recycling centers may accept clean masonry for free. Inspect the patched area for gaps or weak spots, checking flashing and shingles for secure attachment.
Test for leaks by spraying water over the repaired area with a hose for 5 to 10 minutes. Look for water stains inside the home near the former chimney location. A successful patch withstands weather, extending roof life by 5 to 10 years. If issues arise, consult a roofing professional to address them promptly.
Read Also: 5 Essential Things to Consider When Replacing a Roof
Safety Tips for Chimney Removal
Safety is critical when removing a chimney above the roof line to prevent injuries and property damage. Demolition and roof work involve risks like falls, falling debris, and dust exposure.
Use Fall Protection on the Roof
Working on a roof poses a significant fall risk, which accounts for 38% of construction-related injuries. Always wear a fall protection harness anchored to a secure point, such as a roof anchor or chimney base. Harnesses cost $50 to $150 and must meet OSHA standards.
Use a sturdy ladder or scaffolding, priced at $100 to $300 per day to rent, to access the roof safely. Ensure ladders are placed on firm, level ground and extend 3 feet above the roof edge. Check weather conditions before starting, as wet or icy roofs increase slip hazards.
Avoid Working in Poor Weather Conditions
Weather impacts safety during chimney removal. High winds, rain, or snow make roofs slippery and dangerous. Winds above 20 mph can destabilize ladders or scaffolding, per the National Weather Service safety guide. Schedule demolition for calm, dry days with temperatures between 40°F and 80°F to ensure stable footing and comfortable working conditions.
If unexpected weather arises, stop work and secure tools and debris to prevent them from blowing off the roof, which could damage property or injure others below.
Work with a Helper or Spotter
Having a helper or spotter enhances safety during chimney demolition. A second person can monitor ladder stability, assist with debris removal, and call for help in emergencies. For DIY projects, a spotter reduces the risk of accidents. The helper can manage buckets of debris, costing $10 to $20 each, and ensure tarps stay in place to protect the roof. For large chimneys weighing 500 to 1,000 pounds, a helper is essential to safely lower heavy materials using ropes or chutes.
Check for Asbestos in Older Chimneys
Older chimneys, especially in homes built before 1980, may contain asbestos in flue liners or insulation, which poses serious health risks if disturbed. Before demolition, hire a certified asbestos inspector, costing $200 to $500, to test the chimney. If asbestos is present, professional removal is required, adding $500 to $2,000 to the project cost. Never attempt to remove asbestos yourself, as improper handling can release harmful fibers into the air.
Wear Proper Respiratory and Protective Gear
Chimney demolition generates dust and debris, which can irritate lungs and eyes. Wear a dust mask or respirator, priced at $10 to $50, to protect against silica dust from bricks. Safety goggles, costing $5 to $20, shield eyes from flying particles. Use heavy-duty gloves ($10 to $30) to handle sharp bricks and tools like sledgehammers or chisels.
A hard hat, priced at $20 to $50, protects against falling debris. Ensure all gear fits properly and meets safety standards to maintain protection throughout the project.
DIY vs. Hiring a Professional for Chimney Removal
Deciding whether to remove a chimney above the roof line yourself or hire a professional depends on your skills, budget, and project complexity. Here I’ll compares the two approaches, highlighting their advantages, drawbacks, and when each is most appropriate to ensure a safe and effective chimney demolition.
Pros and Cons of DIY Chimney Removal
Tackling a chimney removal as a DIY project appeals to homeowners with construction experience and a desire to save money. However, it comes with significant risks that require careful consideration.
Advantages of DIY Chimney Removal
A DIY approach offers cost savings and flexibility. Homeowners with masonry or roofing experience can complete the project using rented tools and materials, spending $350 to $1,000 on average. This is much lower than professional fees.
DIYers also control the project timeline, working at their own pace without scheduling contractors. For small, single-story chimneys with no structural complications, DIY removal can be a rewarding option.
Challenges of DIY Chimney Removal
DIY chimney removal involves serious safety hazards. Working on a roof without proper fall protection risks injury from falls, which account for 38% of construction-related injuries. Falling bricks or debris can also cause harm. Improper roof sealing may lead to leaks, costing $500 to $2,000 to repair.
Many DIYers lack expertise in assessing structural dependencies, potentially compromising the home’s stability. Local building codes often require permits, and non-compliance can result in fines of $100 to $500.
| DIY Chimney Removal | Pros | Cons |
| Cost | Saves $1,000–$4,000 compared to professional services. | Requires investment in tools ($200–$500) and materials ($100–$300). |
| Control | Full control over timeline and process. | Risk of errors due to lack of expertise. |
| Safety | None—relies on personal precautions. | High risk of falls, debris injuries, or structural damage. |
| Compliance | Flexible if permits are obtained. | Fines for missing permits or code violations. |
When to Hire a Contractor
Hiring a professional is often the safer and more reliable choice for chimney removal, especially for complex projects. Contractors bring expertise, equipment, and compliance with regulations, though costs are higher.
Situations Requiring Professional Help
Professionals are essential for multi-story chimneys, shared chimney stacks in townhomes, or chimneys tied to load-bearing walls. These projects require structural assessments to prevent damage, which 85% of homeowners overlook.
Contractors handle local permits, ensuring compliance with building codes. They also manage asbestos risks in older chimneys, which requires specialized removal costing $500 to $2,000 extra. For homeowners without roofing or masonry skills, professionals minimize the risk of leaks or costly repairs.
Benefits of Hiring a Contractor
Professionals complete projects faster, often in 1–3 days, compared to 5–10 days for DIY efforts. They use specialized equipment like scaffolding and pneumatic chisels, ensuring precise demolition. Licensed contractors carry insurance, protecting homeowners from liability for worker injuries. Their expertise in roof patching and sealing prevents water damage, which affects 20% of improperly sealed roofs.
| Hiring a Contractor | Pros | Cons |
| Cost | Predictable pricing with warranties. | Higher costs ($1,500–$5,000). |
| Expertise | Trained in structural and safety protocols. | Limited control over timeline. |
| Safety | Insured and equipped for safe demolition. | None—professionals handle risks. |
| Compliance | Handles permits and code requirements. | May require scheduling delays. |
Key Considerations for Your Decision
Compare your skills, time, and budget against the project’s demands. For small, non-structural chimneys on single-story homes, DIY removal is feasible with proper safety measures. Complex projects involving multi-story homes, shared walls, or asbestos require professional expertise.
Always check local regulations, as 90% of municipalities mandate permits for chimney demolition. Weigh the risk of costly repairs from DIY errors against the upfront cost of hiring a contractor to make an informed choice.
Cost Breakdown of Chimney Removal
Understanding the costs of removing a chimney above the roof line helps homeowners plan their budget effectively. Expenses vary based on whether you choose a DIY approach or hire a professional, as well as factors like chimney size, roof complexity, and location.
DIY Chimney Removal Costs
A DIY approach can save money for homeowners with roofing or masonry experience, but it still involves specific expenses. Total costs typically range from $350 to $1,000, depending on the tools and materials required. Renting equipment, such as scaffolding or a reciprocating saw, costs $100 to $300 per day. Purchasing safety gear, like a fall protection harness, goggles, and a dust mask, adds $50 to $150.
Materials for patching the roof, including plywood, waterproof membrane, flashing, and shingles, cost $100 to $300. Permit fees, required in 90% of municipalities per a 2023 National League of Cities report, range from $50 to $200. These costs assume a single-story chimney with no structural complications. Unexpected issues, like damaged roof decking, can increase expenses by $100 to $500 for repairs.
Professional Chimney Removal Costs
Hiring a professional ensures expertise and compliance but comes with higher costs, typically $1,500 to $5,000. The price depends on chimney size, material, and roof complexity. For example, removing a single-story brick chimney averages $2,000, while a multi-story stone chimney can cost $4,500. Labor rates, which vary by region, account for 50% to 70% of the total.
Additional expenses may include structural assessments ($300 to $1,000) or asbestos removal ($500 to $2,000) for older chimneys built before 1980. Roof repairs, such as replacing shingles or flashing, add $300 to $1,000. Professionals often include a 1- to 5-year warranty on their work, covering potential leaks or patching issues, which adds value to the higher upfront cost.
Factors Affecting Professional Costs
Several variables influence professional chimney removal costs. Larger chimneys, exceeding 10 feet in height, require more labor and scaffolding, increasing prices by $500 to $1,500. Complex roofs, such as those with steep slopes or slate tiles, raise costs due to specialized equipment and expertise, adding $200 to $800.
Urban areas with higher labor rates can push costs toward the upper end of the range, while rural areas may be 10% to 20% cheaper. If the chimney shares a wall with a neighboring property, coordination and additional structural work can add $1,000 to $3,000. Always request multiple quotes to compare pricing, as costs can vary by 15% to 25% between contractors.
Additional Costs to Consider
Both DIY and professional projects may incur extra expenses. Asbestos testing, required for older homes, costs $200 to $500, and removal adds $500 to $2,000 if detected. Structural reinforcements, needed if the chimney supports a wall, range from $1,000 to $3,000. Debris disposal fees, charged by landfills or recycling centers, average $20 to $50 per load.
For DIYers, renting a dumpster for large projects costs $300 to $500. If roof damage occurs during demolition, repairs like replacing underlayment or shingles add $100 to $500. Budgeting for these potential costs ensures no surprises during the project.
| Cost Category | DIY Costs | Professional Costs |
| Tools/Equipment | $100–$300 (rentals) | Included in labor |
| Materials | $100–$300 | $300–$1,000 |
| Permits | $50–$200 | $50–$200 |
| Labor | None | $1,000–$3,500 |
| Additional Fees | $20–$500 (disposal, repairs) | $500–$3,000 (asbestos, structural work) |
| Total | $350–$1,000 | $1,500–$5,000 |
You May Also Like: 5 Home Fixes You Must Complete Before Selling
Conclusion
Removing a chimney above the roof line enhances a home’s appearance, prevents leaks, and reduces maintenance. Proper planning, safety measures, and roof patching ensure a successful project. DIYers with experience can save money, while complex projects benefit from professional expertise, costing $1,500 to $5,000.
Evaluate your skills and budget to choose the best approach. For further guidance, explore roofing repair guides or consult a contractor for complex chimney demolition.