
To reinforce garage ceiling joists, sister new lumber to existing joists for added strength and support. This simple method strengthens the structure and prevents sagging or bowing over time.
Reinforcing garage ceiling joists is crucial for maintaining the integrity of the overall structure and ensuring safety. By following the correct steps and using the right materials, you can effectively reinforce the joists and enhance the stability of your garage ceiling.
In this guide, we will explore the process of reinforcing garage ceiling joists in detail, providing you with the knowledge and confidence to tackle this project successfully. Whether you are a seasoned DIY enthusiast or a first-time homeowner, reinforcing your garage ceiling joists is a manageable task that can significantly improve the durability and longevity of your garage.
Assessing the Current Condition of Joists
Before starting any project to reinforce garage ceiling joists, it is important to assess the situation and identify any weak areas. Understanding load requirements is also essential to ensure that the reinforcement is done correctly and effectively.
Identifying Weak Spots
Begin by carefully inspecting the ceiling joists for signs of wear, damage, or structural weakness. Look for visible cracks, warping, sagging, or indications of wood rot, as these are signs that the joists may need immediate attention. Pay close attention to areas where joists intersect or connect to other structural elements, as these points are more susceptible to stress and damage over time. Using a flashlight can help you spot even the smallest imperfections.
Evaluating Load Requirements
The next step is to evaluate the load requirements of your garage ceiling. Consider the current weight being supported by the joists, including the roof structure, insulation, stored items, and any additional loads. If you plan on using the ceiling for future storage, you’ll need to account for the increased weight. Consult building codes and local regulations to determine safe load limits for your specific structure. It may also be helpful to consult with a structural engineer to obtain precise load calculations.
Checking for Additional Strain Factors
External factors, such as exposure to moisture, fluctuating temperatures, or improper ventilation, can put additional strain on the joists. Inspect the garage for signs of leaks, excess humidity, or poor airflow, as these can weaken materials over time. Addressing these environmental issues as part of your preparation can prevent future damage and ensure the reinforcement process is effective.
Measuring and Planning
Accurate measurements of your garage space and joist layout are essential at this stage. Measure the spacing between joists, the length and width of the area, and the dimensions of the joists themselves. These measurements will help determine the quantity and size of materials needed for reinforcement. Take this opportunity to map out your reinforcement plan, considering the most effective ways to distribute added support evenly.
Choosing the Reinforcement Method
There are various approaches to reinforcing garage ceiling joists, and selecting the right one will depend on your needs and the current structure. Some common methods include:
- Sistering: Adding identical or similar-sized wood joists alongside the existing ones to strengthen the beam.
- Flitch Plates: Bolting metal plates to the sides of the joists for added strength and rigidity.
- Cross Bracing: Installing diagonal supports between joists to minimize lateral movement and distribute weight evenly.
- Beam Installation: Adding additional beams across the ceiling to support load-bearing joists.
Each of these methods has its advantages, and your choice should align with the level of reinforcement required and the feasibility of installation.
Calculating Materials and Costs to Reinforce Garage Ceiling Joists
Accurately calculating the materials and costs for reinforcing garage ceiling joists is a critical step in ensuring the project stays within budget while meeting structural requirements. Below are the detailed steps to guide the process:

1. Assess the Reinforcement Method
Before calculating materials, determine which reinforcement technique will be used, such as metal plate bolting, cross bracing, or beam installation. Each method will require different types and quantities of materials, which will significantly influence overall costs.
2. Measure the Ceiling Joist Dimensions
Measure the length, width, and spacing of the existing joists. These measurements are essential for determining the amount of material required for reinforcement. For example, longer joists may need more cross braces or larger metal plates, while closely spaced joists might require more fasteners.
3. Create a Material List
Based on the chosen method, compile a detailed list of materials. This list might include:
- Metal Plates – Specify the size, type, and number of plates needed for bolting.
- Cross Bracing Material – Include the length of wood or metal for diagonal supports.
- Beams – Identify the dimensions and quantity of beams for load-bearing reinforcement.
- Fasteners – Account for screws, bolts, or nails needed to secure the reinforcement materials.
- Adhesives or Specialized Tools – Depending on the method, consider whether additional bonding agents or tools are required.
4. Calculate Quantities
Using the measurements and method-specific requirements, determine the exact quantities of each material. For instance, if using cross bracing, calculate the total length of wood or metal required based on the number and spacing of braces across the joist area.
5. Collect Material Pricing
Research prices for the materials listed. Prices can vary depending on the quality, supplier, and geographic location. Visit local hardware stores, browse online marketplaces, or consult with building material suppliers for accurate and up-to-date pricing.
6. Include Labor Costs
If the project will involve hiring professionals, factor in labor costs. Costs may vary based on the complexity of the job, the contractor’s rates, and the time required for installation.
7. Add a Contingency Budget
Set aside an additional 10–15% of the total material and labor estimate as a contingency budget. This ensures that unexpected expenses, such as surplus materials or additional tools, do not derail the project.
Similar Post: How to Reinforce Floor Joists for Plumbing
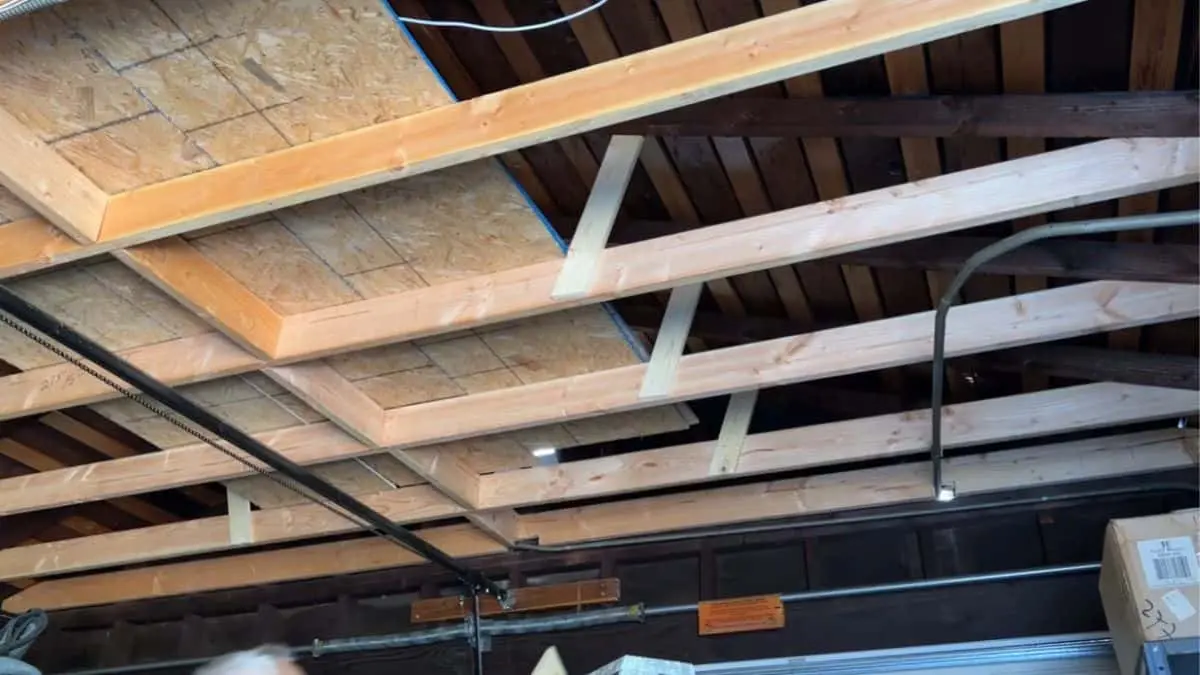
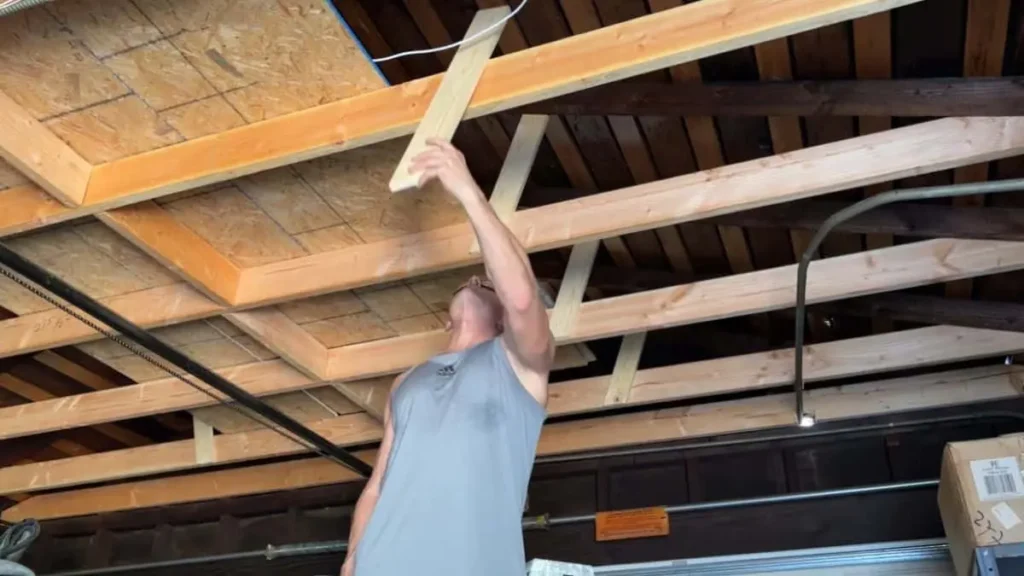
Reinforcing Garage Ceiling Joists
When reinforcing garage ceiling joists, the reinforcement process is a critical step to ensure structural integrity and safety. The reinforcement process involves installing additional joists and attaching support beams to provide extra strength and stability to the existing structure.
Assessing the Current Structure
Before beginning the reinforcement process, it is crucial to assess the current condition of the ceiling joists. Inspect for any signs of damage, such as cracks, warping, or wood rot, which may compromise the structure’s integrity. Ensure that the joists are still securely attached to the surrounding framework, and identify any weak points that might require additional attention.
Selecting the Right Materials
Choosing the appropriate materials for reinforcement is essential for a successful project. Opt for high-quality wood or metal beams that match the specifications of the existing structure. Ensure that the materials are strong enough to handle increased loads, especially if the garage ceiling is intended to support storage or additional weight.
Installing Additional Joists
To improve the load-bearing capacity, install additional joists parallel to the existing ones. These joists should be evenly spaced and securely fastened to ensure stability. Use metal joist hangers or brackets to attach the new joists to the ceiling structure, providing extra support and preventing any movement over time.
Attaching Support Beams
Support beams are a vital component of the reinforcement process, as they distribute weight evenly across the structure. These beams should be installed perpendicular to the joists to maximize strength. Secure them using heavy-duty bolts or screws, ensuring they are firmly anchored into the wall or other structural elements for added support.
Reinforcing Connections
Strengthening the connections between the joists and beams is another critical step. Apply metal plates, braces, or gussets to reinforce these junctions and reduce the risk of separation or failure. Tighten all bolts, screws, and fasteners to eliminate any loose connections and improve overall stability.
Testing for Stability
Once all reinforcements are in place, carefully test the stability of the ceiling joists. Gradually apply weight to ensure the structure can handle the intended load without signs of strain or weakness. Address any adjustments needed before completing the project to confirm the ceiling system is safe and reliable.
Final Inspections
After reinforcement is complete, perform a thorough final inspection. Look for any missed areas or improperly secured components and address them promptly. Ensuring everything is in place provides peace of mind and guarantees the longevity of the garage ceiling joists.
If you’re looking to maximize your garage storage space, it’s crucial to ensure your ceiling structure can handle the extra weight. While reinforcing garage rafters is a common approach, you might also need to reinforce garage ceiling joists to provide additional support and prevent structural issues. By strengthening both the rafters and joists, you can create a safer and more reliable overhead storage solution.
Tips for Long-Term Maintenance
Proper maintenance of your garage ceiling joists is key to ensuring their durability and functionality for years to come. Regularly checking their condition and addressing small issues early can prevent costly repairs in the future. Here are some practical tips for long-term maintenance:
Control Moisture Levels
Excessive moisture can weaken wood joists over time, leading to structural problems. Ensure your garage is properly ventilated to reduce humidity levels. If you notice leaks or condensation, address them immediately by sealing cracks or using a dehumidifier.
Avoid Overloading
While joists are designed to bear certain loads, overloading them with unnecessary weight can cause strain or even damage. Be mindful of what you store in the attic or on any overhead shelving, and distribute weight evenly to avoid stressing a single area.
Reinforce When Needed
Over time, as your needs change or the joists age, they may require reinforcement. This might mean adding additional brackets, beams, or supports. Consult a professional to assess whether reinforcement is necessary and to ensure it’s completed correctly.
Address Problems Promptly
If you notice anything concerning—like creaking noises, cracks, or sagging—don’t wait to act. Ignoring these issues can lead to more extensive damage over time. Consider hiring a contractor or structural engineer to assess the situation and recommend the best course of action.
Monitor for Pests
Pests like termites or rodents can wreak havoc on wooden joists. Regularly inspect for signs of infestations, such as droppings, chew marks, or hollowed wood. If you detect pests, address the issue immediately with pest control services to prevent further damage.
Conclusion
In strengthening garage ceiling joists, safety and stability are top priorities. By following proper reinforcement techniques, you can ensure a secure structure. Understanding the importance of this process is key to maintaining the integrity of your garage. Protect your property with a well-maintained ceiling structure.
So, it is always advisable to regularly inspect and reinforce garage ceiling joists to avoid any potential risks. With the right materials, tools, and techniques in place, this task can be easily accomplished. Remember to prioritize safety at all times and consult with professionals if needed for a successful reinforcement project. Happy reinforcing!

