A raised bathroom on a concrete slab is an innovative solution for homeowners looking to improve both the functionality and aesthetics of their bathroom. In homes with a concrete slab foundation, installing or remodeling a bathroom can present unique challenges, particularly with plumbing. However, raising the bathroom floor above the slab offers an effective way to address these issues without the need for invasive slab cutting.
This guide will explore the many benefits of a raised bathroom, discuss common challenges, and provide a step-by-step process for building one. Whether you’re planning a DIY project or working with a contractor, understanding the necessary tools, materials, and potential costs can help ensure the success of your remodel.
Additionally, we’ll highlight expert tips, common mistakes to avoid, and why a raised bathroom may be the perfect solution for your home.
Benefits of a Raised Bathroom on a Concrete Slab
A raised bathroom provides several key advantages for homeowners with concrete slab foundations. From increasing design flexibility to making plumbing modifications easier, this approach offers practical and aesthetic improvements. Below, we’ll dive into the specific benefits and why this solution is becoming increasingly popular.

Aesthetic Versatility
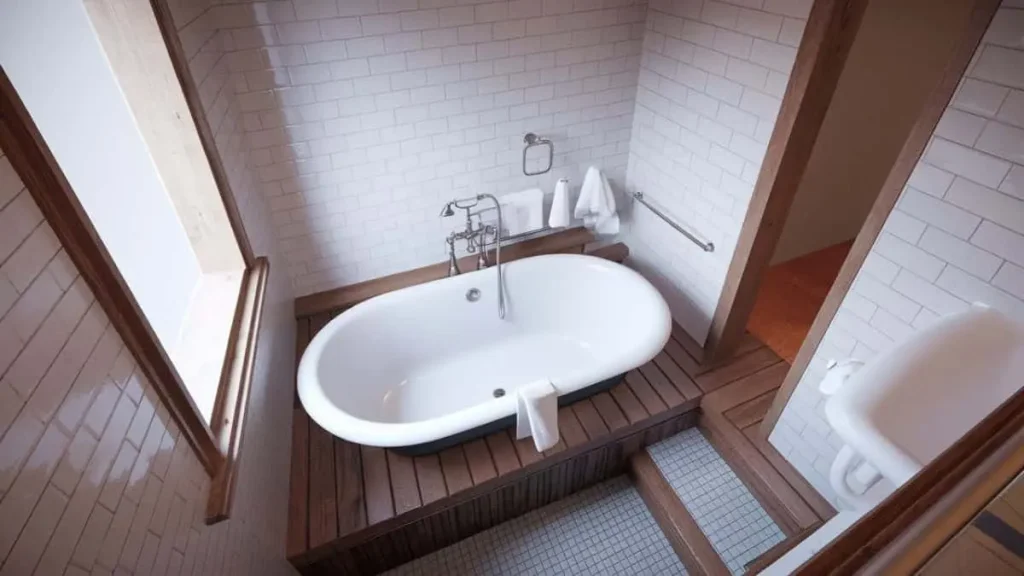
One of the main advantages of raising a bathroom floor is the enhanced design flexibility it offers. When a bathroom is raised off the concrete slab, homeowners have the freedom to choose from a wider variety of flooring materials. This can include luxurious options such as natural stone tiles, ceramic tiles, or even hardwood, which may not have been feasible directly on a slab due to moisture concerns.
Additionally, raising the bathroom floor can allow for the installation of modern, stylish fixtures, such as walk-in showers, freestanding bathtubs, or recessed lighting that would otherwise require modifications to the existing slab. The extra space created beneath the elevated floor can also be used to discreetly run electrical wiring and hide any necessary utilities, leaving the bathroom with a sleek, uncluttered appearance.
Plumbing Flexibility
A raised bathroom offers significant advantages in terms of plumbing. In a traditional bathroom built directly on a concrete slab, running new plumbing pipes or altering existing ones can be extremely difficult and costly, as it requires cutting into the concrete. This process can not only be disruptive but also time-consuming and expensive.
By raising the bathroom floor, plumbing can be run in the space created between the slab and the new subfloor, eliminating the need to break into the slab. This makes it much easier to install new fixtures like sinks, toilets, or bathtubs without the extensive labor typically associated with slab-based plumbing work. It also simplifies future plumbing repairs, since the pipes are more accessible and easier to service without damaging the concrete slab.
Improved Drainage and Ventilation
Raising the bathroom off the slab can enhance the bathroom’s drainage system. Elevating the floor allows for the installation of more efficient drainage solutions because pipes can be angled more appropriately to ensure better flow. This is especially helpful in areas where water buildup or poor drainage has been an issue.
Additionally, the space created between the slab and the raised floor provides room for better ventilation systems. Good ventilation is crucial in preventing moisture buildup, which can lead to mold and mildew growth. A well-ventilated bathroom, with proper airflow beneath the floor, is less likely to suffer from moisture-related problems, ensuring a longer lifespan for the materials used and a healthier indoor environment.
Insulation Benefits
Bathrooms built directly on concrete slabs can often feel cold, especially in colder climates. By raising the bathroom floor, homeowners have the opportunity to add insulation beneath the subfloor, which can make the space warmer and more comfortable. Insulation helps to retain heat, reducing the need for additional heating in the bathroom and improving energy efficiency throughout the home.
This added insulation can also serve as a sound barrier, reducing noise from plumbing or other activities within the bathroom. The extra layer of insulation keeps heat in and helps block the cold that can seep up through an uninsulated concrete slab, leading to a more pleasant bathroom experience, especially during colder months.
Challenges of Installing a Raised Bathroom
While the benefits of a raised bathroom on a concrete slab are numerous, there are also several challenges that homeowners should consider before beginning this type of project. These challenges range from construction complexities to potential cost implications.
Increased Construction Complexity
One of the primary challenges of installing a raised bathroom is the added complexity it brings to the construction process. Unlike a standard bathroom remodel, raising the floor requires careful planning and execution. The subfloor must be built to withstand the weight of bathroom fixtures, and special attention must be given to ensuring that the structure is level and stable. Improper framing or lack of support can lead to uneven floors or structural problems over time.
Additionally, the surrounding areas of the home may be impacted. When the bathroom floor is raised, the transition from adjacent rooms must be seamless, and any doors leading into the bathroom may need to be adjusted for the new floor height.
This can involve cutting down the doors or raising the door frame itself, both of which add complexity to the overall remodel. Such intricacies require skilled craftsmanship and a detailed approach, often making this type of project more challenging than standard bathroom remodels.
Height Restrictions
Another common challenge is the potential impact on ceiling height. In homes with lower ceilings, raising the bathroom floor can reduce the usable vertical space. Bathrooms are already compact areas, and reducing the height can make the space feel even smaller or cramped. This can be particularly problematic if homeowners are looking to install tall fixtures, such as large vanities or full-height cabinets.
If the existing ceiling height is limited, it’s important to carefully calculate how much height the raised floor will occupy and determine whether the remaining ceiling height will be adequate for comfort and design. In some cases, homeowners may need to explore alternative options, such as lowering the ceiling in adjacent areas to maintain proportionality throughout the home.
Cost Considerations
Raising a bathroom on a concrete slab can involve higher costs compared to a typical remodel. The need for additional materials, such as wood joists, subflooring, and insulation, can significantly increase the budget. Moreover, the labor costs tend to rise due to the increased complexity of the construction process. Specialized trades, such as plumbers and electricians, may also charge more since adjustments to plumbing and electrical lines are often required when the bathroom floor is elevated.
Beyond material and labor expenses, there may be unforeseen costs, such as the need for structural reinforcements if the existing foundation is not adequate to support the added weight of the raised floor and fixtures. Homeowners should plan for a higher initial investment and ensure that their budget has some flexibility to account for these potential costs.
Structural Load
The additional weight that comes with a raised bathroom can also pose a challenge. A concrete slab foundation is designed to support the weight of a home, but adding a raised subfloor and heavy bathroom fixtures—such as bathtubs or large tile installations—adds extra load to the structure. If the slab or foundation is not strong enough to bear this additional weight, structural issues may arise.
Before proceeding with the installation of a raised bathroom, it is essential to have the foundation assessed by a structural engineer. This ensures that the slab can handle the increased load and helps prevent problems such as sagging or cracking. Addressing the structural integrity of the foundation at the beginning of the project is crucial for avoiding costly repairs in the future.
“In every challenge, there is an opportunity for growth.” – Reynard Lowel
How to Build a Bathroom on a Concrete Slab: Step-by-Step
Building a bathroom on a concrete slab involves multiple stages that require careful planning and execution. From assessing the existing space to installing the final fixtures, each step must be completed with precision to ensure the bathroom functions properly and lasts for years. Below is a detailed step-by-step process to help guide homeowners or contractors through the installation.
Step 1: Assess the Space
The first step in creating a raised bathroom is to thoroughly assess the existing space. Start by examining the condition of the concrete slab itself. Look for any visible cracks, uneven surfaces, or signs of moisture infiltration. If there are significant issues with the slab, they should be addressed before moving forward with the bathroom project.
During this phase, also consider the ceiling height of the bathroom. Measure the vertical space to determine how much height will be lost when raising the floor. In some cases, homeowners may need to modify adjacent spaces, such as lowering the ceilings in nearby rooms, to maintain a consistent height throughout the home.
Step 2: Design and Layout
Once the space has been assessed, it’s time to design the layout of the raised bathroom. Start by determining the desired height for the raised floor. Typically, a raised bathroom floor will be elevated by 4 to 6 inches, but this can vary based on the needs of the plumbing or the homeowner’s design preferences.
Next, develop a detailed floor plan that includes the placement of all major fixtures, such as the toilet, sink, and bathtub or shower. The layout must also account for plumbing lines and electrical wiring. It is essential to map out where pipes will run under the raised floor, as well as any electrical outlets, switches, or lighting that will be installed in the bathroom.
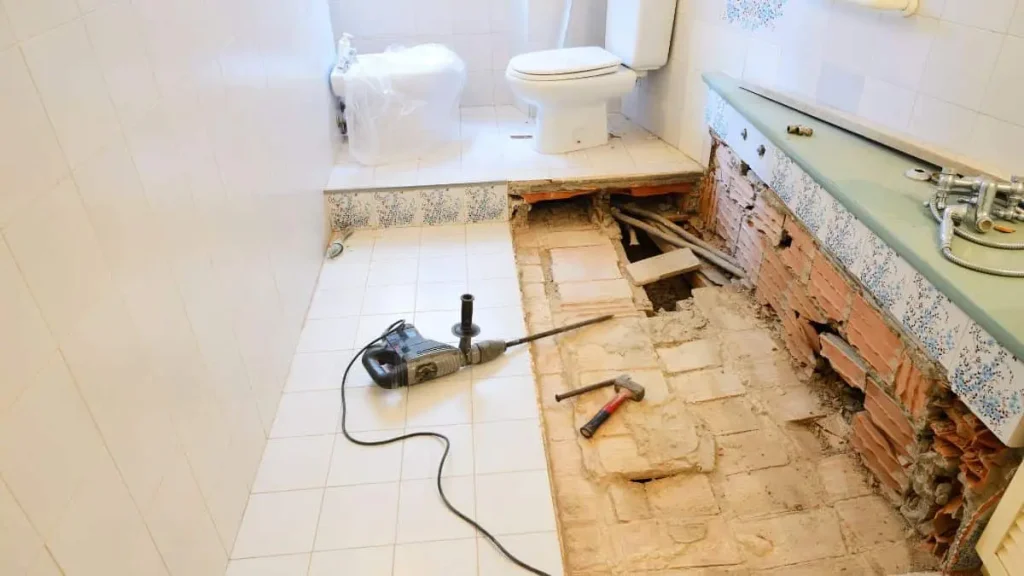
Step 3: Prepare the Slab
Before constructing the raised floor, the concrete slab must be properly prepared. This involves thoroughly cleaning the surface and repairing any cracks or uneven areas. Use a concrete sealer to protect the slab from moisture, which can be a significant issue in bathrooms. Applying a moisture barrier at this stage will help prevent water damage and mold growth under the new floor.
Ensure that the slab is level before moving forward. If the slab is significantly uneven, self-leveling concrete or another leveling compound may need to be applied. The goal is to create a smooth, solid base for the raised subfloor to rest on.
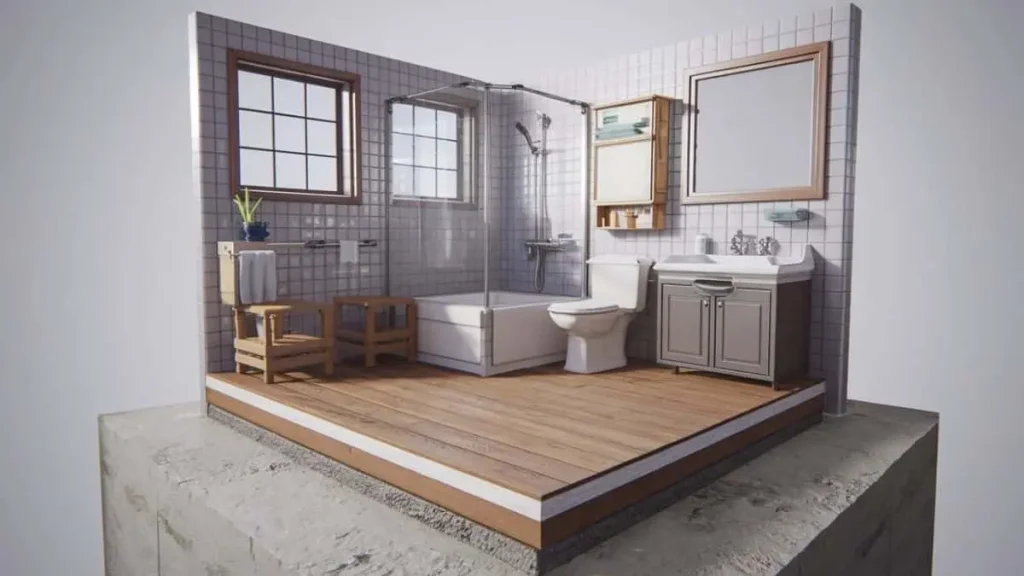
Step 4: Install a Subfloor Structure
With the slab prepared, the next step is to install the subfloor structure. The raised floor is typically built using treated wood joists or metal supports, which create a framework above the concrete slab. These joists should be spaced evenly and securely fastened to create a stable foundation for the floor.
The height of the subfloor should be determined based on the space needed for plumbing, wiring, and insulation. During installation, use a spirit level to ensure that the structure is even. This will prevent problems later when laying down the final flooring material. At this stage, it is important to take into account any transitions to adjacent rooms, ensuring the raised floor doesn’t create awkward step-ups or uneven thresholds.
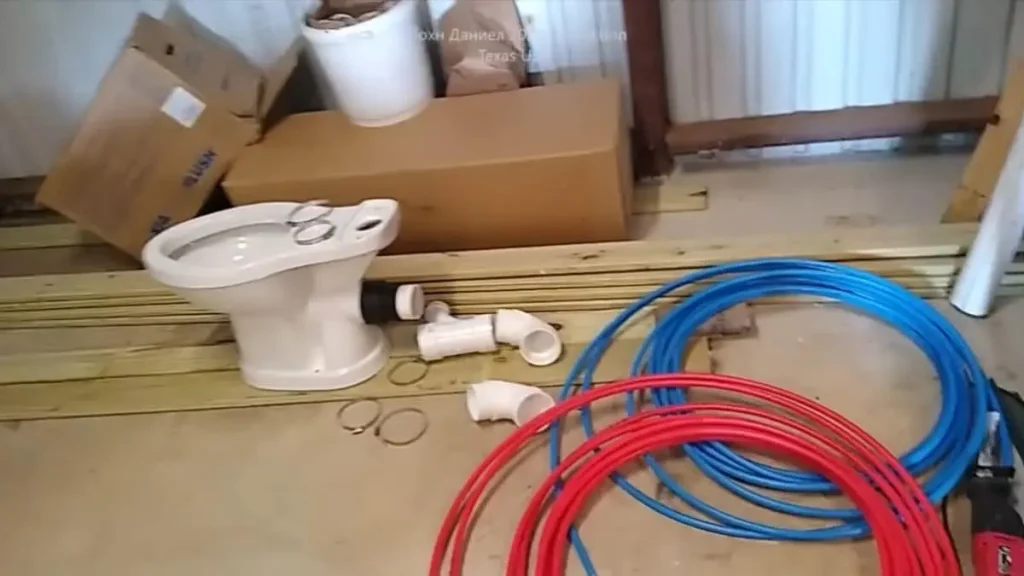
Step 5: Plumbing and Electrical Adjustments
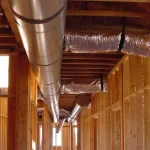
Once the subfloor structure is in place, it’s time to install the plumbing and make necessary electrical adjustments. Begin by laying out the plumbing lines under the raised floor. This includes drain pipes, water supply lines, and any venting required for the bathroom fixtures. Working with the space under the raised floor makes it much easier to route pipes where they are needed, avoiding the need to cut into the concrete slab.
After the plumbing is in place, run electrical wiring to any necessary locations. This includes power for lighting, bathroom fans, heated flooring (if installed), and any outlets. It’s important to follow local building codes and hire a licensed electrician for this stage to ensure the wiring is safe and meets regulatory standards.
Recommended: Raised Floor Bathroom Plumbing
Step 6: Add Insulation and Subfloor
With the plumbing and electrical systems installed, the next step is to add insulation. Insulation beneath the raised floor is important for maintaining a comfortable temperature in the bathroom, especially if the concrete slab tends to be cold. Rigid foam insulation or spray foam are commonly used for this purpose, as they provide both thermal protection and moisture resistance.
Once the insulation is in place, the subfloor can be installed. Typically, plywood or another durable material is used to cover the joists, creating a flat and stable surface for the final flooring. Secure the subflooring material to the joists using screws or nails, making sure that it is level and free from any gaps or weak spots.
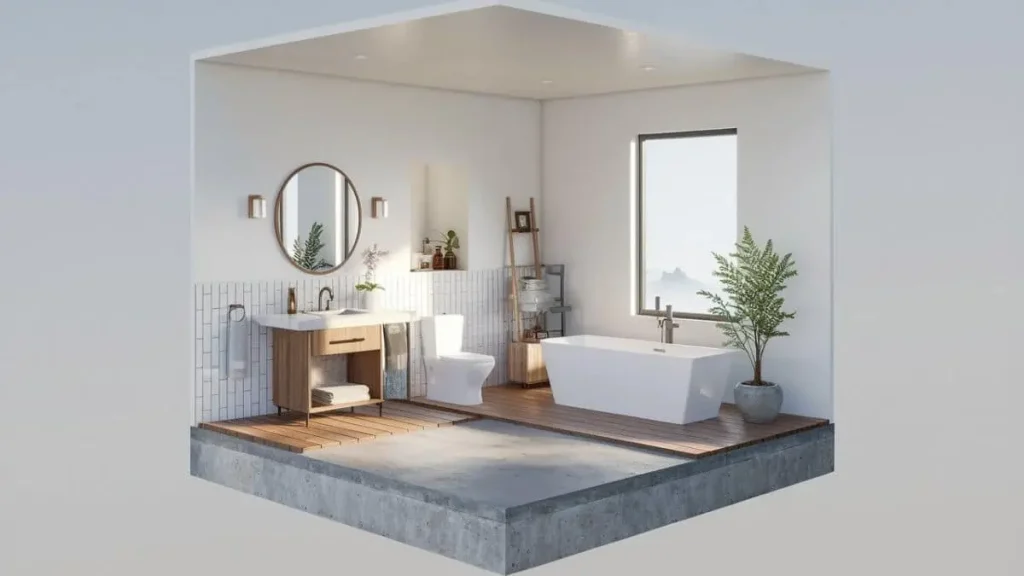
Step 7: Install Bathroom Fixtures and Flooring
At this point, the bathroom is ready for the installation of fixtures and flooring. Begin by positioning and securing the toilet, sink, shower, or bathtub according to the planned layout. Since the plumbing is already installed beneath the raised floor, connecting these fixtures should be relatively straightforward. Double-check for any leaks in the plumbing connections before proceeding.
Once the fixtures are in place, install the final flooring. Tile is a popular choice for bathrooms due to its durability and water resistance, but other options like vinyl or laminate can also be used depending on the design aesthetic. Ensure that the flooring material is sealed properly, especially in areas prone to water exposure, such as around the shower or bathtub.
Step 8: Final Touches
The last step in creating a raised bathroom on a concrete slab is to add the final touches. This includes painting the walls, installing lighting fixtures, and setting up any additional features, such as mirrors, towel racks, or shelving. At this stage, all aesthetic elements are brought together to complete the bathroom’s design.
It’s also important to ensure proper ventilation, either through a bathroom fan or natural ventilation, to prevent moisture buildup. Check that all systems, including plumbing, electrical, and ventilation, are functioning correctly before considering the project complete. With these final touches in place, the raised bathroom should be fully functional and visually appealing.
Expert Tips for a Successful Raised Bathroom Project
Successfully building a raised bathroom requires attention to detail, proper planning, and awareness of common pitfalls. Experienced professionals recommend focusing on structural integrity, moisture control, and careful coordination between trades to avoid costly mistakes. Following these expert tips will help ensure that the project is completed efficiently and up to code.
Focus on Structural Integrity
The first and most critical tip is to prioritize structural stability when raising the bathroom floor. The framework of the raised subfloor must be robust enough to handle the combined weight of bathroom fixtures, flooring, and daily use. Use treated lumber or high-quality metal joists to avoid rot or corrosion from moisture exposure. For larger bathrooms, reinforcing the joists with additional support beams or brackets may be necessary to prevent sagging or uneven floors over time.
Ensure that the floor is level during the construction process. Using a spirit level at various stages of the subfloor installation is vital to avoid issues with tile installation, drainage, and fixture placement. Uneven floors can lead to standing water, leaks, and even structural damage in the future.
Prioritize Moisture Management
Bathrooms are naturally high-moisture environments, making moisture management essential for a successful raised bathroom installation. One expert tip is to always install a vapor barrier between the concrete slab and the raised subfloor to prevent moisture from creeping up into the flooring materials. Additionally, sealing the concrete slab with a waterproofing product before installing the subfloor adds another layer of protection.
Proper ventilation is also critical to moisture control. Installing an exhaust fan to regulate humidity levels will help reduce the chances of mold growth under the raised floor. In cases where water leaks occur, ventilation helps prevent long-term water damage to both the flooring and structural components.
Plan Plumbing and Electrical Layouts Carefully
Running new plumbing and electrical systems beneath the raised floor provides more flexibility, but careful planning is essential. Ensure that plumbing lines are properly sloped to allow for effective drainage. Consult with a licensed plumber to make sure all connections meet building code requirements, especially for water supply and waste lines.
Electrical wiring should be routed efficiently and safely through the space under the raised floor. Mark the locations of all fixtures, outlets, and switches before installation, and consult with an electrician to avoid complications with local code compliance. Overloading circuits or poorly placed wiring can cause safety issues and costly rework later in the project.
Test Systems Before Finalizing Flooring
Before sealing the subfloor or laying down final flooring, always test the plumbing and electrical systems to ensure everything is functioning correctly. Water lines should be pressurized, and drains should be tested for leaks. Similarly, test all electrical connections for functionality, making sure that outlets, switches, and lights are wired properly and operating safely.
This precautionary step can save time and money, as fixing problems before installing the final flooring is far easier and less costly than redoing completed work. Catching any issues early will prevent delays and ensure that the finished bathroom performs as expected.
Budget for Unexpected Costs
Even with careful planning, unexpected costs can arise during a raised bathroom project. Materials may need to be upgraded, or additional repairs to the concrete slab or surrounding structure may be required. It is wise to set aside a contingency budget of around 10-15% of the total project cost to cover unforeseen expenses, such as structural reinforcements, more expensive plumbing components, or specialized labor.
Taking these factors into account will help prevent financial strain and keep the project on track, ensuring a smoother overall experience for homeowners and contractors alike.
Potential Costs
The costs of building a raised bathroom on a concrete slab can vary widely depending on the size of the project, the materials used, and the complexity of the work. Homeowners need to understand the range of expenses involved so they can budget effectively. This section breaks down the costs by key factors such as labor, materials, and additional considerations that may influence the overall price of the project.
Cost of Materials
One of the most significant components of a raised bathroom project is the cost of materials. The primary materials include wood or metal for the subfloor framing, plywood or OSB for the subfloor surface, insulation, and flooring materials like tile, vinyl, or laminate. Depending on the quality of materials selected, these costs can fluctuate significantly. For example, standard plywood may be more affordable, but a moisture-resistant option like marine-grade plywood will cost more. Similarly, high-end ceramic tiles will add to the budget compared to basic vinyl flooring.
Plumbing and electrical materials are another critical factor. PEX pipes, PVC pipes, fittings, and valves for water supply and drainage need to be factored in, along with electrical wiring, junction boxes, and outlets. The type of fixtures selected—such as the toilet, sink, shower, and bathtub—will also greatly influence the cost. High-end fixtures made from materials like porcelain, marble, or brass will be more expensive than basic models. On average, the total cost of materials for a raised bathroom can range from $3,000 to $10,000 or more, depending on these choices.
Labor Costs
Labor is a significant portion of the total cost, especially if multiple skilled trades are involved in the project. Hiring professionals such as carpenters, plumbers, and electricians is often necessary to ensure the work is done safely and meets local building codes. Labor costs can vary based on location, the complexity of the project, and the experience level of the contractor.
Carpenters will typically handle the construction of the raised subfloor, with rates averaging between $40 and $100 per hour. Plumbers, responsible for rerouting or installing new plumbing, generally charge $45 to $200 per hour, depending on the scope of the work. If significant electrical work is needed, electricians may charge between $50 and $120 per hour. Homeowners can expect labor costs to range from $2,000 to $8,000 or more for a complete raised bathroom project, with larger or more complex bathrooms costing on the higher end.
Permits and Inspections
Most raised bathroom projects will require building permits, particularly if the work involves plumbing, electrical systems, or structural modifications. Permit fees vary depending on the jurisdiction, but they typically range from $200 to $1,000.
In addition to initial permits, homeowners may also need to pay for inspections throughout the project to ensure compliance with local building codes. Inspections for plumbing and electrical systems, in particular, may require multiple visits, which can add to the overall cost.
In some cases, hiring an architect or structural engineer may be necessary, especially if the raised bathroom design involves significant changes to the layout of the home or additional structural support. These professionals can charge several hundred to several thousand dollars for their services, depending on the complexity of the project.
Additional Costs
There are often additional costs associated with a raised bathroom project that homeowners may not initially anticipate. Demolition and disposal fees for removing old flooring, fixtures, and debris can range from a few hundred to over a thousand dollars. If the concrete slab requires repairs, such as patching cracks or leveling the surface, these expenses can quickly add up as well.
Another potential expense is the cost of upgrading adjacent rooms or spaces to match the new raised floor. In some cases, this might involve adjusting the height of door frames, installing new transitions between rooms, or even lowering ceilings to maintain a consistent appearance throughout the home. These additional modifications can contribute anywhere from $500 to several thousand dollars to the total project cost.
Furthermore, if the homeowner decides to install premium features such as radiant floor heating or custom fixtures, the price can rise significantly. Radiant heating, for example, can cost anywhere from $10 to $20 per square foot, depending on the system chosen. High-end custom bathroom fixtures and vanities can also increase the final cost, sometimes adding thousands of dollars to the project.
Long-Term Savings Considerations
While the initial investment for a raised bathroom on a concrete slab can be considerable, homeowners should also factor in the potential long-term savings. Proper insulation beneath the raised floor can reduce heating and cooling costs, especially if radiant floor heating is installed. Additionally, addressing moisture issues and installing a well-designed plumbing system can prevent costly water damage and repairs in the future.
In some cases, raising the bathroom floor can also improve the home’s resale value, making it a worthwhile investment. Bathrooms are a key selling point in any home, and a functional, well-designed raised bathroom can add to the overall appeal. Thus, while the upfront costs may be high, the long-term benefits often justify the expense.
Budgeting for Contingencies
Finally, homeowners need to budget for contingencies. Unexpected issues, such as discovering that the concrete slab has moisture damage or that additional structural support is needed, can quickly escalate costs. Experts generally recommend setting aside an additional 10-15% of the total project budget to account for unforeseen expenses.
For example, if a homeowner has estimated the project to cost $15,000, setting aside an additional $1,500 to $2,250 can help cover any surprises along the way.
Common Mistakes to Avoid
Installing a raised bathroom on a concrete slab is a complex project that can present various challenges. Homeowners may inadvertently make mistakes that could lead to costly repairs or suboptimal performance of the bathroom. By recognizing these common errors, homeowners can take proactive steps to avoid them and ensure a successful installation.
Underestimating Structural Requirements
One of the most critical mistakes in constructing a raised bathroom is underestimating the structural requirements needed to support the new floor. The weight of the bathroom fixtures, including the toilet, sink, and bathtub, must be adequately supported by a well-designed subfloor. Failing to reinforce the floor framing can lead to sagging or even structural failure over time.
It is essential to consult with a structural engineer or a skilled contractor to determine the proper materials and dimensions for the joists and supports. This will ensure that the framework can safely handle the weight it will bear without compromising the integrity of the floor.
Neglecting Moisture Barriers
Another common mistake is neglecting to install proper moisture barriers. Bathrooms are inherently humid environments, and without appropriate vapor barriers, moisture can seep through the concrete slab into the subfloor. This can lead to mold growth, wood rot, and damage to the flooring materials. It is vital to install a quality vapor barrier directly on the concrete slab before building the raised floor.
Additionally, applying waterproofing treatments to the subfloor and ensuring proper drainage can mitigate moisture-related issues.
Skipping Plumbing and Electrical Planning
Poor planning for plumbing and electrical systems is another frequent pitfall. Many homeowners assume that they can simply install fixtures wherever they please without considering the underlying systems that must support them. It is crucial to plan the layout of plumbing and electrical lines early in the project to avoid costly alterations later.
Not only should the plumbing be appropriately sloped to facilitate drainage, but the electrical outlets and switches should also be strategically placed for optimal accessibility and safety. Consulting with licensed plumbers and electricians during the planning phase can prevent issues down the line.
Related: Essential Bathroom Safety Features
Ignoring Local Building Codes
Many homeowners overlook the importance of adhering to local building codes when constructing a raised bathroom. These regulations are in place to ensure safety, structural integrity, and proper sanitation. Ignoring or failing to obtain necessary permits can lead to fines, and may require the removal or alteration of work that does not comply. It is essential to research local building codes and obtain the necessary permits before beginning construction. This not only ensures compliance but also provides peace of mind that the work is being done safely and correctly.
Failing to Test Systems
A critical error that homeowners often make is failing to test plumbing and electrical systems before finalizing the flooring. It is imperative to run water through the newly installed plumbing lines and check for leaks before covering everything with the final flooring material.
Additionally, electrical connections should be thoroughly tested to ensure they are functioning correctly and safely. Ignoring this step can result in significant inconveniences, such as having to remove and replace flooring to fix leaks or electrical issues later on.
Overlooking Ventilation Needs
Inadequate ventilation in a raised bathroom can lead to serious problems, including excess humidity and poor air quality. Many homeowners fail to account for proper ventilation, assuming that simply having a window or door will suffice. Installing an efficient exhaust fan is crucial to help regulate humidity levels, especially during showers or baths.
Proper ventilation helps prevent mold growth and ensures a comfortable environment. Moreover, positioning the fan correctly and ensuring it vents outside will enhance its effectiveness.
Choosing Incompatible Flooring Materials
Selecting flooring materials that are not suitable for a bathroom setting can lead to significant problems. For instance, wood or laminate flooring may not withstand the moisture commonly found in bathrooms, leading to warping or damage over time. It is important to choose flooring that is water-resistant and suitable for high-moisture environments.
Materials such as ceramic tile, vinyl, or stone are preferable options for raised bathrooms. Consulting with a flooring specialist can provide valuable insights into the best materials to choose for durability and functionality.
Ignoring Budget Overruns
Underestimating project costs is a common mistake that can result in financial strain. Many homeowners begin their projects without a clear budget, leading to overspending as unforeseen issues arise. It is crucial to develop a realistic budget that accounts for materials, labor, permits, and a contingency fund for unexpected expenses. A contingency fund of 10-15% of the total project cost can help absorb any unforeseen expenses that may come up during construction.
Planning and thorough budgeting will help ensure that the project stays within financial limits and does not lead to unnecessary stress or delays.
Conclusion
Constructing a raised bathroom on a concrete slab offers a practical solution for homeowners seeking to enhance their living spaces. This approach not only improves aesthetics but also addresses potential issues such as moisture and plumbing challenges commonly associated with concrete slabs. By elevating the bathroom, homeowners can effectively manage drainage, enhance ventilation, and create a more comfortable environment.
While the project comes with its set of benefits, it is essential to navigate the challenges carefully. Understanding the importance of structural integrity, proper moisture barriers, and thorough planning for plumbing and electrical systems can significantly influence the success of the installation. Avoiding common pitfalls such as neglecting local building codes, failing to test systems, and overlooking ventilation needs ensures a durable and functional space.
With careful budgeting and attention to detail, homeowners can create a raised bathroom that not only meets their needs but also enhances the value of their home. Ultimately, investing in a raised bathroom on a concrete slab can lead to a more enjoyable and efficient living space, making it a worthwhile consideration for many homeowners.