

Sill plates form the critical connection between a building’s foundation and its framing. Before installation begins, the foundation must be properly prepared to ensure the structural stability, moisture resistance, and code compliance of the entire home.
Skipping essential pre-installation steps can lead to misaligned framing, water damage, pest intrusion, and costly repairs. A thorough checklist helps prevent these issues and ensures that sill plates are installed securely and correctly.
This guide covers everything that should be completed before starting sill plate installation—from inspecting the foundation and choosing the right materials to verifying code compliance and preparing moisture barriers.
Contractors, DIY builders, and homeowners will find practical steps that align with building codes and long-term durability standards.
The Role of Sill Plates in Home Construction
Sill plates are foundational components in wood-frame construction. They create the first point of contact between the house framing and the concrete or masonry foundation. Their correct installation is essential for structural integrity, moisture control, and load transfer.
What Is a Sill Plate?
A sill plate, also known as a sole plate or mudsill, is a horizontal wood beam that sits directly on top of the foundation wall. It anchors the wall framing to the foundation and distributes structural loads evenly.
Most sill plates are made from pressure-treated lumber, which resists rot, moisture damage, and insect infestation. Common sizes include 2×6 and 2×8 boards, depending on design and local code requirements.
Why Sill Plates Are Important
Structural Support
Sill plates anchor the vertical wall studs to the foundation using anchor bolts or straps. They transfer the weight of the entire structure down to the foundation.
Alignment of Framing
They provide a level and square base for wall framing. If the sill plate is misaligned, the entire wall system can shift or lean.
Moisture and Pest Barrier
Sill plates act as the first barrier against ground moisture, water vapor, and termites. When combined with a moisture barrier and termite shield, they protect the interior framing from decay.
Code Compliance and Safety
Modern building codes require sill plates to meet specific standards for material, fastening, and protection. Non-compliant installations can lead to structural violations and safety hazards.
Sill Plate vs. Sole Plate: What’s the Difference?
Both terms refer to horizontal framing members, but they serve different functions:
| Feature | Sill Plate | Sole Plate |
| Location | Between foundation and wall framing | At the bottom of interior framed walls |
| Purpose | Anchors the house to the foundation | Holds wall studs in place |
| Material | Pressure-treated wood | Usually untreated framing lumber |
Sill plates are always in contact with concrete and must be treated to resist decay. Sole plates are used in above-grade, interior framing and do not require the same treatment.
Pre Installation Checklist for Sill Plates
Preparing the foundation and site before installing sill plates is crucial to ensure a solid, durable, and code-compliant structure. This section breaks down the necessary steps to take before placing the sill plates on the foundation.

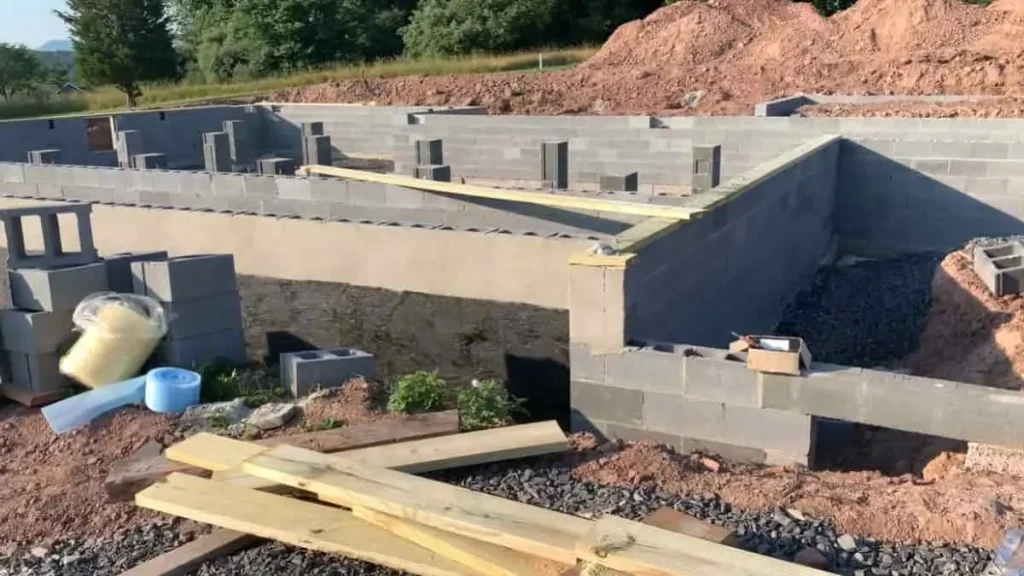
1. Conduct a Thorough Foundation Inspection
Begin by inspecting the foundation for any visible damage such as cracks, chips, or uneven surfaces. Even small imperfections can affect the sill plate’s alignment and structural performance. Use tools like a laser level or straightedge to check the foundation’s flatness and levelness. The foundation should be square and true to avoid framing issues later.
Confirm that the foundation has properly cured and dried to minimize moisture transfer to the sill plates. Excess moisture can lead to wood rot or warping over time. Any signs of standing water or moisture intrusion should be addressed before proceeding.
2. Verify Building Code Compliance
Before installing sill plates, review local building codes and regulations related to sill plate materials, anchoring methods, and spacing requirements. Different regions may have specific rules for bolt placement, fastener type, and moisture barriers. Ensuring code compliance avoids potential inspection failures and costly rework.
Check for required permits and approvals from local building authorities. Codes often reference standards such as the International Residential Code (IRC) or International Building Code (IBC), which set minimum specifications for sill plate installation. Adhering to these ensures safety and durability.
3. Choose the Right Sill Plate Materials
Selecting appropriate materials is essential for long-lasting sill plates. Most builders use pressure-treated lumber, which resists moisture, insects, and decay, especially when in contact with concrete. Untreated wood can absorb moisture and deteriorate rapidly.
Confirm that the lumber is graded for structural use and meets local code requirements. Some areas may require borate-treated or specially treated wood for added termite protection. Avoid mixing untreated and treated materials, as this can cause chemical reactions or premature failure.
4. Prepare the Foundation Surface Properly
Clean the foundation surface thoroughly to remove dust, dirt, oil, and loose debris. A clean surface ensures proper adhesion of any moisture barriers or sealants applied before sill plate placement.
Address any uneven spots by grinding down high areas and filling low spots with a suitable leveling compound. This prevents gaps that could compromise the sill plate’s alignment and connection to the foundation.
Verify the moisture level of the concrete. High moisture content can lead to wood deterioration. In such cases, consider additional moisture barriers or delay installation until proper drying.
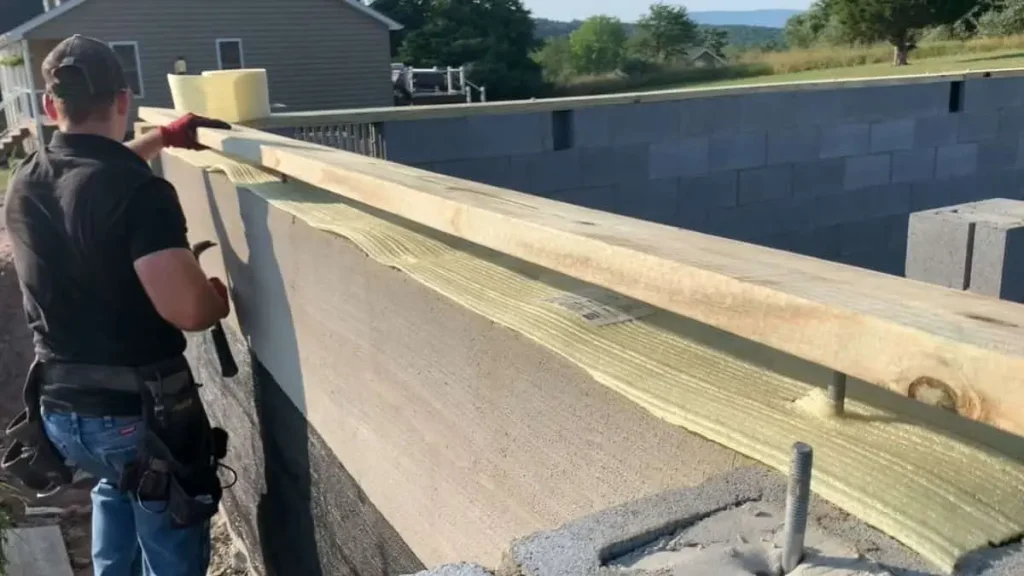
5. Install a Moisture Barrier
Place a continuous moisture barrier between the foundation and sill plate to prevent water vapor from migrating into the wood. Common materials include foam sill sealers, polyethylene sheets, or rubber gaskets.
The barrier should be compressible enough to fill small irregularities on the concrete surface, ensuring a tight seal. Proper moisture barriers reduce air leaks, prevent rot, and improve energy efficiency by minimizing drafts at the foundation line.
6. Plan for Termite Protection
Termite intrusion is a significant risk for sill plates in many regions. Incorporate termite shields or metal flashing beneath the sill plate where required by local codes. These physical barriers block termites from reaching the wood framing.
In high-risk areas, use borate-treated lumber or additional chemical soil treatments to deter termite infestation. Maintain proper ground clearance between soil and sill plate to reduce moisture and pest access.
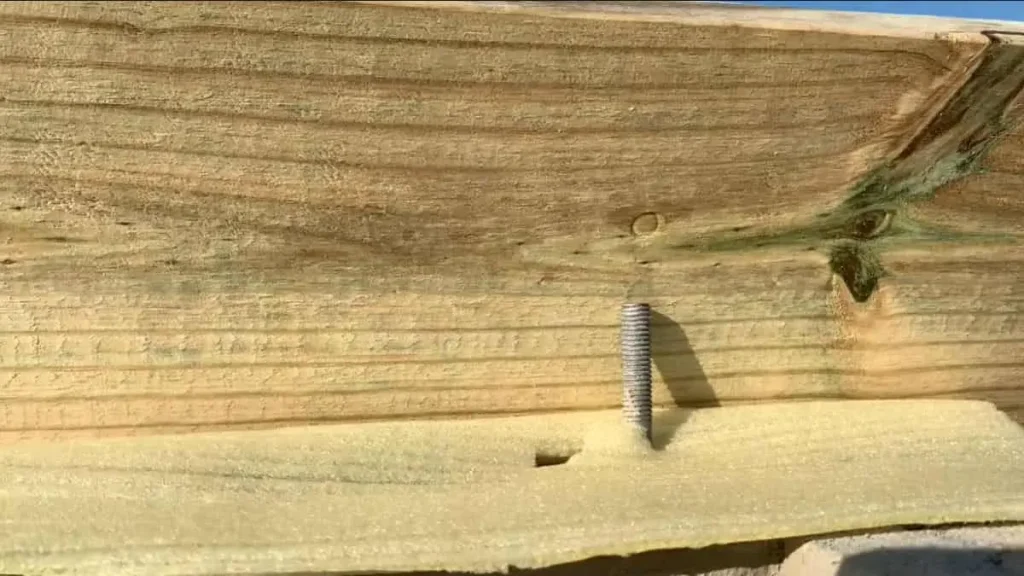
7. Layout and Mark Anchor Bolt Locations
Measure and mark the locations for anchor bolts on the sill plates before installation. Building codes typically require anchor bolts spaced no more than 6 feet apart, with at least one bolt within 12 inches of each end of the plate.
Pre-drill holes in the sill plate for these bolts to ensure proper fit and avoid splitting the wood during installation. Accurate bolt placement guarantees a secure fastening between the sill plate and foundation.
8. Organize Necessary Tools and Safety Gear
Gather all required tools such as drills, impact drivers, levels, measuring tapes, sill sealers, and wrenches before starting. Having tools ready prevents delays and helps maintain workflow.
Wear personal protective equipment (PPE), including gloves, safety goggles, and dust masks, especially when handling pressure-treated lumber or cutting wood. Safety precautions reduce risk of injury and exposure to chemicals in treated wood.
Recommenced Read: How to Attach Floor Joists to Sill Plate
Expert Tips for Ensuring Proper Sill Plate Alignment and Fit
Accurate alignment and a precise fit of sill plates are critical for the overall strength and durability of a building. Improper installation can cause framing issues, structural weaknesses, and costly repairs. This section offers expert advice to help achieve perfect sill plate placement.
Use Precise Measurement and Layout Techniques
Accurate measurements form the foundation of correct sill plate alignment. Before installation, double-check all dimensions of the foundation and mark anchor bolt locations clearly on the sill plates. Use a high-quality tape measure and a carpenter’s square to verify straight lines and right angles.
Marking the sill plates in advance prevents mistakes during installation and ensures that bolt holes align perfectly with embedded anchors in the concrete.
Employ a Level and Laser Tools for Alignment
Leveling the sill plate is essential to provide a flat, stable base for wall framing. Use a spirit level or laser level to check the sill plate as it is placed on the foundation. Adjustments may be necessary to accommodate minor unevenness in the foundation surface.
Laser levels offer precise horizontal and vertical alignment, making it easier to identify any deviations that could affect the framing above.
Ensure Tight Fit Without Gaps
The sill plate should sit flush against the foundation with no significant gaps. Small gaps can cause air leaks, water intrusion, or pest entry. If minor unevenness exists, use a compressible sill sealer or foam gasket to fill gaps and create a continuous seal.
Avoid forcing the sill plate into place, which can lead to splitting or warping. Instead, correct any surface irregularities or replace sections of the sill plate that do not fit properly.
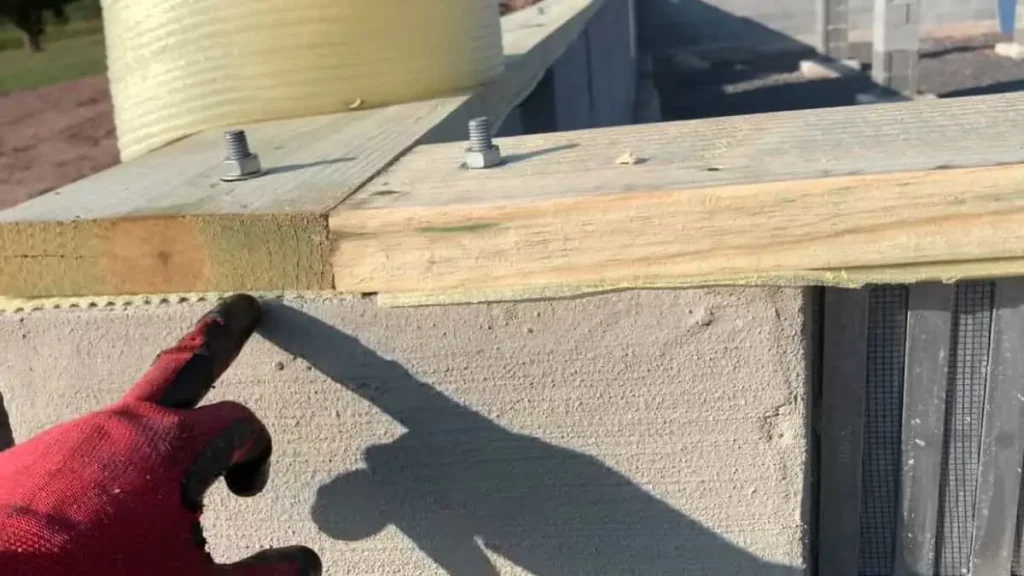
Secure Sill Plates Using Correct Anchoring Methods
Anchor bolts or straps must be tightened securely to prevent movement but not so tight that they crush the wood fibers. Use a torque wrench or ratchet to apply consistent force based on manufacturer and code specifications.
Confirm that all bolts are properly seated and check alignment again after tightening. Loose or uneven bolts reduce structural integrity and can cause framing issues.
Account for Expansion and Contraction
Wood expands and contracts with changes in humidity and temperature. Leave slight spacing around bolt holes and between sill plate sections to allow for this natural movement. Using pressure-treated lumber with proper seasoning reduces excessive shrinkage.
Incorporating expansion joints or staggered seams can prevent warping or buckling over time.
Inspect Alignment Before Final Framing
Before starting wall framing, inspect the sill plates once more for any signs of shifting or misalignment. Use a level and straightedge to verify that the plates remain flat and true.
Correct any issues immediately, as adjustments become more difficult after framing begins. Ensuring a stable, level sill plate foundation simplifies the entire construction process and enhances the building’s longevity.
Common Mistakes to Avoid Before Installing Sill Plates
Avoiding common errors during the pre-installation phase ensures the sill plates perform their critical role effectively. Overlooking these mistakes can lead to structural problems, moisture damage, and costly repairs down the line.
Skipping Foundation Inspection
Failing to thoroughly inspect the foundation before installation is a major oversight. Cracks, uneven surfaces, or unaddressed moisture issues compromise sill plate stability. Installing sill plates on a damaged or unlevel foundation can cause framing misalignment and weaken the overall structure.
Always perform a detailed foundation assessment and fix any problems before proceeding.
Using Untreated or Improper Lumber
Using untreated lumber or wood not rated for foundation contact increases the risk of rot, insect damage, and premature deterioration. Sill plates must be made from pressure-treated lumber that meets local building codes.
Substituting untreated wood to cut costs can lead to costly repairs and reduced structural integrity.
Ignoring Moisture Barriers and Pest Protection
Omitting a moisture barrier between the foundation and sill plate allows water vapor and moisture to penetrate the wood. This creates ideal conditions for mold, rot, and termite infestation.
Similarly, neglecting termite shields or appropriate chemical treatments leaves the wood vulnerable to pests. Moisture barriers and termite protection are essential steps for long-lasting sill plates.
Incorrect Anchor Bolt Placement and Fastening
Improper spacing or misaligned anchor bolts weaken the connection between the sill plate and foundation. Bolts placed too far apart or without proper fastening can cause movement and structural instability.
Pre-marking bolt locations and following code requirements for bolt spacing and torque ensures a secure attachment.
Installing on a Dirty or Uneven Foundation Surface
Installing sill plates on dusty, oily, or uneven foundation surfaces reduces adhesion and causes alignment problems. Dirt or debris can prevent moisture barriers from sealing properly and create gaps that allow water intrusion.
Cleaning and leveling the foundation surface before installation is critical for a tight fit.
Over-tightening or Under-tightening Bolts
Applying too much torque when tightening anchor bolts can crush the wood fibers, weakening the sill plate. Under-tightening allows movement and reduces structural strength.
Using a torque wrench or following manufacturer guidelines ensures bolts are tightened to the correct specification.
Final Pre-Installation Walkthrough
Completing a thorough final walkthrough before installing sill plates ensures all preparations are in place for a smooth and successful installation. This step minimizes errors, saves time, and guarantees compliance with building standards.
Confirm Foundation Readiness
Recheck the foundation for any remaining cracks, debris, or moisture issues. The surface should be clean, dry, and level. Verify that any previous repairs or leveling compounds have fully cured. This confirmation helps prevent unexpected problems once the sill plates are installed.
Verify Moisture Barrier and Termite Protection
Ensure the moisture barrier is properly positioned and continuous along the foundation surface. Check for any gaps or tears that could allow moisture or pests to penetrate.
Confirm that termite shields or chemical treatments are correctly installed according to local regulations. These preventive measures are critical to protecting the sill plates from long-term damage.
Double-Check Anchor Bolt Locations and Fasteners
Review the anchor bolt layout, confirming that bolts are spaced correctly, holes are pre-drilled, and bolts are straight and secure within the foundation.
Prepare all fasteners and tools needed for installation. Make sure torque wrenches or impact drivers are calibrated and ready for precise tightening.
Inspect Sill Plate Materials and Cut to Size
Verify that all sill plate lumber is pressure-treated, free of defects, and cut to the correct lengths. Check that ends are square and surfaces are smooth for a tight fit.
Organize the sill plates in the order they will be installed to streamline the process and reduce handling errors.
Review Safety Measures and Equipment
Ensure all workers have appropriate personal protective equipment (PPE), including gloves, safety glasses, and dust masks.
Check that work areas are clear of hazards, tools are in good condition, and safety protocols are understood by everyone involved.
Conclusion
Proper preparation before installing sill plates is essential for a strong, durable foundation and overall home stability. Following a detailed pre-installation checklist—inspecting the foundation, selecting the right materials, ensuring moisture and pest protection, and verifying alignment—helps avoid costly mistakes and complies with building codes.
A thorough final walkthrough confirms readiness and supports a smooth installation process. Taking these steps guarantees a secure base for framing, contributing to the long-term safety and value of the home.

