

Tying in a new roof to an existing structure requires precision, proper planning, and an understanding of roofing techniques. Whether expanding a home, adding a covered porch, or integrating an extension, ensuring a seamless and watertight connection is essential. Improper roof tie-ins can lead to leaks, structural weaknesses, and long-term damage.
Factors like roof pitch, materials, flashing, and load distribution play a critical role in creating a secure connection. Following proper framing techniques, using high-quality waterproofing materials, and aligning the new roof with the existing one prevent costly repairs.
This guide provides a step-by-step process to successfully tie in a new roof, covering essential tools, framing methods, flashing installation, and best practices for a durable, leak-free connection.
Planning and Preparing for Roof Integration
A successful roof tie-in begins with thorough planning and preparation. Understanding the existing roof structure, ensuring compliance with local building codes, and gathering the necessary tools and materials are crucial steps in avoiding costly mistakes. Proper preparation ensures the new roof integrates seamlessly with the existing one, providing structural stability and weather resistance.
Understanding Roof Types and Structures
Before tying in a new roof, it is essential to assess the existing roof’s type, pitch, and load-bearing capacity. Different roofing structures require distinct integration methods to ensure a secure and watertight connection.
Gable Roofs: These have two sloping sides that meet at a ridge, making them one of the easiest roof types to tie into. A simple extension of the gable can maintain symmetry, or a perpendicular addition can be joined at a valley.
Hip Roofs: Featuring slopes on all four sides, hip roofs require careful framing to maintain uniformity. A proper tie-in involves extending rafters and ensuring valleys are correctly flashed to prevent water penetration.
Shed Roofs: These single-sloped roofs are often used for additions and require precise flashing where they meet the main structure. The new roof must be pitched correctly to facilitate drainage and avoid pooling.
Flat Roofs: Connecting to a flat roof involves careful waterproofing techniques. Adding a slope for drainage or integrating a parapet may be necessary to prevent water buildup.
Matching materials, pitch, and load-bearing considerations with the existing structure ensures uniformity and longevity. Roof pitch, measured as the rise over the run, affects drainage and must be compatible between the new and existing sections. Structural support should be evaluated to determine whether additional reinforcements, such as new rafters or trusses, are needed.
Checking Local Building Codes and Permits
Every roofing project must comply with local building codes to ensure safety and structural integrity. Regulations vary based on location and may dictate factors such as roof pitch, material requirements, and load-bearing limits.
Permit Requirements: Many municipalities require permits for roof extensions, especially if the project alters the existing structure. Skipping this step can result in fines, failed inspections, or forced removal of the addition.
Zoning and Setback Rules: Some areas have restrictions on roof height, extensions beyond property lines, or proximity to neighboring structures. Understanding these regulations prevents compliance issues.
Wind and Snow Load Considerations: Certain regions enforce specific building codes to withstand extreme weather conditions. Areas prone to hurricanes may require reinforced framing, while regions with heavy snowfall need additional load-bearing support.
Consulting the local building authority or a structural engineer ensures the project meets all legal requirements. Failing to follow codes can lead to structural failures, insurance issues, or legal complications.
Essential Tools and Materials Needed
Having the right tools and materials on hand streamlines the roof integration process and ensures a secure, long-lasting connection.
Key Tools:
- Circular saw or reciprocating saw for cutting rafters and sheathing
- Framing square and level for accurate alignment
- Hammer or nail gun for securing framing components
- Drill and screws for additional fastening
- Roofing knife for cutting shingles and underlayment
- Chalk line for precise layout markings
- Pry bar for removing existing shingles or flashing
- Ladder and scaffolding for safe roof access
Essential Materials:
- Lumber for rafters, trusses, or support beams
- Roof sheathing (plywood or OSB) to provide a solid base
- Roofing underlayment to protect against moisture infiltration
- Flashing (metal or rubber) for waterproofing joints and valleys
- Shingles or roofing panels to match the existing roof
- Nails, screws, and adhesives for secure fastening
- Sealant and caulking for added water resistance
How to Tie in a Roof to an Existing Roof: Step-by-Step Guide
Properly tying in a new roof to an existing structure requires careful measurement, structural adjustments, and precise installation techniques. This process involves removing necessary sections of the existing roof, installing new framing, securing the connection with proper waterproofing, and blending the roofing materials for a seamless finish.
Step 1: Measuring and Planning the Roof Tie-In
Accurate measurements and strategic planning are essential before cutting into the existing structure. The new roof must align with the existing one in terms of slope, ridge height, and overhangs to maintain structural integrity and aesthetic appeal.
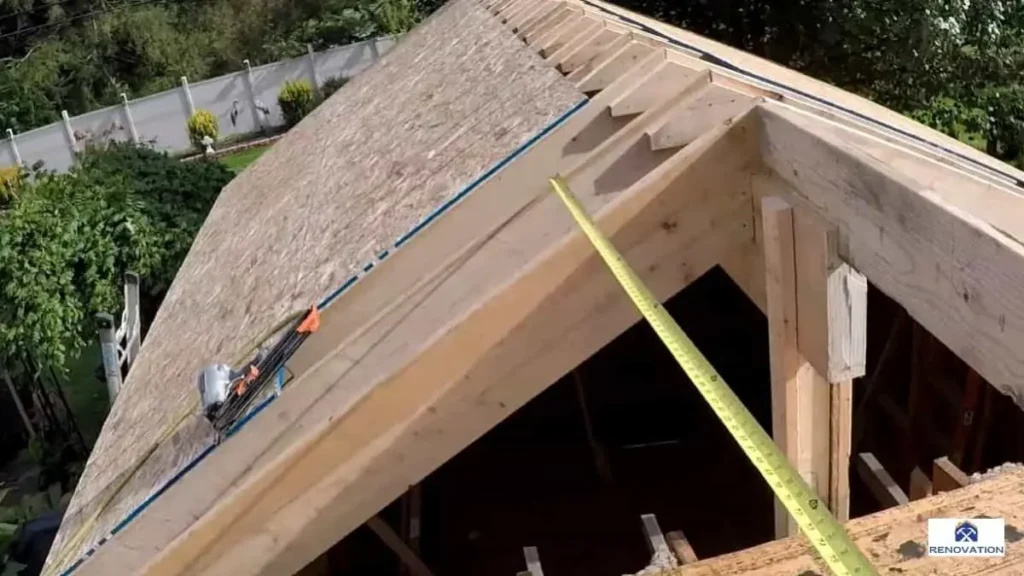
First, determine the roof pitch by measuring the rise over a 12-inch horizontal run. The new roof should match this pitch unless a different design is intended, such as a lower-slope shed roof connecting to a gable or hip roof. Next, mark the tie-in point where the new roof will intersect with the existing structure. Use a chalk line to outline the area where framing modifications will occur.
Consider load distribution when planning the connection. Ensure that the existing structure can support the additional weight, or reinforce it with additional rafters, beams, or trusses if needed. Planning proper drainage is also critical—water must flow naturally from the new section into the existing roofing system without pooling or backflow issues.
Step 2: Removing Shingles and Preparing the Existing Roof
Before installing new framing, the existing roof must be prepared by removing shingles and underlayment from the tie-in area. This prevents layering issues and ensures a watertight seal when the new roof is installed.
Using a pry bar or roofing shovel, carefully lift and remove shingles, working from the top down. Avoid damaging surrounding shingles that will remain intact. Remove the roofing underlayment and expose the sheathing beneath. If necessary, cut back the roof decking to create a clean edge for the new roof to attach.
Inspect the exposed structure for rot, mold, or damage. If deteriorated wood is found, replace it before proceeding. Ensure the area is clean and dry before moving to the next step.
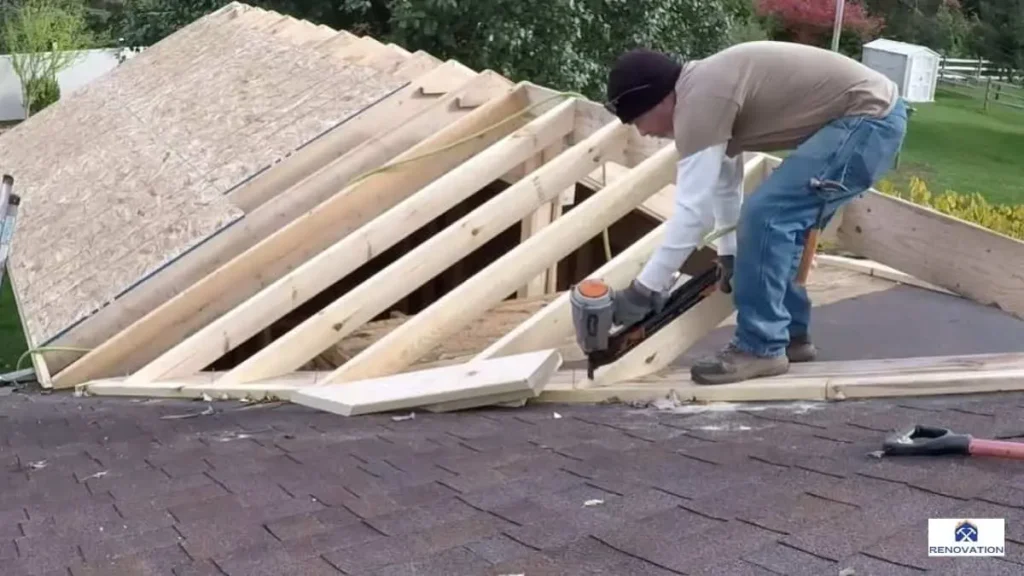
Step 3: Installing the Roof Framing and Rafters
Framing is the backbone of the new roof section and must be properly integrated with the existing structure. Start by installing a ledger board (if applicable) along the connection point to provide support for new rafters.
For gable or hip roof extensions, position new rafters so they align with existing ones. Secure them using metal framing brackets or nails, ensuring they are level and spaced appropriately according to local building codes. If a valley is created where the roofs meet, install valley boards for added structural support.
For a shed roof tie-in, attach the new rafters to the existing wall plate or ridge, securing them with hurricane ties or rafter hangers. Verify the rafter angles match the planned pitch and check alignment using a level.
In cases where additional structural reinforcement is needed, install temporary bracing to hold rafters in place until the decking is secured.
Step 4: Adding Roof Decking and Underlayment
Once the framing is in place, cover the new rafters with roof decking to create a solid foundation for roofing materials. Use plywood or OSB (oriented strand board) and attach it with roofing nails or screws, ensuring tight seams between panels.
The next step is installing the roofing underlayment, which provides moisture protection and prevents leaks.
- For standard asphalt shingle roofs, use synthetic or felt underlayment, starting at the lowest point and overlapping each layer.
- If integrating with a metal or tile roof, ensure the correct underlayment type is used to accommodate the roofing material.
Extend the underlayment over the joint between the new and existing roofs to create a waterproof barrier. If a valley is present, install a self-adhering waterproof membrane before applying the underlayment.
Step 5: Flashing and Waterproofing the Roof Connection
Proper flashing is critical to preventing leaks where the new roof meets the existing structure. Several types of flashing may be required, depending on the roof design.
Valley Flashing: If the tie-in creates a valley, install a metal valley flashing along the seam. Secure it with roofing nails and apply a waterproof sealant at the edges before layering shingles or roofing material.
Step Flashing: For shed roof connections or side-wall intersections, install step flashing where the new roof meets an existing vertical wall. Each piece should overlap the shingle below it and be sealed with roofing cement.
Ridge Flashing: If the new roof extends an existing ridge, install a ridge cap that overlaps both sections, securing it with ridge vents or shingles.
After flashing is installed, apply sealant or roofing caulk along all seams and penetrations for added protection.
Step 6: Installing New Shingles or Roofing Material
To complete the tie-in, install new roofing materials to blend the new section with the existing roof. If using asphalt shingles, follow the staggered pattern of the original installation. Lift the remaining shingles along the connection point and tuck the new shingles underneath to create a seamless transition.
For metal roofs, overlap the panels correctly and secure them with the appropriate fasteners to prevent wind uplift. Ensure any exposed edges are sealed with butyl tape or roof sealant.
If the roof has tiles or shakes, carefully match the existing pattern and use the correct fasteners to prevent shifting or gaps.
Once the roofing material is in place, inspect the entire tie-in area for gaps, loose sections, or misaligned shingles. Apply additional sealant or flashing adjustments as needed to ensure complete waterproofing.
If you’re planning a building addition where the new roof is higher than the existing one, proper structural adjustments and waterproofing techniques are essential to ensure a seamless connection and prevent water infiltration. Understanding framing techniques, load distribution, and flashing installation will help maintain stability and longevity.
Common Challenges and How to Overcome Them
Tying in a new roof to an existing one presents several challenges that can impact structural stability, weatherproofing, and overall aesthetics. Differences in roof pitch, potential leak points, and load-bearing concerns must be addressed to ensure a durable and seamless integration.

Dealing with Different Roof Pitches and Heights
One of the biggest challenges when adding a new roof section is matching the pitch and height of the existing roof. If the new roof has a different slope or sits at a different elevation, the transition can create awkward angles, drainage problems, and aesthetic inconsistencies.
Solutions:
- Adjust Rafter Cuts and Angles: If the new roof must meet an existing one at a different pitch, adjust the rafter angles accordingly. Use a framing square to determine the correct bevel cuts and plumb cuts to ensure a snug fit.
- Use a Cricket or Saddle for Smoother Transitions: When tying in a lower-pitched roof, build a cricket or saddle to divert water properly and maintain a smooth flow toward gutters or valleys.
- Incorporate a Step-Up Connection: If the new roof is at a higher elevation, use a step-up or step-down framing technique to create a structured transition that supports the load while maintaining a visually cohesive design.
- Blending the Roofline: For aesthetic continuity, align fascia boards, soffits, and overhangs to create a smooth appearance where the two roofs meet.
Preventing Leaks at the Connection Point
The junction between the new and existing roof is a common leak-prone area. Poor flashing, improper underlayment installation, or gaps between materials can allow water infiltration, leading to rot, mold, and interior damage.
Solutions:
- Install Proper Flashing: Use step flashing, valley flashing, and counter flashing where necessary. Step flashing should be installed at each shingle layer along walls or dormers, while valley flashing should extend underneath shingles to guide water away.
- Use a Waterproof Membrane: A self-adhering waterproof membrane (such as ice and water shield) should be installed beneath shingles in areas prone to water buildup, such as valleys and low-slope connections.
- Seal All Seams and Nail Holes: Apply roofing cement or high-quality sealant along flashing edges, nail heads, and any gaps between materials.
- Ensure Proper Overlapping of Materials: Underlayment and shingles should overlap correctly, allowing water to run off smoothly rather than seeping between layers.
Related Read: How to Remove Ice and Water Shield From Roof
Structural Integrity and Load Considerations
Adding a new roof section increases the weight load on the existing structure. If the original framework isn’t designed to handle the additional weight, issues such as sagging, warping, or even structural failure can occur over time.
Solutions:
- Assess Load-Bearing Capacity: Before construction, evaluate whether the existing structure can support the added roof section. Reinforce rafters, beams, or trusses as needed. If necessary, consult a structural engineer to determine load-bearing limits.
- Use Adequate Framing Support: If extending a gable or hip roof, double up rafters at the connection point or install sister joists to distribute weight evenly.
- Account for Snow and Wind Loads: In regions prone to heavy snowfall or strong winds, use additional bracing, hurricane ties, or collar ties to prevent structural movement and collapse.
- Verify Roof Decking Thickness: The existing roof decking should be at least ½-inch plywood or OSB to provide adequate support. If the new section requires more strength, upgrade to ⅝-inch or use reinforcement strips where the two sections meet.
Best Practices for Long-Lasting Roof Integration
Ensuring a durable and weather-resistant roof connection requires attention to detail, proper installation techniques, and high-quality materials. A well-integrated roof enhances structural stability, prevents leaks, and maintains the home’s overall aesthetic appeal.
Using High-Quality Materials
The longevity of a roof connection depends largely on the materials used. Opting for durable and weather-resistant components ensures that the new section blends seamlessly with the existing roof while providing long-term protection.
Using matching or complementary roofing materials prevents visual inconsistencies and maintains uniformity. If the existing shingles are aged or discontinued, consider upgrading the entire roof to ensure consistent performance. For waterproofing, install synthetic underlayment instead of traditional felt paper, as it offers better durability and moisture resistance. Flashing materials should be rust-resistant metal, such as aluminum or galvanized steel, to prevent corrosion over time.
Ensuring Proper Ventilation and Drainage
A well-ventilated and properly drained roof system prevents moisture buildup, ice dams, and premature deterioration. When tying in a new roof, existing ventilation systems must be evaluated and adjusted if necessary.
The attic should have a balanced intake and exhaust ventilation system to prevent heat and moisture accumulation. Adding ridge vents, soffit vents, or gable vents ensures consistent airflow. In areas where the new roof alters drainage patterns, install crickets, saddles, or additional downspouts to direct water away from vulnerable areas. Ensuring that valleys are wide enough and properly flashed prevents water pooling, which can lead to leaks and rot.
Maintaining a Uniform Roof Appearance
A seamless transition between the existing and new roof improves the home’s curb appeal and prevents weak points in the structure. The new section should match the existing roof in pitch, material, color, and texture.
If the existing roof is significantly older, blending new shingles with aged ones can be challenging. A staggered shingle pattern helps create a smoother visual transition. Aligning fascia boards, soffits, and overhangs ensures continuity in design. If differences in roof pitch or height are unavoidable, use step transitions or dormers to create a natural-looking connection.
Conducting Regular Roof Inspections and Maintenance
Routine maintenance ensures that the roof tie-in remains secure and functional over time. Inspecting the connection point at least twice a year helps detect early signs of wear, leaks, or structural shifting.
Look for loose or damaged shingles, deteriorated flashing, and water stains in the attic or ceiling. Clear debris from valleys and gutters to maintain proper drainage. Reapply roof sealant where necessary to prevent water infiltration. If any structural movement occurs at the tie-in point, reinforcing the rafters or fasteners may be required.
Conclusion
Tying in a roof to an existing structure requires careful planning, precise execution, and proper waterproofing to ensure durability and leak prevention. By understanding roof structures, following local building codes, and using the right materials, homeowners and contractors can create a seamless and long-lasting roof connection.
Addressing challenges like different roof pitches, structural integrity, and weatherproofing is essential for a successful integration. Whether tackling it as a DIY project or hiring a professional, following best practices ensures a secure and visually cohesive roof addition that enhances the home’s functionality and value.
You May Also Like:

