
Do you need to raise a fence for extra privacy or extend a deck post to meet building codes? Extending a 4×4 post vertically is a practical solution for homeowners and DIY enthusiasts. This process adds height to wooden posts for fences, decks, pergolas, or shade structures without requiring the replacement of the entire framework. It saves time and money while maintaining structural stability.
This guide provides step-by-step instructions, tools, materials, and safety tips to help you extend a 4×4 post securely. Learn reliable methods like using post extension brackets or splicing joints to achieve a sturdy, long-lasting result.
Why Extend a 4×4 Post Vertically?
Extending a 4×4 post vertically addresses several home improvement needs. Homeowners often require taller posts for projects without replacing existing structures.
Common Scenarios
Homeowners extend 4×4 posts for various projects. For fences, taller posts add privacy or meet local regulations while enhancing security. On decks, raising posts support higher railings to ensure safety and comply with building codes. For pergolas or arbors, extended posts create space for shade structures or climbing plants.
Benefits of Extending Posts
Extending a 4×4 post is practical and economical compared to full replacement. This method saves money by avoiding the cost of new posts and foundations. It also preserves the current structure, which reduces labor time. Projects finish faster than rebuilding from the ground up, making it an efficient choice.
Challenges to Address
Extending posts demands attention to detail for safety and durability. The structure must support added height and weight to remain stable. Matching wood types, such as cedar or pressure-treated pine, ensures a seamless appearance. Local building codes may require permits or specific hardware, like galvanized bolts, to meet standards.
Methods to Extend a 4×4 Post Vertically
Multiple techniques allow homeowners to extend a 4×4 post vertically for projects like fences, decks, or pergolas. Each method ensures a secure connection when done correctly.
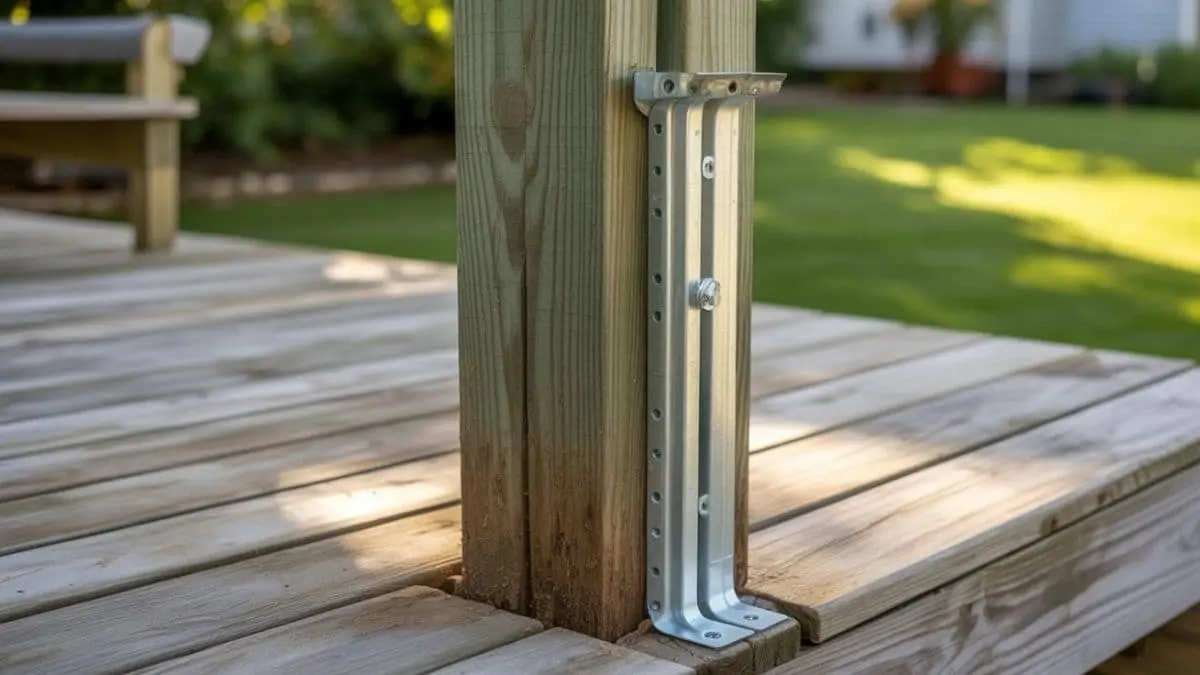
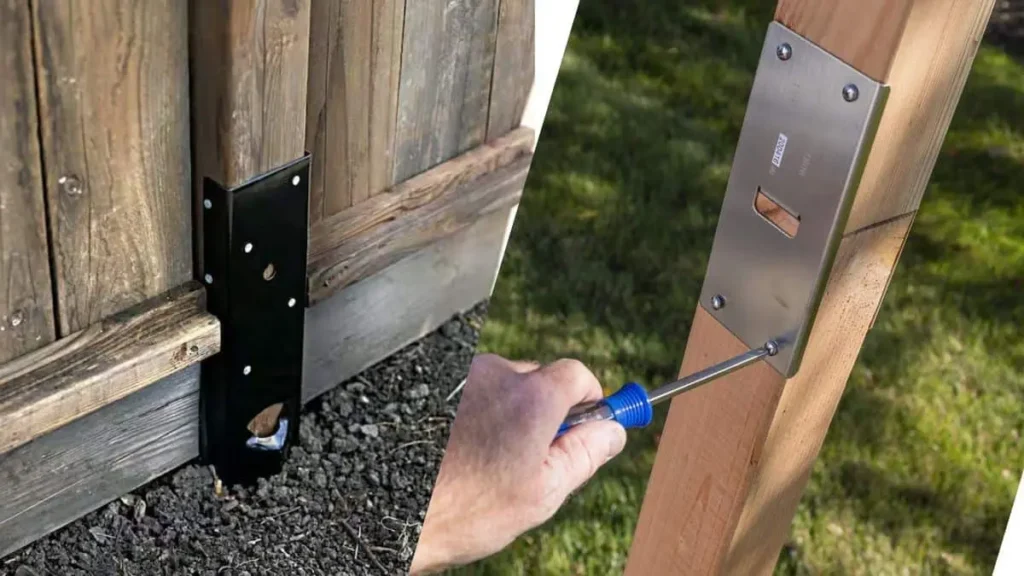
Method 1: Using a Post Extension Bracket
Post extension brackets provide a simple, sturdy solution for joining 4×4 posts vertically. These metal connectors ensure stability for non-load-bearing projects like fences.
Extend Process
Measure and cut the extension post to the required length. Secure the bracket to the existing post using galvanized bolts or screws. Attach the extension post to the bracket, ensuring alignment. Check the post with a level and tighten all fasteners.
Pros and Cons
| Pros | Cons |
| Quick and beginner-friendly | Brackets may be visible |
| Strong with proper hardware | Slightly higher material cost |
Method 2: Splicing with a Lap Joint
A lap joint creates a seamless wood post extension, ideal for aesthetic projects like pergolas. This method joins posts without visible hardware.
Extend Process
Cut a notch, half the post’s thickness, on both the existing and extension posts. Fit the posts together for a tight joint. Secure with wood glue and galvanized bolts or screws. Seal the joint with waterproof sealant for durability.
Pros and Cons
| Pros | Cons |
| Clean, aesthetic finish | Requires precise cutting |
| Strong when done correctly | Time-intensive |
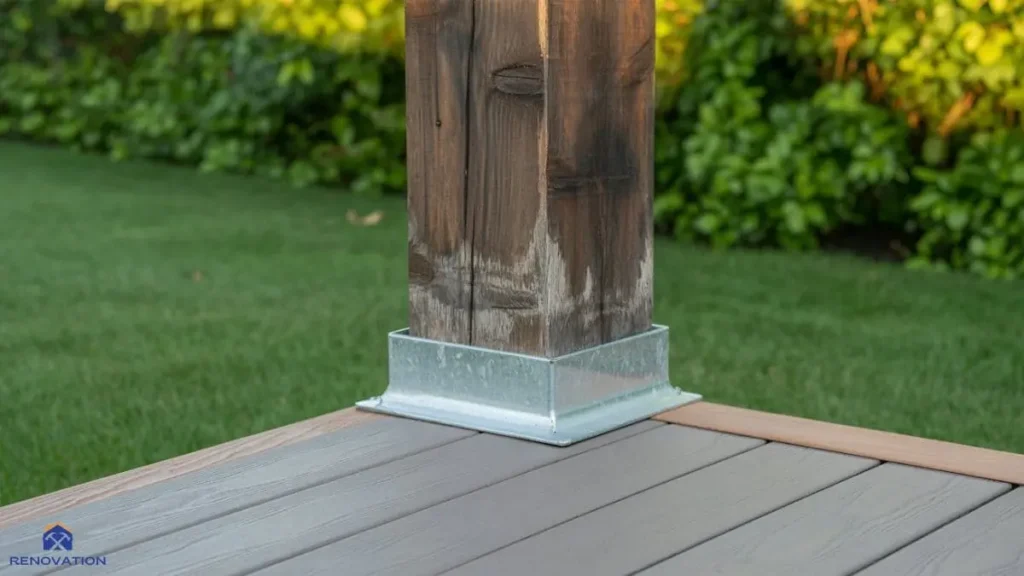
Method 3: Using a Metal Post Joiner
Metal post joiners offer a robust solution for structural extensions, such as deck support posts. They provide durability for load-bearing applications.
Extend Process
Insert the metal joiner into the top of the existing post. Secure it with screws or bolts per manufacturer instructions. Attach the extension post to the joiner’s top half. Verify alignment and stability with a level.
Pros and Cons
| Pros | Cons |
| Ideal for load-bearing posts | Higher cost for joiners |
| Durable and weather-resistant | May require pre-drilling |
Extending a 4×4 Post Vertically: Step-by-Step Guide

Extending a 4×4 post vertically requires careful planning and execution to ensure a secure, durable result. Follow these steps to achieve a stable and professional-looking extension.
Step 1: Assess the Project
Evaluate the project’s scope before starting. Measure the desired height for the extended post to confirm it meets your needs, such as increased fence privacy or deck railing compliance. Check if the post supports weight, like in deck structures, to choose a method that ensures structural integrity.
Review local building codes, as some areas require permits for fence height increases or structural changes. Note any load-bearing requirements to select appropriate hardware, such as galvanized bolts for outdoor durability.
Step 2: Gather Tools and Materials
Collect all necessary tools and materials based on your chosen extension method. Common tools include a power drill with bits, a circular saw, a measuring tape, a level, a screwdriver or impact driver, and clamps. Safety gear, such as gloves and safety glasses, protects against splinters and debris.
Materials vary by method but typically include a 4×4 pressure-treated wood post, post extension brackets or metal joiners, galvanized screws or bolts, wood glue, and waterproof sealant. Choose weather-resistant hardware to prevent rust in outdoor settings. A table below summarizes key items.
| Item Type | Examples | Purpose |
| Tools | Power drill, circular saw, level | Cutting, securing, and aligning |
| Materials | 4×4 post, galvanized bolts, sealant | Building and protecting the extension |
| Safety Gear | Gloves, safety glasses | Ensuring safe work conditions |
Step 3: Prepare the Posts
Prepare both the existing and extension posts for a seamless connection. Measure and cut the new post to the exact length needed, using a circular saw for precision. Sand the cut edges to remove splinters and ensure a smooth fit. For outdoor projects, apply a wood preservative or sealant to both posts to protect against moisture and insects. If using a lap joint, cut matching notches with a saw, ensuring each is half the post’s thickness for a snug fit. Proper preparation enhances durability and appearance.
Step 4: Install the Extension
Install the extension using your chosen method. For a post extension bracket, secure the bracket to the existing post with bolts, then attach the new post, checking alignment. For a lap joint, fit the notched posts together, apply wood glue, and fasten with bolts or screws. For a metal post joiner, insert the joiner into the existing post, secure it, and attach the extension post. Use clamps to hold posts in place during installation. Ensure the connection is tight to prevent wobbling.
Step 5: Secure and Reinforce the Connection
Strengthen the extension to ensure stability. Tighten all bolts or screws with a drill or impact driver, checking manufacturer torque recommendations for metal joiners. If using a lap joint, add wood glue before bolting for extra strength.
For load-bearing posts, like deck supports, consider adding diagonal bracing to resist wind or weight stress. Verify the connection can handle the project’s demands, such as supporting a pergola’s roof. A secure connection prevents future repairs.
Step 6: Check for Plumb and Level
Use a level to confirm the extended post is straight and plumb. Place the level on multiple sides of the post to check vertical alignment. Adjust the post or fasteners if needed, ensuring no tilt or lean. For tall extensions, have a helper hold the post steady while checking. Proper alignment ensures safety and a professional finish, especially for visible structures like fences or arbors.
Step 7: Apply Sealant or Paint
Protect the extended post from weather damage. Apply a waterproof sealant to all exposed wood surfaces, focusing on joints and cut ends. Use a brush for even coverage, applying two coats for outdoor posts. Alternatively, paint or stain the post to match the existing structure, such as a cedar fence or pine deck. Allow the sealant or paint to dry fully, typically 24 hours, before adding weight or decorations. This step extends the post’s lifespan in harsh conditions.
Tips for Success
Achieve a professional result with these practical suggestions. Work on a flat, stable surface to maintain alignment during installation. Double-check measurements before cutting to avoid errors. For larger or taller posts, enlist a helper to hold materials steady, reducing the risk of misalignment. If unsure about load-bearing requirements, consult a structural engineer for deck or pergola projects. These tips streamline the process and enhance the extension’s durability.
Recommended: How to Attach 4×4 Post to Existing Deck for Roof
Safety Tips for Extending 4×4 Posts
Safety is critical when extending a 4×4 post vertically for projects like fences or decks. Proper precautions protect against injuries and ensure a stable, durable result.
Wear Protective Gear
Protective gear prevents injuries from tools or materials. Use safety glasses to shield eyes from wood dust or metal shavings. Wear sturdy gloves to avoid splinters when handling 4×4 posts. A dust mask is essential when cutting pressure-treated wood, which releases fine particles.
For loud tools like circular saws, ear protection reduces hearing damage risk. These measures keep you safe during cutting, drilling, or fastening tasks.
Ensure Stable Footing
Stable footing prevents falls, especially when working at height. Use a sturdy ladder or scaffolding for tall posts, ensuring it’s on level ground. Check ladder weight capacity, typically 250–300 pounds, to confirm it supports you and your tools. Avoid overreaching while on the ladder to maintain balance.
For ground-level work, clear the area of debris to prevent tripping. A secure setup reduces accident risks.
Verify Load Capacity
A 4×4 post extension must support the intended weight, especially for decks or pergolas. Check the post’s load-bearing capacity, typically 2,000–4,000 pounds for pressure-treated pine, depending on length and bracing. Use galvanized bolts or metal joiners rated for outdoor structural use. Consult a structural engineer for load-bearing projects to ensure safety. Proper load verification prevents collapses or structural failures.
Follow Local Building Codes
Local building codes ensure safe and compliant structures. Some areas require permits for fence height increases above 6 feet or deck modifications. Check with your local building department to confirm regulations. Use approved hardware, like stainless steel screws, to meet code standards. Compliance avoids fines and ensures the extension’s safety for long-term use.
Common Mistakes to Avoid
Certain errors compromise safety and durability. Avoid using undersized or non-galvanized hardware, as it weakens connections and rusts outdoors. Do not skip wood preservative on outdoor posts, as untreated wood rots faster, reducing lifespan.
Ensure proper alignment during installation, as misaligned posts cause instability. The Home Safety Council noted that improper hardware selection causes 15% of DIY structural failures. Avoiding these mistakes ensures a secure extension.
How to Ensure a Long-Lasting 4×4 Post Extension
A durable 4×4 post extension enhances projects like fences, decks, or pergolas, ensuring they withstand weather and wear. Proper maintenance, reinforcement, and aesthetic choices extend the post’s lifespan and functionality.
Maintenance Tips for Durability
Regular maintenance protects the extended post from environmental damage. Apply a waterproof sealant annually to shield against moisture, which can cause rot in untreated wood. Sealant penetrates wood fibers, extending lifespan by up to 5 years for pressure-treated pine.
Inspect hardware, such as galvanized bolts or screws, every 6–12 months for rust or loosening, and tighten or replace as needed. Clean posts with a mild detergent and water to remove dirt or mold, preventing surface degradation. These steps maintain structural integrity and appearance.
Reinforcement Strategies
Strengthening the extension ensures stability under stress. For projects in windy areas, add diagonal bracing, typically 2×4 lumber, to reduce swaying. Secure braces with stainless steel screws for outdoor durability. For ground-level extensions, set posts in concrete footings, with a minimum depth of 24 inches, to anchor against movement. The National Association of Home Builders noted that concrete footings increase post stability by 30% in high-wind zones. These reinforcements support load-bearing structures like deck posts or pergola supports.
Aesthetic Enhancements
A polished appearance enhances the project’s appeal. Paint or stain the extended post to match existing structures, such as a cedar fence or pine deck, for a cohesive look. Use exterior-grade products, like acrylic-based stains, for weather resistance. Cover visible brackets with decorative trim, such as wood molding, to conceal hardware and improve aesthetics. Ensure trim is sealed to prevent water infiltration. These enhancements create a seamless, professional finish while protecting the post.
| Maintenance/Reinforcement Task | Frequency/Material | Benefit |
| Apply waterproof sealant | Annually, exterior-grade sealant | Prevents rot, extends lifespan |
| Inspect hardware | Every 6–12 months, galvanized bolts | Ensures secure connections |
| Add diagonal bracing | During installation, 2×4 lumber | Increases stability in wind |
| Set in concrete footings | During setup, 24-inch depth | Anchors ground-level posts |
| Paint or stain | During finishing, acrylic stain | Enhances look, protects wood |
These strategies ensure a 4×4 post extension remains durable and visually appealing. Regular maintenance, proper reinforcement, and thoughtful aesthetic choices create a reliable, long-lasting structure for any outdoor project.
You Can Real Also: Splicing a Floor Joist: Ensure Structural Integrity!
FAQs About Extending a 4×4 Post Vertically
Can You Extend a 4×4 Post Without Replacing It?
Yes, a 4×4 post can be extended using a post extension bracket, lap joint, or metal post joiner. These methods securely add height without removing the existing post.
What’s the Strongest Way to Join 4×4 Posts Vertically?
Metal post joiners or bolted lap joints provide the strongest connection. They support load-bearing posts, like deck supports, with galvanized hardware ensuring durability.
Do I Need a Permit to Extend Fence Posts?
Check local building codes, as permits may be required for fence heights above 6 feet. Contact your local building department to confirm regulations.
How Do I Make a 4×4 Post Extension Weather-Resistant?
Use pressure-treated wood, galvanized hardware, and apply waterproof sealant. Sealant protects against moisture, extending the post’s lifespan by up to 5 years.
Can I Extend a Deck Post for Railing Height?
Yes, deck posts can be extended to increase railing height. Ensure the method, like a metal joiner, meets building codes and supports the railing’s load.

