

Adding a roof to an existing deck requires strong and secure support posts. Attaching 4×4 posts to a deck’s structure ensures stability and prevents structural failure. Whether installing a pergola, covered porch, or patio roof, proper attachment methods are essential for durability and safety.
Building codes often require posts to be anchored to the deck’s framing rather than just the surface boards. Using post bases, through-bolting, blocking, or notching provides a solid foundation for the roof structure. Choosing the right method depends on the deck’s design, load requirements, and material strength.
This guide explains how to securely attach 4×4 posts to an existing deck using different techniques. It also covers building code considerations, reinforcement tips, and common mistakes to avoid.
Step-by-Step Guide to Attaching 4×4 Post to Existing Deck for Roof
Attaching a 4×4 post to an existing deck is a crucial step in adding a roof, pergola, or covered structure. A strong connection ensures the stability of the posts, prevents movement, and supports the weight of the roof. The method used depends on factors like deck framing, post placement, and load-bearing requirements.

Planning and Preparation
Check Local Building Codes and Permits
Most areas have specific building codes that regulate deck modifications, including post attachments for a roof. Some jurisdictions require a permit, especially if the roof is attached to the house. Check local codes to determine:
- Minimum post size and spacing requirements.
- Load-bearing capacity for the deck structure.
- Required fastening methods for securing posts.
Skipping this step can result in safety hazards, failed inspections, or costly modifications later.
Choose the Right Materials
A 4×4 post should be pressure-treated lumber or a naturally weather-resistant wood like cedar or redwood. These materials resist moisture, rot, and insect damage. Metal or composite posts can also be an option for modern designs.
Fasteners and brackets must be rated for structural connections and outdoor use. Recommended options include:
- Galvanized lag bolts (at least ½-inch diameter).
- Carriage bolts with washers and nuts for stronger connections.
- Post bases and anchors designed for deck installations.
Measure and Mark Post Locations
Accurate placement is critical for structural integrity. Measure the deck layout and determine the exact position for each post. Use a chalk line or pencil to mark locations, ensuring even spacing and alignment.
- Posts should align with joists or beams for maximum support.
- Roof loads must be evenly distributed to avoid uneven stress on the deck.
Once planned, double-check measurements before drilling or cutting.
Methods for Attaching 4×4 Posts to an Existing Deck
The best method depends on the deck’s structure, post location, and intended load capacity. Below are the most effective techniques.

Using Post Bases (Best for Stability & Ease of Installation)
Post bases or anchors provide a secure way to attach 4×4 posts without compromising the deck’s integrity. These brackets are mounted directly to the deck surface and keep the posts elevated, preventing water damage.
Installation Steps:
- Position the post base bracket on the marked location.
- Drill pilot holes and secure the bracket to the deck using lag screws or structural screws.
- Insert the 4×4 post into the bracket and ensure it is plumb.
- Fasten the post by bolting it through the base or securing it with screws.
Pros:
- Easy installation with minimal modifications to the deck.
- Prevents moisture from affecting the bottom of the post.
- Suitable for light to moderate roof loads.
Cons:
- Less stable than through-bolting.
- Not ideal for heavy roof structures.
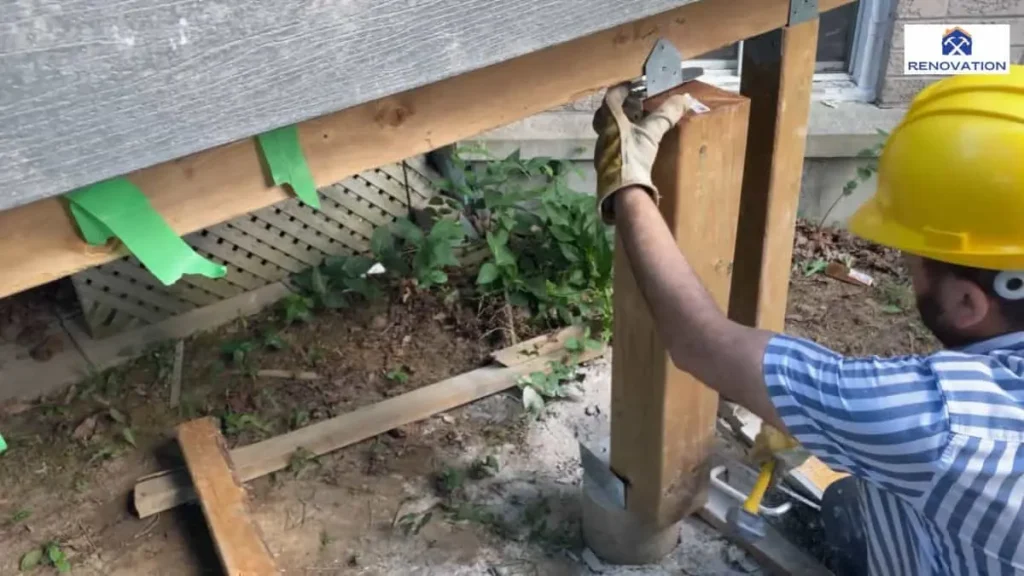
Through-Bolting for Maximum Strength
Through-bolting involves attaching the post directly to the deck’s framing, providing a much stronger connection than surface-mounted brackets. This method is recommended for heavier roof structures.
Installation Steps:
- Position the post against a joist or beam for maximum support.
- Drill holes through both the post and deck framing.
- Insert a ½-inch carriage bolt, ensuring it extends fully through both materials.
- Secure with a washer and nut on the opposite side.
- Tighten until the post is firmly in place.
Pros:
- Provides a strong and durable connection.
- Ideal for supporting heavier roofs or pergolas.
- Ensures a wobble-free post attachment.
Cons:
- Requires access to the deck’s underside for securing nuts.
- More labor-intensive than post bases.
Blocking and Reinforcement for Added Support
Blocking strengthens the deck by adding extra wood between joists, creating a solid anchor point for the post. This method is essential when the post is not directly over a joist or beam.
Installation Steps:
- Measure and cut a 2×6 or 2×8 block to fit between joists.
- Secure the block with screws or bolts to prevent shifting.
- Position the 4×4 post over the reinforced section.
- Use lag screws or bolts to attach the post to both the deck and blocking.
Pros:
- Adds extra strength to the deck frame.
- Helps distribute the weight of the roof evenly.
- Prevents posts from shifting over time.
Cons:
- Requires modification of the deck’s structure.
- More time-consuming than other methods.
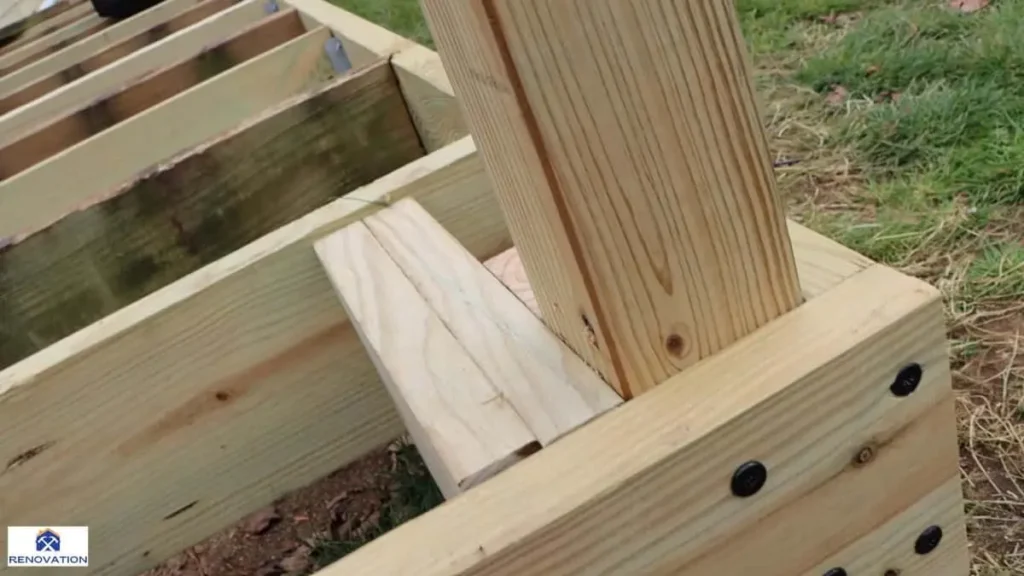
Notching the Post for Extra Stability
Notching allows the 4×4 post to rest directly on the deck’s framing, increasing stability. This method works best when the post aligns with the deck’s rim joist or beam.
Installation Steps:
- Cut a 1½-inch deep notch into the bottom of the 4×4 post to fit over the joist.
- Position the notched post over the rim joist or beam.
- Secure with lag bolts or carriage bolts through the post and framing.
- Ensure the post is level before tightening the bolts.
Pros:
- Increases contact between the post and deck frame.
- Provides extra lateral stability.
- Works well for load-bearing posts.
Cons:
- Requires precise cutting for a proper fit.
- Not suitable if the deck’s structure doesn’t allow for notching.
Read Also: How to Attach a Porch Roof to a Brick House
Ensuring Stability & Durability
A properly attached 4×4 post must be stable and capable of supporting the roof’s weight without shifting over time. Reinforcing the connection, protecting the materials, and conducting regular maintenance are essential for long-term durability.

Reinforcing Posts for Structural Strength
Attaching the post securely is only the first step. Additional reinforcement is necessary, especially for structures exposed to wind, snow loads, or heavy roofing materials. Diagonal bracing is one of the most effective ways to improve stability. By installing diagonal supports between the posts and the deck framing, lateral movement is significantly reduced. These braces should be fastened with structural screws or carriage bolts for maximum strength.
Another reinforcement technique is doubling up on blocking. If the post is not directly aligned with a joist or beam, additional blocking between the joists provides extra anchoring support. The blocking should be cut to fit tightly and secured with screws or bolts to prevent shifting under load.
Protecting Wood Posts from Moisture Damage
Wood posts are constantly exposed to moisture, which can lead to rot and deterioration if not properly treated. Applying a waterproofing sealant to the base of the post helps prevent water absorption. Using pressure-treated wood is essential, but adding an extra layer of protection with an oil-based or exterior-grade wood sealant extends its lifespan.
Elevating the post slightly above the deck surface using a metal post base prevents direct contact with standing water. These brackets create an air gap, allowing moisture to escape and reducing the risk of rot. If the post is installed directly onto the framing, flashing tape or a rubber gasket can be placed between the wood and metal components to minimize water penetration.
Checking for Level and Alignment
Ensuring that the posts are perfectly vertical is crucial for structural integrity. Even a slight tilt can cause uneven weight distribution, leading to premature wear or failure. A post should be checked with a level before securing it permanently. If minor adjustments are needed, shims can be used before tightening bolts or screws.
After installation, it is important to recheck alignment periodically. Wood can shift slightly over time due to temperature changes and moisture absorption. If movement is detected, reinforcements such as additional bracing or tightening of fasteners may be necessary.
Regular Inspection and Maintenance
Routine inspections help identify early signs of wear, damage, or instability. Every few months, the post connections should be checked for loosened bolts or screws. Any signs of cracking, splitting, or warping in the wood should be addressed immediately to prevent further deterioration.
If metal brackets or bolts were used, inspecting them for rust or corrosion is essential. Replacing corroded fasteners with galvanized or stainless-steel alternatives prevents long-term structural weakening. Keeping the posts clean and free of debris also helps maintain their strength, as dirt and moisture buildup can accelerate deterioration.
Ensuring stability and durability involves a combination of reinforcement, moisture protection, alignment checks, and routine maintenance. A well-supported post will provide a solid foundation for the deck roof, preventing structural failures and extending the lifespan of the entire installation.
Common Mistakes to Avoid
Attaching a 4×4 post to an existing deck for a roof requires precision and careful execution. Even small errors can compromise the structural integrity, leading to instability, premature wear, or even failure. Below are some of the most common mistakes homeowners and DIY enthusiasts make, along with ways to avoid them.
Using Inadequate Fasteners
One of the biggest mistakes is using the wrong type of fasteners. Standard wood screws or nails are not strong enough to support structural loads, especially when exposed to wind and weather. Instead, lag bolts, carriage bolts, or structural screws should be used to ensure a secure and durable connection. Additionally, all fasteners should be corrosion-resistant, such as galvanized or stainless steel, to prevent rust and deterioration.
Failing to Secure the Post to the Deck Framing
Attaching a 4×4 post directly to the deck boards without securing it to the underlying joists or beams is a critical mistake. Deck boards alone are not strong enough to support vertical loads, especially when a roof is added. The post should be bolted through the deck frame, joists, or blocking to ensure stability. If necessary, additional blocking should be installed beneath the deck to provide a solid anchor point.
Skipping Structural Bracing
Even if the post is securely attached, lateral movement can occur over time due to wind, roof weight, or vibrations. Many homeowners overlook the importance of diagonal bracing between the post and the deck frame. Without bracing, the post may gradually lean or shift, weakening the entire structure. Installing diagonal braces or cross-bracing between posts helps prevent movement and reinforces overall stability.
Neglecting Moisture Protection
Wood posts exposed to the elements can rot, warp, or weaken over time if not properly protected. A common mistake is placing the post directly onto the deck surface, where it absorbs moisture from rain or snow. To prevent this, a metal post base should be used to elevate the post slightly above the deck, reducing contact with water. Applying a waterproof sealant and using pressure-treated wood further extends the post’s lifespan.
Incorrect Post Placement and Alignment
Improperly positioning the post can create alignment issues, affecting both the aesthetics and structural integrity of the roof. A post that is slightly tilted or misaligned can cause the roof to shift unevenly over time. Before securing the post, a level and measuring tape should be used to ensure proper alignment. Checking for squareness with the existing deck structure is essential to prevent long-term structural issues.
Ignoring Load Capacity and Structural Calculations
Many homeowners underestimate the weight of a roof and fail to account for load-bearing capacity. If the deck structure is not designed to support the additional weight, it may lead to sagging or collapse. Before installing posts, it is crucial to evaluate the deck’s framing, joist size, and foundation strength to ensure they can support the roof. If necessary, reinforcing the deck with additional joists or footings will help distribute the load safely.
Overlooking Regular Maintenance and Inspections
Even a properly installed post can weaken over time if not maintained. Many people assume that once the post is installed, no further attention is needed. However, fasteners can loosen, wood can shift, and exposure to weather can cause deterioration. Regular inspections should be conducted to check for signs of wear, corrosion, or movement. Any issues should be addressed promptly to prevent long-term structural damage.
Avoiding these common mistakes ensures that a 4×4 post is securely attached, stable, and durable, providing reliable support for the deck roof. Proper planning, the right materials, and attention to detail will prevent costly repairs and structural failures in the future.
You May Also Like: Attaching Patio Roof to Fascia
FAQs: Answering Common Questions
What type of wood should I use for a 4×4 post on my deck?
When selecting wood for a 4×4 post, it’s crucial to choose pressure-treated lumber for outdoor use. This wood is chemically treated to resist rot, moisture, and insects. Cedar and redwood are also excellent choices, as they naturally resist decay. For added longevity, you can apply a protective wood sealant to further extend the lifespan of the post.
How do I ensure the 4×4 post is properly aligned with my deck?
Proper alignment is essential for both aesthetic appeal and structural stability. Use a level to check that the post is vertically straight before securing it in place. You should also measure the distance between the post and surrounding framing to ensure it is evenly spaced. If necessary, adjust the placement and use shims to keep the post plumb (vertically straight).
How deep should the 4×4 post go into the deck frame?
The 4×4 post should be securely anchored to the deck framing, with the base of the post either resting on a metal post base or bolted through the deck’s joists. Typically, the post should be embedded into the frame to a depth of at least 2-3 inches. This ensures a stable connection and reduces the risk of shifting over time.
Can I attach a 4×4 post to an existing deck without any additional reinforcement?
It’s essential to reinforce the connection to ensure safety and stability. Attaching a post directly to deck boards without securing it to the underlying joists or beams is not recommended. The post should be bolted through the framing to provide the necessary structural support. Using additional diagonal bracing and blocking also improves the post’s strength.
How do I protect the 4×4 post from moisture and rot?
Wood posts are susceptible to moisture, which can lead to rot. To protect the post, use a metal post base to elevate it slightly off the deck surface, preventing direct contact with water. Additionally, apply a waterproof sealant to the base of the post and use pressure-treated wood that is resistant to moisture. This will help extend the lifespan of the post and prevent long-term damage.
Conclusion
Attaching a 4×4 post to an existing deck for a roof may seem like a simple task, but it requires careful planning, proper materials, and attention to detail to ensure stability and safety. By following the right methods for securing the post, reinforcing it for added strength, and protecting it from moisture, you can create a durable and reliable foundation for your deck roof.
Avoiding common mistakes, such as using inadequate fasteners or failing to reinforce the structure, is essential for ensuring that your post will stand the test of time. Regular maintenance and inspections also play a crucial role in keeping the post stable and preventing long-term damage.
Whether you’re a DIY enthusiast or seeking professional help, taking the time to properly attach and reinforce your 4×4 post will ensure a safe and functional deck roof. With the right approach and attention to detail, you’ll be able to enjoy a strong, long-lasting outdoor space for years to come.

