

Properly wiring a bathroom fan and light is essential for ventilation, moisture control, and lighting efficiency. A well-ventilated bathroom prevents mold, mildew, and excess humidity, while proper lighting enhances visibility and ambiance. Ensuring the correct wiring setup improves energy efficiency, extends the lifespan of electrical components, and enhances safety.
A bathroom fan and light can be wired using a single switch, dual switch, or a smart control system, depending on preference and functionality. Each wiring method follows specific electrical codes, requiring the right wire gauge, circuit protection, and grounding for safe operation. Understanding National Electrical Code (NEC) regulations, GFCI/AFCI protection, and local building codes is critical to ensuring compliance and avoiding electrical hazards.
This guide explains the step-by-step process of wiring a bathroom fan and light, covering tools, materials, best practices, and common mistakes to avoid. Whether installing a new system or upgrading an existing one, following proper wiring methods ensures a safe and efficient bathroom electrical setup.
Electrical Wiring for a Bathroom Fan and Light
Wiring a bathroom fan and light involves connecting both devices to a power source, ensuring they operate safely and efficiently. The wiring configuration depends on whether the fan and light are controlled by a single switch, dual switches, or a timer-based smart control. Proper installation follows electrical codes, safety standards, and load requirements to prevent issues such as circuit overloads, short circuits, or fire hazards.

How a Bathroom Fan and Light Work Together
A bathroom fan and light can be wired to function independently or together. The fan is responsible for removing excess humidity, odors, and airborne particles, while the light provides illumination for daily activities.
In most cases, a fan-light combination unit is installed, where both components share a common power source but have separate or combined switch controls. Wiring options include:
- Single-Switch Operation – Both the fan and light turn on and off together using one switch. This setup is simple but may lead to unnecessary fan usage when only lighting is needed.
- Dual-Switch Operation – A separate switch controls each component, allowing independent use. This setup improves energy efficiency and user convenience.
- Smart or Timer-Based Controls – Advanced setups include motion sensors, humidity sensors, or timers that automatically activate or turn off the fan based on usage conditions.
Each wiring method has different circuit requirements, including proper grounding, wire gauge selection, and switch configuration to ensure smooth operation.
Electrical Code Requirements and Safety Standards
Electrical installations in bathrooms must comply with National Electrical Code (NEC) standards and local building regulations to ensure safety and efficiency. Bathrooms are considered high-moisture areas, requiring special precautions for wiring, circuit protection, and switch placement.
Ground Fault Circuit Interrupter (GFCI) Protection
The NEC mandates that all bathroom electrical outlets and certain hardwired fixtures, including fans and lights, be protected by a GFCI circuit. GFCI protection prevents electrical shock by immediately shutting off power if a ground fault occurs.
Arc Fault Circuit Interrupter (AFCI) Protection
In many areas, AFCI protection is required in residential circuits, including bathroom lighting and exhaust fans. AFCIs detect electrical arcs that could lead to fires, shutting off power if a hazardous condition is detected.
Wire Gauge and Circuit Requirements
The wiring setup depends on the electrical load and circuit amperage:
- A 15-amp circuit is typically used for a standard bathroom light and fan combination. A 12-gauge wire is recommended for a 20-amp circuit, while a 14-gauge wire is suitable for 15-amp circuits.
- If the fan includes a heater function, a separate dedicated 20-amp circuit is often required to handle the additional load safely.
Switch Placement and Accessibility
Switches must be placed at least 3 feet away from bathtubs and showers to prevent accidental contact with water. If installing a dimmer or timer switch, it must be rated for use in high-humidity environments to prevent premature failure.
Ducting and Ventilation Requirements
The NEC requires that bathroom exhaust fans vent directly outdoors rather than into an attic or ceiling cavity to prevent moisture buildup and mold growth. The ductwork should be as short and direct as possible, using a rigid or semi-rigid duct to ensure efficient airflow.
Following these electrical code guidelines ensures a safe and compliant installation, preventing hazards such as circuit overload, fire risks, or improper ventilation.
Step-by-Step Guide to Wiring a Bathroom Fan and Light
Wiring a bathroom fan and light correctly ensures safe and efficient operation. The installation process depends on whether they are controlled by a single switch, dual switches, or a timer/smart switch. Regardless of the wiring configuration, using the right tools, following electrical code requirements, and ensuring proper connections are crucial to prevent safety hazards such as overloaded circuits, electrical shorts, or improper ventilation.
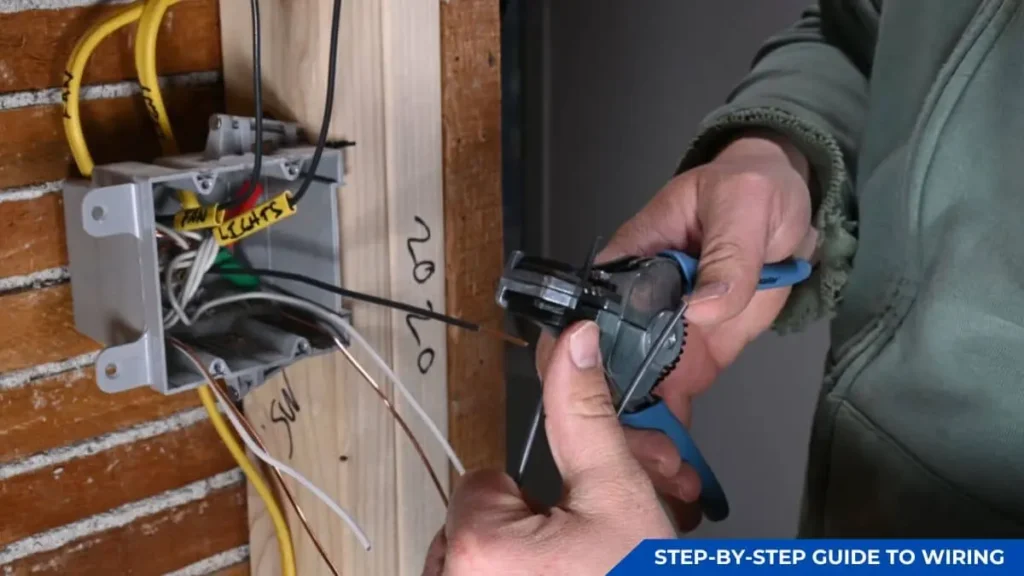
Tools and Materials Needed
Before beginning the installation, gather the necessary tools and materials to ensure a smooth process. Having everything prepared minimizes the risk of interruptions and potential wiring errors.
Essential Tools
- Voltage tester – To confirm power is off before working on wiring.
- Wire stripper and cutter – For removing insulation and trimming wires to the proper length.
- Needle-nose pliers – For twisting and securing wire connections.
- Screwdrivers (flathead and Phillips) – For securing electrical connections and installing the switch.
- Drill and hole saw – If cutting a hole for the fan unit is required.
Required Materials
- Bathroom fan and light unit – Ensure it meets the required ventilation capacity and electrical rating.
- Electrical wire (Romex NM-B 14/2 or 12/2) – Select the correct wire gauge based on circuit requirements.
- Wire nuts – To secure wire connections.
- Electrical tape – For additional insulation around wire connections.
- Wall switch (single, dual, or timer switch) – Based on the preferred control method.
- Electrical box – To house the switch securely.
- Circuit breaker (if upgrading electrical panel) – Ensure the circuit has adequate protection.
Wiring a Bathroom Fan and Light to a Single Switch
A single-switch setup controls both the fan and light simultaneously. This method is simpler to install and requires minimal wiring. However, the fan will turn on whenever the light is used, which may not be ideal for energy efficiency.
Step 1: Turn Off the Power
Locate the correct circuit breaker in the electrical panel and switch it off. Use a voltage tester to confirm there is no power running to the switch or fixture.
Step 2: Run the Electrical Wire
Run a 14/2 NM-B wire (black, white, and ground) from the circuit breaker to the switch box and then to the bathroom fan-light combo. Ensure the wiring is properly secured along the joists or within conduit if required by local code.
Step 3: Make the Connections
At the Switch Box:
- Connect the black wire (hot) from the power source to the switch terminal.
- Connect the black wire leading to the fan-light unit to the same terminal (hot side).
- Connect the white neutral wires together with a wire nut.
- Attach the ground wire to the grounding screw inside the box.
At the Fan-Light Unit:
- Connect the black wire to the black wire of the fan-light combo (hot).
- Connect the white wire to the white wire of the unit (neutral).
- Secure the ground wire to the grounding screw.
Step 4: Test the Installation
Restore power at the breaker and turn on the switch to ensure both the fan and light function correctly.
Wiring a Bathroom Fan and Light to Separate Switches
Using dual switches allows independent control over the fan and light, improving energy efficiency and convenience. This method requires additional wiring but offers greater flexibility.
Step 1: Turn Off Power and Prepare Wiring
Turn off the power at the breaker and run a 14/3 NM-B cable (black, red, white, and ground) from the switch box to the fan-light unit.
Step 2: Wire the Switch Box
- Connect the black (hot) wire from the power source to the common terminal of the switch box.
- Connect the red wire (fan control) to one switch terminal.
- Connect the black wire (light control) to the other switch terminal.
- Secure the neutral wires together and attach the ground wire to the grounding screw.
Step 3: Wire the Fan-Light Unit
- Connect the black wire to the light’s hot wire.
- Connect the red wire to the fan’s hot wire.
- Connect the white neutral wires together.
- Secure the ground wire to the grounding terminal.
Step 4: Test the Switches
Turn the power back on and verify that each switch controls its respective function independently.
Wiring a Bathroom Fan and Light to a Timer or Smart Switch
For enhanced functionality, a timer switch or smart switch can automate the fan operation, ensuring it runs for a set duration after use. Smart switches can integrate with voice commands, humidity sensors, or motion detectors for hands-free operation.
Step 1: Choose the Right Switch
Select a timer switch with an appropriate amperage rating for the fan or a smart switch compatible with Wi-Fi or Bluetooth connectivity.
Step 2: Turn Off Power and Prepare Wiring
Turn off power at the circuit breaker and remove the existing switch if replacing one. Run the necessary wiring from the power source to the switch box and then to the fan-light unit.
Step 3: Install the Timer or Smart Switch
- Connect the line wire (hot) from the power source to the switch’s input terminal.
- Connect the load wire (black or red) to the fan or light as per the switch’s wiring diagram.
- Connect the neutral wire (if required) and secure the ground wire to the grounding screw.
Step 4: Wire the Fan-Light Unit
- Connect the corresponding load wires from the switch to the fan and light.
- Secure the neutral wires together.
- Attach the ground wire to the unit’s grounding terminal.
Step 5: Configure and Test
Restore power and set the timer duration or smart settings via the app or control panel. Test operation to ensure the fan turns on/off as programmed.
Final Checks and Safety Precautions
Regardless of the wiring method used, verify that:
- All connections are secure with wire nuts and electrical tape.
- The fan is properly vented to the exterior to prevent moisture buildup.
- The circuit is not overloaded based on amperage ratings.
Correctly wiring a bathroom fan and light improves ventilation, energy efficiency, and convenience while ensuring compliance with safety regulations.
Common Wiring Mistakes and How to Avoid Them
Properly wiring a bathroom fan and light is essential for safety, efficiency, and compliance with electrical codes. However, mistakes during installation can lead to circuit overloads, fire hazards, electrical shorts, and operational failures. Understanding common wiring errors and how to prevent them ensures a safe and long-lasting setup.
Overloading the Circuit
A common mistake when installing a bathroom fan and light is connecting them to an already overloaded circuit. Bathroom appliances, including heaters, hair dryers, and electric razors, consume significant power, and adding a fan-light combo to an overburdened circuit can cause breaker trips or overheating.
Why Overloading Occurs
- Connecting the fan and light to an existing 15-amp circuit already powering multiple outlets.
- Running additional devices (e.g., heated towel racks) on the same line.
- Using a fan with a built-in heater, which draws more current than a standard exhaust fan.
How to Avoid Overloading the Circuit
- Calculate total circuit load: Ensure the circuit does not exceed 80% of its rated capacity to prevent overheating.
- Use a dedicated circuit: Large or high-power bathroom fans should have a separate 20-amp circuit if required by code.
- Check the fan’s amperage: Standard exhaust fans typically draw between 0.5 to 2.0 amps, while fans with heaters may need 10-15 amps.
If circuit overloads continue, upgrading to a higher-capacity breaker and wiring may be necessary.
Improper Grounding
Proper grounding is critical for electrical safety, preventing shocks and ensuring excess electricity is safely discharged. Many DIY installers neglect or incorrectly wire the ground connection, increasing the risk of electrical faults.
Why Improper Grounding Happens
- Failing to connect the ground wire from the fan/light unit to the electrical box.
- Using plastic junction boxes without a dedicated grounding system.
- Leaving ground wires unsecured or disconnected.
How to Ensure Proper Grounding
- Always connect the ground wire (typically bare copper or green) to the unit’s grounding terminal.
- Use a metal junction box when required, ensuring it is properly grounded to the circuit.
- Secure ground wires with a wire nut or grounding screw to maintain a solid connection.
- Test grounding continuity with a voltage tester before restoring power.
Failure to ground the fan and light can result in electrical shocks or fire hazards, making it a non-negotiable safety step.
Incorrect Wire Gauge Selection
Choosing the wrong wire gauge can lead to overheating, excessive voltage drop, and potential fire risks. The gauge determines how much current a wire can safely carry, and selecting one that is too small for the electrical load can cause excessive heat buildup.
Common Wire Gauge Mistakes
- Using 14-gauge wire on a 20-amp circuit, which requires 12-gauge wire.
- Mixing different wire gauges within the same circuit.
- Using old or damaged wiring that cannot handle modern appliance loads.
How to Choose the Correct Wire Gauge
- Follow circuit requirements:
- 15-amp circuits require 14-gauge wire (14/2 NM-B).
- 20-amp circuits require 12-gauge wire (12/2 NM-B).
- Check the fan and light’s amperage rating to determine the necessary wire gauge.
- Upgrade old wiring if installing a high-powered fan with a heater or smart controls.
Using the correct wire gauge prevents overheating, ensures consistent voltage, and extends the lifespan of the fan and light.
Not Following Local Electrical Codes
Ignoring or misunderstanding local electrical codes can result in failed inspections, increased fire risks, and even legal consequences if the installation is not compliant. Codes vary by region but generally follow National Electrical Code (NEC) standards with specific rules for bathroom circuits, GFCI protection, and ventilation requirements.
Common Code Violations
- Installing a bathroom fan without GFCI protection in damp locations.
- Running wiring through unapproved conduit or leaving exposed splices.
- Failing to vent the exhaust fan outside, which can cause mold growth in the attic.
- Using undersized electrical boxes, leading to overcrowded wiring.
How to Stay Code-Compliant
- Check local codes before installation to ensure all wiring methods are approved.
- Use GFCI-protected circuits in bathrooms, especially near sinks and showers.
- Vent the fan to the outside rather than an attic or crawl space.
- Ensure electrical boxes have enough capacity for all wire connections.
Hiring a licensed electrician or consulting a building inspector can help verify code compliance before finalizing the installation.
You May Also Read: How to Replace a Bathroom Light with a Fan Light Combo
FAQs for Bathroom Fan and Light Wiring
Can I wire a bathroom fan and light to the same switch?
Yes, a bathroom fan and light can be wired to a single switch by connecting both devices to the same power source. This setup ensures that both turn on and off simultaneously. Use a 14/2 or 12/2 NM-B wire, depending on circuit amperage, and follow local electrical codes for safety.
Do I need a dedicated circuit for a bathroom fan and light?
Not always. A standard exhaust fan and light can often share an existing bathroom circuit. However, if the fan includes a heater, it typically requires a dedicated 20-amp circuit due to its high power draw.
What size wire do I need for wiring a bathroom fan and light?
For a 15-amp circuit, use 14-gauge wire (14/2 NM-B). For a 20-amp circuit, use 12-gauge wire (12/2 NM-B). Always match the wire size to the circuit breaker’s rating to prevent overheating and fire hazards.
Does a bathroom fan need to be GFCI-protected?
Yes, if installed near a water source. The National Electrical Code (NEC) requires bathroom fans on GFCI-protected circuits when installed near showers, tubs, or sinks to prevent electrical shocks.
What happens if I don’t ground my bathroom fan and light?
Failure to ground the fan and light can cause electrical shocks and fire hazards. Always connect the ground wire (bare copper or green) to the grounding screw or wire in the electrical box.

