

Transitioning from brick to Hardie siding is a significant upgrade that enhances a home’s curb appeal, durability, and energy efficiency. Hardie board siding, made from fiber cement, offers superior resistance to moisture, fire, and pests compared to traditional brick. Homeowners looking to modernize their exterior, improve insulation, or repair aging brick structures often consider this transition.
However, switching from brick to Hardie siding involves structural modifications, proper installation techniques, and cost considerations. Understanding the benefits, challenges, and best practices ensures a smooth transition that adds long-term value to your home.
This guide covers everything you need to know about replacing brick with Hardie siding, including key steps, material comparisons, cost estimates, and expert insights.
What is Hardie Siding?
Hardie siding, also known as James Hardie fiber cement siding, is a composite material made from cement, sand, and cellulose fibers. This combination creates a highly durable, weather-resistant, and low-maintenance exterior siding solution. Unlike wood, which is prone to rot and termites, or vinyl, which can warp under extreme heat, Hardie board is designed to withstand harsh climates and environmental stressors.

Key features of Hardie siding include:
- Moisture and Rot Resistance – Unlike wood, Hardie board does not absorb moisture, reducing the risk of warping, swelling, or mold growth.
- Fire Resistance – As a non-combustible material, Hardie siding does not ignite when exposed to flames, making it a safer option than wood or vinyl.
- Impact Resistance – Hardie board can withstand hail, strong winds, and flying debris better than traditional brick or vinyl.
- Aesthetic Variety – Available in multiple styles, including lap siding, shingles, and vertical panels, Hardie siding can replicate the appearance of wood, stucco, or traditional clapboard.
- Factory-Applied Color Technology – James Hardie’s ColorPlus® Technology provides a baked-on finish that resists fading, chipping, and peeling, reducing long-term maintenance needs.
Why Homeowners Switch from Brick to Hardie Siding
Homeowners opt for a brick to Hardie transition for several reasons, including aesthetics, performance, and cost-effectiveness. While brick is a classic, durable material, it has limitations that make Hardie siding a more attractive option in certain situations.
Modern Aesthetic Appeal
Brick exteriors can look outdated, especially on older homes. Hardie siding offers a variety of design options that allow homeowners to achieve a contemporary or traditional look with customizable textures and colors. Many homeowners prefer board and batten, shingle, or lap siding styles to create a fresh, updated appearance.
Cost-Effectiveness
Brick is expensive to install and repair. The cost of removing brick and replacing it with Hardie siding is often lower than repointing or replacing damaged brickwork. Hardie board also requires less long-term maintenance, saving homeowners money on upkeep.
Energy Efficiency and Insulation
Brick has thermal mass, meaning it retains heat but does not provide significant insulation. Hardie siding, when installed with an appropriate moisture barrier and insulation, enhances a home’s energy efficiency, reducing heating and cooling costs. This makes it a more effective option for climates with temperature fluctuations.
Structural Flexibility
Brick is heavy and rigid, making it susceptible to cracking due to foundation shifts. Hardie siding is more flexible and lightweight, reducing the risk of cracks and structural damage. Homeowners dealing with settling foundations or shifting soil conditions benefit from switching to Hardie board.
Easier Repairs and Maintenance
Damaged brick requires specialized masonry repair, which can be costly and time-consuming. Hardie siding is easier to repair or replace in sections, and its pre-painted finish (ColorPlus® Technology) extends its lifespan without frequent repainting.
Fire and Weather Resistance
While brick is non-combustible, mortar can deteriorate over time, leading to moisture intrusion and structural weakness. Hardie siding resists fire, moisture, pests, and extreme weather conditions, making it a durable, low-maintenance alternative.
Challenges & Considerations Before Transitioning from Brick to Hardie
While switching from brick to Hardie siding offers numerous benefits, the process involves significant planning, structural adjustments, and cost considerations. Homeowners must evaluate installation complexities, budget constraints, and local building regulations to ensure a successful transition. Addressing these challenges in advance helps avoid unexpected expenses and delays.
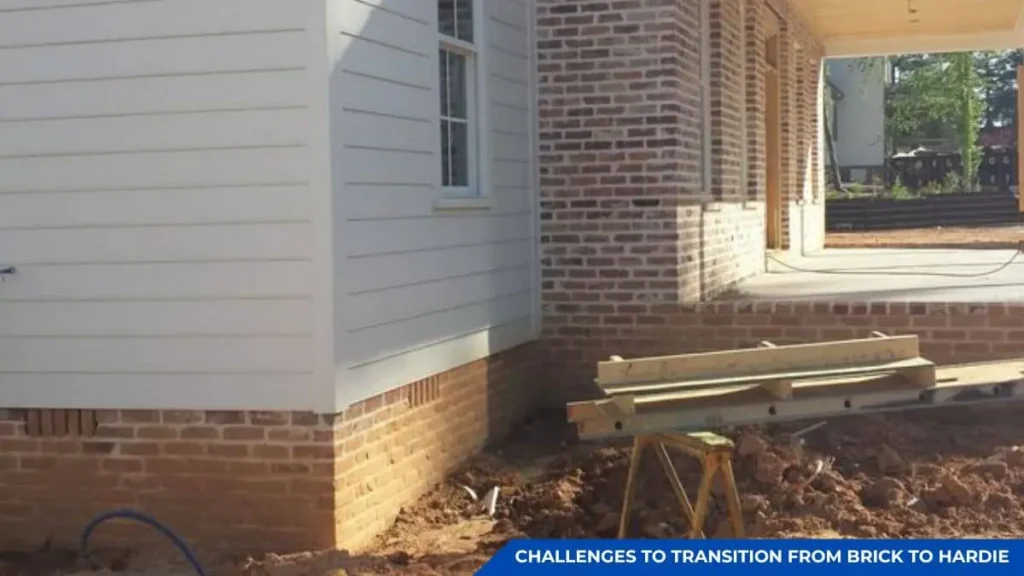
Structural and Installation Challenges
Replacing a brick exterior with Hardie siding is more complex than a standard siding upgrade. Brick is a structural material, meaning it contributes to the home’s stability. Removing it can expose underlying issues that need reinforcement before installing new siding.
One major challenge is the attachment surface. Brick is often attached directly to a wooden or metal frame, which may require additional sheathing before Hardie board can be installed. Contractors must inspect the framing to ensure it is in good condition and can support the new siding.
Moisture control is another key consideration. Unlike brick, which allows some natural airflow, fiber cement siding requires proper water barriers and flashing to prevent moisture buildup behind the panels. Incorrect installation can lead to trapped condensation, mold, and structural damage over time.
Additionally, surface leveling is crucial. Brick surfaces are often uneven, requiring modifications such as adding a plywood or OSB sheathing layer before the Hardie board is attached. Skipping this step can result in a wavy or misaligned finish, impacting the siding’s appearance and performance.
Cost Factors & Budget Planning
The cost of transitioning from brick to Hardie siding varies based on home size, labor costs, and necessary structural reinforcements. Unlike a direct siding replacement, this process involves demolition, disposal of old brick, and new material installation, which can add to the overall expense.
The main cost factors include:
- Demolition and Disposal – Removing brick is labor-intensive and may require professional demolition services. Brick disposal fees also add to the cost.
- Framing and Surface Preparation – If the home’s underlying structure requires reinforcement or sheathing, additional materials and labor will increase expenses.
- Material Costs – While Hardie siding is more affordable than brick, high-quality fiber cement panels, trims, and sealants can still be a significant investment.
- Installation Labor – Skilled labor is required for proper Hardie board installation, including cutting, sealing, and fastening the panels securely.
- Painting and Finishing – If opting for primed Hardie board instead of pre-painted ColorPlus® siding, additional painting costs should be factored in.
Homeowners should obtain multiple contractor quotes to compare costs and avoid overpaying. Budgeting for unexpected expenses, such as structural repairs or additional waterproofing, is also important to prevent financial strain during the project.
Potential Permit & Code Requirements
Switching from brick to Hardie siding often requires building permits and compliance with local construction codes. Since brick is a structural element, removing it may impact the home’s weight distribution and wind resistance, triggering specific regulations.
Common permit requirements include:
- Structural Inspection – Some municipalities require an inspection to determine if additional reinforcements are needed before removing brick.
- Energy Code Compliance – Hardie siding must be installed with proper insulation and vapor barriers to meet energy efficiency standards.
- Fire Code Considerations – While Hardie board is fire-resistant, some areas may have fire-rated sheathing requirements when replacing masonry exteriors.
- Historical or HOA Restrictions – Homes in historic districts or HOA-governed communities may have design restrictions preventing full brick removal.
Failing to secure permits can result in fines, project delays, or issues when selling the home. Homeowners should consult their local building department or a licensed contractor to ensure compliance before starting the transition.
Related Read: Hardie Siding Over Concrete Block
How to Transition from Brick to Hardie Siding: Step-by-Step
Successfully transitioning from brick to Hardie siding requires a well-planned approach to avoid structural issues, ensure durability, and achieve the desired aesthetic. The process involves preparation, brick removal or covering, and proper installation of Hardie board. Each step must be executed carefully to prevent moisture problems, misalignment, or code violations.
Step 1: Planning & Preparing Your Home
Proper planning is essential before making the switch from brick to Hardie siding. The first step is to assess the home’s structure, as brick often serves as a partial load-bearing element. A licensed contractor or structural engineer should evaluate whether additional reinforcements are needed before removing the brick.
Obtaining the necessary permits is another crucial step. Most municipalities require a building permit for siding replacement, especially when removing masonry. Homeowners should check local zoning laws, energy codes, and fire safety regulations to ensure compliance.
Budgeting is also important. Since the transition process involves demolition, disposal, framing adjustments, and new material installation, costs can range between $12,000 and $30,000, depending on home size and labor rates. Getting multiple contractor estimates helps homeowners make an informed financial decision.
Before starting work, it’s essential to protect surrounding areas. Removing brick generates dust and debris, which can damage windows, landscaping, and adjacent structures. Using plastic sheeting and temporary barriers helps minimize the mess and protects the home during construction.
Step 2: Removing or Covering the Brick
Once the home is prepped, the next decision is whether to remove the brick entirely or cover it. Each approach has its pros and cons, depending on structural requirements, cost, and personal preference.
Opinion 1: Removing the Brick Completely
Many homeowners opt to fully remove the brick to create a clean slate for installing Hardie siding. This method ensures proper surface leveling, structural reinforcement, and moisture control.
Brick removal begins with carefully dismantling the masonry using chisels, hammers, or power tools. Contractors typically start at the top and work downward to prevent uncontrolled collapse. Once the brick is removed, the exposed framing is inspected for damage, rot, or insect infestation. Any compromised areas must be repaired before proceeding.
One key advantage of full brick removal is that it allows for modern insulation upgrades. Adding rigid foam board or house wrap improves energy efficiency and prevents heat loss. However, this approach is more labor-intensive and costly, as it requires additional materials like sheathing and vapor barriers before installing the Hardie board.
Opinion 2: Covering the Brick with Furring Strips
For homeowners seeking a less invasive and more budget-friendly approach, Hardie siding can be installed directly over brick by using furring strips. This method eliminates the need for demolition while still achieving a modern, clean look.
Furring strips, usually treated wood or metal, are secured to the brick using masonry anchors. These strips create a flat, even surface for attaching Hardie panels. The main challenge with this method is ensuring proper moisture drainage. If water gets trapped between the old brick and the new siding, it can lead to mold, rot, or structural damage. Installing a drainage plane and vapor barrier is critical to prevent these issues.
Covering brick with Hardie board is faster and less expensive than removal, but it adds slight bulk to the exterior walls. Homeowners should check for any restrictions from HOAs or local building codes, as some areas may not permit this approach.
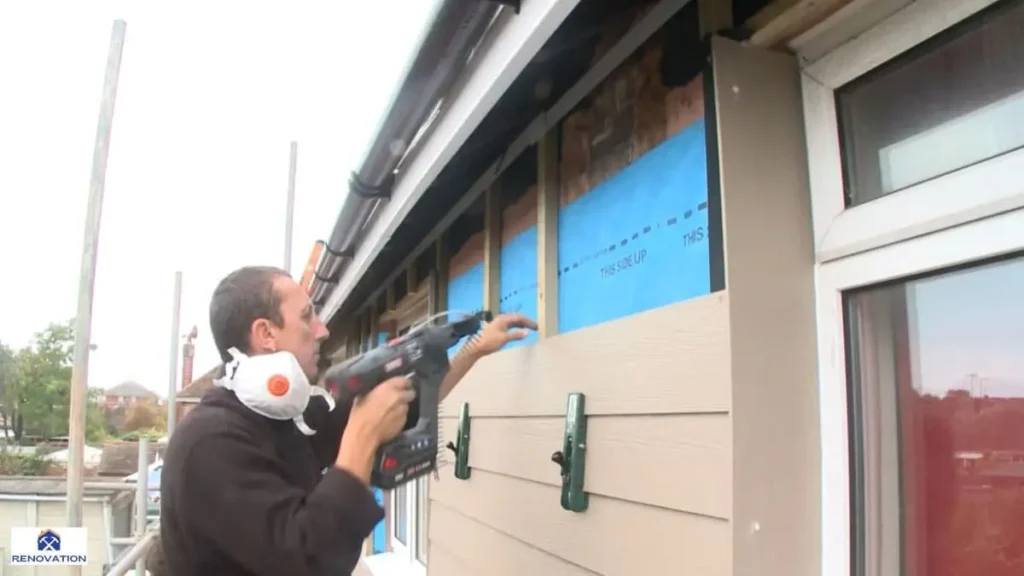
Step 3: Installing Hardie Siding Properly
Once the surface is prepared, the final step is installing Hardie siding correctly to ensure durability and longevity.
First, a weather-resistant barrier (WRB), such as house wrap or felt paper, is applied over the framing or furring strips. This barrier protects against moisture infiltration and ensures the home remains energy-efficient.
Next, Hardie siding is cut to size using specialized shears or carbide-tipped blades. Unlike wood or vinyl, fiber cement requires precise cutting tools to prevent chipping or dust buildup. The panels are then attached using stainless steel or hot-dipped galvanized nails, ensuring a secure hold against wind and moisture.
Proper spacing and joint sealing are critical during installation. Expansion gaps must be left between panels to accommodate temperature changes, and all seams should be sealed with caulk or flashing to prevent water intrusion. If the siding is pre-primed, it must be painted with a high-quality, weather-resistant coating to enhance durability. Alternatively, homeowners can opt for James Hardie’s ColorPlus® technology, which comes pre-finished and requires minimal maintenance.
After installation, a final inspection ensures all seams are properly sealed, panels are securely fastened, and the overall alignment is smooth. This final step guarantees that the Hardie siding will provide long-term protection, energy efficiency, and enhanced curb appeal.
If you’re considering a brick to siding transition, it’s essential to understand the different options available for your home. Whether you’re leaning toward Hardie siding or another material, making the right choice can significantly impact both the aesthetic and functional aspects of your home’s exterior. Explore more about siding installation and material choices in our related blog articles for helpful insights and step-by-step guidance.
Expert Tips & Best Practices for a Seamless Transition
Transitioning from brick to Hardie siding requires careful planning and precise execution to ensure the best results. Choosing the right materials, deciding between professional installation and DIY, and maintaining the siding properly can significantly impact the durability and aesthetic appeal of the new exterior.

Choosing the Right Hardie Siding for Your Home
James Hardie offers a variety of fiber cement siding options that cater to different architectural styles and climate conditions. Selecting the right type of Hardie siding is crucial for both functionality and aesthetics.
Consider the Architectural Style
The choice of Hardie siding style should complement the home’s design. For a traditional or classic look, HardiePlank® lap siding provides the timeless appeal of wood without the risk of warping or rotting. Homeowners who prefer a modern aesthetic might opt for HardiePanel® vertical siding, which creates a sleek and contemporary appearance. HardieShingle® siding is ideal for homes that aim for a coastal or cottage-style look, as it mimics the charm of cedar shingles.
Factor in Climate Conditions
James Hardie designs its products based on HardieZone® technology, which tailors siding to specific climates. Homes in wet or humid regions benefit from H5-rated siding, which resists moisture and mold growth, while properties in areas with extreme temperature fluctuations require H3-rated siding, engineered to withstand freeze-thaw cycles. Checking the local climate zone ensures the siding performs optimally in the long run.
Color and Finish Options
Hardie siding is available in pre-finished options (ColorPlus® Technology) or paint-ready versions. ColorPlus® siding is factory-coated with a baked-on finish, providing better UV resistance and reducing the need for frequent repainting. Homeowners who want custom color choices can select primed Hardie siding and paint it post-installation. However, it’s essential to use high-quality, weather-resistant paint to maintain durability.
Working with Professionals vs. DIY Installation
Deciding between hiring a contractor or installing Hardie siding as a DIY project depends on experience, skill level, and budget. While professional installation guarantees precision and compliance with building codes, some homeowners may consider DIY to cut costs.
Hiring Professionals for Hardie Siding Installation
Working with a James Hardie Preferred Contractor ensures the siding is installed correctly, according to manufacturer guidelines. These contractors have been trained and certified to follow best practices, including proper moisture barrier installation, correct fastener placement, and expansion gap allowances.
Professional installation also reduces the risk of structural issues, as experts know how to assess framing, install sheathing, and create proper drainage paths. Hiring a contractor typically costs between $5 to $12 per square foot, depending on labor rates and project complexity.
Challenges of DIY Hardie Siding Installation
Although DIY installation may seem cost-effective, it requires specialized tools and expertise. Cutting Hardie board produces silica dust, which can be hazardous without proper protective gear. Additionally, fiber cement siding is heavier than vinyl or wood, making handling and fastening more challenging for an individual.
Improper installation can lead to moisture infiltration, misalignment, or structural weaknesses, which may void the James Hardie warranty. While DIY may work for small areas or detached structures, full-scale home siding replacement is best left to professionals.
Maintaining Hardie Siding for Longevity
Proper maintenance extends the lifespan of Hardie siding and keeps it looking new for decades. Unlike wood or vinyl, fiber cement requires minimal upkeep, but a few key practices help preserve its durability.
Regular Cleaning
Hardie siding should be cleaned at least once a year to remove dirt, mold, and grime. A garden hose and a soft-bristle brush work best for routine cleaning. Avoid using high-pressure washers, as excessive force can damage the finish. For stubborn stains, a mild soap-and-water solution is effective.
Inspecting for Damage
Although Hardie siding is resistant to pests, rot, and extreme weather, periodic inspections help identify minor cracks, chipped paint, or loose panels before they worsen. If damage is found, it should be repaired promptly to prevent moisture penetration.
Repainting When Necessary
If the siding was installed in a primed, unpainted form, it typically requires repainting every 8 to 10 years using high-quality exterior acrylic paint. Pre-finished ColorPlus® siding lasts longer but may still need touch-ups in high-exposure areas over time.
FAQs: Brick to Hardie Transition
Homeowners often have questions about transitioning from brick to Hardie siding, including cost, installation, and maintenance. Below are the most frequently asked questions, with clear and concise answers optimized for featured snippets.
Can You Install Hardie Siding Over Brick?
Yes, Hardie siding can be installed over brick, but it requires a proper framework. Contractors typically attach wood or metal furring strips to the brick to create a flat surface for mounting the Hardie panels. A moisture barrier is also necessary to prevent water infiltration.
How Much Does It Cost to Replace Brick with Hardie Siding?
The cost of replacing brick with Hardie siding ranges from $12,000 to $35,000 for a 2,000-square-foot home. This includes demolition, material costs, labor, and finishing. The exact price depends on the home’s size, structural modifications, and regional labor rates.
Is Hardie Siding More Durable Than Brick?
Brick is more durable in terms of lifespan, but Hardie siding offers better flexibility and resistance to moisture. While brick can last over 100 years, it is prone to cracking and mortar erosion. Hardie siding, made of fiber cement, is resistant to rot, fire, and pests, lasting 50+ years with proper maintenance.
Does Removing Brick Affect the Structural Integrity of a Home?
In most cases, removing brick does not compromise structural integrity, but professional assessment is necessary. Some homes use brick as a load-bearing material, so removing it requires reinforcements or alternative structural supports before installing Hardie siding.
How Long Does It Take to Replace Brick with Hardie Siding?
A full brick-to-Hardie transition typically takes 1 to 3 weeks. The timeline depends on brick removal, surface preparation, weather conditions, and contractor availability. Larger homes or those requiring extensive structural changes may take longer.
What Type of Hardie Siding is Best for Replacing Brick?
HardiePlank® lap siding is the most popular choice for replacing brick. It mimics the look of traditional wood siding while offering superior weather resistance and durability. Other options include HardiePanel® vertical siding for a modern look and HardieShingle® siding for a textured appearance.
Is Hardie Siding Energy Efficient Compared to Brick?
Brick has higher thermal mass, meaning it retains heat longer, but Hardie siding offers better insulation when installed with house wrap. Adding a moisture barrier and rigid foam insulation behind Hardie siding improves energy efficiency, helping to regulate indoor temperatures more effectively.
Conclusion
Transitioning from brick to Hardie siding is a transformative home improvement project that enhances both aesthetics and functionality. Hardie siding offers durability, design versatility, and better resistance to moisture and pests, making it an excellent choice for homeowners looking to update their exteriors.
While the process involves structural modifications, installation planning, and cost considerations, proper preparation and professional guidance ensure a smooth and long-lasting transition. Whether you choose to remove or cover the existing brick, following best practices and working with experienced contractors can help you achieve a beautiful, energy-efficient, and low-maintenance home exterior.
If you’re considering making the switch, assess your budget, check local building codes, and select the right Hardie siding style for your home’s architecture. With the right approach, your investment in fiber cement siding can significantly boost curb appeal, home value, and overall durability for decades to come.
You May Also Like: Installing Shutters on Hardie Board Siding

