
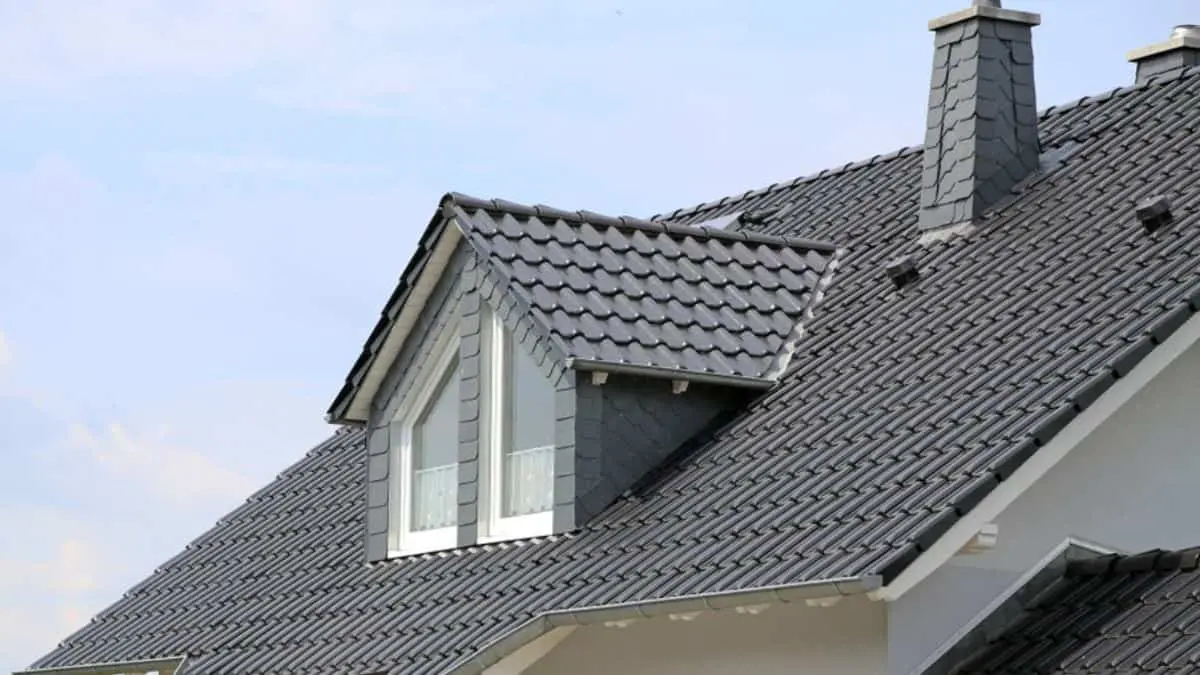
Adding a fake dormer to an existing roof is a cost-effective way to enhance a home’s curb appeal without extensive structural modifications. Unlike real dormers, which create usable interior space, fake dormers are purely decorative. They give the illusion of depth, adding character to a roofline while maintaining the architectural balance of the home.
Homeowners often choose false dormers to complement traditional styles like Cape Cod, Colonial, and Craftsman homes. They can be designed to match existing roofing materials, ensuring a seamless and natural look. With proper planning and installation, a fake dormer can improve a home’s exterior aesthetics while avoiding the complexities of full dormer construction.
This guide covers everything homeowners need to know about adding a fake dormer to an existing roof, including design considerations, materials, installation steps, costs, and common mistakes to avoid.
What Is a Fake Dormer?
A fake dormer, also called a false dormer or decorative dormer, is a non-functional architectural feature added to a roof for aesthetic purposes. Unlike a real dormer, which extends into the attic to create usable interior space, a fake dormer sits on top of the roof without penetrating it. Its primary function is to enhance the home’s curb appeal by adding depth, symmetry, and visual interest to the roofline.
Fake Dormer vs. Real Dormer
| Feature | Fake Dormer | Real Dormer |
| Function | Decorative only | Creates interior space |
| Construction | Built on top of the roof | Extends into attic or upper floor |
| Cost | Lower ($500–$3,000) | Higher ($5,000–$20,000+) |
| Structural Impact | No major modifications | Requires framing, insulation, and ventilation |
| Permit Requirement | Rarely needed | Often required |
Types of Fake Dormers
Different styles of fake dormers can match various architectural designs:
- Gable Dormer – Features a triangular roof and is the most common choice for traditional homes.
- Shed Dormer – Has a single sloping roof and works well with modern or contemporary designs.
- Eyebrow Dormer – Features a curved, wave-like roof that adds an elegant, subtle touch to the exterior.
Best Homes for Fake Dormers
Fake dormers work best on homes with pitched roofs where they blend naturally into the structure. They are commonly added to:
- Cape Cod homes – Enhance traditional charm and symmetry.
- Colonial-style homes – Maintain a balanced, stately appearance.
- Craftsman homes – Add character without altering the original design.
When properly designed, a fake dormer creates the illusion of a functional architectural element, improving the home’s overall look without the expense and complexity of a real dormer.
Benefits of Adding a Fake Dormer
Installing a fake dormer on an existing roof offers several advantages, primarily centered around aesthetics, cost savings, and long-term maintenance. While real dormers provide additional space, they require significant structural modifications. A false dormer achieves a similar architectural effect without the complexity, making it an attractive option for homeowners looking to improve curb appeal without major renovations.
Aesthetic Enhancement
One of the main reasons homeowners add a fake dormer is to improve the exterior appearance of their home. Dormers create visual interest by breaking up large, flat roof surfaces, adding a sense of depth and dimension. This is particularly beneficial for homes with plain, expansive rooflines, where a decorative dormer introduces a more traditional and balanced look.
Architecturally, dormers are often associated with classic home styles such as Cape Cod, Colonial, and Craftsman. Adding a fake dormer helps reinforce these styles, ensuring the home maintains its historical character or enhances its charm without structural modifications. Additionally, dormers can be designed to match existing roofing materials, trim, and window styles, making them blend seamlessly with the home’s exterior.
Cost-Effective Alternative to a Real Dormer
Real dormers require framing, insulation, interior finishing, and potentially altering the home’s roof structure, leading to significant expenses. The average cost of constructing a real dormer ranges between $5,000 and $20,000, depending on size and complexity.
In contrast, a fake dormer costs significantly less, typically ranging from $500 to $3,000, depending on materials, design, and labor. Because it does not penetrate the roof, there are no expenses related to flashing, waterproofing, or structural reinforcements. Homeowners can achieve the same exterior appeal at a fraction of the cost, making it a budget-friendly solution for enhancing curb appeal.
Additionally, the installation process for a false dormer is much faster. A real dormer may take several weeks to complete, whereas a decorative dormer can often be installed in a few days, reducing labor costs and minimizing disruption to the home.
Low Maintenance & Durability
Since a fake dormer does not function as a real windowed structure, it requires minimal upkeep. There is no need for interior insulation, drywall repairs, or window sealing, which are common maintenance concerns with real dormers.
Fake dormers are constructed with weather-resistant materials, such as vinyl, composite wood, or metal, ensuring they withstand rain, wind, and sun exposure without deterioration. Unlike real dormers, which can develop leaks around window edges or flashing, a false dormer is fully sealed and does not compromise the roof’s waterproofing.
Additionally, because it does not create an opening in the roof, it eliminates common problems such as roof leaks, heat loss, and ventilation issues that real dormers may introduce. This durability and low maintenance make fake dormers a long-term, worry-free investment for homeowners who want to enhance their home’s appearance without ongoing upkeep costs.
How to Add a Fake Dormer to an Existing Roof
Installing a fake dormer requires careful planning, precise construction, and proper weatherproofing to achieve an authentic look without compromising the roof’s integrity. The process involves designing the dormer to complement the home’s architecture, building a sturdy frame, and ensuring it is securely attached to the roof. Proper execution prevents water damage, maintains roof ventilation, and enhances curb appeal.

Step 1: Planning & Design
Choosing the Right Dormer Style
The first step is selecting a dormer style that matches the home’s architecture. The most common fake dormer styles include:
- Gable Dormer – Features a pitched roof with two sloping sides, ideal for traditional and colonial-style homes.
- Shed Dormer – Has a single sloping roof, suitable for modern and contemporary designs.
- Eyebrow Dormer – A curved, arched dormer that adds a soft, elegant touch to a roofline.
The dormer should blend naturally with the existing roof pitch, materials, and proportions to avoid looking out of place.
Determining Size & Placement
Proportion is crucial for a realistic appearance. A fake dormer that is too large can overwhelm the roof, while one that is too small may go unnoticed. General size guidelines include:
- Width: 30%–50% of the total dormer length should be occupied by the faux window.
- Height: The dormer should be tall enough to look functional but not extend significantly above the main roofline.
- Placement: Dormers should align with existing windows or doors for symmetry.
Using 3D design software or architectural sketches can help visualize how the dormer will look before installation.
Gathering Materials & Tools
Essential materials include:
- Framing Lumber (Pressure-treated wood for durability)
- Plywood or OSB Sheathing (For the dormer walls and roof)
- Asphalt Shingles, Metal, or Composite Roofing (To match the existing roof)
- Faux Window & Trim (PVC or composite materials for longevity)
- Flashing & Sealant (For waterproofing)
Necessary tools:
- Circular Saw & Jigsaw (For cutting materials)
- Drill & Screws (For securing the frame)
- Roofing Nails & Hammer (For shingle installation)
- Level & Measuring Tape (For precision)
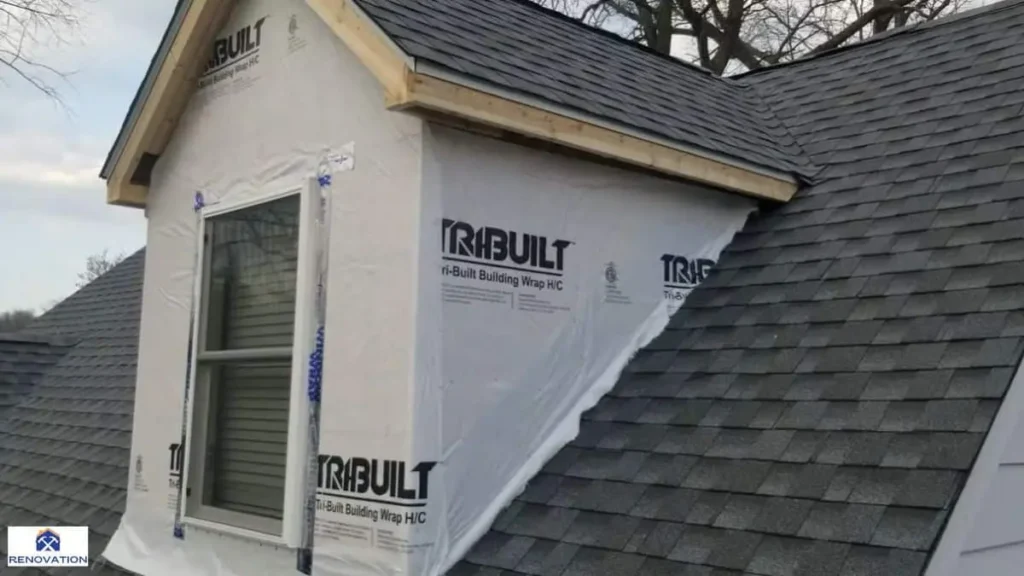
Step 2: Constructing the Fake Dormer
Building the Dormer Frame
The frame serves as the structural base of the dormer and should be built on the ground before attaching it to the roof. Steps include:
- Cut the front, sides, and roof panels according to the dormer’s dimensions.
- Assemble the frame using 2×4 or 2×6 lumber, securing corners with screws.
- Attach plywood sheathing to create the dormer walls and roof.
- Cut an opening for the faux window to enhance authenticity.
The frame must be lightweight yet durable to avoid adding excessive weight to the roof.
Installing the Faux Window & Trim
A fake dormer does not require an operable window, but including a faux window with decorative trim enhances realism. The window can be:
- A fixed glass panel for a realistic look.
- A decorative PVC or composite insert with shutters.
- A painted-on illusion for budget-friendly projects.
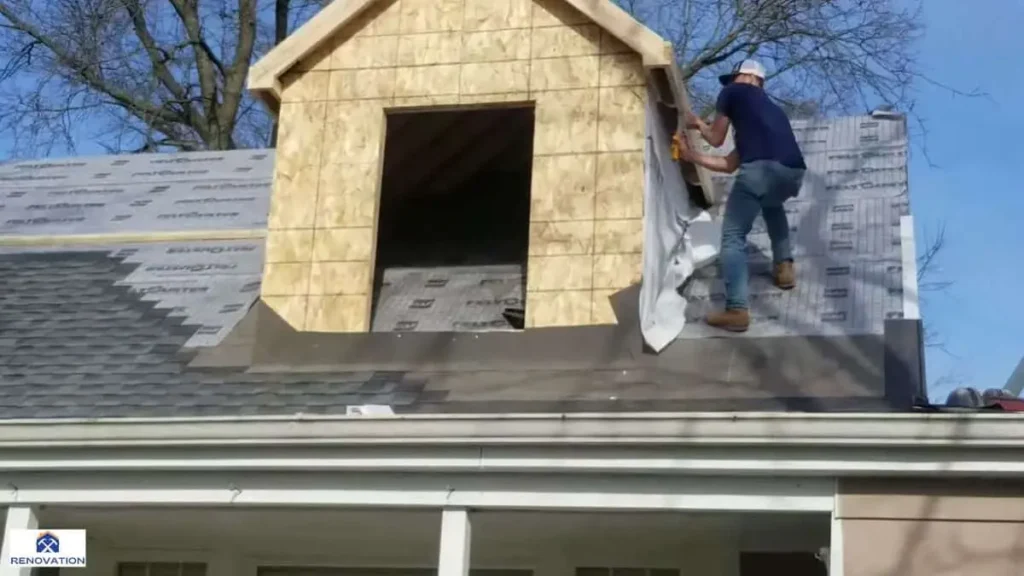
Step 3: Securing & Weatherproofing
Attaching the Dormer to the Roof
Once assembled, the dormer must be securely fastened to the existing roof. The process involves:
- Positioning the dormer correctly to ensure alignment with the home’s architectural symmetry.
- Lifting the frame onto the roof using a team or pulley system.
- Securing the dormer base with lag bolts or screws, anchoring it into the roof decking.
To prevent roof damage, avoid penetrating the shingles whenever possible. Using brackets or a raised base can help minimize potential leaks.
Waterproofing & Sealing
Proper waterproofing ensures that the fake dormer does not create moisture-related issues. Key steps include:
- Installing flashing around the base to direct water runoff.
- Applying weather-resistant sealant along all seams.
- Extending shingles over dormer edges to integrate it seamlessly with the roof.
Using UV-resistant materials and anti-mold coatings enhances durability and reduces maintenance.
Final Inspection & Maintenance
After installation, inspect the dormer for secure attachment, proper alignment, and effective water drainage. Periodically check for signs of shingle wear, sealant deterioration, or water pooling, especially after heavy rain.
A properly installed fake dormer enhances curb appeal, remains low maintenance, and preserves roof integrity, making it an excellent investment for homeowners seeking a stylish yet cost-effective home upgrade.
If your home already has fake dormer windows, you might be wondering how to enhance their appearance or make them more functional. While these architectural features are primarily decorative, there are creative ways to improve their design, integrate lighting, or repurpose them for added curb appeal. For more ideas, check out our guide on What to Do With Fake Dormer Windows, where we explore practical ways to upgrade and maintain these non-functional elements.
Challenges and Considerations
While adding a fake dormer offers aesthetic and financial benefits, several challenges must be addressed to ensure a successful installation. Proper design, weatherproofing, and compliance with local regulations are critical to avoiding common pitfalls. Failing to consider these factors can lead to a dormer that looks out of place, causes roofing issues, or violates neighborhood guidelines.
Ensuring Proper Proportions & Scale
A poorly designed fake dormer can negatively impact a home’s curb appeal instead of enhancing it. The key to a visually appealing dormer is correct proportion and scale relative to the roof and overall home architecture. If the dormer is too large, it will appear exaggerated and unnatural. If it is too small, it may look insignificant or out of place.
The dormer should align with the existing roof slope and architectural style. A gable dormer works well for steeply pitched roofs, while a shed dormer complements lower slopes. The dormer’s placement also matters—installing it too high or too low on the roofline can disrupt the home’s symmetry. Working with an experienced contractor or using design software can help homeowners visualize the dormer before installation and adjust dimensions for a balanced look.
Additionally, window size plays a role in proportion. Even though fake dormers do not have functional windows, they often include faux glass panels or decorative shutters. The window should be similar in size and style to the home’s existing windows to create cohesion.
Weatherproofing & Roof Integrity
Although a fake dormer does not penetrate the roof, improper installation can still lead to roofing issues. The biggest concern is water pooling around the dormer base, which can cause moisture buildup, mold, or roof leaks over time. To prevent this, the dormer should be securely attached with proper flashing and waterproof seals to ensure rainwater flows freely off the roof.
Another challenge is roof ventilation. Real dormers naturally introduce airflow into attic spaces, but fake dormers do not. If installed incorrectly, they may disrupt existing ventilation systems, leading to trapped heat and moisture in the attic. Ensuring that ridge vents, soffit vents, or attic fans remain unobstructed is essential for maintaining proper airflow.
Material selection also affects durability. Using weather-resistant materials like composite wood, PVC, or fiber cement prevents warping, cracking, or rotting over time. Choosing UV-resistant paints and finishes helps maintain the dormer’s appearance without frequent maintenance.
Potential HOA Restrictions
In some neighborhoods, homeowners’ associations (HOAs) regulate exterior modifications, including decorative dormers. Before adding a fake dormer, homeowners should check with their HOA or local building authority to ensure compliance with regulations.
Some HOAs impose size, color, or style restrictions to maintain neighborhood uniformity. Others may require architectural review and approval before installation. Ignoring these rules could result in fines or the need to remove the dormer entirely.
Even in areas without HOA oversight, local building codes may still apply. While fake dormers typically do not require permits, certain municipalities may have height restrictions or design guidelines for roof structures. Consulting with a contractor or building inspector ensures compliance with all applicable regulations.
Cost Breakdown & Budget Considerations
Adding a fake dormer to an existing roof is a budget-friendly way to enhance curb appeal, but costs can vary depending on materials, labor, and project complexity. A well-planned budget ensures the dormer blends seamlessly with the home’s architecture while staying within financial limits.

Material Costs
The total cost of materials depends on the size, design, and finish of the dormer. Homeowners should choose materials that match the existing roof while ensuring durability and weather resistance.
- Framing Lumber: Pressure-treated wood or engineered wood is used for the dormer’s structure. A small dormer frame typically costs $50–$150 in lumber.
- Sheathing: Plywood or oriented strand board (OSB) is necessary for the dormer walls and roof, adding $40–$100 to the total cost.
- Roofing Materials: Asphalt shingles, metal, or composite roofing must match the existing roof to maintain visual consistency. A small dormer requires about $50–$200 worth of roofing materials.
- Faux Window: Options range from PVC window inserts ($50–$200) to custom glass panels, which can cost over $300 if a realistic look is desired.
- Siding & Trim: To match the home’s exterior, homeowners may need vinyl, fiber cement, or wood siding, which costs between $5–$10 per square foot.
- Flashing & Sealant: Proper waterproofing is essential to prevent leaks. High-quality flashing and sealant cost around $30–$100, depending on dormer size.
For a basic fake dormer, material costs range from $300–$800, while a high-end dormer with custom materials can exceed $1,500.
Labor vs. DIY
The choice between hiring a contractor and handling the project as a DIY build significantly impacts overall costs.
Hiring a Professional
A professional contractor ensures proper installation, waterproofing, and aesthetic alignment with the home’s roofline. Hiring a contractor typically costs between $1,500–$4,000, depending on complexity and regional labor rates. Factors influencing labor costs include:
- Roof Accessibility: Steeper or complex roof structures increase labor charges.
- Custom Design: A fully customized dormer with high-end materials requires more labor time.
- Permits & HOA Compliance: If required, permit fees and HOA approvals can add $100–$500 to the total cost.
DIY Installation
For skilled homeowners, a DIY fake dormer is a cost-effective alternative, reducing expenses by eliminating labor fees. However, DIY installation requires knowledge of roofing techniques, structural framing, and waterproofing. The main costs are materials, tools, and potential rental equipment.
- Basic DIY Dormer: Materials cost $300–$800, with additional costs for tools if not already owned.
- Advanced DIY Dormer: Custom designs or premium materials increase costs to $1,000–$1,500.
Overall Cost Estimates
| Project Type | Estimated Cost Range |
| Basic DIY Dormer | $300–$800 |
| Advanced DIY Dormer | $1,000–$1,500 |
| Contractor-Built Dormer | $1,500–$4,000 |
| High-End Custom Dormer | $3,500+ |
A DIY project offers substantial savings but requires expertise in roofing and construction. For homeowners unfamiliar with structural work, hiring a professional ensures long-term durability and a flawless finish.
Expert Tips for a Professional Finish
A fake dormer should seamlessly blend with the roofline, complement the home’s architectural style, and withstand weather conditions. Achieving a professional finish requires careful planning, precise installation, and attention to detail.
Match Roofing & Siding Materials
Consistency is key when adding a dormer to an existing roof. Using the same shingle type, color, and texture as the main roof ensures a seamless look. If exact matches are unavailable, opt for complementary shades to avoid noticeable contrasts. Siding should also match or complement the home’s exterior, whether it’s vinyl, fiber cement, or wood.
Proportion & Placement Matter
A dormer that is too small or too large can look awkward. Proper proportion ensures balance and symmetry. The dormer should align with windows, doors, or other architectural elements to create a natural visual flow. Positioning it too close to the roof’s edge or too far back can disrupt the home’s aesthetic.
Ensure Proper Waterproofing
Even though a fake dormer is decorative, it must be properly sealed to prevent moisture issues. High-quality roof flashing, sealant, and underlayment are essential to keep water from penetrating seams. Incorrect waterproofing can lead to leaks, mold growth, and structural damage over time.
Use a Realistic Faux Window
A dormer with a blank panel instead of a faux window can look artificial. For a realistic effect, install a faux window with reflective glass or PVC inserts. If the dormer is positioned where it can be illuminated, installing backlighting or an LED panel behind the window creates the illusion of an interior space.
Secure the Frame Properly
A poorly constructed frame can warp, shift, or collapse over time. The dormer’s structure should be securely fastened to the roof deck without compromising the existing shingles. Reinforcing it with angled supports or additional bracing prevents wind damage, ensuring long-term durability.
Blend Trim & Architectural Details
Adding decorative trim, molding, or corbels helps integrate the dormer with the home’s design. Choosing the right window grid pattern, gable shape, and fascia detailing enhances authenticity. Matching or complementing existing soffits, gutters, and roof overhangs further improves the final look.
Test the Visual Impact Before Installation
Before building, use 3D modeling software, mockups, or scaled drawings to visualize the dormer. This helps fine-tune the design and placement, ensuring it looks proportional from multiple angles. If possible, construct a temporary frame and position it on the roof to assess visibility and alignment before final installation.
A well-designed fake dormer should look like an intentional architectural feature rather than an afterthought. With careful material selection, precise placement, and attention to finishing details, homeowners can achieve a high-end aesthetic without the cost of a functional dormer.
Conclusion
Adding a fake dormer to an existing roof is a cost-effective way to enhance curb appeal without the complexities of structural renovations. It creates the illusion of additional space, improves architectural balance, and can increase a home’s visual charm.
Proper planning, material selection, and installation techniques are essential to achieving a seamless and realistic look. Matching roofing and siding materials, ensuring proportionate placement, and prioritizing weatherproofing help prevent issues like leaks or aesthetic mismatches. While DIY installation is possible for experienced homeowners, hiring a professional ensures durability and a high-quality finish.
Before starting the project, check local building codes and HOA regulations to ensure compliance. Investing in quality materials, precise craftsmanship, and expert techniques will result in a long-lasting, visually appealing addition to your home.
You May Also Read: Guide to Building an Addition Roof Higher than Existing Roof

