Efficient ductwork is essential for maintaining consistent airflow, balanced temperatures, and optimal energy efficiency in multi-story homes. When ducts between floors become damaged, outdated, or improperly sealed, they can cause uneven heating and cooling, higher energy bills, and poor indoor air quality.
Replacing ductwork between floors restores proper airflow and ensures the HVAC system can efficiently deliver heated or cooled air to every level of the home. Whether addressing air leaks, upgrading aging ducts, or improving airflow during a renovation, understanding the correct process helps avoid costly mistakes.
This guide explains how to replace ductwork between floors, covering tools, materials, step-by-step instructions, expert solutions for common challenges, and key factors to consider for safe and efficient duct replacement in multi-level homes.
The Role of Ductwork Between Floors
Ductwork between floors plays a critical role in distributing heated and cooled air to different levels of a home. In multi-story houses, the HVAC system relies on a network of ducts running horizontally between floors and vertically through walls to deliver air efficiently to upper rooms.
What Between-Floor Ductwork Does
Between-floor ductwork is responsible for moving conditioned air from the main trunk line, often located in a basement or attic, to registers on upper floors. These ducts are commonly found inside floor cavities, ceilings, and wall chases, where they remain hidden but vital to maintaining comfort and proper airflow.
Horizontal vs. Vertical Ducts
There are two primary types of ducts in multi-story homes:
- Horizontal ducts: Run between the floors, typically inside floor joist cavities. These ducts carry air across the house to reach rooms above.
- Vertical ducts: Travel through wall cavities, connecting different floors to the main trunk line. Vertical ducts are essential for moving air between stories in homes with limited horizontal space.
Importance of Proper Airflow
Balanced airflow between floors ensures that rooms on upper levels receive the same heating and cooling as lower floors. Poorly designed or damaged ducts between floors can restrict airflow, creating uneven temperatures and forcing the HVAC system to work harder.
Signs Ductwork Between Floors Needs Replacement
4 key signs indicate ductwork between floors may need replacing:
- Reduced airflow: Air coming from registers feels weak, even when the system is running.
- Uneven heating and cooling: Some rooms are consistently too hot or too cold compared to others.
- Visible damage: Duct sections between floors may develop holes, disconnected joints, or sagging over time.
- Increased energy bills: Leaky or inefficient ducts force the HVAC system to use more energy, raising heating and cooling costs.
Tools and Materials Needed to Replace Ductwork Between Floors
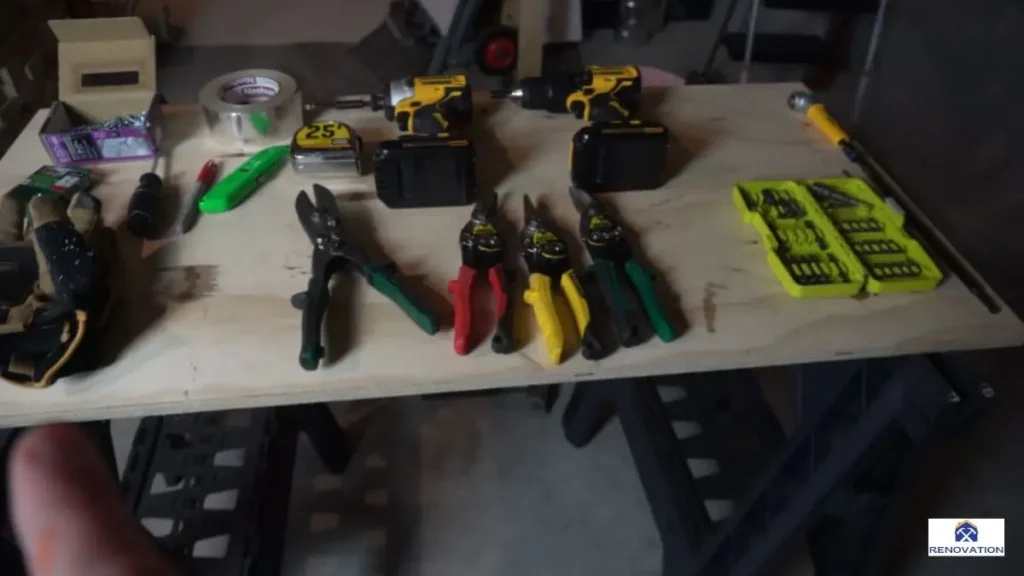
Replacing ductwork between floors requires a combination of cutting tools, fasteners, sealants, and proper duct materials to ensure a secure and airtight installation. Below is a concise table outlining essential tools and materials for the job:
| Category | Tools & Materials |
| Cutting Tools | Tin snips, reciprocating saw, utility knife |
| Fastening Tools | Drill, screwdriver, sheet metal screws |
| Measuring Tools | Tape measure, stud finder, level |
| Sealing Materials | Foil tape, mastic sealant |
| Safety Gear | Safety goggles, work gloves, dust mask |
| Duct Materials | Flexible duct, rigid metal duct, duct fittings |
| Support Materials | Hangers, straps, and brackets |
| Inspection Tools | Flashlight, inspection camera (optional) |
Step-by-Step Process to Replace Ductwork Between Floors
Replacing ductwork between floors requires careful planning, precise measurements, and proper sealing to ensure the new ducts deliver efficient airflow without leaks. Each step plays a crucial role in maintaining the overall performance of the HVAC system and ensuring that all areas of the home receive balanced heating and cooling. Below is a comprehensive, step-by-step process covering each stage in detail.
Step 1 – Inspect Existing Ductwork and Plan the Replacement
Before starting any work, a thorough inspection of the existing ductwork is essential. Identify the exact path of the ducts between floors, checking for damage, disconnected sections, or airflow restrictions. This helps determine if a full replacement is needed or if some sections can be repaired.
Use an inspection camera if sections of ductwork are hard to see, especially in tight floor cavities or wall chases. Take note of the duct type — flexible, rigid metal, or fiberglass-lined — and decide if the same material will be used for the replacement.
Key factors to assess:
- Existing duct size and layout
- Locations of floor joists, plumbing, and electrical lines
- Accessibility for removing and replacing ducts
- Condition of insulation and air seals
A detailed plan helps avoid surprises and ensures the new ductwork fits properly within the available space between floors.
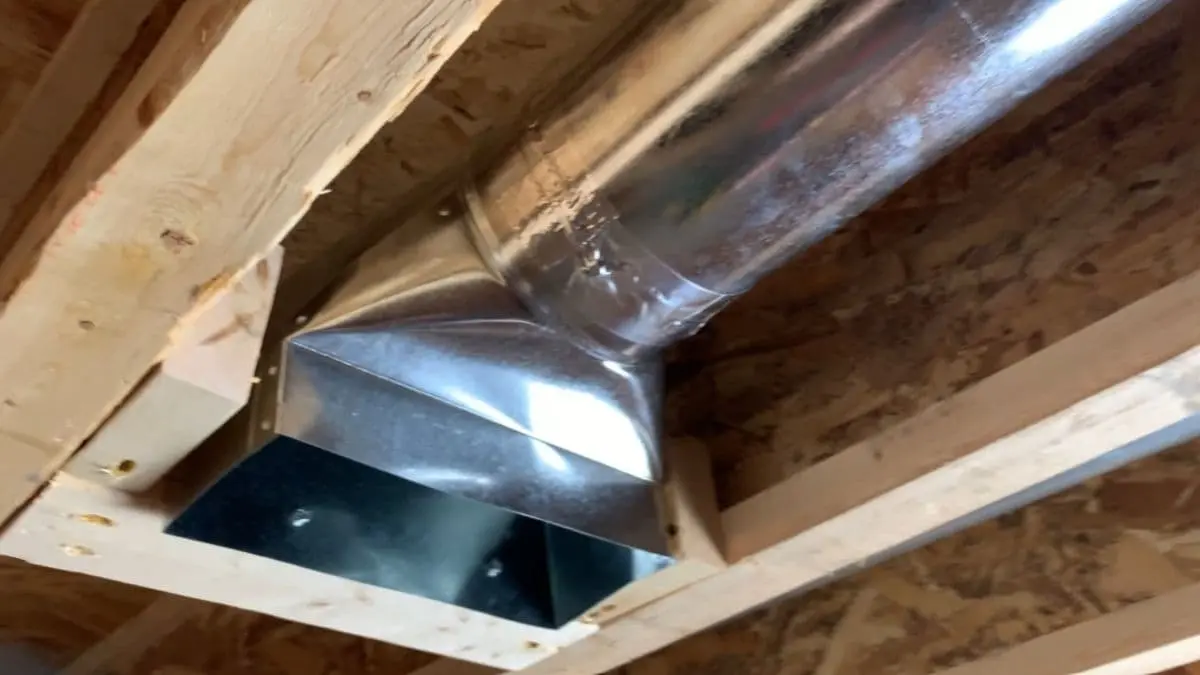
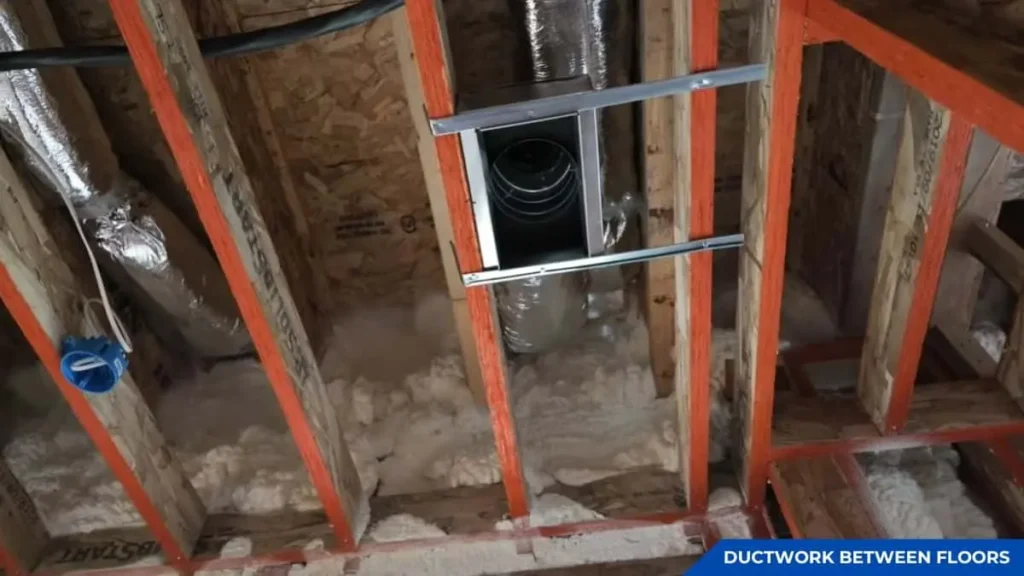
Step 2 – Gain Access to Between-Floor Ducts
Ducts running between floors are typically enclosed within floor cavities, ceilings, or interior walls. To replace them, access openings must be created without compromising structural components.
If ducts run horizontally through the floor joists, cut access panels in the ceiling below or the floor above. When ducts pass vertically through walls, sections of drywall must be removed to expose the ducts.
Always use a stud finder to locate joists, pipes, and wires before cutting. Keep the openings as small as possible while still allowing enough room to remove old duct sections and install new ones.
Common access points include:
- Ceilings beneath second-floor rooms
- Interior walls (often behind return air grilles)
- Floor cavities near HVAC supply trunks
Step 3 – Remove Old Ductwork
With access created, carefully disconnect and remove the old duct sections. For flexible ducts, cut any straps or supports and detach the ducts from the fittings. For rigid metal ducts, unscrew sections at joints and pull them apart.
Check for signs of contamination, such as dust buildup, mold, or pest debris inside the ducts. This helps determine if further cleaning or insulation replacement is necessary before installing the new ductwork.
Proper removal helps avoid damaging surrounding materials, especially if ducts run close to plumbing lines, electrical wiring, or load-bearing framing. If ducts are tightly wedged between joists, they may need to be cut into smaller sections for easier removal.
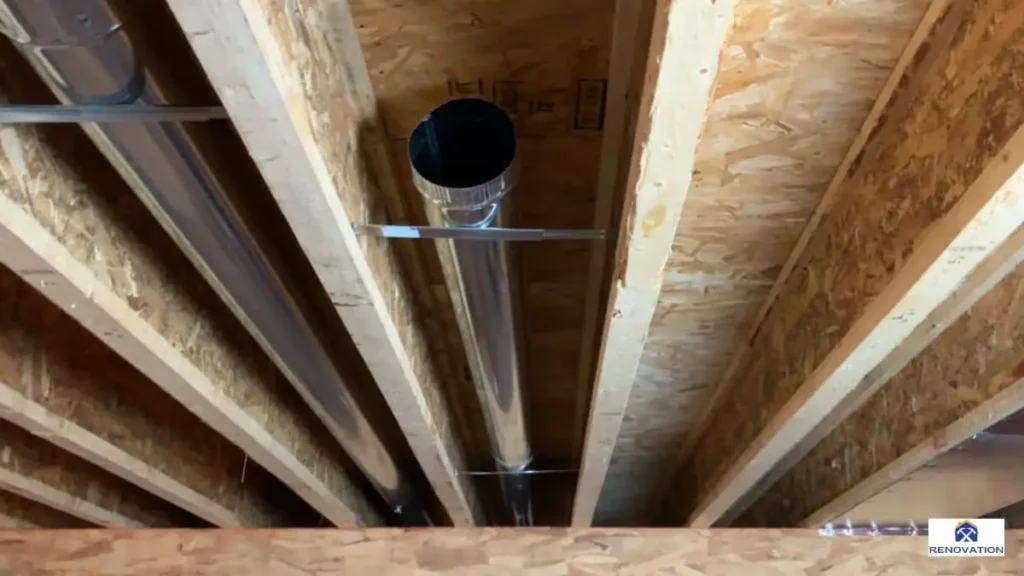
Step 4 – Measure and Cut New Duct Sections
Accurate measurements ensure the new duct sections fit securely between floors. Measure the total length of each duct run, including any bends or offsets required to navigate floor joists or wall cavities.
When using flexible ducts, cut sections slightly longer than needed to allow for secure connections at both ends. For rigid metal ducts, measure and cut each section with tin snips or a reciprocating saw, ensuring smooth edges to prevent airflow restrictions.
Best practice: Mark all connection points in advance, including transitions from horizontal to vertical runs and connections to registers or main supply lines.
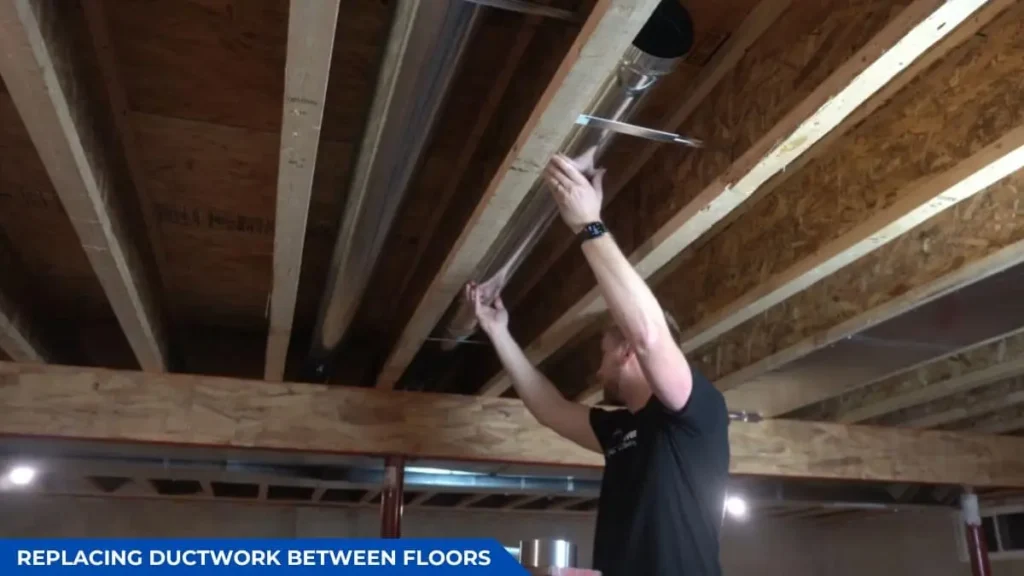
Step 5 – Install New Ductwork Between Floors
With sections cut, install the new ductwork in the same path as the old system. Start by connecting ducts at the main trunk or supply plenum, then work outward toward registers and return grilles.
When installing flexible ducts, avoid sharp bends or compressing the duct, as this restricts airflow. Stretch flexible ducts to their full length before securing them to fittings with metal clamps or zip ties.
For rigid ducts, ensure each joint fits snugly, then fasten sections together with sheet metal screws. Use hangers, straps, or brackets to support ducts every 4 to 6 feet, preventing sagging and ensuring proper airflow.
Special considerations:
- Maintain proper duct slope to encourage airflow.
- Minimize the number of elbows or sharp turns.
- Use appropriately sized ducts to match system airflow requirements.
Step 6 – Seal and Insulate Ductwork
Sealing and insulating between-floor ductwork is critical for energy efficiency and indoor air quality. Use foil-backed tape or mastic sealant to seal all joints, seams, and connections.
For ducts running through unconditioned spaces (like exterior walls), wrap them in R-6 or higher duct insulation to prevent heat loss and condensation. Even ducts inside conditioned floors benefit from basic insulation as it helps maintain consistent air temperatures.
Proper sealing and insulation prevent:
- Air leaks
- Energy loss
- Temperature inconsistencies
- Moisture buildup inside floors and walls
Step 7 – Test and Balance the HVAC System
Once installation and sealing are complete, test the HVAC system to confirm the new ducts are delivering balanced airflow to all floors. Run the heating and cooling system, checking each register for airflow strength and temperature.
If airflow varies between rooms, adjust dampers or registers to balance the system. In larger homes, professional airflow testing may be required to ensure consistent performance across floors.
Key tests to perform:
- Airflow check at each register
- Pressure testing for duct leaks (optional)
- Temperature check at supply and return vents
Step 8 – Restore Walls and Ceilings
After confirming the new ductwork is working correctly, restore all access openings. Replace drywall, patch holes, and apply new paint or texture as needed.
When closing up walls or ceilings, ensure the ducts remain easily accessible for future maintenance by installing removable access panels if possible.
Proper duct placement is essential for maintaining efficient airflow in multi-story homes. If you’re considering replacing ductwork between floors, it’s important to understand how ducts are installed within floor joists to maximize space and efficiency. For more details on ductwork between floor joists, including best practices and installation techniques, check out our in-depth guide.
Common Challenges and Expert Solutions for Replacing Ductwork Between Floors
Replacing ductwork between floors involves more than simply removing old ducts and installing new ones. Homeowners and contractors often face structural obstacles, airflow issues, and potential energy losses if proper techniques are not used.
Limited Access Between Floors
One of the biggest challenges is working within the confined spaces between floors. Ducts are often routed through narrow floor joist cavities, behind finished walls, or across multiple floor levels. Limited access makes it difficult to inspect the full duct run, remove old sections, or properly secure new ductwork.
In older homes, duct runs may pass through areas that were never designed for modern HVAC systems, further restricting access. The presence of plumbing lines, electrical wiring, and structural supports adds another layer of complexity, often requiring creative solutions to route ducts efficiently.
Expert Solutions:
- Use inspection cameras or small scopes to view inside concealed spaces before cutting access points. This helps pinpoint duct locations and obstacles.
- Plan strategic access points that allow for the removal and installation of duct sections without unnecessary cutting. Ceiling panels or access doors can sometimes be left in place for future maintenance.
- Modular duct sections — shorter lengths of rigid duct that are joined inside the floor cavity — allow for easier installation in tight spaces.
- In cases where existing ducts are severely restricted, rerouting ducts through alternative paths — such as through closets, soffits, or perimeter walls — may be required.
Avoiding Structural Damage
When cutting into floors, walls, or ceilings to access ductwork, there is always a risk of damaging load-bearing framing, floor joists, or shear walls. Removing too much structural material or cutting improperly can weaken the building’s support system, leading to costly repairs and safety hazards.
In modern homes, ducts are often pre-planned into floor systems, but in older homes, unplanned retrofits may require careful evaluation to avoid cutting critical framing members.
Expert Solutions:
- Review architectural plans or consult a structural engineer if large openings or rerouted ducts are needed. This ensures that floor joists, support beams, and headers remain intact.
- Use a stud finder and exploratory holes to identify the framing layout before making larger cuts.
- In situations where floor joists must be notched, follow building code guidelines to maintain joist strength — typically, notches should not exceed 1/6 the joist depth and should be placed at approved locations, not mid-span.
- Reinforce any modified framing with sister joists, blocking, or engineered reinforcements if necessary.
Minimizing unnecessary demolition helps preserve structural integrity while reducing overall repair costs.
Ensuring Proper Airflow and Efficiency
Even if ducts are successfully replaced between floors, improper sizing, excessive bends, or poor positioning can restrict airflow. Inadequate airflow reduces system efficiency, increases energy consumption, and can cause uneven heating and cooling between floors.
Inconsistent duct sizing is another common issue, especially in older homes where ducts were originally installed for smaller, less efficient systems. Modern HVAC systems require properly sized ducts to maintain balanced airflow and support efficient operation.
Expert Solutions:
- Perform a Manual D calculation (an industry-standard method for sizing ductwork) to ensure each duct run is appropriately sized for the room’s heating and cooling load.
- Minimize sharp bends and unnecessary elbows to reduce static pressure and airflow restrictions.
- Use flexible ducts only where necessary, and ensure they are fully extended without kinks or compressions.
- Install balancing dampers at strategic points to allow for fine-tuning of airflow between different floors and rooms.
- In homes with significant layout changes, consider upgrading the main trunk line or installing zoned systems to ensure consistent comfort.
Proper airflow design protects the HVAC system from overwork, extending equipment lifespan while improving comfort and energy efficiency.
Preventing Air Leaks and Energy Loss
Air leaks are a common source of energy waste in duct systems, especially when ducts run between floors where access is limited and joints are harder to inspect. Unsealed joints, poorly fitted duct connections, or missing insulation can allow conditioned air to escape into wall or floor cavities.
Leaky ducts force HVAC systems to work harder, increasing energy costs by as much as 20% to 30%. In multi-story homes, leaks between floors often lead to uneven temperatures, with upper floors becoming too hot in summer or too cold in winter.
Expert Solutions:
- Seal all duct joints, seams, and connections using UL-listed foil tape or water-based mastic sealant. These materials are designed for long-term durability and are superior to standard duct tape.
- Conduct pressure testing after installation to identify leaks in hard-to-see areas. This can be done with specialized tools like a duct blaster, which pressurizes the system and detects leaks.
- Insulate ducts that pass through unconditioned areas, even if they are between floors. Insulated ducts prevent temperature loss and reduce the risk of condensation forming inside walls or ceilings.
- For extra assurance, install removable access panels in key locations, allowing future inspections and resealing if necessary.
Recommended Read: How to Fix Disconnected Air Duct
Benefits of Replacing Ductwork Between Floors
Replacing old, damaged, or inefficient ductwork between floors provides several long-term benefits for home comfort, energy efficiency, indoor air quality, and HVAC performance. Below are the key advantages of replacing ductwork between floors in residential homes.
Improved HVAC Efficiency
New ductwork reduces airflow restrictions, air leaks, and static pressure, allowing the HVAC system to operate more efficiently. Older ducts, especially those with damage, sagging, or poor connections, force the HVAC system to work harder to move air through the home.
- Properly sized and sealed ducts optimize airflow, reducing the system’s workload.
- Energy savings can range from 15% to 30%, depending on the extent of previous duct leakage and inefficiencies.
- Balanced airflow between floors reduces hot and cold spots, improving overall comfort.
Enhanced Indoor Air Quality
Old ducts between floors often accumulate dust, debris, mold, and allergens, especially if they have leaks or water damage. Contaminated ducts can circulate particles and pollutants throughout the home.
- New, properly sealed ducts prevent contaminants from entering the HVAC system.
- Tighter duct systems reduce dust infiltration from wall cavities, insulation, and building materials.
- Cleaner air improves respiratory health, especially for individuals with asthma or allergies.
Consistent Temperature Control Between Floors
Many multi-story homes experience uneven heating and cooling, with upper floors often too hot in the summer or too cold in the winter. These temperature imbalances are frequently caused by restricted or leaky ductwork between floors.
- Replacing ducts allows for proper duct sizing, improved balancing, and better airflow distribution.
- Consistent airflow helps maintain even temperatures across all floors.
- Comfort improves in both living spaces and bedrooms, especially in older homes with aging ductwork.
Lower Energy Bills
Duct leaks and poor airflow reduce HVAC efficiency, leading to higher energy consumption. The U.S. Department of Energy estimates that leaky ducts can waste up to 30% of conditioned air, resulting in unnecessary heating and cooling costs.
- Sealing and replacing ducts reduces conditioned air loss, allowing the HVAC system to use less energy.
- Improved airflow also reduces the need for constant thermostat adjustments, saving energy year-round.
- Homes with energy-efficient ductwork can see noticeable savings, especially in larger homes with extensive between-floor duct runs.
Longer HVAC System Lifespan
When ducts are properly sealed, insulated, and balanced, the HVAC system doesn’t have to work as hard to maintain desired temperatures. Reduced strain helps extend the lifespan of key components, including:
- Furnaces
- Air conditioners
- Heat pumps
- Blower motors
- A less stressed system is less prone to breakdowns.
- Proper ductwork supports overall system performance, especially in multi-story homes with complex airflow needs.
Increased Home Value
Modern, energy-efficient ductwork is a valuable upgrade, especially in older homes where HVAC systems may have outdated ducts. Potential buyers often prioritize home energy efficiency, air quality, and consistent comfort, all of which are directly influenced by the condition of the ductwork.
- New ductwork is a selling point for home buyers, especially in homes with energy-efficient HVAC systems.
- Documented duct replacements, including proper sealing, insulation, and pressure testing, add to the home’s appeal and demonstrate proper maintenance.
- Homes with modern HVAC systems and well-maintained ducts often receive higher appraisals during home sales.
Conclusion
Replacing ductwork between floors is essential for improving HVAC efficiency, indoor air quality, and overall home comfort. Whether addressing damaged ducts, improving airflow, or upgrading an aging system, proper planning, precise installation, and expert sealing ensure long-term performance and energy savings.
While the process involves structural access and careful coordination, working with qualified HVAC professionals helps avoid costly mistakes and ensures your system delivers reliable, efficient heating and cooling for years to come.
You May Also Like: How To Make Air Ducts Stop Popping