Your hot water heater thermostat plays a crucial role in regulating the temperature of the water in your home. It ensures that water is heated to the right level, maintaining comfort while also conserving energy.
A malfunctioning thermostat can lead to inconsistent water temperatures, increased energy bills, or even safety hazards, such as overheating.
You will learn how to check your hot water heater thermostat step by step. We’ll cover the tools you need, common issues, safety tips, and troubleshooting techniques.
Proper thermostat maintenance is key to ensuring your water heater operates efficiently and safely, helping you avoid costly repairs and prolonging its lifespan.
How Does a Hot Water Heater Thermostat Work?
What Is a Hot Water Heater Thermostat?
A hot water heater thermostat is an essential component that controls the temperature of the water in your tank. It works by sensing the temperature of the water inside the heater and signaling the heating elements to turn on or off to maintain the desired temperature. Without the thermostat, water temperature would either drop too low or rise too high, leading to inefficiency and potential safety risks.
In electric water heaters, thermostats are typically found in two places: one at the top of the tank and one at the bottom. These dual thermostats work together to regulate the heating elements that warm the water. The top thermostat controls the upper heating element and also serves as the primary thermostat. Once the top section of water reaches the set temperature, the lower thermostat takes over to heat the remaining water in the tank.
In gas water heaters, the thermostat is usually part of the gas control valve. It monitors the water temperature and adjusts the burner to heat the water as necessary.
How Does the Thermostat Control Water Temperature?
The thermostat monitors water temperature by using a sensor that reacts to changes in temperature. In electric models, the thermostat is a small device mounted directly on the outside of the tank, connected to heating elements inside the tank.
The thermostat’s sensor detects the water temperature, and when it drops below the set point, the thermostat signals the heating element to activate, warming the water to the desired level. Once the temperature is reached, the thermostat cuts power to the heating element, preventing overheating.
In gas water heaters, the thermostat is integrated into the gas control valve. When the water temperature falls below the set point, the thermostat opens the gas valve, allowing gas to flow to the burner. The burner heats the water until it reaches the specified temperature, at which point the thermostat shuts off the gas supply.
Both types of thermostats are designed to maintain a consistent water temperature, typically set between 120°F and 140°F for safety and energy efficiency. However, if the thermostat malfunctions, you may experience water that is too hot, too cold, or fluctuates between temperatures. It is crucial to check and test the thermostat to prevent further issues.
Differences Between Gas and Electric Water Heater Thermostats
While both gas and electric water heater thermostats serve the same purpose—regulating water temperature—there are some key differences in how they operate.
- Electric Water Heater Thermostats: These thermostats rely on electrical current to activate heating elements. Electric water heaters generally have two thermostats: an upper and a lower one. The upper thermostat has priority in controlling the heating elements, ensuring that the top part of the tank is heated first.
Once the upper thermostat reaches the set temperature, the lower one is engaged to heat the water at the bottom. This design ensures efficient energy use, heating water more evenly across the tank.
- Gas Water Heater Thermostats: In gas models, the thermostat is integrated with the gas control valve. It controls the burner at the bottom of the tank by adjusting the flow of gas.
When the water temperature drops, the thermostat signals the burner to ignite, heating the water until it reaches the set temperature. Unlike electric models, gas water heaters typically use a single thermostat, which makes them simpler to operate but requires regular maintenance to ensure the burner functions properly.
Understanding these differences is important, as the type of water heater you own will determine the troubleshooting process and the method for testing and maintaining your thermostat.
Tools You’ll Need to Check Your Water Heater Thermostat
What Tools Are Necessary for Testing a Hot Water Heater Thermostat?
To test your hot water heater thermostat properly, you’ll need a few specific tools that allow you to safely assess whether the thermostat is working as it should. These tools help ensure that the process is efficient and reduces the risk of damaging the thermostat or other components of your water heater.
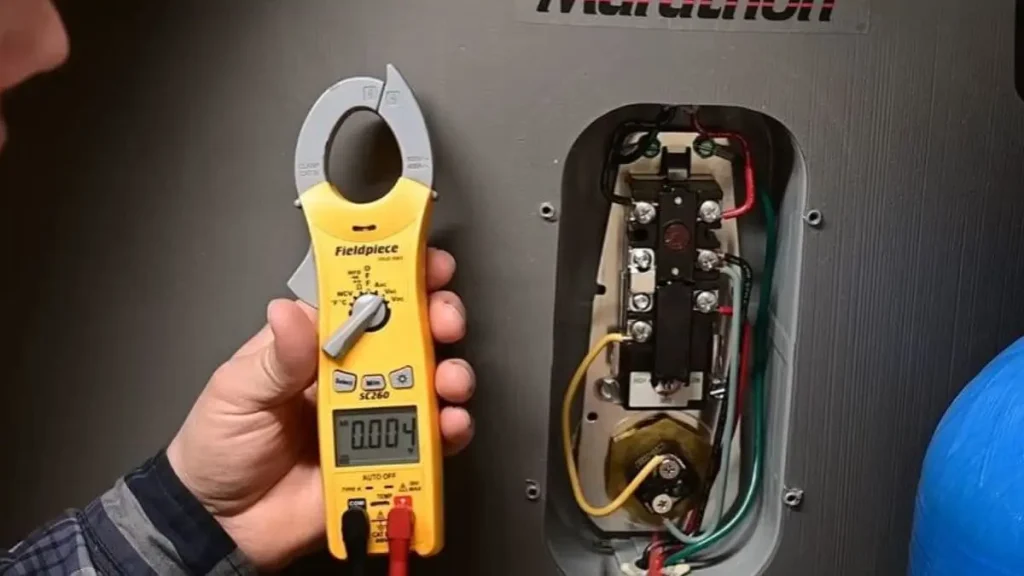
First, you will need a multimeter or voltage tester. This device is crucial because it allows you to check the electrical connections and measure the continuity of the thermostat and heating elements. Without it, determining whether the thermostat is functioning correctly would be nearly impossible.
Additionally, a screwdriver is required. Most water heater panels are secured with screws that you will need to remove in order to access the thermostat. A standard flathead or Phillips-head screwdriver should work, but this can vary depending on the model of your water heater.
If you are working with an electric water heater, it is important to have insulated gloves for safety. These gloves protect you from electric shocks when testing electrical components, especially if there is residual voltage in the system. Safety goggles are also recommended to protect your eyes while working around electrical components or gas burners.
Finally, having a non-contact voltage tester is a good precautionary measure. Before you start working, this tool allows you to double-check that there is no live current running through the heater, ensuring your safety during the process.
Why Is a Multimeter Essential?
A multimeter is the most critical tool in checking your thermostat because it measures both voltage and resistance. For electric water heaters, the multimeter helps you verify if the thermostat is sending power to the heating elements.
It does this by testing for continuity—essentially checking whether the electrical circuit is complete. If there is no continuity, the thermostat might be faulty and unable to send the necessary electrical signal to the heating elements, resulting in water that isn’t heated properly.
When you use the multimeter, you will set it to the lowest resistance setting and touch the multimeter’s probes to the appropriate terminals on the thermostat. A functioning thermostat will show a reading indicating continuity. If the reading is infinite or shows no continuity, then the thermostat likely needs to be replaced.
How Do Screwdrivers Help in Accessing the Thermostat?
Since the thermostat is typically housed behind a metal or plastic cover on the side of the water heater, you’ll need a screwdriver to access it. Removing the cover safely exposes the thermostat and the heating elements without damaging the water heater.
Depending on your water heater model, the screws could be flathead or Phillips-head. Using the correct type of screwdriver prevents stripping the screws and ensures that the cover can be easily removed and replaced without difficulty.
After removing the panel, you might also need to use the screwdriver to loosen the screws that connect the thermostat to the water heater. This will give you clear access to the terminals, making it easier to test the electrical connections with your multimeter.
Why Are Insulated Gloves and Safety Goggles Important?
Working with electric or gas-powered devices always involves a level of risk. Insulated gloves are essential for protecting yourself from electric shocks when working with an electric water heater. Even though the heater should be turned off during testing, residual voltage might remain, and wearing gloves adds an extra layer of protection.
Safety goggles are equally important, especially when dealing with older water heaters that might have rust or debris around the thermostat area. When accessing and testing these components, there’s a chance that particles could fall or fly into your eyes, making goggles a necessary precaution.
What Role Does a Non-Contact Voltage Tester Play?
A non-contact voltage tester allows you to confirm that the power to the water heater has been completely shut off before you begin any work. This tool detects electrical current without needing to touch the wires directly.
You simply place it near the electrical connections, and it will indicate whether any current is still flowing. This is a critical step, as even a small amount of electricity can be dangerous.
While using a multimeter during the testing phase will give you a more detailed reading, a non-contact voltage tester ensures that the area is safe to work on before you start, reducing the risk of accidental shocks.
Step-by-Step Guide to Check Your Hot Water Heater Thermostat
How Do You Safely Turn Off Power to the Water Heater?
Before checking the thermostat, ensuring your safety is the first priority. To turn off power to an electric water heater, locate your home’s circuit breaker panel. Look for the breaker labeled “Water Heater” and switch it to the “off” position. This cuts off the electrical supply to the water heater and prevents accidental shocks during testing.
If you’re working with a gas water heater, instead of switching off electricity, you’ll need to turn off the gas supply. Locate the gas shutoff valve on the water heater or the main gas line leading into your home. Turn the valve clockwise until it stops. This action ensures no gas flows to the unit while you’re working.
Once the power or gas has been turned off, use a non-contact voltage tester to double-check that no electricity is still running to the heater. Place the tester near the water heater’s electrical wires to confirm there’s no current, making the unit safe to work on.
How Do You Access the Thermostat?
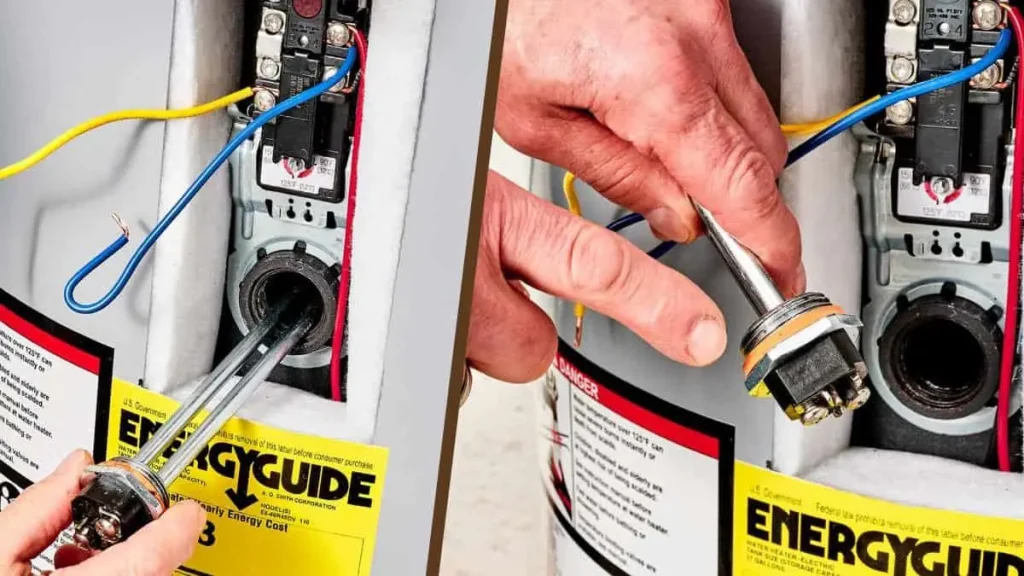
With the power safely turned off, the next step is to access the thermostat inside the water heater. Begin by locating the metal or plastic access panel on the side of the unit. Using a screwdriver, remove the screws securing the panel. This will expose the thermostat and the heating element.
Electric water heaters often have two thermostats—one at the top and one at the bottom. These are typically hidden behind two separate access panels. If your water heater has two, you will need to repeat this process for each panel.
Once you’ve removed the cover, you may also find a layer of insulation protecting the thermostat and wires. Gently pull back the insulation to reveal the thermostat itself. Be cautious not to tear or damage the insulation, as it will need to be replaced once you’ve finished your tests.
How Do You Test the Upper Thermostat?
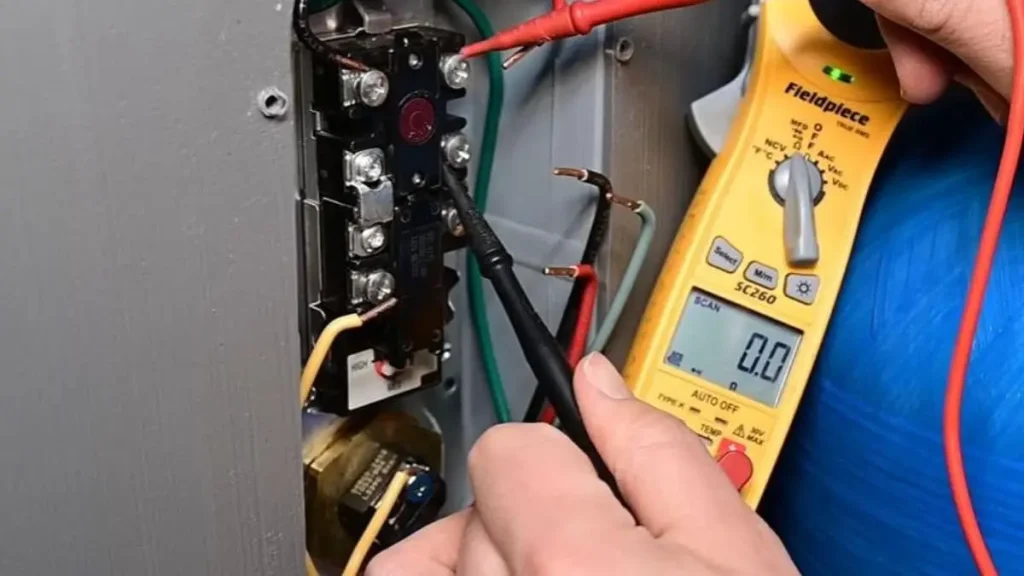
After exposing the upper thermostat, you’re ready to begin testing it. First, take your multimeter and set it to measure resistance or continuity. Carefully touch one probe of the multimeter to the terminal screw where the thermostat connects to the heating element, and the other probe to the common terminal.
If the thermostat is functioning correctly, the multimeter should display a reading indicating continuity. This means that the electrical current can flow through the thermostat, and it’s sending power to the heating element. If the multimeter shows no reading or displays infinite resistance, the thermostat may be faulty and might need replacement.
If you’re unsure about the readings, refer to the manufacturer’s manual for your water heater. Different models may have specific resistance values that indicate a properly working thermostat.
How Do You Test the Lower Thermostat?
Next, move on to testing the lower thermostat if your water heater has one. The process is similar to testing the upper thermostat. First, set your multimeter to measure continuity or resistance. Then, touch the probes to the appropriate terminals on the lower thermostat.
Since the lower thermostat usually only activates when there is a large demand for hot water, it’s essential to test this part to ensure that the heater can handle high usage. Just like with the upper thermostat, if the multimeter does not show continuity or displays infinite resistance, the lower thermostat could be defective and should be replaced.
Remember that while the upper thermostat controls both the upper and lower heating elements, the lower thermostat specifically handles the lower element. Therefore, any malfunction here could lead to inconsistent water temperatures.
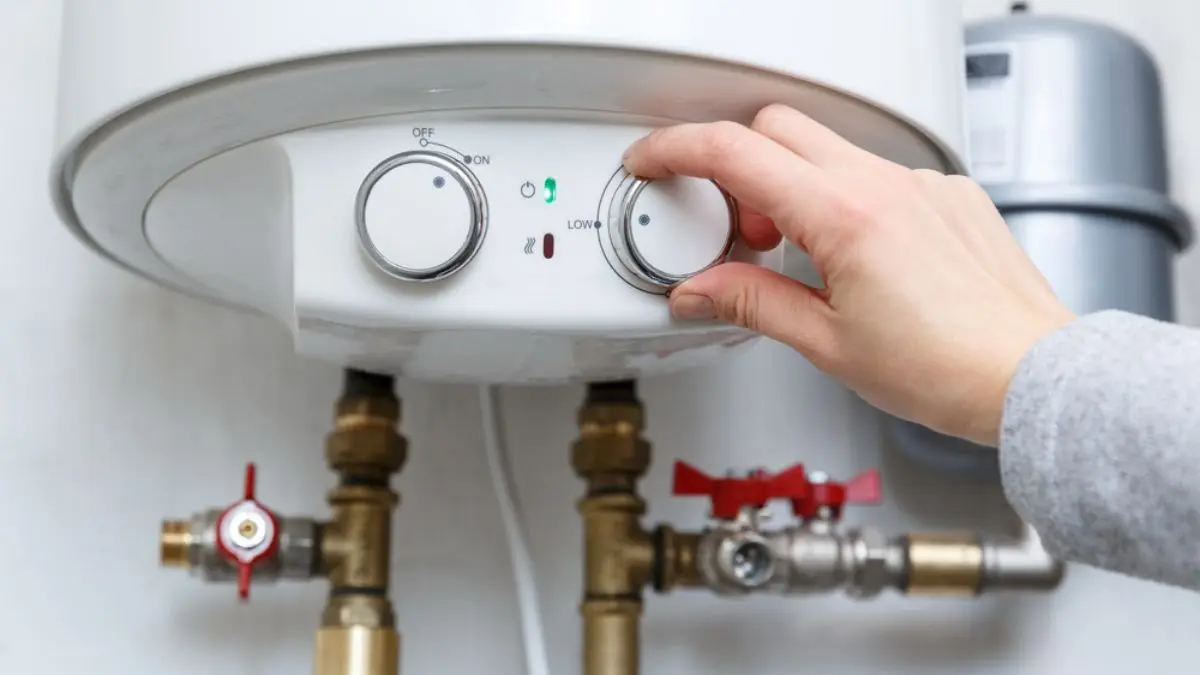
How Do You Adjust the Thermostat Settings?
After testing, it’s a good idea to check whether the thermostat settings are correct. Both the upper and lower thermostats typically have a temperature dial that allows you to adjust the water heater’s operating temperature.
Using a flathead screwdriver, you can adjust the temperature by turning the dial to the desired setting. Most experts recommend setting the temperature between 120°F (49°C) and 140°F (60°C) to ensure safe and energy-efficient operation.
If the temperature is set too low, you might experience lukewarm water. On the other hand, setting the temperature too high can lead to scalding hot water and increased energy costs. Ensure that both the upper and lower thermostats are set to the same temperature to avoid issues with water temperature fluctuations.
How Do You Restore Power to the Water Heater?
Once you’ve finished testing and adjusting the thermostats, you can now restore power to the water heater. Begin by replacing the insulation you removed earlier to protect the thermostat and heating elements from external temperatures. Afterward, screw the access panel back into place to cover the thermostat.
For electric water heaters, go back to the circuit breaker panel and flip the switch for the water heater back to the “on” position. If you’re working with a gas water heater, turn the gas valve counterclockwise to restore the flow of gas.
Give the water heater some time—about 30 to 40 minutes—to fully heat up. Afterward, test your hot water to ensure that the heater is working correctly and producing water at the desired temperature.
This process not only checks for potential thermostat issues but also ensures that your water heater is functioning at optimal performance. If any problems persist after testing, further professional assistance may be required.
Common Issues with Hot Water Heater Thermostats
What Are the Symptoms of a Faulty Thermostat?
A faulty thermostat in your hot water heater can lead to various problems, some of which are easy to spot. One of the most common symptoms is inconsistent water temperature.
If you notice that the water in your home fluctuates between hot and cold without adjusting the faucet, this may indicate that the thermostat isn’t regulating the temperature properly.
Another key sign is the water being too hot or not heating at all. If the water coming out of your faucets is either scalding hot or completely cold, the thermostat might be malfunctioning.
Sometimes, the water heater may run continuously, leading to higher energy bills. This happens when the thermostat fails to turn off the heating element after the water has reached the set temperature.
In extreme cases, you might hear unusual noises, such as hissing or popping sounds. While these can be caused by sediment buildup in the tank, a malfunctioning thermostat can contribute to overheating, creating excess pressure and noise.
If these symptoms arise, it’s essential to test the thermostat promptly to avoid further damage to your water heater or your home’s electrical system.
What Causes a Water Heater Thermostat to Fail?
Several factors can lead to a thermostat failure in a hot water heater. One common cause is wear and tear over time. Since thermostats control the heating elements frequently, they can wear out from regular use. Older thermostats are more prone to failure due to their mechanical components degrading.
Electrical surges are another common cause of thermostat issues. Power spikes from storms or faulty wiring can damage the thermostat’s internal circuitry, causing it to stop functioning properly. In some cases, this might even cause the thermostat to short circuit, resulting in a total failure of the water heater.
Another contributing factor is corrosion. Over time, water exposure, particularly if there are small leaks in the heater, can cause corrosion around the electrical connections, affecting the thermostat’s performance. This is especially likely in older units where gaskets or seals may have weakened.
Improper installation can also lead to thermostat problems. If the thermostat wasn’t installed correctly or wasn’t calibrated during installation, it may not control the water temperature accurately. This can cause the water to overheat or remain too cold.
Lastly, sediment buildup in the tank can indirectly affect the thermostat’s ability to function. The layer of sediment at the bottom of the tank can trap heat, causing the water heater to overheat, which might eventually cause the thermostat to fail.
Can a Faulty Thermostat Cause Water to Overheat?
Yes, a faulty thermostat can cause water to overheat. Normally, the thermostat regulates the heating elements, turning them on and off based on the water temperature. However, if the thermostat gets stuck in the “on” position, it won’t shut off the heating elements, causing the water temperature to rise uncontrollably. This can lead to dangerously hot water, increasing the risk of scalding.
Overheating water can also cause the temperature and pressure relief valve (T&P valve) to open, which is designed to release pressure when the water inside the tank gets too hot. However, relying solely on this valve isn’t a solution, as it could eventually fail due to prolonged use, causing further safety hazards like leaks or even tank ruptures in extreme cases.
If you suspect your water heater is overheating, it’s crucial to test and replace the faulty thermostat immediately. Failure to address this issue can lead to extensive damage to both the water heater and your home.
Can a Bad Thermostat Lead to No Hot Water at All?
A bad thermostat can definitely result in no hot water being produced. In a typical electric water heater, the thermostat controls the heating elements responsible for warming the water. If the thermostat fails, it might not send the signal to the heating elements, preventing them from turning on. This would leave you with cold water.
For water heaters with two thermostats—upper and lower—a failure in the upper thermostat is particularly significant. The upper thermostat controls the entire system, and if it malfunctions, neither the upper nor the lower heating element will receive power. Consequently, your water heater will stop heating water altogether.
On the other hand, if the lower thermostat fails, you may still have some hot water, but the capacity will be reduced since the lower heating element won’t be able to provide the necessary heat. If you’re consistently running out of hot water quickly, this could indicate an issue with the lower thermostat.
How Do Electrical Issues Affect the Thermostat?
Electrical issues can severely impact the performance of your water heater’s thermostat. As an electronic component, the thermostat relies on a stable power supply to function. Any fluctuations, such as power surges or voltage drops, can damage the thermostat’s internal components.
Power surges, often caused by lightning strikes or sudden power restoration after an outage, can lead to the thermostat being burned out. This will make the thermostat unable to regulate the temperature effectively, potentially leaving the water heater stuck in either the “on” or “off” position.
Loose wiring or poor electrical connections can also affect the thermostat. If wires connecting the thermostat to the heating elements are not secure, they may not carry enough power for the thermostat to work properly. This could lead to intermittent heating or a complete lack of hot water.
It’s important to regularly inspect the electrical connections to ensure they are in good condition. If any damage is found, hiring a professional electrician or plumber to repair the issue is recommended to avoid further electrical complications.
Read Also: Low Water Pressure in Kitchen Sink After Replacing Water Heater
Safety Tips When Handling Hot Water Heaters
Why Is Safety Important When Checking a Water Heater?
Safety is paramount when working with water heaters, as these devices operate using a combination of electricity, gas, and water—three elements that can be hazardous if mishandled.
Water heaters are designed to reach and maintain high temperatures, and improper handling can lead to severe burns, electrical shocks, or even gas leaks in certain systems. Moreover, water heaters are pressurized, meaning that any malfunction could cause explosions or ruptures if not managed carefully.
Checking or repairing a hot water heater without following appropriate safety protocols increases the risk of personal injury and property damage. Faulty thermostats, heating elements, or electrical wiring can create dangerous situations, and without the right precautions, small issues can quickly escalate into major problems.
What Are the Basic Safety Measures to Follow?
The first step in ensuring safety when working with a hot water heater is to turn off the power supply. For electric water heaters, this means switching off the corresponding breaker at your home’s electrical panel. If you are working with a gas water heater, it’s important to set the gas valve to the “off” position to prevent gas from flowing to the unit during your inspection.
Before opening any access panels, use a voltage tester to confirm that no electricity is flowing to the water heater. This step is crucial for avoiding electrical shocks. Even if the breaker is off, faulty wiring or improper installations can sometimes cause residual electricity to remain in the system.
In addition to cutting off power, make sure the water heater has had enough time to cool down before you begin. Hot water heaters can store water at very high temperatures, and touching the water or the tank when it’s too hot can result in severe burns. Wait at least an hour after turning off the unit before proceeding with any inspection or repair tasks.
Wearing protective gear such as insulated gloves and safety goggles is also advisable when handling electrical components or hot surfaces. Additionally, if you are working in a confined space, ensure proper ventilation to avoid the buildup of any fumes, especially if you are working on a gas water heater.
What Should You Do If You Detect a Gas Leak?
If you smell gas or detect a gas leak while working on your water heater, it’s essential to stop what you’re doing immediately and prioritize safety. Gas leaks can pose serious risks, including fire or explosions, and need to be addressed quickly and cautiously.
First, shut off the gas supply to the water heater using the gas shutoff valve. Avoid turning any electrical switches on or off, as even a small spark can ignite the gas. Evacuate the area and ensure that everyone in the home is safely outside.
Contact your local gas company or emergency services right away to report the leak. It’s crucial not to re-enter the home until a professional has deemed it safe to do so.
Once the gas leak is confirmed and repaired by a licensed professional, they can also assess your water heater and ensure that it’s functioning properly and safely.
How Do You Avoid Electrical Hazards?
Electric water heaters present the risk of electrical shocks if proper precautions aren’t followed. Always ensure that the water heater is disconnected from its power source before handling any electrical components, such as thermostats or heating elements. As previously mentioned, use a non-contact voltage tester to confirm the absence of electrical current.
Water heaters can accumulate moisture, which increases the danger of electrical shocks. If the area around the water heater is damp or there are signs of leaks, make sure to dry the area thoroughly before performing any work. Water and electricity are a dangerous combination, so it’s critical to inspect for any water-related damage or leaks before proceeding.
It’s also important to avoid working on your water heater when it’s plugged into an electrical outlet. This is a common mistake, especially in older homes where the water heater is directly connected to a wall socket instead of hardwired. Always check how your unit is powered and disconnect it accordingly before you begin.
Additionally, if you are unfamiliar with electrical systems or if there are complex issues with the wiring, it’s safer to call a professional electrician to inspect or repair the water heater to prevent unnecessary risks.
Why Is Pressure Relief Critical in Water Heaters?
Water heaters operate under pressure, and the temperature and pressure relief (T&P) valve is a critical safety feature designed to release excess pressure from the tank. Without this valve functioning properly, there is a risk of the tank rupturing or even exploding if the pressure builds up too high.
Before starting any inspection or repair work, it’s important to check that the T&P valve is in good working condition. The valve is usually located on the side or top of the water heater tank, and it releases water when the internal pressure becomes too high.
To test the valve, place a bucket under the discharge pipe, lift the valve lever, and allow some water to flow out. If water flows freely, the valve is working correctly. If no water comes out or the valve is stuck, it may need to be replaced.
After confirming the T&P valve’s functionality, it’s important to handle any maintenance work carefully. Never cap or plug the valve, as this can prevent it from releasing pressure, which could lead to dangerous consequences. If you notice any significant pressure issues during your thermostat inspection, it’s best to stop the process and call a licensed plumber to assess the situation.
What Protective Gear Should You Use?
Wearing the appropriate protective gear is essential when working on a hot water heater. Insulated gloves are particularly important when handling electrical components, as they protect against electric shock. Additionally, wearing safety goggles can help shield your eyes from any splashes of hot water, debris, or sparks that may occur during the inspection.
If you’re dealing with gas water heaters, protective masks may be necessary to prevent the inhalation of harmful fumes or dust, particularly in poorly ventilated areas. Long sleeves and durable clothing can further protect your skin from burns or exposure to harmful materials.
When to Replace Your Hot Water Heater Thermostat
What Are the Signs That Your Thermostat Needs Replacing?
Knowing when to replace your hot water heater thermostat is crucial to maintaining the efficient operation of your water heater. One of the most common signs that your thermostat may be faulty is inconsistent water temperatures.
If your water suddenly turns too hot or too cold without any adjustment to the settings, the thermostat may no longer be regulating the temperature effectively. This fluctuation can signal that the thermostat’s sensor is failing, and it can no longer detect or control the water temperature properly.
Another indicator is if your water heater isn’t producing hot water at all. If you’ve checked the power source and the heating elements are functioning properly, but the water remains cold, the thermostat might be the issue. A defective thermostat can prevent the heating element from turning on, leading to a lack of hot water.
Frequent resetting of the water heater’s high-limit switch is another red flag. This switch is designed to trip when the water temperature exceeds a safe level.
If the high-limit switch trips regularly, it may indicate that the thermostat is stuck in the “on” position, causing the heating element to stay active longer than it should. In this case, replacing the thermostat can solve the problem and prevent overheating.
Additionally, if you notice unusually high energy bills, it could be a sign that your thermostat is not functioning efficiently. A malfunctioning thermostat may cause the water heater to run continuously, using more energy than necessary. If these issues persist despite troubleshooting, it’s likely time for a thermostat replacement.
How Long Does a Hot Water Heater Thermostat Last?
The average lifespan of a hot water heater thermostat is around 8 to 10 years, though this can vary depending on the quality of the unit and the conditions in which it operates. Factors like water hardness, usage patterns, and regular maintenance can all affect the longevity of a thermostat.
If your water heater is approaching this age range and you are experiencing issues like temperature fluctuations or frequent reset switch trips, replacing the thermostat may be a necessary step to restore efficiency.
While thermostats can last a long time, they are not designed to last forever. Even well-maintained units will eventually wear out due to continuous cycling on and off. If your water heater is nearing the end of its life span, it’s worth considering whether the cost of replacing the thermostat is worth it, or if replacing the entire water heater may be a more cost-effective solution.
Should You Replace the Thermostat or the Entire Water Heater?
Determining whether to replace just the thermostat or the entire water heater depends largely on the age of your water heater and the extent of the problem. If your water heater is relatively new and in good condition, replacing the thermostat can be a simple and cost-effective fix.
Thermostats are much cheaper to replace than a whole water heater and can be swapped out relatively quickly by a professional or an experienced DIYer.
However, if your water heater is older, replacing the thermostat might not resolve all the underlying issues. Older units often suffer from multiple wear-and-tear problems, including corroded tanks, faulty heating elements, or inefficient operation.
Replacing the thermostat may only serve as a temporary solution, and you might continue to experience problems with the water heater’s overall performance.
Replacing an aging water heater instead of repeatedly repairing it can save money in the long term. Modern water heaters are also more energy-efficient, so investing in a new unit could reduce your energy bills and improve the reliability of your hot water supply.
It’s a good idea to consult with a plumber or HVAC professional to assess whether a thermostat replacement will suffice or if a full water heater replacement is the better option.
What Are the Costs Involved in Replacing a Thermostat?
The cost of replacing a hot water heater thermostat can vary depending on factors such as the type of water heater, whether it’s gas or electric, and the complexity of the installation.
On average, a replacement thermostat costs between $20 and $50. Labor costs, if you choose to hire a professional, can range from $100 to $200, depending on your location and the difficulty of the job.
If you’re comfortable with electrical work and have the necessary tools, replacing the thermostat yourself can save you the labor costs.
However, if the water heater is still under warranty, hiring a professional may be the best route to ensure the replacement is done correctly and without voiding the warranty.
If you need to replace both the upper and lower thermostats, the costs will increase slightly. Additionally, if there are other issues with the water heater that need addressing, such as a faulty heating element, the total repair cost could be higher.
It’s always a good idea to get multiple quotes from local plumbers to compare pricing and find the best option for your situation
Conclusion
Checking and maintaining your hot water heater thermostat is a key step in ensuring the consistent performance and longevity of your water heater.
A malfunctioning thermostat can lead to fluctuating water temperatures, inefficient energy usage, and unexpected breakdowns.
The step-by-step guide and using the right tools, you can effectively troubleshoot common issues and identify when a replacement is needed.
Regular maintenance, combined with prompt attention to signs of wear, will help you avoid costly repairs and extend the lifespan of your water heater.
Whether you decide to replace the thermostat yourself or call a professional, addressing problems early can save time, money, and energy in the long run.
Remember, when in doubt, consult a professional to ensure your water heater operates safely and efficiently for years to come.